Have you ever noticed a “thank you” page pops up as soon as you complete an online purchase?Sometimes, e-commerce stores recommend products based on your previous purchases or showcase relevant products buyers purchase along with those products.
You might wonder how this happens. Well, the secret behind all this is something called conversion pixels.
I’ll explain the conversion pixels in a jiffy, but let’s discuss the pixels first.
What’s a pixel?
Pixel is a code inserted into a website, mobile app, or email. The purpose behind adding a pixel to a website or any other online real estate is to track a user’s activity.
The pixel observes the user behavior and reports back to the main source. Thus, it opens up a floodgate of opportunities for digital marketers, online businesses, and e-commerce stores to reach out to the same audience through retargeting.
What is retargeting?
Retargeting is an advertising strategy that allows brands and entrepreneurs to remarket the products or services to the audience that has visited their websites or used their apps. All this becomes possible due to the pixel.
Almost all major social media platforms provide pixels for advertisers. It helps marketers track website visitors and better understand how they interact with the products and content.
What’s a conversion pixel?
A conversion pixel is a piece of code placed on e-commerce websites and apps to track the conversions that occur on the websites, sales pages, and emails.
A conversion pixel is crucial to tracking conversions on websites and apps as it reports to the advertiser when a conversion event occurs. Usually, advertisers use conversion pixels to track the sales performances of their marketing campaigns.
Its code is embedded in the “payment successful” or “thank you for the purchase” pages on an e-commerce website.
When the conversion happens, the conversion pixel triggers a signal and the event gets recorded for the advertiser’s record.
If you ever run a Facebook ad campaign for generating sales on your website, the Facebook Pixel is used to track the sales.
Note that a sale isn’t the only conversion metric used by advertisers. In some cases, a successfully generated lead or a downloaded file through an ad is also considered a conversion.
Why use a conversion pixel?
While the primary goal of using a conversion pixel is to keep track of the ad campaign’s performance, there’s more to the story.
Advertisers must know that conversion pixel is imperative to understand the performance of ad units, call-to-actions, and landing pages. Moreover, it doesn’t end here.
Here are four key reasons why to use a conversion pixel:
i. Measure conversion rate
The key benefit of injecting a conversion pixel on your website or landing page is to keep track of your conversion rate, especially after the conversion optimization tactics have been applied. Low or zero conversion is indicative of wrong tactics.
ii. A/B testing Ad strategies
When a conversion pixel is embedded into the website code, it’s pretty clear that the conversions are being closely analyzed. Therefore, it allows advertisers to test out different ad designs, ad copies, and color schemes to see what works the best.
iii. Analyze conversion cost
One of the most underrated metrics is the conversion cost. Some digital marketers pay attention to analyzing the conversion cost, especially if they’re running different marketing campaigns, such as social media advertising and influencer marketing campaigns. It helps them understand which one is outperforming the other one.
iv. Optimize campaigns
When the data of an ad campaign comes up — usually at the end of the campaign — it’s the time to reflect on the situation. Moreover, marketers could optimize campaigns based on the previous ad campaign’s data. This data analysis wouldn’t have been possible without placing the conversion pixel on the site or landing page to track performance.
Use cases for using a conversion pixel
Since conversion pixel provides valuable insights into visitor engagement, it assists brands make data-driven marketing decisions, optimize their digital marketing campaign, and skyrocket the conversion rate.
Here are different areas where marketers can use conversion pixels:
i. Email marketing
Most email marketing softwares have a built-in feature to track the open rate of emails so that users could keep track of their email campaigns’ performances. However, a conversion pixel is also linked with an email campaign to inform the merchant or brand about the action being taken.
For instance, users often get confirmation emails when they sign up for a service, it triggers the confirmation signal that a conversion event has occurred.
iii. Online advertising
Running online ad campaigns without any check-and-balance might be a huge mistake. It’s essential to track the performance of an ad campaign. One of the easiest campaign measurement techniques is to place a conversion pixel in the website or landing code.
When advertisers utilize conversion pixels, it assists them track, record, and analyze the output of the ad campaign. As a result, it helps them make informed decisions based on the ROI.
iii. Affiliate marketing
An affiliate marketing campaign would fall flat if there is no conversion tracking available or the conversion pixel isn’t working properly.
The way affiliate marketing works is that an affiliate promotes a product of a merchant and when a web visitor makes a purchase through the affiliate partner’s link, the affiliate earns a commission.
However, the merchant uses the affiliate tracking software to keep track of the affiliate conversions so that the affiliate partners could be paid for their referrals.
iv. E-commerce sales
The most common use case of the conversion pixel is in the e-commerce industry. It assists e-commerce businesses track e-commerce sales.
All they need to do is to place a conversion pixel on their “thank you” or “order confirmation” page to trigger the successful sale signal.
It significantly helps users measure the sales numbers from online ads or any other marketing campaign. More importantly, it’ll give insight into which of the online campaigns or ad platforms are driving the most sales.
v. Track mobile app installations
Startups and mobile app developers can use conversion pixels to track app installs and downloads. Remember to add the conversion pixel to the app download completion page to track the data.
Once it starts working properly, the user can analyze which ad campaigns or marketing channel is driving the most traction.
vi. Lead generation
Lead generation is a process of gathering user details, such as name, phone, and email through a lead magnet or sign-up form.
Businesses and organizations can track the performance of their event registrations landing pages, whether they’re hosting a webinar or a physical event.
Most brands and entrepreneurs use opt-in bribes to generate leads whether it’s access to an email course or a downloadable content.
The conversion pixel comes in handy in lead generation. Without placing a conversion pixel, it won’t be possible to track the conversion of a specific campaign or platform.
For example, if you run a Quora ads campaign, you place Quore Pixel on your website to measure the campaign’s effectiveness.
All they need to do is to paste a conversion pixel, and it will track the performance and effectiveness of the copy, landing page layout design, and ad campaign.
Best conversion tracking tools
Here are some of the best conversion tracking tools to check out:
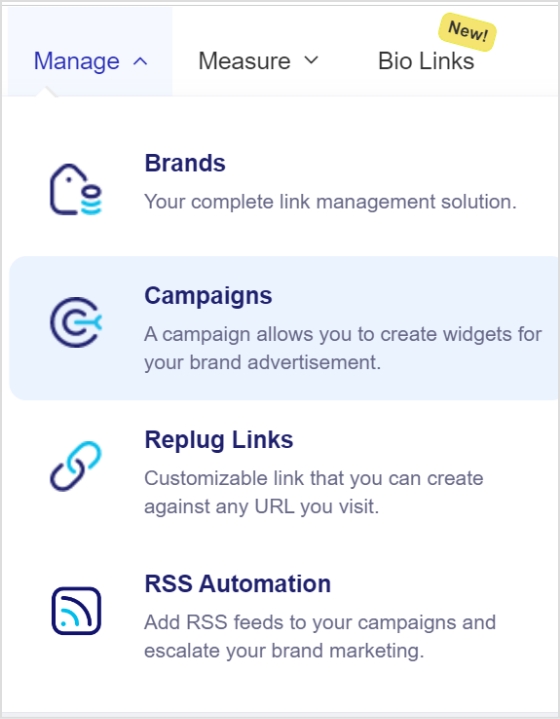
⦁ Replug

Replug is an all-in-one link management tool that provides a complete toolkit for URL management. The key features include a URL shortener, branded URLs, UTM codes, URL tracking, deep links, retargeting, and more. This tool plays a vital role in setting up a retargeting campaign for brands and advertisers using pixel tracking.
⦁ Optimizely

Optimizely is yet another powerful URL-tracking tool for digital marketers and brands. It assists web developers and digital marketers in analyzing and optimizing landing pages and website content pages. This tool empowers brands and digital marketing agencies to implement visual editing, page optimization, and advanced targeting.
⦁ Google Analytics
Google Analytics is the widely popular website and app analytics tool from the house of the internet tech giant Google. It’s used to collect website visitors’ data, conversion reporting, site traffic sources, bounce rate, page views, and much more.
⦁ Woopra

Woopra is a well-known player in the website conversion optimization genre. It’s a powerful tool that helps users track, analyze, and improve the customer journey. It offers powerful features to empower brands with effective, real-time customer analytics.
How to set up conversion tracking pixel for your website?
Conversion pixels are a must-have tool for measuring the effectiveness of your online advertising efforts and digital marketing campaign.
Let’s shed some light on how to set up a conversion pixel for your website:
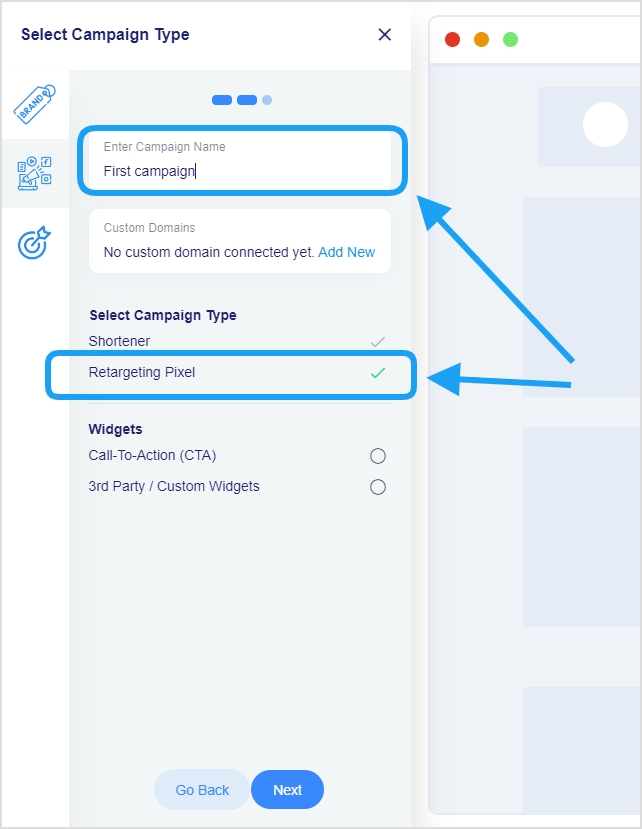
1. Create a Conversion Pixel
Most first-timers haven’t had a chance to generate their conversion pixel. So the first step while setting up the conversion pixels is to generate the pixel itself. To do this, marketers need to go to their advertising platforms, such as we have taken Facebook Ads Manager in this case.

If it’s not created before, then select the option to create a new conversion pixel in the conversion tracking area. The process is pretty much the same across all social media ad platforms.
2. Choose a name for the pixel
All you need to do is to choose a name for the pixel and select the type of conversion you want to measure, such as a purchase or lead generation.
3. Generate the pixel code for your website
Once the conversion pixel is generated, grab it for installation on your web or app property. You don’t need to be a website developer to insert this piece of code into your website or application.
4. Add the pixel code to your website
Install your conversion pixel on your website or app by adding it to the source code. If you’re using WordPress, it’s better to use a link insertion plugin.
In some cases, you might have to manually inject the code into the website source. Make sure the code is in the right place on your page, such as the header or footer. Once it’s done, go ahead and connect it with your site.
So this entails adding a short piece of code to the page or website section where conversions are to be tracked. Once the code is added, save the changes and move on to the next step.
Now you can test traffic using Pixel Helper extension.
Setup Facebook conversion API
- Click on the “Events Manager” tab in the Business Manager menu.
- Click on “Data Sources” in the left-hand menu.
- Select or create the event you want to configure for the Conversion API.
Now you have two options
- If using Partner Integration, choose the partner and follow the provided instructions.
- If using Manual, you’ll need to manually implement the API calls.
Just follow the prescribed steps and you will be done setting up your conversion API. If you still have any confusion, check the detail here..
Conversion tracking using GA4
Two steps for tracking conversions on Google Analytics4.
- Create an event for the confirmation page
- Mark the event as a conversion
Step 1: Create an event for the confirmation page
Access admin section and choose property:
Begin by accessing the admin section of your analytics tool or platform. Within this section, locate and select your preferred property. For this guide, let’s focus on the “events” property. Navigate to the property options where you can manage and set up events.
Create a new event:
Inside the “events” property settings, you’ll find the option to create a new event. Click on this option to initiate the event creation process. This is where you’ll define the specific event you want to track and analyze.
Enter custom event name:
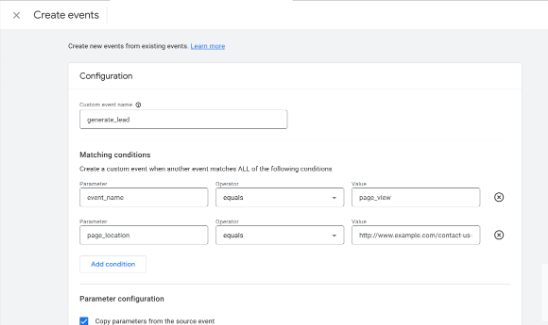
As part of event creation, you’ll need to provide a unique name for the event. For instance, let’s use the example of tracking a lead generation event. In the “Custom event name” field, input a descriptive name such as “generate_lead.” This name should clearly represent the nature of the event you’re setting up.
Set matching conditions:
Matching conditions help define when the event should be triggered and recorded. In the “Matching conditions” section, you’ll configure these conditions for accurate tracking. Start by entering the first matching condition. For instance, if you want to track an event when a page is viewed, input “event_name equals page_view.”
Add first condition:
After entering the initial matching condition, click on the “Add condition” button. This step confirms the first condition you’ve specified. It’s essential for ensuring the event is only triggered when the specified conditions are met.
Enter second matching condition:
Now, proceed to input the second matching condition. This further refines when the event should be recorded. For the lead generation example, if you want to track a form submission on a specific page, enter “page_location equals https://www.example.com/contact-us-submitted.”
Finalize Event Setup:
After providing both matching conditions, review the details you’ve entered. Make sure the event name and conditions accurately represent the event you’re tracking. This step is crucial for proper data interpretation and analysis.
In the Parameter configuration section, click Add modification twice. Because you are using a recommended event, you need to define each of the required parameters. Otherwise, Google Analytics will treat the event as a custom event.
Step 2: Mark the event as a conversion
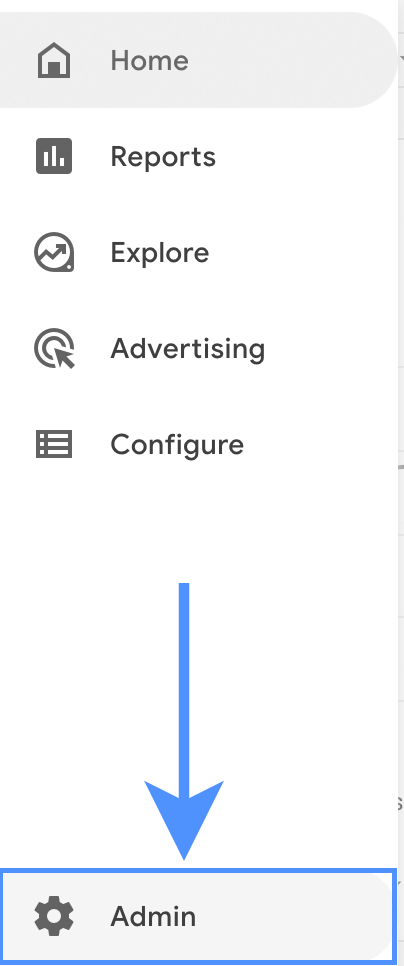
To set up a new conversion event in Google Analytics, start by clicking on the “Admin” option from the main menu. This will take you to the administrative section where you can manage various settings for your account.
Ensure that you’re working within the correct Google Analytics account and property. You’ll want to make sure you’re making changes to the right data. In the “Property” column, find and click on the “Conversions” option. This is where you can manage your conversion tracking settings.
Once you’re in the “Conversions” section, you’ll see an option to create a new conversion event. Click on “New conversion event” to initiate the event creation process. This is where you’ll define the specifics of the event you want to track.
Give your new event a descriptive name. For instance, let’s say you’re setting up an event to track lead generation. Enter the name “generate_lead” in the provided field. This name should clearly represent the action or interaction you’re interested in tracking.
Here’s a detailed video of tracking conversion goals in GA4.
That’s it from our side now get started with your conversion tracking process.
FAQs about Conversion Tracking Pixels
Let’s answer some of the frequently asked questions about conversion tracking:
What triggers a conversion pixel?
Any pre-defined action or event that matches the conversion criteria triggers the conversion pixel and ensures that the action or event gets recorded. The conversion pixel is a short piece of code that plays a crucial role in recording a specific event or action.
How do you set conversion pixels?
To set a conversion pixel, create and grab the conversion pixel from the desired social media advertising platform like Facebook ads or Quora ads, and then put it on the website property, such as a landing page or website to start tracking an action or event.
What is pixel-perfect conversion?
Pixel-perfect conversion refers to the process of understanding design principles and front-end development techniques for translating a design into a digital format with absolute precision. The goal is to ensure that the digital version replicates the original design with accuracy and avoids discrepancies in the output.