Tag: Retargeting

  • Abandoned Cart Email Examples & Tips That Actually Convert

    Abandoned Cart Email Examples & Tips That Actually Convert

    Have you ever heard the phrase “leaving money on the table”?

    Well, cart abandonment is somewhat similar – the customers leave the website without completing the transaction.

    Cart Abandonment Meme

    Bummer. Right?

    Most e-commerce brands struggle with minimizing cart abandonment so that they can squeeze more money from their website traffic.

    However, it doesn’t happen unless they have a bullet-proof strategy in place.

    To fix the problem, one needs to come up with an excellent shopping cart abandonment email template that tempts the reader to get back to the website and complete the purchase process.

    You’re about to learn:

    • What is a cart abandonment email?
    • Why do marketers send out cart abandonment emails?
    • Why buyers abandon shopping carts in the first place?
    • The best cart abandonment email templates to get inspiration from
    • How to approach a prospect who has abandoned the cart

    But first things first, you must know what the heck is cart abandonment email.

    What is an abandoned cart email?

    The abandoned cart email is the one that you receive in your inbox when you add a product to your shopping cart on an e-commerce website, but leave the site without completing the transaction.

    The purpose of sending an abandoned cart email is to re-engage the customers who left the website without placing the order.

    In some cases, e-commerce brands successfully convert those customers who left the website without buying by sending them the best-abandoned cart emails.

    I’ve seen some SAAS companies send out a discount offer to website visitors who abandon the shopping cart on their website.

    There could be several reasons why customers might abandon a shopping cart, for instance:

    • Got distracted and left the website
    • Found the product on a competitor’s website
    • Changed their mind about buying it

    The reason why it’s important to understand abandoned carts and reach out to those customers is that a customer with a buying intent would add a product to the shopping cart.

    Such customers are way more valuable than those lurkers who click through your offers from social media ads but never end up buying anything.

    So the next time you leave Target or Amazon’s website after adding a product to your shopping cart and receive an email reminder about that product, don’t be surprised.

    Do abandoned cart emails work?

    Most of the time, they do work unless you mess it up in the email newsletter formatting or send it out too late. No wonder it’s a widely adopted sales strategy. It looks like a lot of brands recover lost sales through abandoned cart emails.

    Statistics by Moosend are clear proof that abandoned cart emails actually convert.

    • Cart abandonment emails exhibit impressive engagement statistics. They achieve open rates of over 40%, occasionally even reaching a remarkable 45%.
    • Furthermore, half of these abandonment emails are not just opened but also clicked on, with 21% of the opened emails resulting in click-throughs.
    • The most compelling fact is that 50% of the users who click through these emails go on to complete their purchase. In essence, half of the recipients who engage with the email content ultimately make a purchase, underlining the effectiveness of these campaigns in converting potential customers into buyers.

    What do you write in an abandoned cart email?

    There is a not rocket science. You have to quickly explain to the customers where they left off when shopping on your website. Showcase the product they added to the cart, and place a CTA button that takes them straight to the shopping

    10 abandoned cart email examples to learn from

    Let’s take a look at some of the best-abandoned cart email templates that work for businesses:

    1. Fiverr

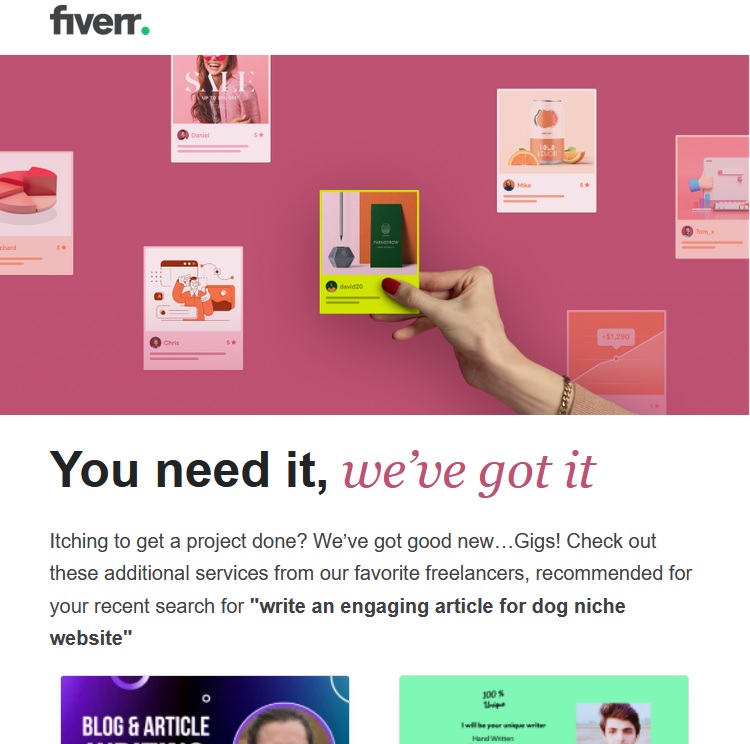
    Fiverr is quick to send out an email to buyers who search for a specific gig but never end up placing an order on the platform.

    The freelancing platform finds a bunch of relevant gigs and emails to the buyer. Here’s what I got when I searched for dog-related gigs while doing some research on the platform:
    Fiverr Cart Abandonment Email

    2. Daraz

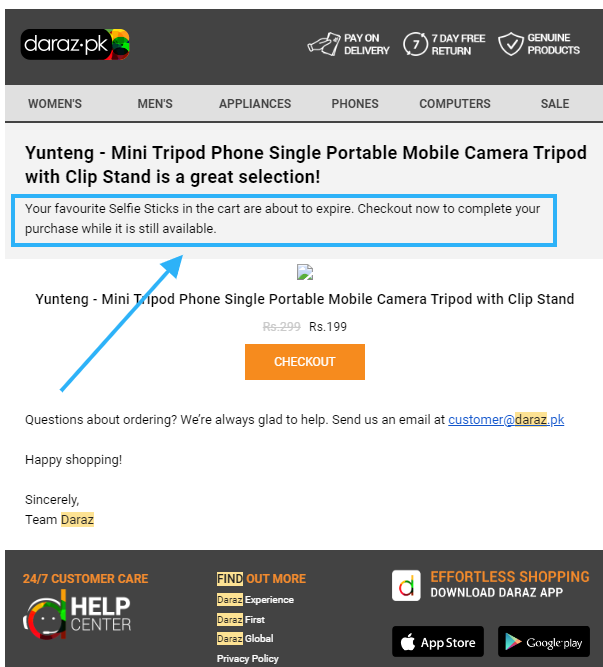
    Daraz is a popular e-commerce website in Pakistan. It was acquired by Alibaba in 2018. Here’s how Daraz sends out emails if you abandoned carts on their platforms.

    Here’s what I found:
    Daraz Cart Abandonment Email

    3. Kayak Media

    Kayak Media is a software company that makes small software.

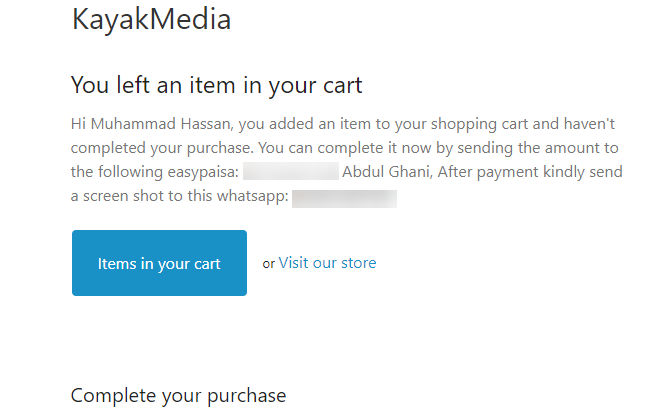
    I once wanted to test out one of their softwares, but somehow, I didn’t go through the purchase process.

    Then I received this cart abandonment email which sounds about right:
    Kayak Media's Cart Abandonment Email

    4. NetPeak Software

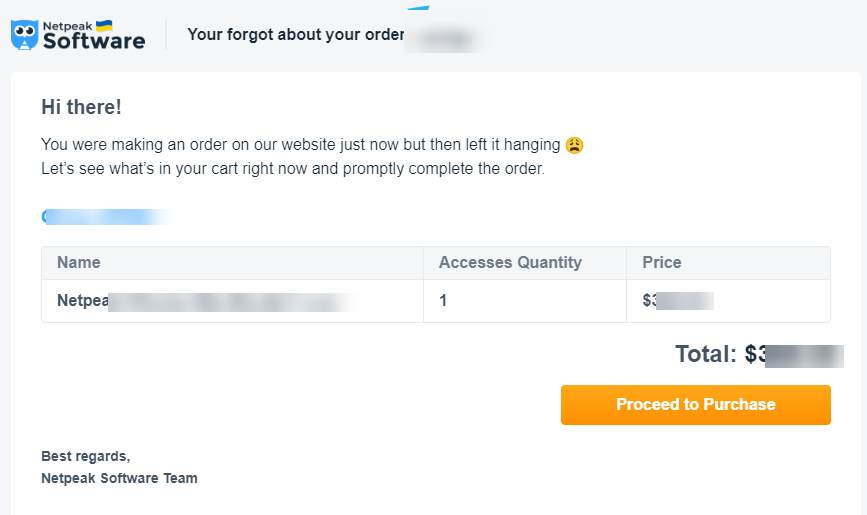
    Netpeak is yet another software company that immediately sends out cart abandonment emails if you don’t complete the purchase process. Here’s an example:
    NetPeak Cart Abandoned Email Example

    5. Away

    Away is an e-commerce website that sells travel and fashion accessories. I stumbled upon their abandoned cart email template while researching this topic. Here’s what their abandoned cart email looks like:
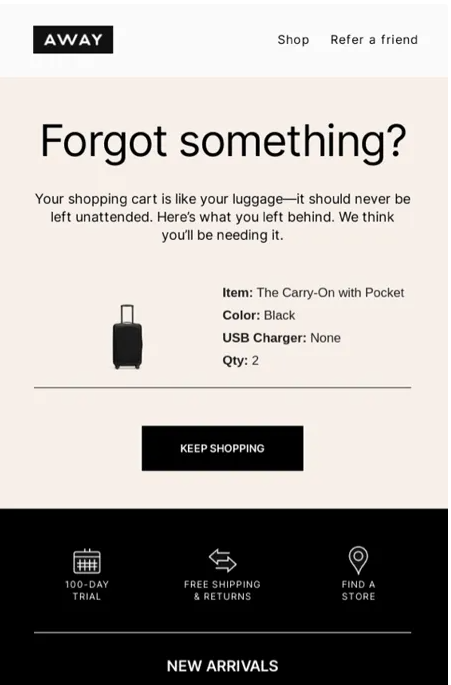
    Away- Cart- Abandoned Email Practice

    You May Also Like : Retargeting Ad Examples That Drive Growth

    6. Ugmonk

    Ugmonk is a desk accessories e-commerce store that sells aesthetically pleasing and classy office and desk accessories. They send out abandoned cart emails in style as well:
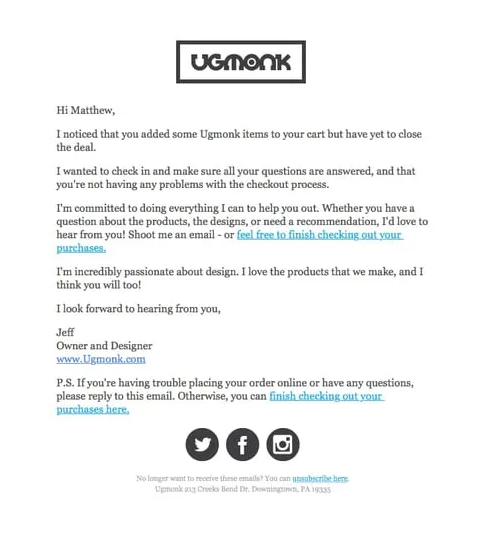
    Ugmonk's Cart Abandonment Email

    You May Also Like: 8 Best Retargeting Platforms

    7. Peel

    Peel is a well-known brand in the phone case space. They sell all sorts of iPhone and Android phone cases. They also send out cart abandonment emails if you don’t complete the purchase and leave their website. Here’s how they send out a reminder via email:
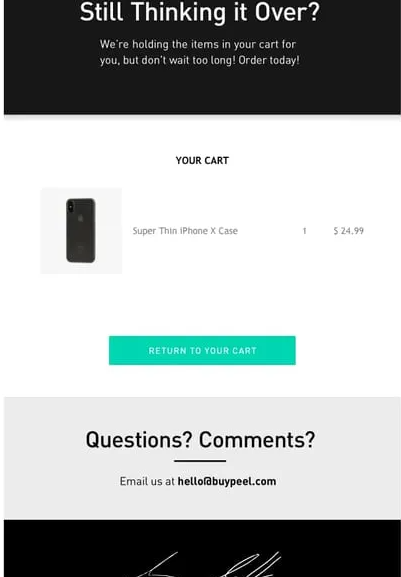
    Peel- Cart- Abandoned Email Practice

    8. Bearsville Soap Company

    Bearsville Soap Company has an interesting approach to sending out abandoned cart emails. They have a brief email copy with a CTA that says, “Return to your cart.”
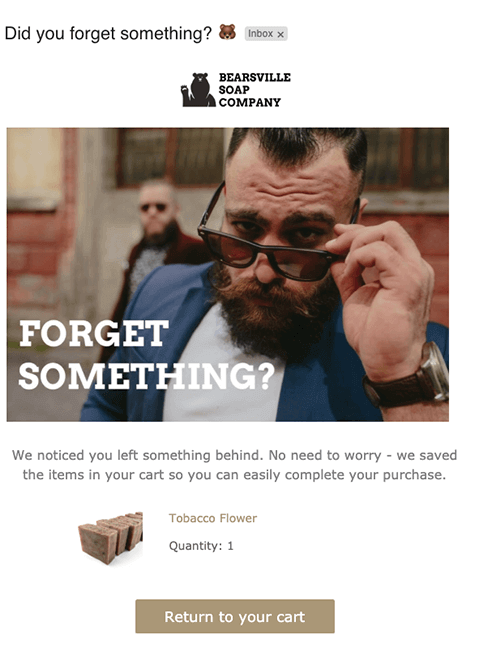
    Bearsville Cart Abandonment Email Example

    9. ThredUp

    ThredUp comes with a straightforward message in their abandoned cart. They have several things added to their abandoned cart email, for instance, discounted prices, coupon codes, and the CTA.
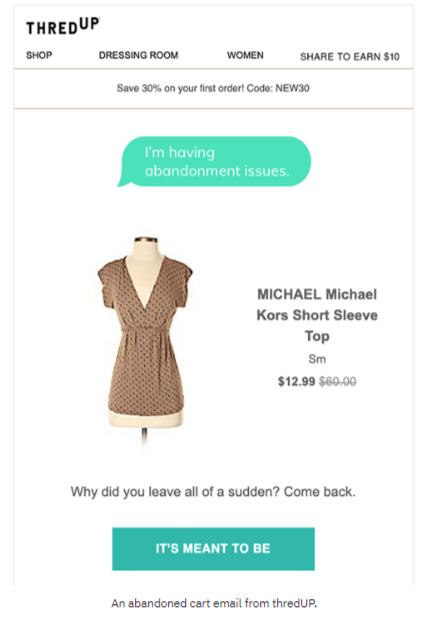
    Thred-Up Abandonment Email Template

    10. Vans

    Vans is a footwear brand that sells sneakers for kids, women, and men. They adopted a unique yet interesting approach in their abandoned cart email. They quickly remind the customers who abandoned the cart that they’re still holding the shopping cart for them.

    Plus, they go on to mention the products that the customer might also like, which is quite an ambitious approach.
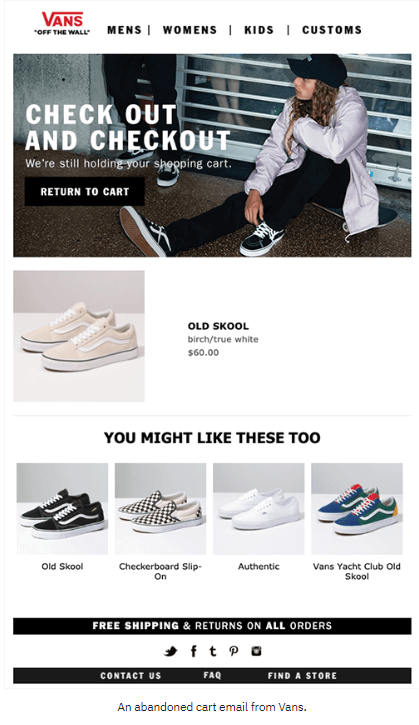
    Vans Abandonment Email Exmaple

    These were some of the examples of abandoned cart newsletters which were using unique and diverse email newsletter templates to attract, re-engage, and convert abandoned visitors. Sure, marketers could take away a lot from these newsletter examples.

    Replug Branded Short Links CTA
    Replug Logo
    A complete link management solution
    for marketing professionals & agencies.
    Try Replug for free

    Abandoned Cart Email Best Practices

    Email-Best-Practices

    Wondering how do I email someone who’s abandoned a cart?

    If you’re curious about emailing customers who have abandoned the shopping cart and are not sure what to do or say, then this section might come in handy.

    Compliance with the best practices will give you better results in turning cart abandoners to customers.

    Without any further ado, let’s get right into it:

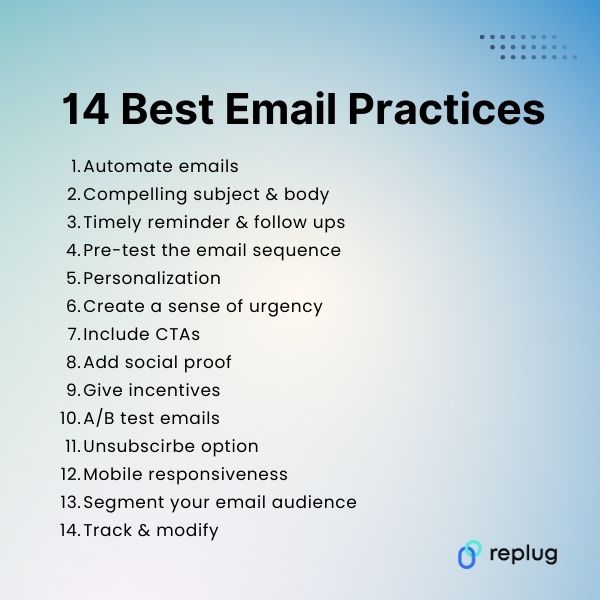
    1. Set up the email automation

    Email automation is the process of setting up an email sequence that sends out a series of emails to customers depending on the situation.

    When a customer signs up on an e-commerce website, usually the first email that comes through is an account verification email. Similarly, when a purchase is made by the user, a confirmation email goes out to the customer.

    So most e-commerce platforms seamlessly integrate with email marketing softwares and allow merchants to send out abandoned cart emails.

    To get started with sending abandoned cart emails, simply set up an email sequence in your e-commerce platform or email marketing software to get going.

    You May Also Like: 18 Ways To Turnaround eCommerce Sales

    2. Opt for an email newsletter template

    An email newsletter template is an email theme that a sender uses to compose and design the email message.

    Keep in mind that most e-commerce businesses go for a fancy email newsletter template when setting up an abandonment cart email.

    While an attractive email newsletter template could attract the customers to take action, it could also create a hurdle in engaging the customers.

    The reason is that sometimes the email services block out the email template and notify the email receiver to unblock the template if they want to.

    This could impact the clickability of the email and divert the attention of the customer to somewhere else. Similarly, a text-only email doesn’t appeal to the customers to take any section.

    Therefore, it’s necessary to find a middle ground where you use an email newsletter template that increases the click-through rate of your email.

    3. Write a compelling email subject and body

    The email subject line and the in-body message are essential parts of the email. No matter how good your offer is, it won’t work out unless you don’t get the email subject line and body right.

    The subject line of your cart abandonment email is the gateway to engagement. This can be achieved through various techniques, such as humor, creating a sense of urgency, or utilizing personalized language.

    Writing a compelling email subject and body would significantly help you succeed in generating sales from abandoned carts. Whereas, the body of the email message would convince readers to take action or ignore it altogether.

    There has always been a debate about the length of the email newsletters. Some believe that it has to be short, sweet, and brief as a well-crafted subject line entices recipients to open the email and explore its contents further. Whereas, a lot of marketers prefer to send out in-depth email newsletters.

    Moreover, a catchy and attractive email subject line would massively impact your abandoned cart email open rate.

    4. The first email reminder:

    The first email should ideally be dispatched within an hour or two of cart abandonment. At this point, the shopper’s interest is at its peak, making them more likely to return and complete the purchase.

    Subsequent reminder emails can be strategically spaced out over a few days or a week to gently encourage the customer to take action without bombarding them with messages.

    5. Test out the email sequence

    It’s vital to do testing before you move on to the next thing. Don’t shy away from sending out a few test email sequences to yourself to be 100% sure about this.

    If you don’t test your abandoned cart email sequence, you’ll never know what customers receive when they abandon the cart.

    6. Follow-up sequences:

    Achieving the right balance in terms of email frequency and timing is crucial. While follow-up emails are effective, sending too many in quick succession can irritate recipients. Experiment with different timing strategies to identify what resonates best with your audience without inundating them with reminders.

    A series of follow-up emails can be a powerful strategy if the initial reminder email doesn’t lead to a conversion. These subsequent emails can build upon the previous messages, progressively strengthening the offer or message. By providing additional incentives or addressing specific objections, you increase the likelihood of convincing hesitant shoppers to complete their purchase.

    You May Also Like: Email Marketing: The Best Time Send Emails

    7. Clear & compelling content:

    The content of your cart abandonment email should be clear, concise, and compelling. It should remind the shopper about the items they left behind, emphasizing the unique benefits of those products. Explain why completing the purchase is an excellent decision, using persuasive language and complementing your message with high-quality images of the products. The aim is to reignite the shopper’s interest and urgency to buy.

    8. Personalization:

    Personalization adds a human touch to your emails. It involves addressing the recipient by their first name and referencing the specific items left in their cart. This level of personalization can significantly increase engagement because it demonstrates that you’re paying attention to their preferences and needs.

    You May Also Like: Top 22 Personal Branding Tools To Upscale Your Marketing

    9. Urgency and scarcity:

    Urgency and scarcity tactics can create a sense of FOMO (fear of missing out). You can implement these tactics by mentioning limited stock quantities or including countdown timers for discounts or promotions. These elements encourage recipients to take prompt action, fearing they may miss out on a great deal.

    10. Call-to-Action (CTA):
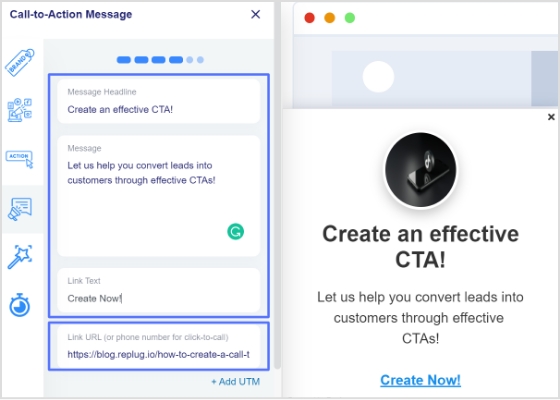
    CTA message and link

    The Call-to-Action (CTA) is the key element that prompts recipients to take action. It should be clear, visually striking, and placed prominently within the email. The CTA button should guide the recipient directly back to their abandoned cart or the checkout page. Use action-oriented language in the CTA, such as “Complete Your Purchase” or “Get Started Now,” to motivate immediate action.

    Boost ROI with branded URLs - Replug dashboard showing performance metrics and branded URL creation
    Replug Logo
    Boost your conversion rates with irresistable CTAs with

    for your marketing campaigns.

    Check

    Higher clicks

    Check

    More leads

    Check

    Better ROI

    Generate free CTAs

    11. Incentives:

    Incentives are powerful tools to entice shoppers to return and complete their purchase. Common incentives include limited-time discounts, free shipping, or complimentary gifts. To maximize the effectiveness of incentives, ensure they are directly relevant to the items left in the abandoned cart. Additionally, clearly communicate the urgency of these incentives to drive immediate action.

    12. Mobile responsiveness:

    Given the prevalence of mobile shopping, it’s imperative that your cart abandonment emails are mobile-responsive. Mobile-responsive design ensures that your emails display correctly and are easy to navigate on smartphones and tablets. To ensure compatibility, thoroughly test your emails on various devices and email clients to guarantee a seamless experience for all recipients.

    13. Segmentation:

    Segmentation is a strategic approach to dividing your email list into distinct groups based on customer behavior, purchase history, and the value of the abandoned cart. Once segmented, you can tailor your email messaging to suit the unique preferences and needs of each group. This level of personalization can significantly enhance engagement and conversion rates.

    14. Social proof:

    Social proof is a psychological phenomenon that influences behavior. In your cart abandonment emails, you can leverage social proof by showcasing positive reviews, testimonials, or product ratings from satisfied customers. By highlighting the experiences of others, you build trust and demonstrate the popularity and quality of your products, making recipients more inclined to complete their purchase.

    15. Privacy and trust:

    In an age of heightened concern for data security and privacy, assuring customers of their information’s safety is paramount. In your cart abandonment emails, display trust symbols, security badges, and contact information prominently to instill confidence. By addressing these concerns, you build trust and reduce potential barriers to completing the purchase.

    16. A/B Testing:
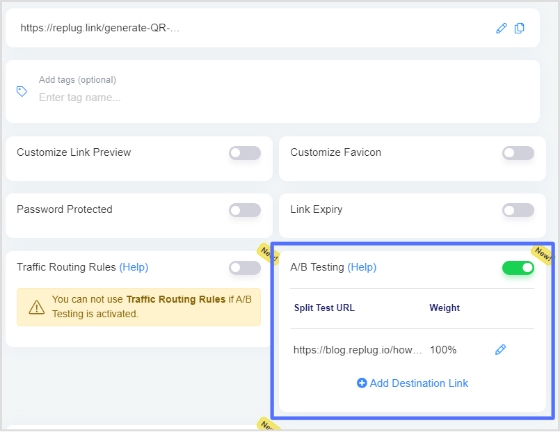
    enable AB testing

    A/B testing, also known as split testing, is a method of experimentation where you compare two versions of an element within your emails to determine which performs better. This can involve testing different subject lines, email content, CTA buttons, or incentives. A/B testing is an ongoing process that allows you to fine-tune your emails and optimize their performance based on data-driven insights.

    You May Also Like: How to Do A/B Testing the Easy Way

    17. Customer support:

    Providing accessible customer support options in your cart abandonment emails demonstrates your commitment to customer satisfaction. Include easy-to-find contact information or a chat option for recipients who may have questions or need assistance. A responsive and helpful customer support system can contribute to higher satisfaction levels and increased conversions.

    18. Opt-out option:

    Including an opt-out or unsubscribe option is both a best practice and a legal requirement to comply with email regulations. This feature allows recipients to stop receiving emails if they no longer wish to be contacted. Respecting recipients’ preferences is not only ethical but also important for maintaining a positive brand reputation.

    19. Analytics and monitoring:
    url-tracking- analytics

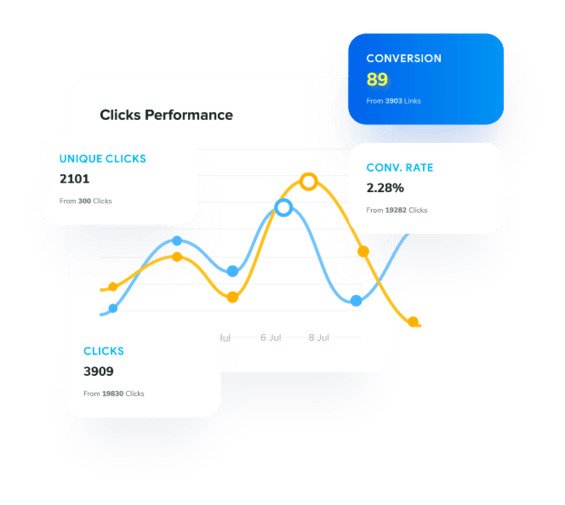
    Leveraging analytics tools is essential for tracking the performance of your cart abandonment email campaign. Key metrics to monitor include open rates, click-through rates, conversion rates, and the revenue generated from the campaign. By closely analyzing these metrics, you gain valuable insights into the effectiveness of your strategy and can make informed adjustments.

    FAQs About Abandoned Cart Emails

    Let’s shed some light on the frequently asked questions about abandoned carts:

    How many abandoned cart emails should I send?

    There is no right or wrong way of doing this, especially when it comes to the number of emails one should send out when a customer abandons the shopping cart. Most brands send out one email to remind customers to complete the transaction. However, some brands send up to three abandoned cart emails.

    How to keep unwanted emails away?

    There are several settings available in the user account settings area on almost every e-commerce platform. Users must go through the settings and alter the settings for notifications, promotional offers, and emails. That’s the perfect way to keep unwanted emails away from your inbox.

    Is it legal to send abandoned cart emails?

    An abandoned cart email is just another email newsletter that you send to your customers. Make sure you have mentioned in the email or communication section of the terms and conditions of your e-commerce website that the customers may receive promotional or abandoned cart emails from the brand.

    What is the best time delay for an abandoned cart email?

    It depends on multiple factors, such as time zone, genre, demographics, etc. For instance, if a customer is shopping at 3 a.m. and abandons the cart, you might not want to send out that abandoned cart email at 4 a.m. because he might have gone to bed.

    Therefore, you can always test out different time delays so that you can decide what works best for you. Give it at least 10 to 12 hours before you send out the first email.

    Other Interesting Reads

    How to Create an Email Marketing Strategy to Grow Your Business

    Getting Started with Meta Pixel: The Key to Successful Retargeting
  • How LinkedIn Retargeting Ads Work – A Complete Guide

    How LinkedIn Retargeting Ads Work – A Complete Guide

    In today’s digital landscape, capturing and retaining the attention of potential customers is a constant challenge. However, what if there was a way to reconnect with those who have already shown interest in your brand? Enter LinkedIn retargeting ads – a game-changing strategy that enables you to precisely target and engage with your desired audience. 

    Whether you’re aiming to increase conversions, drive brand awareness, or nurture leads, understanding how LinkedIn retargeting ads work is crucial. In this complete guide, we delve into the intricacies of LinkedIn retargeting, unraveling the mechanisms behind this powerful advertising tool. 

    Get ready to embark on a journey that will transform the way you connect, engage, and convert on the world’s largest professional network – LinkedIn. Buckle up and prepare to discover the untapped potential of LinkedIn retargeting in this comprehensive and insightful guide.

    What is retargeting?

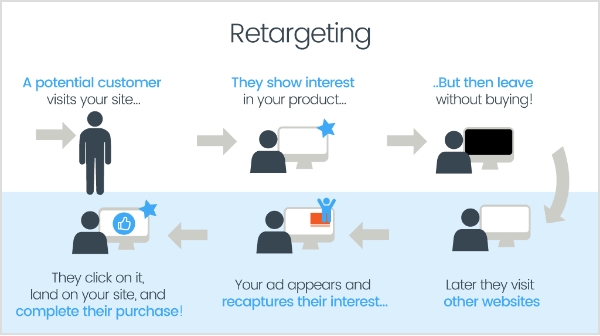
    Retargeting, also known as remarketing, is a strategic advertising technique that allows you to reconnect with users who have previously interacted with your brand or website. It involves targeting ads specifically to individuals who have shown interest in your products or services, but may not have completed a desired action, such as making a purchase or filling out a form.

    When someone visits your website, a small piece of code called a tracking pixel or tag is placed on their browser. This pixel enables your advertising platform to track their online behavior and collect valuable data about their interactions. Using this data, you can then deliver personalized ads to these individuals as they browse other websites or social media platforms.

    Also read: 8 Best Retargeting Platforms To Retarget Your Potential Audience

    What-is-retargeting

    The goal of retargeting is to stay top-of-mind with potential customers, reminding them of your brand and enticing them to return to your website to complete the desired action. By targeting individuals who have already shown interest, retargeting allows you to maximize your advertising budget and increase the chances of converting leads into customers.

    Lead Generation with Retargeting Pixels

    Maximize your lead generation efforts with retargeting pixels from Replug. Capture valuable data and engage your website visitors with targeted ads. Boost conversions and grow your customer base. Get started with Replug today.

    What is retargeting on LinkedIn?

    Retargeting on LinkedIn refers to the advertising strategy that allows businesses to target and engage with individuals who have previously visited their website or interacted with their brand on LinkedIn. LinkedIn, being the world’s largest professional network, offers powerful retargeting capabilities to reach a specific audience of professionals and decision-makers.

    Retargeting-on-linkedin

    LinkedIn’s retargeting feature utilizes the LinkedIn Insight Tag, which is a code snippet placed on a website to track visitor behavior. This Insight Tag collects valuable data about website visitors, including company names, job seniority, industry, geography, and more. This data enables advertisers to create highly targeted and personalized ad campaigns on LinkedIn.

    With LinkedIn retargeting, businesses can show tailored ads to individuals who have shown interest in their brand by visiting their website. These ads can appear across the LinkedIn platform, including the LinkedIn feed, sponsored content, messaging, and more. By reconnecting with website visitors on LinkedIn, businesses can nurture leads, drive conversions, and increase brand visibility among a professional audience.

    Also read: Getting Started with Meta Pixel: The Key to Successful Retargeting
    Retargeting on LinkedIn: How does it work?

    LinkedIn retargeting works by utilizing the LinkedIn Insight Tag, a code snippet placed on a website to track visitor behavior and collect valuable data. Here’s a step-by-step overview of how LinkedIn retargeting works:

    Implement the LinkedIn Insight Tag: 

    To start using LinkedIn retargeting, you need to place the LinkedIn Insight Tag on your website. This tag is a small snippet of code provided by LinkedIn that needs to be added to the pages of your website.

    Capture Visitor Data: 

    Once the Insight Tag is installed, it starts capturing data about the visitors to your website. The tag collects information such as company names, job seniority, industry, geography, and more, providing valuable insights into your website visitors’ characteristics.

    Create Audience Segments: 

    Using the data collected by the Insight Tag, you can create customized audience segments based on specific criteria. For example, you can target visitors from specific industries, job titles, or company sizes. These audience segments allow you to tailor your retargeting campaigns and deliver personalized messaging.

    Also read: Starter’s Guide to Setup Facebook Custom Audience

    Set Up Retargeting Campaigns: 

    With your audience segments defined, you can create retargeting campaigns on LinkedIn’s advertising platform. These campaigns enable you to display targeted ads to the specific audience segments you have defined. The ads can appear on various LinkedIn placements, including the LinkedIn feed, sponsored content, and messaging.

    Display Tailored Ads: 

    When a visitor who has previously been on your website visits LinkedIn, the LinkedIn platform recognizes them through the Insight Tag and displays your tailored ads to them. This ensures that your ads reach the right people at the right time, maximizing their effectiveness.

    Drive Engagement and Conversions: 

    Through retargeting, you can engage with visitors who have already shown interest in your brand. By delivering relevant and personalized ads, you can encourage them to take desired actions, such as signing up for a newsletter, requesting a demo, or making a purchase. Retargeting allows you to nurture these leads and guide them through the customer journey.

    Also read: How To Utilize Replug for Facebook Retargeting Ads?

    How to set up Linkedin retargeting ads?

    Setting up LinkedIn retargeting ads involves a few steps to ensure your campaigns are properly configured.  The first step is to install the LinkedIn Insight Tag on your website. This tag is a code snippet provided by LinkedIn that needs to be placed on all the pages of your website. It enables LinkedIn to track visitor behavior and collect data for retargeting purposes.

    Here’s how to set up retargeting on LinkedIn:

    Once LinkedIn Insight Tag is Installed, you can set up retargeting ads on LinkedIn by following the steps below:

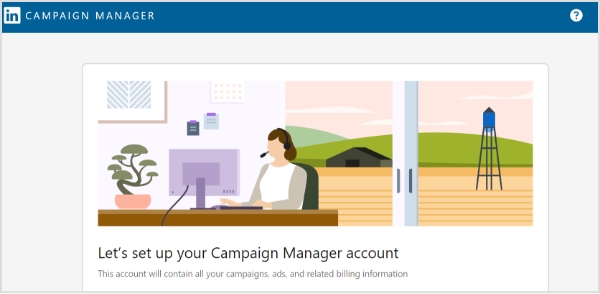
    Step 1: Sign in to LinkedIn Campaign Manager.

    retargeting-on-linkedin

    Step 2: If needed, switch to the correct account by clicking on the account name in the upper-left corner and selecting the desired account from the dropdown.

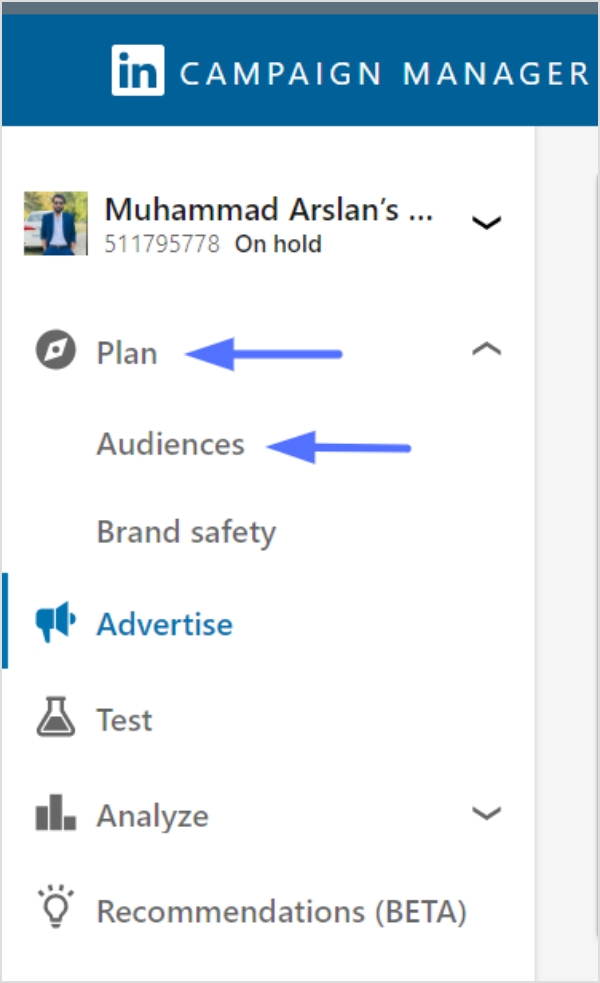
    Step 3: Click on “Plan” in the left menu and select “Audiences”.

    retargeting-on-linkedin

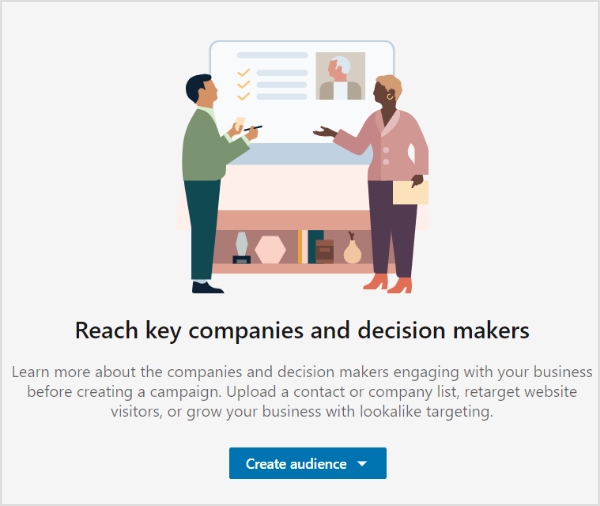
    Step 4: Click on the “Create Audience” button in the top left of the page.

    retargeting-on-linkedin

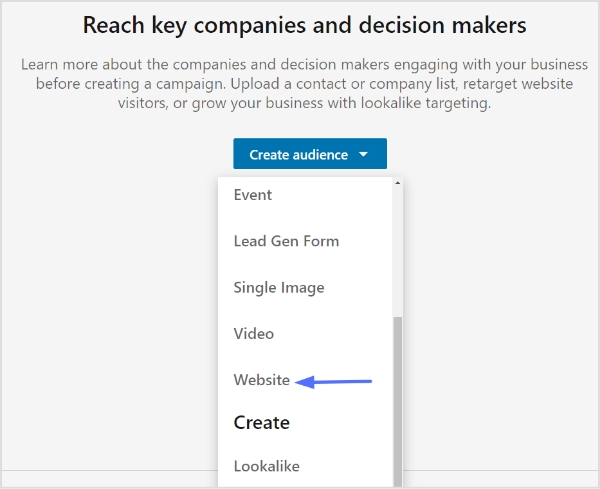
    Step 5: Select “Website” from the dropdown menu.

    retargeting-on-linkedin

    Also read: Google Retargeting: The Ultimate Guide For 2023

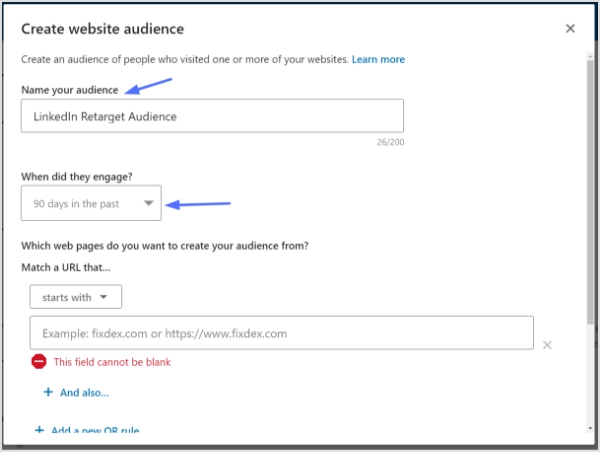
    Step 6: Give your audience a name.

    Step 7: Choose the time range for your audience engagement. You can select from 30, 60, 90, or 180 days in the past.

    retargeting-on-linkedin

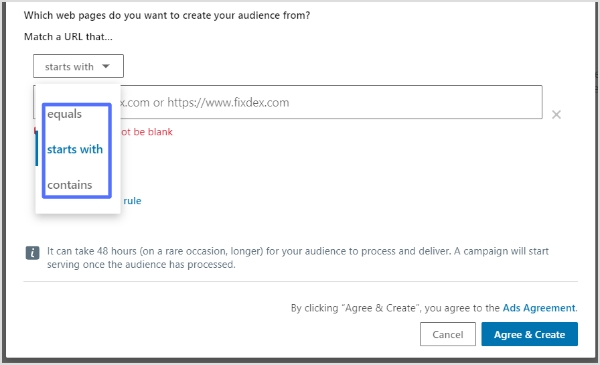
    Step 8: Add the website URLs you want to retarget. You can specify whether the URL starts with, equals, or contains a specific value. This allows you to define the pages on your website that will contribute to building your retargeting audience.

    linkedin-retargeting
    • “Starts with” is useful for URLs with dynamic parameters at the end.
    • “Equals” is used when you want to match a specific URL.
    • “Contains” allows you to target URLs that contain specific keywords or phrases.
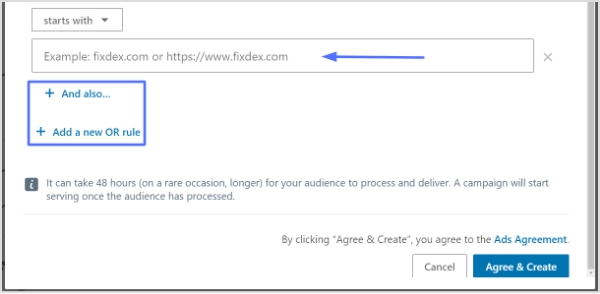
    • You can click “+ And also” below a URL to further narrow down the pages where conversions are counted.

    Use “+ Add a new OR rule” if you have multiple URLs contributing to the audience.

    retargeting-on-linkedin

    Step 9: Click “Agree & Create” to create your retargeting audience.

    Important Note:

    Note that your audience needs to have at least 300 website visitors to be usable in an active campaign. Depending on the traffic to your website, it may take up to 48 hours for your audience to build.

    Keep in mind that website retargeting audiences cannot be used with member interests and traits when selecting targeting facets for your campaign audience.

    Also read: How To Optimize Your Retargeting Efforts To Win Back Online Customers

    Benefits of retargeting on LinkedIn:

    The benefits of LinkedIn retargeting are numerous and can significantly enhance your customer acquisition efforts. Here are some key advantages of utilizing LinkedIn retargeting in your marketing strategy:

    Enhanced Customer Acquisition: 

    LinkedIn’s extensive user database and professional targeting options allow you to reach highly relevant audiences. By retargeting individuals who have previously visited your website, you can reconnect with potential customers who have already shown interest in your brand. This familiarity increases the likelihood of engagement and conversion, ultimately driving customer acquisition.

    Increased Engagement: 

    Retargeting allows you to engage with visitors who have already interacted with your brand. These individuals are more likely to view multiple pages on your website, spend more time exploring your offerings, and exhibit a genuine interest in what you have to offer. This heightened engagement can lead to higher conversion rates, increased customer loyalty, and a higher customer lifetime value.

    Integration with Paid Traffic Acquisition: 

    Retargeting works synergistically with paid traffic acquisition efforts. By broadly targeting website pages through paid ads, you can capture initial awareness and generate new traffic. Then, through retargeting, you can focus on those visitors who landed on your pages but did not convert on the first visit. This keeps your brand top of mind as they continue to browse the internet, maximizing the impact of your advertising investment.

    Augment Organic Traffic Strategies: 

    In addition to paid traffic, retargeting can complement your organic traffic strategies. By retargeting visitors who came to your website through search engines, social media platforms, or referral channels, you can reinforce their interest in your brand and encourage them to take further action. This amplifies your organic traffic efforts and increases the likelihood of conversions.

    Also read: 7 Powerful Ways to Boost Your Website Traffic Through Social Media

    When to launch a LinkedIn retargeting campaign?

    Launching a LinkedIn retargeting campaign can be a powerful strategy to maximize your marketing efforts and drive better results. While there is no fixed rule on when to start, it is generally recommended to consider a few factors before launching your campaign.

    Minimum visitor requirement:

    Firstly, it’s important to have a sufficient amount of website traffic to retarget. While the common suggestion is to start retargeting once you’ve reached 500-1,000 monthly visitors, the actual number can vary based on your specific circumstances. 

    For example, if you have a one-page website, retargeting 1,000 visitors can yield stronger results compared to retargeting the same number of visitors on a larger website with multiple pages. It’s crucial to have a minimum of 300 visitors for a segment to be eligible for retargeting using the LinkedIn Insight tag.

    Maximizing returns on high-converting pages:

    Additionally, it’s beneficial to launch retargeting campaigns when your traffic acquisition efforts have scaled and are consistently targeting pages that convert visitors into paid customers. By focusing on pages that have a higher conversion rate, you can maximize the effectiveness of your retargeting campaigns and achieve better returns on your investment.

    Timing is the key:

    Timing is key when it comes to retargeting. While launching retargeting early in the traffic acquisition lifecycle has its advantages, such as building brand familiarity and engaging with visitors who have already shown interest, it’s essential to align your retargeting efforts with the stage where your traffic acquisition is scaled and generating consistent conversions.

    Also read: 14 Crazy-Effective Ways to Boost E-commerce Sales Through Retargeting

    Retargeting vs Remarketing: What is the difference?

    Remarketing and retargeting are two distinct methods of marketing to existing leads, often used interchangeably but with subtle differences.

    Retargeting:

    Retargeting involves serving paid ads to previous visitors across various platforms to re-engage them and prompt them to take desired actions. It utilizes tracking pixels and JavaScript codes to capture visitor data and display tailored advertising. 

    Retargeting focuses on reaching out to visitors who have shown interest but may not have converted yet. It helps increase brand visibility, engagement, and customer acquisition.

    Remarketing:

    On the other hand, remarketing uses the retargeting pixel to serve ads specific to existing customers and leads who have provided their email addresses. With access to the visitor’s email address, businesses can leverage email marketing to deliver personalized offers and messages. 

    Remarketing allows for more targeted and personalized communication, such as sending subscription renewal reminders, re-engaging cold subscribers, or offering targeted up-sells and cross-sells based on purchasing behavior. 

    It provides an opportunity to tie behavioral data to action and deliver offers in a more personal environment.

    Also read: The Complete Guide to Content Remarketing: 20 Tips and Examples to Re-Engage Audience

    Conclusion:

    LinkedIn Retargeting offers a powerful means to re-engage with past website visitors, leveraging the platform’s extensive user data and advanced advertising capabilities. By implementing effective retargeting campaigns, businesses can boost engagement, increase conversions, and drive revenue growth. With its unique features and the ability to tailor content based on visitor insights, LinkedIn Retargeting stands out as a valuable tool in any comprehensive customer acquisition strategy.

    Remember, successful LinkedIn Retargeting campaigns require careful planning, audience segmentation, and ongoing optimization to yield optimal results. By harnessing the potential of LinkedIn Retargeting, businesses can connect with their target audience on a more personalized level, nurturing valuable relationships and achieving their marketing objectives.

    FAQs 

    When is the right time to launch a LinkedIn retargeting campaign?

    The ideal time to launch a LinkedIn retargeting campaign may vary depending on the specific circumstances of each business. While some recommend starting retargeting after reaching 500-1,000 monthly visitors, it is crucial to consider the quality and relevance of the traffic. Retargeting campaigns generally yield higher returns when traffic acquisition efforts have scaled and when there are consistent conversions of website visitors into paid customers.

    How many website visitors do I need for LinkedIn retargeting?

    LinkedIn’s Insight tag requires retargeting segments to have a minimum of 300 website visitors. This ensures that the audience is large enough to generate meaningful results and target effectively.

    What are some effective strategies for LinkedIn retargeting?

    Effective strategies for LinkedIn retargeting include segmenting the audience based on specific actions or pages visited, creating compelling ad creatives that align with the visitor’s interests, using personalized messaging, and testing different ad formats and placements to optimize performance.

    Can LinkedIn retargeting be used for B2B marketing?

    Yes, LinkedIn retargeting can be used for B2B marketing. With LinkedIn’s professional user base, businesses can target specific industries, job titles, company sizes, and more, making it a valuable platform for reaching and engaging with the B2B audience.

    What metrics should I track to measure the success of my LinkedIn retargeting campaigns?

    Key metrics to track the success of LinkedIn retargeting campaigns include click-through rates (CTRs), conversion rates, cost per click (CPC), return on ad spend (ROAS), and overall campaign performance. These metrics help measure the effectiveness of the ads, audience targeting, and overall campaign ROI.

    You may also like:

    How to Redirect a URL in WordPress – Ultimate Guide

    How to Redirect a URL in WordPress – Ultimate Guide

  • Getting Started with Meta Pixel: The Key to Successful Retargeting

    Getting Started with Meta Pixel: The Key to Successful Retargeting
    What is a Meta Pixel?

    Meta Pixel, previously known as Facebook Pixel, is a small piece of code that can be added to the back-end of a website, mobile app, or partner application to track user’s footprints, making it easier for advertisers to retarget them on Facebook.
    Moreover, the Meta Pixel assists brands, organizations, entrepreneurs, and marketers with Facebook pages in determining and enhancing their return on investment from the largest social network in the world.

    While e-commerce has never been this popular, social media platforms are adapting to the latest technologies and advancements.
    Since Facebook is the number one social media platform with over one billion monthly active users, digital marketers and online advertisers need to tighten their grip on every aspect of Facebook ads.
    In a world full of AI tools and chatbots, it’s crucial to figure out the basic online marketing techniques that could give you a slight edge over the competition.
    Let’s dive deep into Meta Pixel and understand more about it.

    Why is the Meta Pixel called “Pixel”?

    Since Meta Pixel is a powerful analytical tool that tracks website visitors‘ activities. The way it works is that it uses a short code that leaves a cookie on each website visitor and helps advertisers track them via Facebook ads.
    Pixel is the industry-standard name for retargeting code that sits on the advertiser’s website or app and provides them with insights into consumer behaviors, actions, and choices.
    Meta Pixel helps identify Facebook advertisers and how users are interacting with the content or products on their website.
    Installing a pixel, whether you’re running Quora ads or Facebook ads, is vital to remarketing the previous website’s visitors and understanding the audience’s behavior toward your ad.

    What are the benefits of installing the Meta Pixel?

    Digital marketing gurus and online advertising experts rave about retargeting and often consider it one of the most important aspects of e-commerce sales growth.
    Installing the Meta Pixel in your website or app can provide various benefits that can help improve your Facebook advertising efforts – no question about it.
    So let me shed some light on the capabilities and benefits of installing or using the Meta Pixel:

    Essential for Facebook remarketing:

    Retargeting or remarketing is the core reason why meta-pixel is a thing now. With the help of the Meta Pixel, you can track the behavior of users who have visited your website or app, and target them with specific ads to encourage them to return to your site or complete a desired action.

    Track and improve conversions:

    Advertisers can track user behavior on their websites or apps and analyze the effectiveness of their advertising campaigns. The data can help them identify areas where they need to improve their campaigns and optimize their ads to increase conversions.

    Helps build custom audiences:

    Marketers and advertisers could create custom audiences based on the actions users take on their website or app. This can help them create targeted ads for specific groups of users and improve the relevance of their advertising campaigns.

    Assists in building lookalike audiences:

    By analyzing the behavior of users who have interacted with your website or app, the Meta Pixel can help advertisers identify similar audiences that are likely to be interested in their products or services. It can easily expand the reach of the advertising campaigns and help target new potential customers.

    Measures the results of your ad campaigns:

    The Meta Pixel provides advertisers with detailed data about the performance of your advertising campaigns. They can track the number of clicks, conversions, and other metrics that help them understand the effectiveness of their ads.

    Enables advertisers to show ads to the right audience:

    It gets easier to track user behavior with such a facility. Therefore, the advertisers could create targeted ads that are shown to the right people at the right time. It can significantly improve the relevance of their advertising campaigns and increase the chances of users taking action.

    How does the Meta Pixel work?

    meta-pixel

    The Meta Pixel works by inserting a one-time code into your website or app source so that it could track the users and allows you to remarket them using Facebook retargeting ad campaigns.
    To use the Meta pixel effectively, you must first install it on the website or app – wherever you’re trying to capture the audience footprints for Facebook retargeting.
    The retargeting pixel goes into the header section of the website or the source code of your app and helps you monitor, analyze, and track the audience visiting the pages/sections with the code on it.
    For example, an author is selling an ebook through a website and has already set up a landing page, a checkout page, and a thank you page for the campaign. The Meta Pixel would be installed on all three pages to record the buyer’s journey.
    In most content management systems (CMS), the header and footer are common on all pages. Therefore, adding any piece of code into the header or footer section means it’s been added to all pages eventually.

    What does Meta Pixel collect?

    Facebook-ads

    The Meta Pixel is a powerful tool that enables advertisers to collect valuable data that can be used to improve the effectiveness of your Facebook ad campaigns.
    The data collection using Meta Pixel begins by installing the Meta Pixel on the back end of your website or app. Once it’s added, you can monitor and track conversions on the website/app.
    This valuable data can be used to optimize your ad campaigns, ensuring that they are delivering the best possible results.
    The reason why advertisers collect data is because of its ability to facilitate remarketing to people who have already taken some kind of action on your website.
    By tracking the actions of visitors, such as adding items to a cart or completing a purchase, the Meta pixel can help facilitate the delivery of targeted ads to those individuals.
    Furthermore, one of the benefits of using the Meta pixel is that it allows you to build targeted audiences for future ads. As visitors interact with your website, their actions are recorded and analyzed by the Meta pixel.
    This empowers you (or the advertiser) to create audience segments based on specific behaviors or interests, which can then be used to target future ads. This process is called retargeting or remarketing.
    So the Meta Pixel collects valuable information about the website visitors so that the advertiser could design or create a relevant ad campaign to target the right audience.

    What are Meta Pixel Events?

    Meta has provided several “Events” for conversion optimization. If you’re new to Facebook advertising jargon, then let me make it easier for you.
    Events are defined as any type of action that takes place on your website after the visitor lands on the website as a result of the ad.
    There are several “Standard events” which are predefined by Meta and advertisers could use them to log user activities, conversion analysis, and build an audience.
    Besides the “Standard events,” there are “Object properties” that are also predefined by Meta and can be included with “Standard events” based on compatibility. For more clarification on Meta Pixel or to access the event codes, check out this page.

    How to setup Meta Pixel?


    Setting up the Meta Pixel is not a complex process unless you haven’t done any Facebook ad campaigns before or you never edited even a simple HTML code.
    I’ll try to break down the process into brief sections so that it gets easier for an average Joe to digest, comprehend, and implement it.
    Before I head over to the next part, just remember that Meta Pixel is a code that works as a cookie and helps advertisers target the website audience on Facebook.
    Since you have already learned about the Meta Pixel by now, it’s important to know how you can create it. It’s not a complex process so no need to panic.
    Here are the steps involved in creating a meta pixel:

    Step 1: Access the ads manager

    Ads Manager is a platform provided by Facebook that allows you to manage and create advertisements for your business.

    To create a meta pixel, you need to first access the Ads Manager by logging in to your Facebook account and clicking on the “Ads Manager” button in the top left corner of the screen.

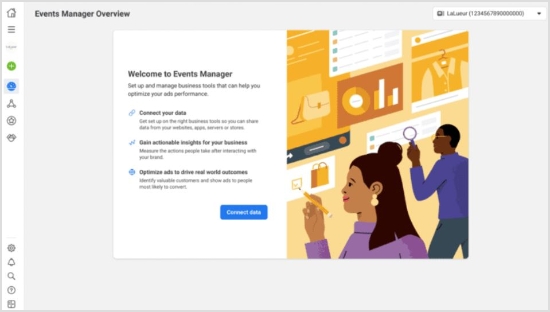
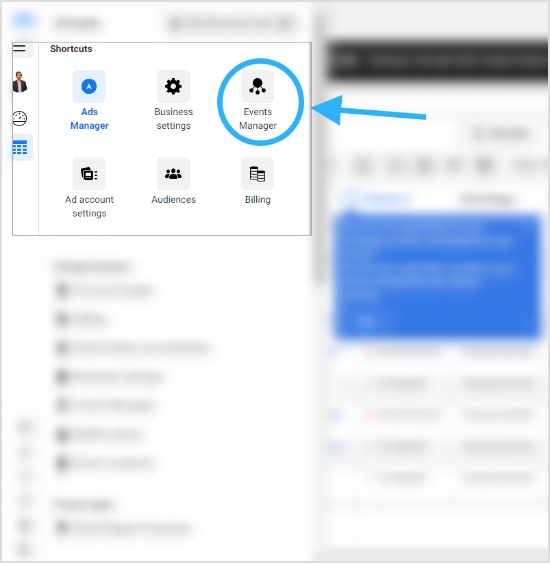
    Step 2: Go to the events manager

    Once you are in the Ads Manager, you need to navigate to the Events Manager section. This can be done by clicking on the “Events Manager” button in the left-hand menu.

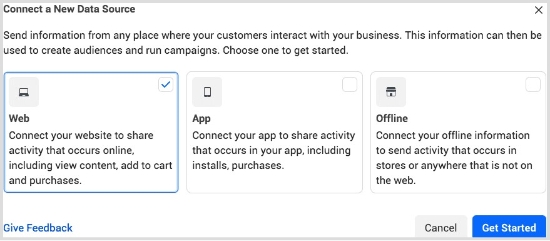
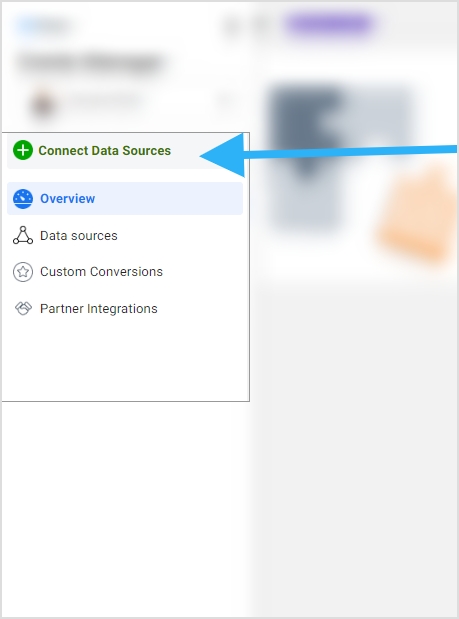
    Step 3 Connect a data source:

    Connect-Data-Source

    After accessing the Events Manager, you need to connect a data source. A data source can be any platform that you use to collect data related to your websites or apps, such as Google Analytics or Shopify.
    By connecting a data source, you can collect information about user behavior on your website or app and use it to create targeted ads.

    Step 4: Choose the data source

    Choose-data-source

    Lastly, you need to choose the data source that you want to use for creating your meta pixel. This can be done by clicking on the “Connect Data Sources” button in the Events Manager. In most cases, the data source is the website, so you’ll need to provide the URL of your website.
    You may also like: How to rename a link using Replug?

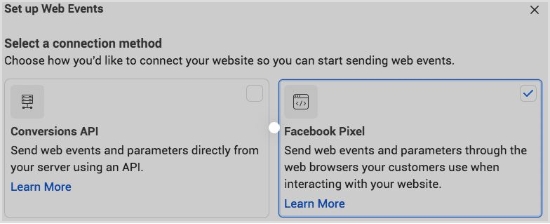
    Step 5: Select connection methods

    Select-connection-method

    You can either connect through the Conversion API method or Facebook Pixel method. For the said case we have selected the Facebook Pixel method.

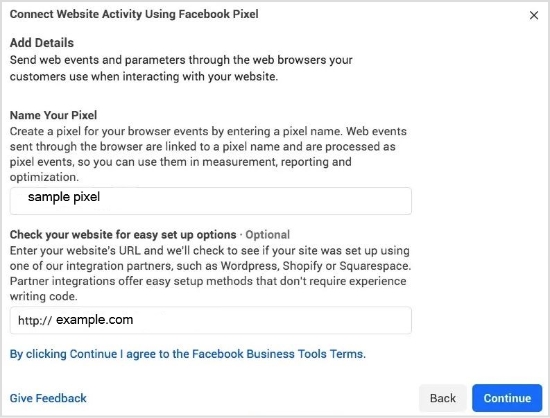
    Step 6: Connect website activity using Facebook Pixel

    Connect-Website-Activity-using-Facebook-Pixel

    Once you have chosen the data source and followed the on-screen instructions to complete the process of creating a meta pixel, you’ll be able to generate your meta pixel for installation on your website or landing page.

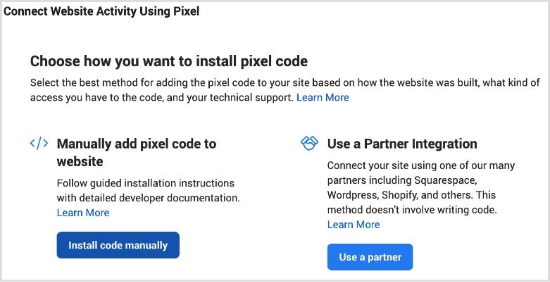
    How to install the Meta Pixel on your website?

    Connect-website-Activity-using-pixel

    There are two basic ways of installing the meta pixel on your website.

    i. Insert Meta Pixel code manually

    The simple yet basic method of inserting the meta pixel code into your website is by accessing the source code of the website and putting the code into it. It’s usually done by editing the HTML or PHP file using a code editor and pasting the code into it.
    Make sure to add it to the pages that need the most or else you won’t be able to track the conversion. If your website is built with PHP, you might have a header.php file, just insert the code into it and it’ll be available/accessible on every page of the website.
    Below are the steps to follow to install the Meta Pixel code manually.

    1.Naviagte to the Events Manager in your FB Business Suite and click the Data Sources.

    2. Select the Meta Pixel you want to setup, and click Continue Pixel setup.

    3. Select Meta Pixel and click Connect.

    Connect-website-Activity-using-pixel

    4. Select Install code manually

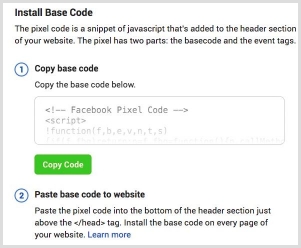
    5. Copy the pixel base code.

    copy the pixel code
    -put-Meta-Pixel-code-on-website-header-


    6. Paste the pixel code at the bottom of the header section above the closing header tag in your CMS or web platform.
    Note: Ensure to toggle on Automatic Advanced Matching 

    ii. Add Meta Pixel code via Partner Integration

    The second method is more convenient than the previous one. It will work only if you’re using a CMS like WordPress, Drupal, or Shopify. All you need is to edit the source file and insert the meta pixel into your website’s code.
    Most people use WordPress for building their websites, blogs, and landing pages. So you could use any code insertion WordPress plugin for that matter. All you have to do is to install such a plugin and paste the code into it. The plugin would do the rest of the process of code placement on the website.
    Here are some of the popular code insertion plugins:
    ⦁ WPCode
    ⦁ Woody code snippets
    ⦁ Header Footer Code Manager
    Below video by digital marketer Jacob Lee explains the steps to add Meta Pixel code via WordPress partner integration.

    Here’s a video by Metics Media explaining the steps to add Meta Pixel code via the Shopify partner integration.

    How to find the Meta Pixel ID?

    install-code-header
    Facebook-Pixel-Id-

    Locating the meta pixel ID might be difficult for beginners, but it’s quite simple. If you have created your meta pixel ID, then it won’t be difficult for you to find and access it.
    However, if you’re new to Facebook ads, then it might seem intimidating at first. Don’t worry because I’ve got your back.
    To find the Meta Pixel in the Facebook Ads Manager, you can follow these steps:
    i. Log in to your Facebook account and go to the Ads Manager.
    ii. Click on the hamburger menu icon (three horizontal lines) in the top left corner of the screen.
    iii. Select the “Events Manager” option from the list of available options.
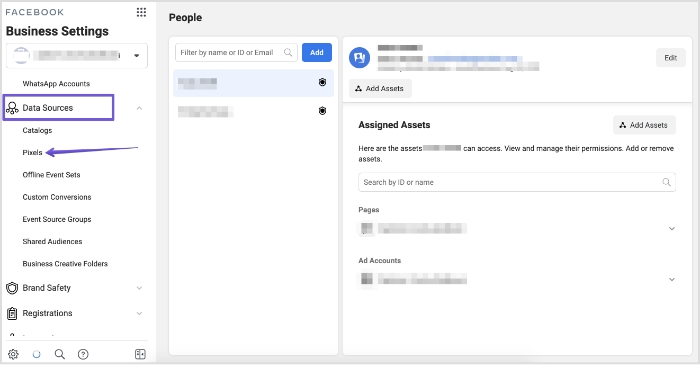
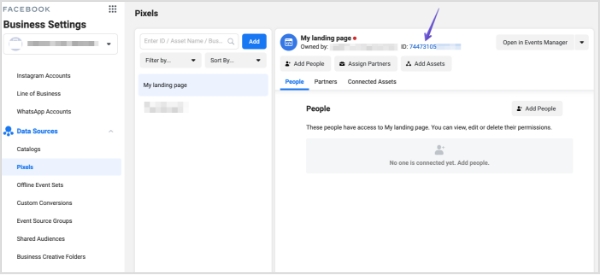
    iv. In the Events Manager section, click on the “Data sources” tab in the left-hand menu.
    v. Once you click on the data source button, you will be taken to your pixel page. Here, you can see the pixel ID, view the pixel code, and make any necessary changes to the pixel settings.
    vi. If you want to use the pixel to track specific events on your website or app, you can click on the “Settings” button next to the top menu and access the specific option. This is the area that will give you access to the cookies set, event setup, and conversion API.
    That’s pretty much it!
    Now you have successfully found your Meta Pixel in the Facebook Ads Manager and can now use it to track user behavior on your website or app and create targeted ads.

    How to setup Events using the Event setup tool?


    Setting up Events is an essential step in optimizing and improving the ad campaign as it directly influences the customer base targeting. Since retargeting is all about reaching out to the audience that has shown some interest in your website, setting up the right event helps identify the intent of the website visitors.
    To start using Events, you first need to set them up. Facebook has a dedicated section for Events setup, and it’s called Event Setup Tool.
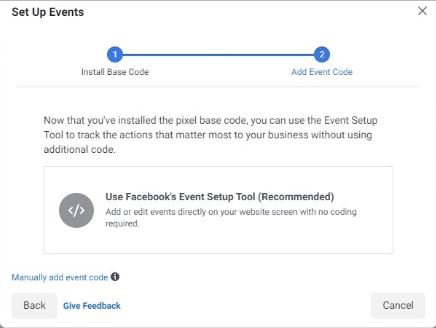
    Let’s head over to the Ads Manager once again for showcasing how to set up events using the Events Setup Tool. Here’s the step-by-step guide on how to do it:

    Step 1: Go to the Ads Manager
    The first step in setting up events using the Event Setup Tool is to log in to the Ads Manager. If you don’t have an account, you can create one for free by going to the Facebook Ads Manager.

    events-manager

    Step 2: Open the Events Manager
    Once you have logged in to the Ads Manager, you will need to navigate to the Events Manager. You can do this by clicking on the hamburger icon in the top left corner of the screen and selecting “Events Manager” from the menu that appears.

    connect-data-sources

    Step 3: Access the Data Sources

    Once you have opened the Events Manager, you will see a menu on the left side of the screen. From here, click on “Data Sources,” which will take you to a page where you can manage your data sources, such as your website, app, or offline events.

    settings-data-sources

    Step 4: Go to the Settings Section
    After accessing the Data Sources page, you will see a list of your data sources. Select the data source you want to set up events for and click on its name. This will take you to the Settings section for that particular data source.

    event-setup
    setup-events-popup-window

    Step 5: Open the Events Setup Tool

    Within the Settings section, scroll down until you see the “Events” section. Here, you will find the option to open the Events Setup Tool.

    Once you click on this button, you will be taken to a page where you can create and manage the events that you want to track on your website.

    How to confirm that the Meta Pixel is working using the Meta Pixel Helper?

    Facebook-Pixel-Helper-Extension
    Pixel-Helper-

    The Meta Pixel Helper is a convenient Chrome browser extension that can be used to check for the presence of Meta Pixel code on websites without any hassle.
    This browser extension operates in the background and doesn’t bother the script or performance of the website. Plus, it is quite easy to install even for newbies.
    After installation, an icon resembling </> – the Pixel Helper icon – will appear in the upper right corner of the browser alongside the address bar.
    When a website has a Meta Pixel installed, the Pixel Helper icon will change color from grey to blue, and a badge will appear showing the number of Pixels found on the page.

    If the icon does not turn blue, it means that there are no Meta Pixels installed on that particular webpage. To access the Pixel Helper, click on the Pixel Helper icon and a small popup will appear containing information that can be used to verify, troubleshoot, and improve the Pixel.
    Therefore, the Pixel Helper is a helpful tool for confirming the installation or existence of the Meta Pixel on the website. To download this Chrome extension, visit this page.

    How to use Meta Pixel with Replug?

    Replug is a powerful URL shortener that offers several features such as URL shortening, branded short URLs, retargeting, deep links, and bio links.

    You already know by now that Meta Pixel is used for retargeting people through Facebook ads. Since Replug also provides a retargeting feature, it’s time to figure out how the combo of Meta Pixel and Replug plays out.
    You can use the short links created with Replug to reach out and retarget the users that click on your short URLs through Facebook ads.
    Here are the steps involved in using Meta Pixel with Replug:

    i. Grab the Pixel ID from Facebook

    Facebook-Pixel-Id-

    You’d surely know by now where to get the pixel ID from your Facebook account. Here’s a quick guide if it all seems intimidating or too much to digest:

    • Go to the Ads Manager section and click on the Events Manager button from the options.
    • Then, go to the Data Sources from the left menu and you’ll see the Facebook pixel.
    • Open the settings area of your pixel and copy the pixel ID from there.

    ii. Login to your Replug Account

    add-retargeting-pixel

    Now go to the Replug website and log in to your Replug account.

    In case, you haven’t signed up for a Replug account, I highly recommend doing it now. Replug has a 14-day free trial. Try Now!

    iii. Add a Retargeting Pixel in Replug

    add-retargeting-pixel
    Click-Add-Pixel
    add-retargeting-pixel

    Once you’re in, access the profile settings from the top-right corner. Just click on your profile icon to do so.
    A drop-down menu would appear; click on the Retargeting Pixels.
    You’ll land on the Retargeting Pixels page. Now click on the “Add Pixel” button.
    Once you click the Add Pixel button, a popup window would appear. Choose Facebook, provide your pixel name, and paste your Facebook pixel ID.
    Once it’s done, click on the “Add” button to proceed.

    iv. Create a retargeting campaign

    Create-Retargeting-Pixel-Campaign
    select-brand-for-retargeting-campaign

    The next up is creating a new campaign for retargeting the Replug audience, meaning the visitors who click through your short links, so you could start retargeting them through Facebook ads.
    To do this, go to your Replug dashboard and access the Campaign section.
    Click on the “New Campaign” button to create a new campaign for this purpose.

    Select the appropriate brand or create a new one for this campaign.

    Add-retargeting-codes-for-campaign-

    Name this campaign and select the campaign type. You must check the “retargeting” option at this stage to let Replug know that it’s a retargeting campaign.

    Choose the retargeting script afterwards.

    In this case, it’ll be the one associated with Facebook. Choose the Facebook pixel you created earlier in your Replug account.

    Now save the campaign and you’re done with creating a new campaign using Replug.


    You may also like: 14 Crazy-Effective Ways to Boost E-commerce Sales Through Retargeting

    How to change the Meta Pixel’s name?

    Changing the meta pixel’s name might not be on your mind, but you should know whether or not you can do it, just in case.
    It’s possible to change the meta pixel’s name. All you have to do is to follow a few simple steps to do this:
    i. Go to your Ads Manager account after logging in to your Facebook account.
    ii. Access the Events Manager section from the Ads Manager.
    iii. Open the Data Sources to access your already created meta pixel. (Remember that you could create only one meta pixel per account).
    iv. Now click on the edit button next to your meta pixel’s name. This is where you could change the meta pixel’s name.
    That’s it.
    Easy-peasy!

    FAQs about Meta Pixel

    Is meta pixel a cookie?

    The Meta Pixel is a pixel code that helps advertisers target the audience who have visited their websites through Facebook ads. A cookie also does the user-tracking on the websites, but may not be directly influencing the retargeting like the meta pixel.

    How do I create the Meta Pixel?

    Log in to your Facebook account, go to the Ads Manager, access the Events Manager, and click on the Data Sources. You’ll see the option to create your meta pixel.

    Is the Meta pixel different from than Facebook pixel?

    No. The Meta Pixel and the Facebook Pixel are the same. The Meta Pixel was formerly known as the Facebook Pixel.

    What is Meta pixel in Facebook ads?

    It’s a pixel code that helps advertisers track the website visitors and empowers them to advertise to those visitors using Facebook ads by retargeting them.

    What is a Facebook Pixel notice?

    This is by no means legal advice, but a lot of countries require websites to display the cookie consent notification which tells the website visitors that this website is using cookies to track visitors.
    When a website is using Meta Pixel or any other user tracking tool to track website visitors’ activity, performance, and behavior, they must notify the website visitors about this.
    Have you ever seen a cookie consent notification on websites, especially when you visit it for the first time?
    The website is trying to tell you that they’re using some tracking tools or softwares to track the visitors’ activities and behaviors – it’s a very common website management practice.
    I’m no expert on GDPR or CCPA, so you should consult your lawyer for more clarity. However, I simply use a cookie consent WordPress plugin on my website that displays a cookie consent notification on the website.
    Some several tools and plugins automatically add cookies consent notices to the websites, but here are some of the popular website plugins for this purpose:
    ⦁ Cookie Notice & Compliance for GDPR / CCPA
    ⦁ Cookies and Content Security Policy
    ⦁ Cookie Script
    You May Also Like:
    Campaign Tracking: Data-Driven Tools for Marketers
    15 Proven Facebook SEO Techniques To Increase Brand Visibility

  • What are tracking pixels & how do they work?

    What are tracking pixels & how do they work?

    What is a tracking pixel?

    A tracking pixel is a pixel tag or code snippet that triggers the tracking system when a visitor lands on a website page after clicking on a specific link or CTA.

    A tracking pixel works by placing it on a website or in an email and tracking the data that helps the marketer or advertiser analyze and track the campaign performances.

    Have you ever noticed how quickly you land on a “thank you” page when you finish the checkout process on an e-commerce site?

    Do you know that the largest websites, such as e-commerce platforms, social media platforms, and web portals, track their website visitors?

    Websites and apps track their users because it helps them navigate in the right direction or understand what they need to accomplish.

    In some cases, a tiny image file is added to the website or app, which usually goes unnoticed by the naked eye. While in some instances, a tracking pixel could also be a piece of code that goes into the website page URL and helps marketers track performance through clickability.

    Adding a tracking pixel on any web or app property is to collect user data to understand their behaviors, actions, and choices.

    Furthermore, it is used to track the activity of users on a website or email campaign to determine the success of the campaign.

    Let’s do this. Shall we?

    Why do you need tracking pixels?


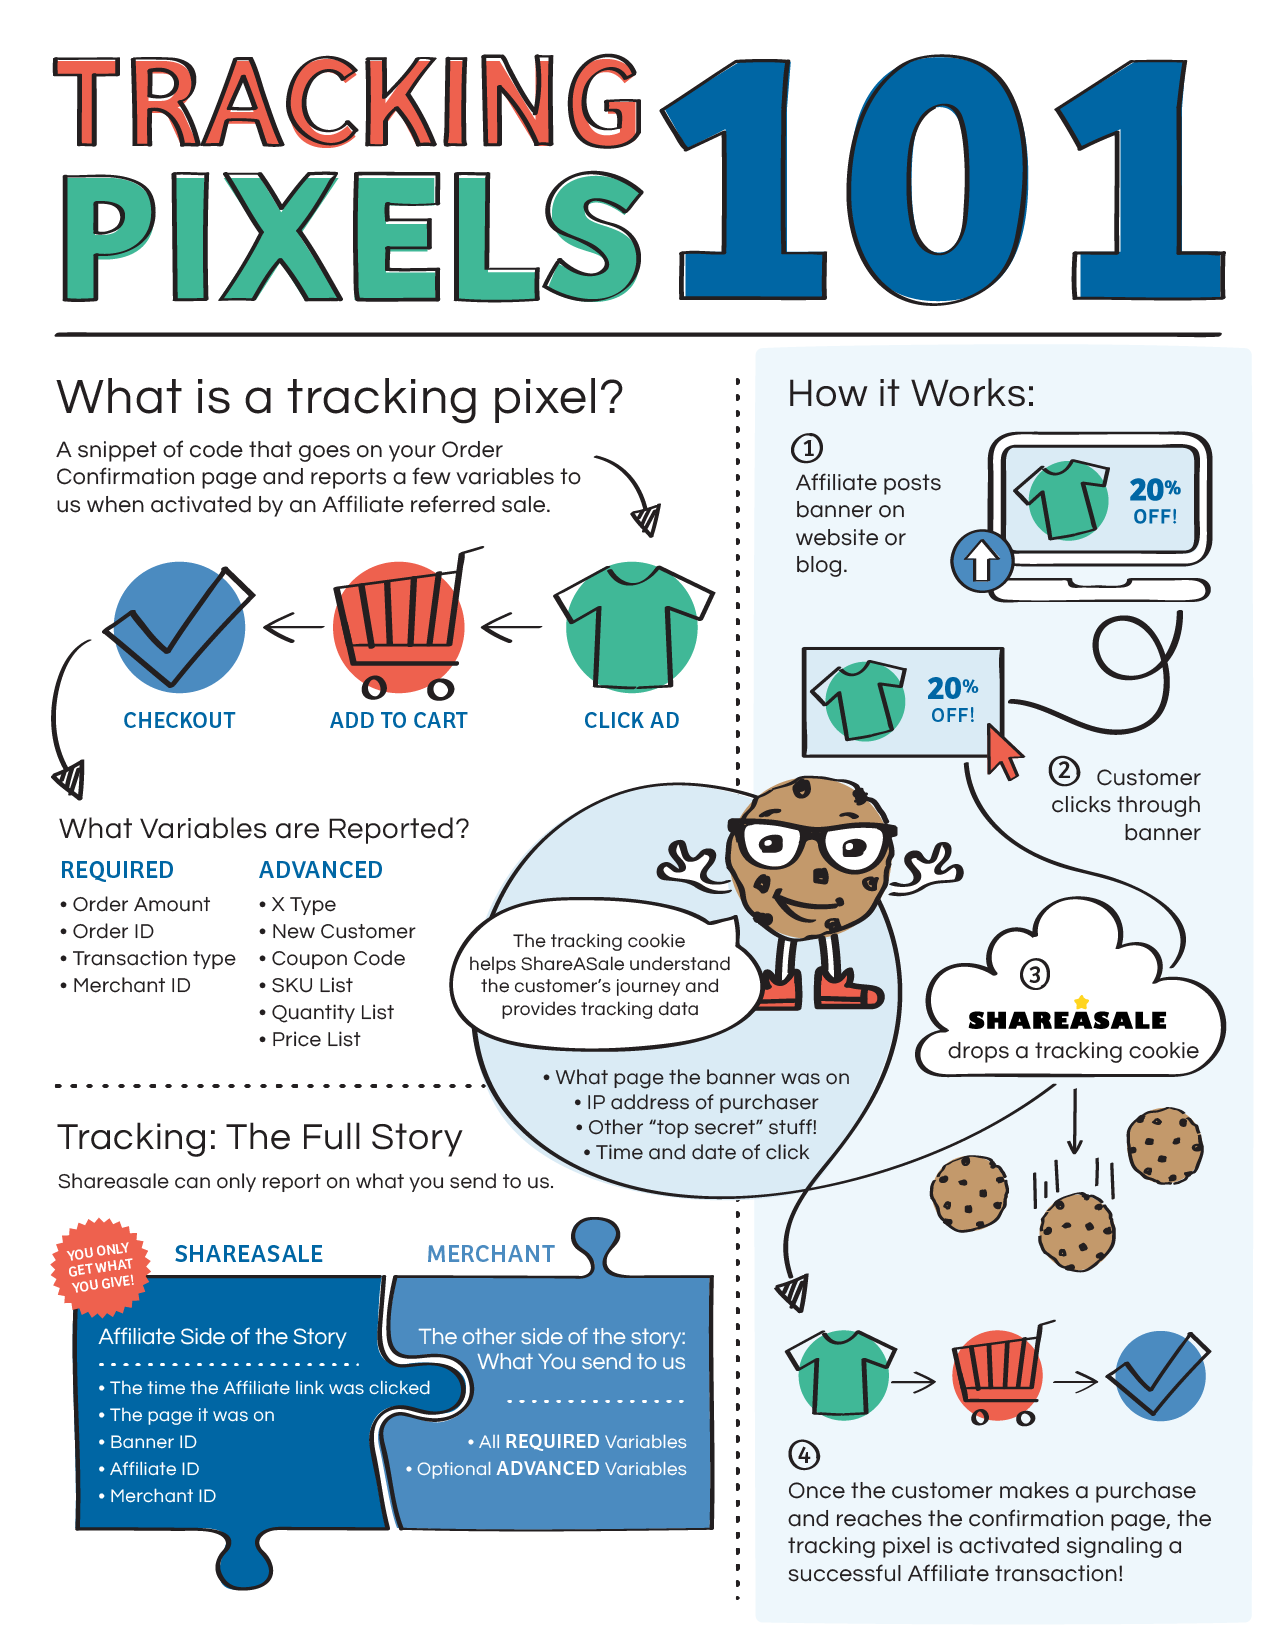
    TrackingPixel_Info-
    Source: https://blog.shareasale.com/2016/01/25/tracking-pixels-101/

    Tracking performance is the essence of any marketing campaign, as it helps marketers understand how their marketing efforts will pan out.

    Here are four areas where tracking pixels comes in handy:

    i. Analyzing website traffic: Tracking pixels can gather data on how users interact with a website. This can help website owners understand which pages are most popular, how users navigate through the site, and where they are coming from.

    ii. Measuring the effectiveness of online advertising: Tracking pixels can measure the success of online advertising campaigns by tracking how many users click on an advertisement and then go on to make a purchase or complete some other desired action.

    iii. Targeting users with relevant advertisements: Tracking pixels can be used to track user behavior and interests, which can be used to show targeted advertisements to users that are more likely to be interested in them.

    iv, Email marketing campaign: Tracking pixels can be used to track the success of email marketing campaigns by measuring how many users open the email and click on links within it.

    No doubt, tracking pixels are important for businesses and marketers, as they allow them to gather data on how users interact with their websites and emails regardless of the platform.

    Moreover, it enables marketers and advertisers to use this information to improve their marketing efforts and relaunch their advertising campaigns more effectively.

    What are the different types of tracking pixels?

    There are two main types of tracking pixels used in digital marketing:

    Conversion Pixels

    Conversion pixels play a vital role in tracking conversions on websites and apps. For example, you may have seen “thank you” or “also check these” pages while buying products online. Such pages trigger or direct visitors to specific pages when they notice a conversion. And conversion pixels help perform this action.

    Now a product sale isn’t the only conversion. In fact, a generated lead or downloaded file is also a conversion. It depends on the campaign type and what the marketer or advertiser wants from the audience.

    Retargeting Pixels

    retargeting-pixel

    One of the most popular tracking pixels is the retargeting pixels. It’s used in retargeting campaigns in the digital marketing field. Retargeting is a marketing strategy of targeting the audience that has visited their website or landing page to convert visitors into subscribers or paid users.

    Retargeting is usually done through paid advertising. However, the targeting process begins earlier by adding a tracking parameter to the URL or the website code. Hence, the retargeting pixel collects visitor data and helps marketers reach the same audience through paid ads.

    How does tracking pixels work?

    Tracking pixels are used to track the users’ online behavior, such as the pages they visit, the links they click on, and the products they purchase.

    A tracking pixel is a piece of code that embeds into the website code or URL to track the performance of the page or link.

    In some cases, tracking pixels are tiny, transparent images placed on web pages or emails to track user behavior.

    Advertisers often use tracking pixels to track the effectiveness of their online advertising campaigns. They can also be used by website owners to track the traffic to their sites and to understand the demographics of their users.

    The way tracking pixels works is that they are often placed in the HTML code of a web page or in the body of an email. They can be implemented using JavaScript or iFrame.

    Example: Suppose a user visits a website or opens an email that contains a tracking pixel; the pixel sends a request to the server that hosts the pixel.

    This request includes information about the user’s browser, such as the user’s IP address, the type of device they are using, and the type of browser they are using.

    The server then records this information and stores it in a database. This information can be used by the webmaster or by the sender of the email to analyze the user’s behavior and tailor their marketing efforts.

    How to Set Up a Tracking Pixel Using Replug?

    Replug is a powerful URL shortener tool that allows brands and marketers to create short, branded URLs for marketing such as for social media, email marketing, and online advertising.

    Since Replug is a URL shortener that offers UTM embedding, URL tracking, branded URLs, deep links, and other services, it opens up the opportunity to retarget the audience.

    As Replug records data of the users’ behavior on the short links, it makes it possible for marketers and brands to retarget those people through different advertising channels.

    Replug plays an anchor role in setting up a retargeting campaign for brands and advertisers using pixel tracking.

    Here’s how you can set up tracking pixels using Replug:

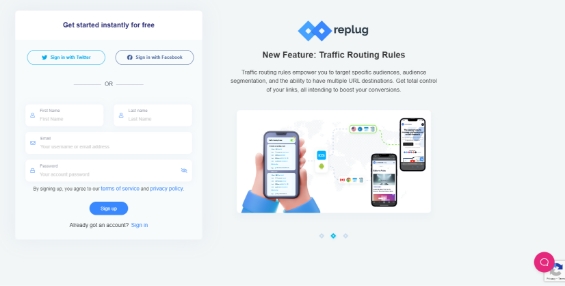
    Step #1: Create a Replug account

    log-in-to-your-account

    To get started with Replug, you must first create a Replug account. Then, you just need to visit the Replug website and sign-up for a free trial account to start the process.

    Once you’ve created your Replug account, log in to your account to explore the features this URL-shortening tool has to offer.

    After the successful login to your Replug account, you’ll see the Replug dashboard, where the process begins.

    Pay close attention to all the steps for setting up a tracking pixel using Replug before jumping the gun. And more importantly, don’t create a short link right after landing on the dashboard area because you’d have missed out on a few steps.

    Step: #2: Setup your brand in the Replug account

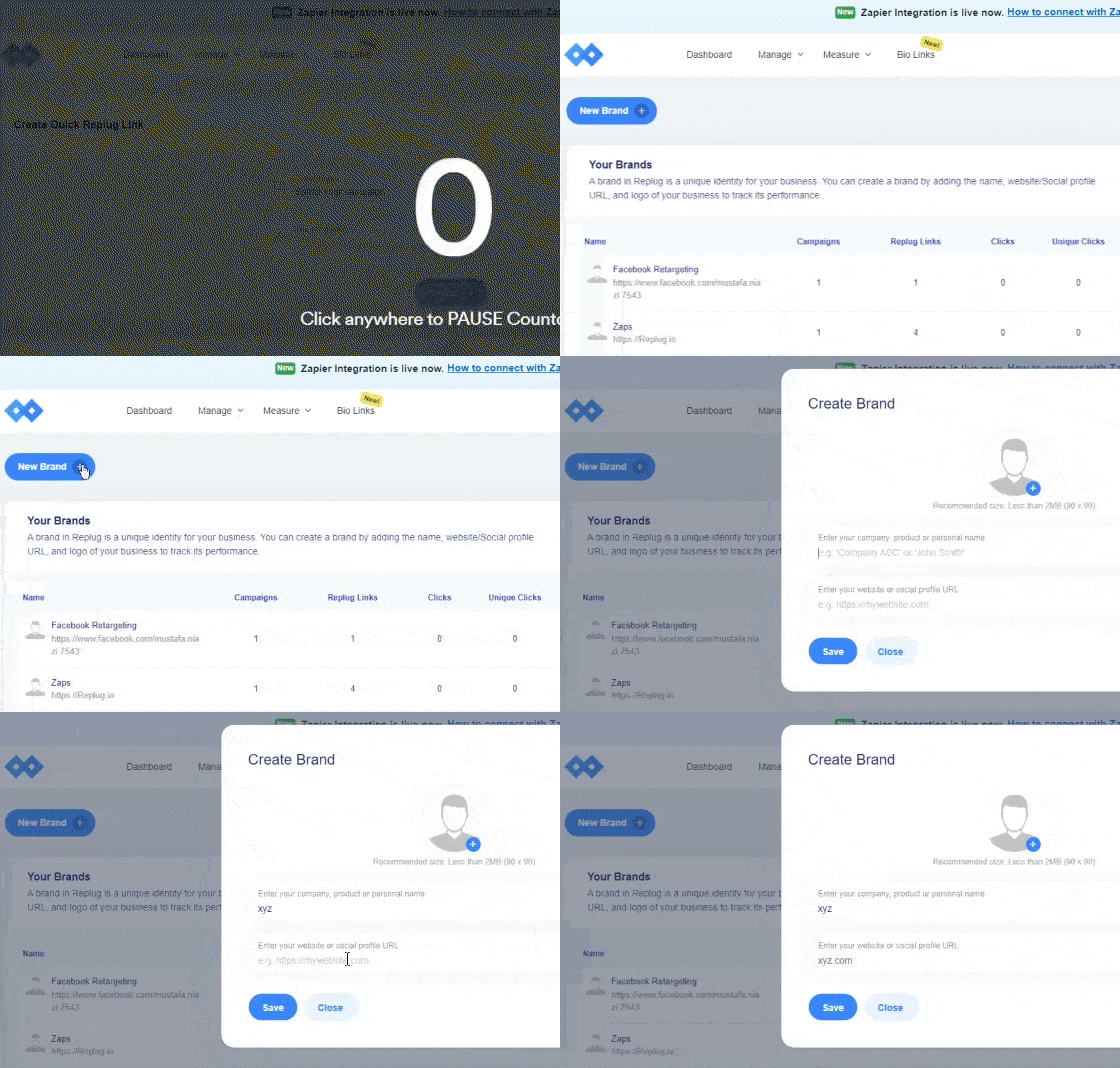
    All the steps are crucial to setting up the retargeting pixel using Replug. Now select the appropriate brand or create a new one, just in case.

    Creating a brand on Replug would only take a few seconds. It’s highly unlikely that most readers have already set up their brands on Replug since most would be new users.

    To create a brand:

    Create a Brand

    1. Go to the “Manage” page from the dashboard header menu and click “Brands.”
    2. Option.”
    3. Click on the “Add Brand” button to get started with creating a brand.

    Once it’s done, click the “next” button to proceed.

    Step #3: Make a new campaign

    The next up is creating a new Replug campaign in line with your retargeting campaign. But first, ensure you’ve set up the brand on Replug properly.

    click campaign

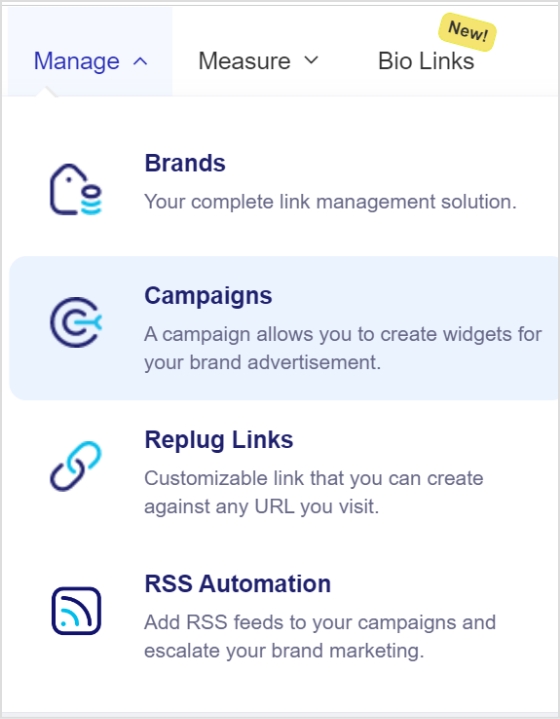
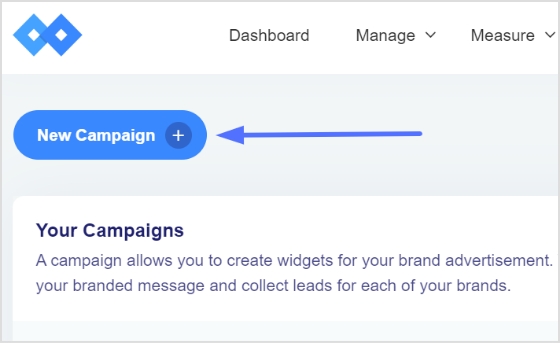
    Now go to the “Manage” drop-down from the top menu and click on the “Campaigns” button, and then select “New Campaign” to get started.

    new campaign

    At this point, you’d have to select an already existing brand or create a new brand. Since you have just created a new brand, continue with the created brand in the Replug account.

    Step #4: Select retargeting as the campaign type

    select-campaign-type

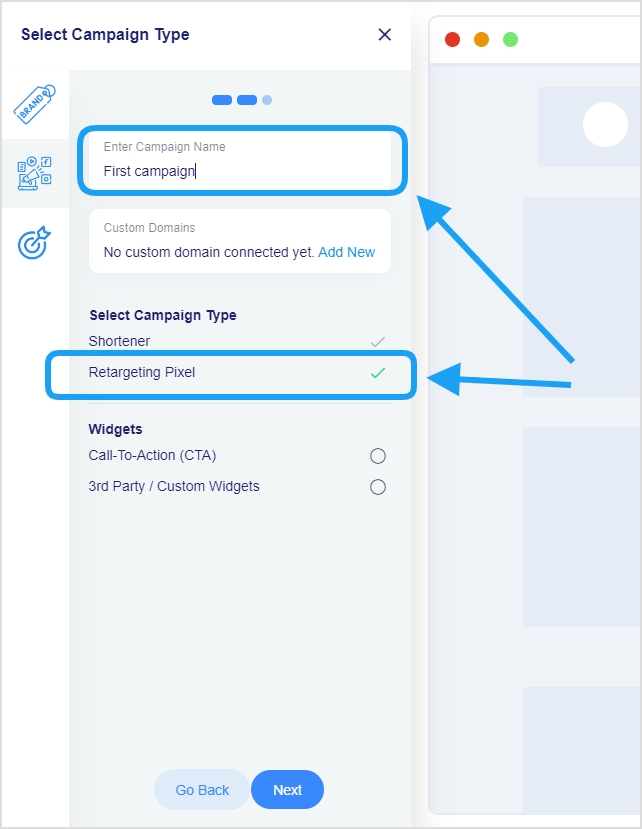
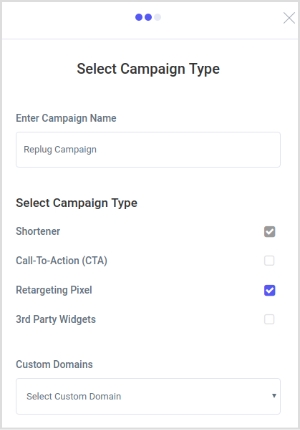
    It’s one of the most important steps in the retargeting campaign because it sets the direction of the campaign. This is the part where you name your campaign and choose its type.

    Provide a name for your campaign and select the custom domain if required in the campaign. Otherwise, you can skip the custom domain section.

    However, make sure that you check the retargeting pixel option before moving on to the next step. Once you choose the retargeting pixel, it becomes crystal clear to the Replug platform that it’s a retargeting campaign.
    Also read: Retargeting Ad Examples That Convert & Drive Growth

    Step #5: Add your retargeting code

    Everything seems quite easy until this point, and I’ll ensure the last step goes as smoothly as possible.

    Now, this is the part where you select the social media platform to run your retargeting ad campaign.

    add-retargeting-pixel

    The way it works is that marketers choose the social media platform, give the pixel a name, and finally enter the pixel ID from the respective social media platform such as Facebook pixel id.

    Once everything is done, you’re all set to launch your retargeting campaign using Replug.

    Also read: How to find my Twitter Pixel ID?

    What are the key differences between a pixel and cookie?

    A pixel is a small piece of code placed on a website or in an email. It is often used to track a user’s activity on the website or email and to send this information back to the company or organization that placed the pixel.

    Pixels are typically used to track website visitors and to understand how they interact with the website.

    A cookie is a tiny chunk of data that is stored on the visitor’s computer by a website. It is used to remember certain information about the user, such as their preferences or login information. In addition, cookies are often used to personalize the user experience and to track a user’s activity on a website.

    There are some key differences between pixels and cookies:

    Purpose/Goal: Pixels are primarily used for tracking and analytics, while cookies are used for personalization and tracking.

    Placement: Pixels are placed on websites or in emails, while cookies are stored on a user’s computer.

    Size: Pixels are typically very small (a few hundred bytes), while cookies can be larger (up to 4KB).

    Duration: Pixels are usually short-lived and expire after a certain period. At the same time, cookies can persist for extended periods, depending on how they are configured.

    Privacy: Pixels can be used to track users across different websites and devices, which has raised privacy concerns. Cookies are generally less controversial, but they can also be used to track users and their activity.

    Also read: How To Utilize Replug for Facebook Retargeting Ads?

    FAQs about tracking pixels

    Is tracking pixel legal?

    Tracking pixels are legal as long as they comply with relevant laws and regulations, such as the General Data Protection Regulation (GDPR) in the European Union. Therefore, once the users comply with all the legal requirements, there shouldn’t be any problem regarding using tracking pixels.

    Is a tracking pixel a cookie?

    A tracking pixel is a small, transparent image file that is placed on a website or in an email. It is often used for tracking and analysis purposes. A tracking pixel is not the same as a cookie, a small piece of data stored on a user’s device and used for tracking and personalization targeting.

    Does pixel track steps?

    A tracking pixel does not track steps, but it can be used to track a user’s actions on a website or in an email. For example, a tracking pixel can be used to track how many people opened an email or clicked on a link.

    Is tracking pixel free?

    Tracking pixels may or may not be free to use. Some tracking pixels are provided by third-party vendors and may require a subscription or fee to use. However, social media platforms provide pixels for retargeting purposes that are free to use for advertisers.

    How to block tracking pixels?

    You can use a browser extension that blocks tracking systems set by websites to block tracking pixels. Furthermore, you can also adjust your browser settings to block or limit the use of cookies.

    Will users know if I’m using a tracking pixel?

    In most cases, users will not know if a tracking pixel is being used on a website or in an email. This is because tracking pixels are typically small and transparent, and they do not interact with the user in any way. However, as described above, users can use tools to detect and block tracking pixels.

  • The complete guide to content remarketing: 20 tips and examples to re-engage audience

    The complete guide to content remarketing: 20 tips and examples to re-engage audience

    It is funny how very few people know about content remarketing. Some confuse it with usual content marketing, but it is actually a separate technique that has its own aims and practices involved.

    Don’t worry, you are on the right foot steps as this walk-through and guide is what you need to begin with content remarketing.

    What is content remarketing?

    Content remarketing is a strategy of targeting to bring back and re-engaging with people who have already visited your website or have been past customers of your brand.

    What is the goal of remarketing?

    With this strategy, marketers strive to capture the attention of your site’s visitors to make them come back to your website and complete an action they didn’t make during their first visit. This can be anything from purchasing your product to subscribing to your newsletter. Content remarketing is like that second chance you needed desperately.

    What are the benefits of remarketing?

    Remarketing helps you to:

    • Increase brand recall and branded searches.
    • Turn abandoners and bouncers into leads.
    • Improve the repeat visitor rate and engagement.
    • Improve SEO

    What’s the difference between remarketing and retargeting?

    Remarketing vs. Retargeting

    The two terms can confuse many as they are very interrelated.

    In general, the goals of both are focused on targeting and converting potential clients that have bounced from your socials or website.

    But what really makes remarketing different from retargeting?

    In the beginning, remarketing was thought off as sending just email campaigns to re-engage with customers to inform about discounts, trial expiry or to follow up potential clients, whereas retargeting involved paid advertising.

    However, with the evolution of internet and social media both have evolved though the goal is still the same.

    Retargeting still involves paid advertising to target and convert potential clients. While, remarketing involves reaching out or following up to past customers or potential clients through various channels that may be Instagram, Facebook, Email, SMS or Whatsapp etc.

    Generally, the key medium of remarketing strategy is still email. Both strategies can be used in conjunction, where emails are sent with a paid advertisement.

    Further in-depth study of the both terms makes one thing clear that they are not the same.

    According to Neil Patel, a famous digital marketing expert,

    “I see remarketing more as an umbrella term for marketing to the same prospect multiple times, whereas retargeting really is targeting online ads at the same traffic again and again.”

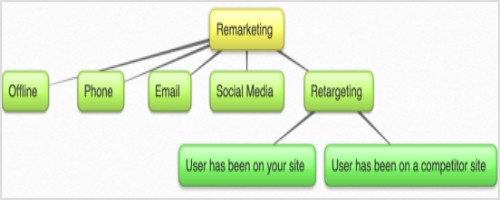
    So it’s safe to say that retargeting ads and remarketing emails are actually two sides of the same coin. However, retargeting is more of a subset of remarketing which only targets website traffic, while remarketing is more concerned with getting back to past visitors using personalized content mostly confined to emails. The image below will develop a better understanding of the subject.

    Content-Remarketing-

    Now that the difference between the two is clear. Let’s move on further.

    What are the different types of remarketing?

    Remarketing is categorized into 5 types. The five types are

    • Standard Remarketing
    • Email Remarketing
    • Dynamic Remarketing
    • Video Remarketing
    • Remarketing Lists for Search Ads

    When to use remarketing?

    • Use remarketing strategy for
    • Up-selling products and services
    • Cross selling 
    • Special offers
    • Re-engagement campaigns
    • Customer support campaigns
    • Inventory update campaigns
    • Follow ups such as cart abandonment or trial expiry etc.

    The right tools and channels for content remarketing

    You can create personalized content using these different channels that can be used for remarketing are

    Facebook ads

    It’s an analytics tool by Facebook containing a pixel code that can be put on your website. A pixel is a small box that is placed on a webpage. When someone visits the page, the pixel is able to collect information about the visitor. This information can then be used by other websites to target that person with ads. In remarketing, an advertiser places a pixel on their website. When a user visits the site, the pixel is able to track everything from their web browser’s cookie to their IP address. This data is then used to track people who have visited other websites or viewed certain content. The advertiser can then use this information to show them relevant ads across multiple websites. For example, if a user has visited Amazon and viewed an item for sale, an ad for the same product could be shown on Facebook which would drive more purchases for the advertiser.

    Related: Getting Started with Meta Pixel: The Key to Successful Retargeting
    Google ads

    The Google Display Network is a web-based advertising network run by Google. The network allows advertisers to place text, image, video and Native ad units on websites and mobile apps.

    One of the best things about using GDN for remarketing is that it gives you a lot of reaches. You will be able to find your tagged site visitors on the network several times per day across many different sites. In general, you will be able to connect with the people you tagged several times per month.

    The first step in remarketing is to create an audience of users that you will be remarketing too. This can include people who visited specific pages on your website or read your blog, but you will have to group

    them into separate audiences depending on your goals.

    By grouping your tagged site visitors into audiences, you will be able to reach out to only certain people and persuade them to come back to you.

    Another benefit of grouping your audience is that you can bid more aggressively. Consequently, this will lead to more impressions and higher ad positions. Some pages on your website such as the pricing or product pages are way more valuable than your blog. By selecting those who visited specifically your product and pricing pages, you can write follow up mails to them.

    In order to define your audience, create a new remarketing list on GDN and define which website visitors you want to include and which you want to exclude. Don’t worry about cookies and such, because Google will take care of them itself.

    Yet another great idea is to group your blog audience by the posts they read. So, for example, if you have articles on three different topics, create three remarketing lists for each of these topics’ visitors.

    Remarketing-List

    Once you have your remarketing lists set up, you must decide on your audience membership duration. In remarketing, this refers to the number of days you follow a user around. This means that setting your audience membership duration to 30 days will make your site visitors see your ads for, you guessed it, 30 days.

    The problem with deciding on the “right” audience member duration is that there is such a fatigue which results in overly aggressive remarketing. Many experts believe that being too “creepy” with your ads may result in the loss of ROI of your campaigns or can even damage your brand. This is why so many marketers advocate for shortening audience membership duration, even though the reality seems to be different.

    Fortunately, remarketing has shown to be way more effective. In fact, they stay effective even after ad fatigue starts setting in and viewers are more likely to engage with remarketing campaigns.

    This brings us to the fact that being bold with your remarketing is the way to go. Set your audience membership duration for longer time (something like three times your average sale cycle length). Having more impressions means a higher conversion rate and can help you fight ad fatigue.

    Related:Google Retargeting: The Ultimate Guide for 2022

    Email lists

    Prior to Google ads and Facebook ads, emails were the original form of remarketing. With email remarketing, you can take advantage of existing customers who’ve visited your website and email them with targeted offers. By targeting specific segments of customers who have shown interest in your product or service, you can increase the likelihood of success with your campaign.

    For example, you might use an email remarketing list to send out emails to past customers with discounts on flights or hotel stays.

    Another way to use email remarketing is to show ads to people who have already looked at your website. This allows you to broaden the pool of potential customers, while also reducing the cost of running an ad. While email remarketing can be a powerful tool for reaching out-of-the-people, it does require some preparation and maintenance.

    First, you’ll need to create a custom audience that’s carefully selected so that you don’t run into any false positives. Next, make sure that your campaign doesn’t overreach by carefully monitoring performance and experimenting with different tactics until you find the one that works best for you.

    Look at the example of Tarte Cosmetics remarketing email.

    Tarte-Email-Remarketing

    The “Ends Soon” call to action button creates a sense of urgency and persuades the customer to click and reach directly to the meaningful content.

    Email remarketing is the practice of sending out an email to people who have previously expressed interest in your product or service. It’s a great way to reach out to customers who were previously interested in your brand, but may no longer be actively using it. Remarketing allows you to keep them in the loop and possibly re-engage with them. There are two types of remarketing lists:

    1. Remarketing lists for customers who’ve already completed a purchase. These are referred to as Customer Lists.

    2. Remarketing lists for people who have shown interest in your company in some way, but have never purchased from you (yet). These are referred to as Leads Lists. Remarketing is a very effective way to keep in touch with existing customers and generate new ones.

    Related: How to Create an Email Marketing Strategy to Grow Your Business

    Replug

    In addition to GDN and Facebook, you can also use Replug (a platform for link shortening, tracking, optimization, and deep analytics) which is quite valuable for content remarketing. You can use other platforms as well to send personalized messages and ads to your past visitors on the respected platforms.

    Using Replug, you can create a retargeting pixel campaign and add relevant tags to track for any short URL. Here’s a preview of it.

    Retargeting-Pixel-Replug-

    Related:Retargeting Pixel Setup
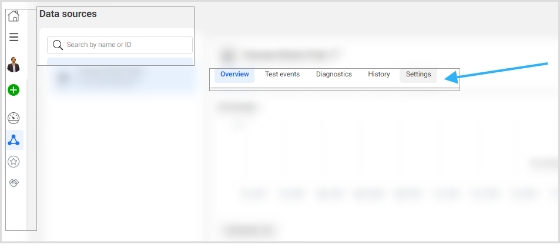
    Content remarketing best practices

    Here are the best practices in content remarketing for you to use:

    Ads that push to “hard” offers: The best way to get your ads working is to promote your best offers. If you have a bestselling product, make an ad for it, because this will make it sell even better and will help you get your other products selling too.

    Conversion path analysis: Do a conversion path analysis and figure out which pages the user usually visits before converting. Once you know what these pages are, target them with your ads.

    Ads that push to content: Your content may be even more important to visitors than your products. This means that it may be better to target an article in your ad rather than promote a product page.

    Social shares on your blog content: Analyze your blog content and see which content gets the most shares to social media. This will give you a general idea of what kind of content people are interested in and you will be able to target your ads at those articles on your blog.

    Email segmentation: Segmenting emails lists depending on specific actions taken by the customer when making the purchase. Depending on the actions, you can send more information and a personalized email using CRM with email marketing software to target specific segments.

    Reengage with inactive subscribers: There are a lot of people that subscribe to emails but remain inactive, reengaging with such potential customers by reminding them at the first place that why they subscribed the email. Adding an CTA within the email can encourage them to complete the journey.

    Below is an example of American Giant who sent an remarketing email to its subscriber by including the product they browsed previously.

    american-giant-remarketing-email

    20 tips for remarketing

    Lastly, to give you more ideas about how to retarget your ads and remarket your content, here are twenty examples from the past:


    1. The right link

    One of the biggest mistakes you can possibly do is sending your customers to the wrong place. Imagine you posted a picture of one product, but linked to another one. The person who clicks on the link wants to see the product in the picture, but once they see something different, they quickly lose interest. Instead of doing this, act like Kelley Blue Book on Twitter – link the corresponding product that is in the image you attach to the post.


    2. Customer buying window

    A common misconception in remarketing is that you have to retarget potential buyers with ads for the product they haven’t bought. In reality, there are many customers who can’t afford certain products and have simply browsed through your catalogue before and viewed these very products. As Rob Weatherhead, the owner of Agent Wolf, says, you must retarget these individuals only for a certain amount of time while their interest is still present. If they don’t convert during this time, it means they either decided not to purchase your product or bought something similar elsewhere.


    3. Separate landing pages

    This is a mistake done not only by those who practice remarketing but also by many experienced marketers. Instead of linking their ads to separate landing pages, they simply link them to the homepage which is a big turnoff for many consumers. Neil Andrew, Marketing Manager at PPC Protect Limited, recommends creating separate landing pages for your ads and always linking to them.


    4. Cheap alternatives

    Philippe Côté-Léger, Marketing Director at Lab Urbain, believes that using Facebook and Google is not mandatory. You can follow suit and make use of cheaper alternatives that can prove to be just as effective as Google and Facebook. For example, a content discovery network like Outbrain offers inexpensive CPC.


    5. Dynamic remarketing ads

    This is one of the simplest yet overlooked tips. Using dynamic remarketing tips is essential for getting the best results.

    For example, Ryan Scollon says that dynamic remarketing ads allow him to show ads with products that customers have viewed before. This makes the ads way more interesting instead of leaving them generic. The only thing to keep in mind when designing dynamic remarketing ads is that your imagery must be on point to capture the attention of your target audience.

    6. Email promotion

    Learning Success Systems has been implementing this technique into their strategy for quite a while now. They match their retargeting campaign with email promotion making it twice as effective. There is no logical explanation for why this works so well, but it has been proven to be successful for many businesses. Perhaps, people remember their emails once they see the ads.
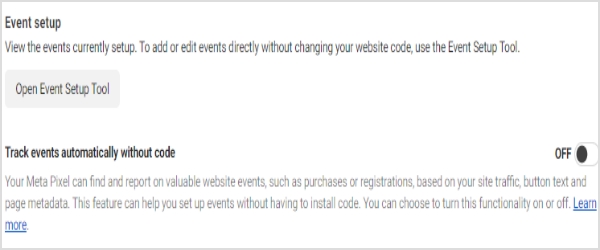

    7. Reviews

    Karen Sahetya, the founder of Brand Central Marketing, says that one of the best ways to build social proof is to use reviews for retargeting and remarketing. Those who viewed your products but didn’t make a purchase are more likely to buy once they see that others have had a positive experience with your brand and with some particular products of yours. It is the equivalent of someone considering buying a car in real life and a friend telling that person about their positive experience with this model.
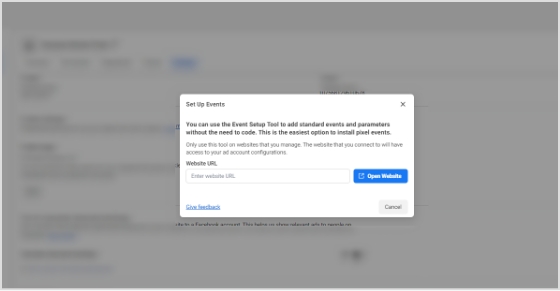

    8. Social proof

    This is very similar to the previous example, but it is still quite different. Let’s look into this practice with the help of Birchbox. They have successfully integrated social proof into their retargeting ads. You can either send those who click on the ads to reviews of your products or include quotes from your past customers about your brand into the ads themselves among other things.


    9. Audience segmenting

    Audience segmenting is crucial for your digital remarketing campaign. Separating your targeted audience into those who have converted and those who haven’t will allow you to show corresponding ads to different individuals. This practice has been proven effective by many businesses that used it and Evoke Strategy LLC in particular. Its co-founder Devon Vocke says that audience segmenting has always helped them make their campaigns more effective.


    10. Best offer

    Displaying your best offer is essential for attracting the most attention. One of the best examples of this is Handy’s home cleaning retargeting banner that appears after a customer views other similar websites with home cleaning services. Making such ads catchy is also very important. They have to have bright colors, a promotional offer, and a call to action that stands out and speaks to the audience.
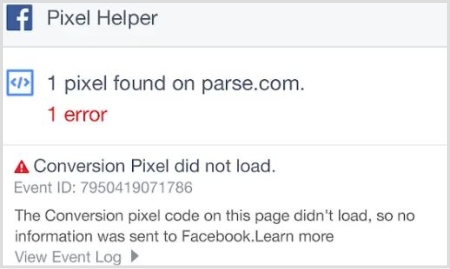
    11. Prioritizing users

    Joe Castro from Elevation says that prioritizing users that are close to completing a purchase is crucial for achieving more conversions. Those who added products to the cart or went as far as to get to the billing stage are more likely to purchase something than those who simply visited your homepage or product pages. Be ready to invest more in targeting the former ones and offer them free shipping or something similar to get them to convert.
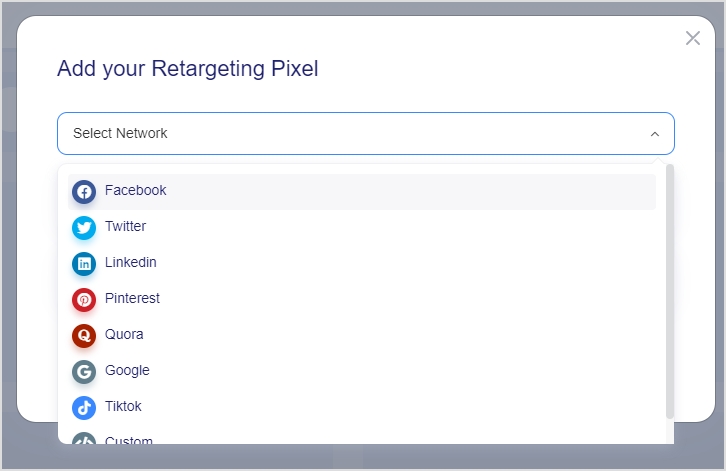
    12. Potential clients over sales

    Instead of focusing on making a sale, nurture potential clients. Take WordStream, for example. The company offered a free assessment instead of a discount for their products. Consequently, many customers let their guard down because they weren’t pressured into purchasing. WordStream offered a service of value related to what their customers wanted based on what their remarketing “sensors” detected. Always think of customers first and sales second.
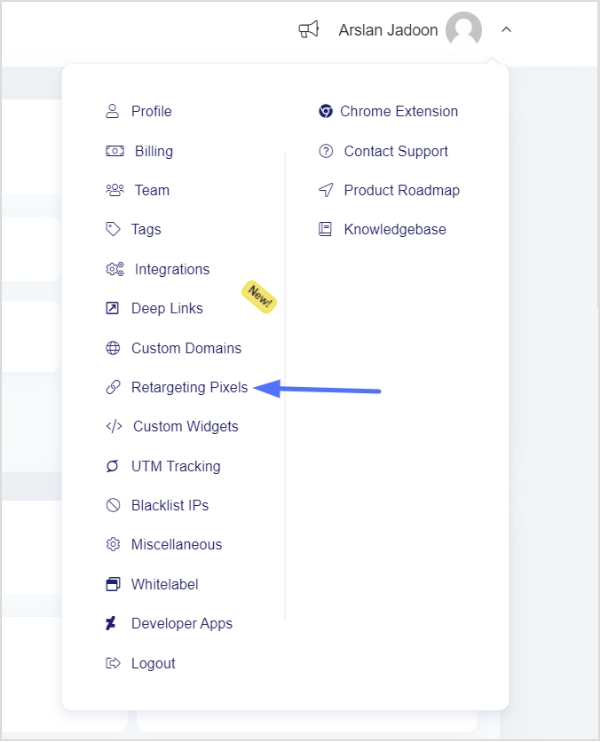
    13. Urgency

    Many marketers know of this simple characteristic that always works. Creating a sense of urgency will motivate your customers to complete the action you want them to faster. For example, Expedia uses urgency in their retargeting ads to prompt users to book travel from their site. Expedia uses irresistible deals with a last-minute offer and this works like a miracle. This is credited to the fear of missing out that most people experience when they see such ads.
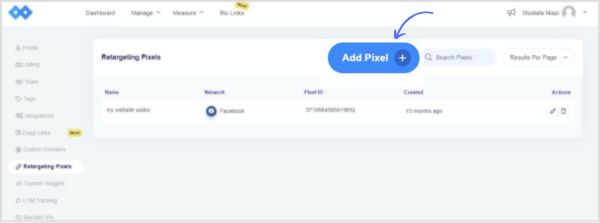
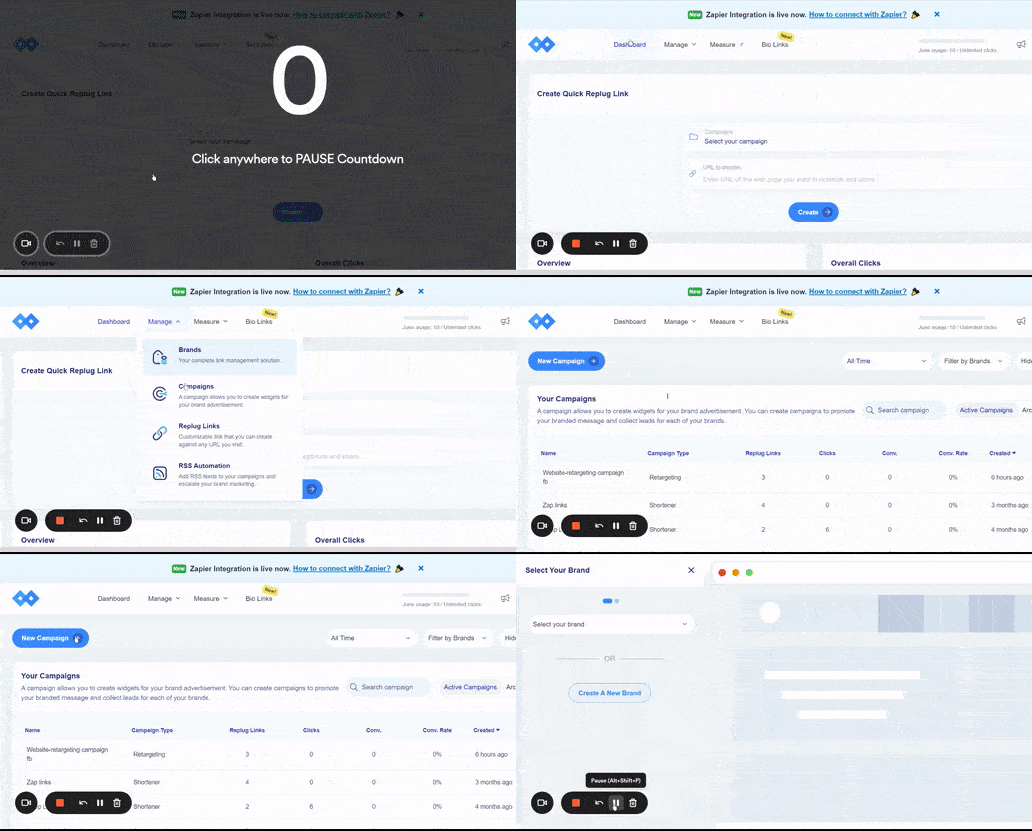
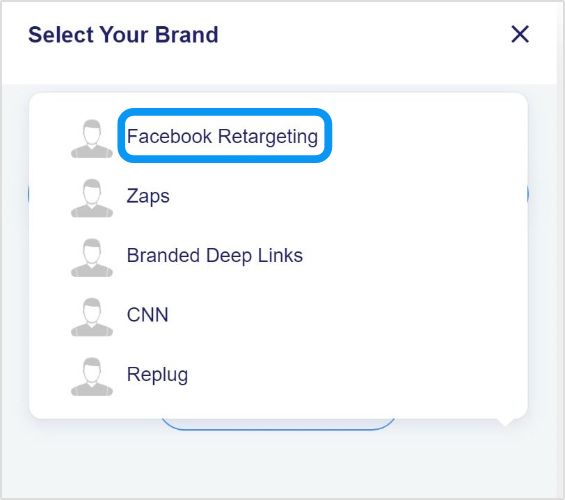
    14. Interesting & relatable
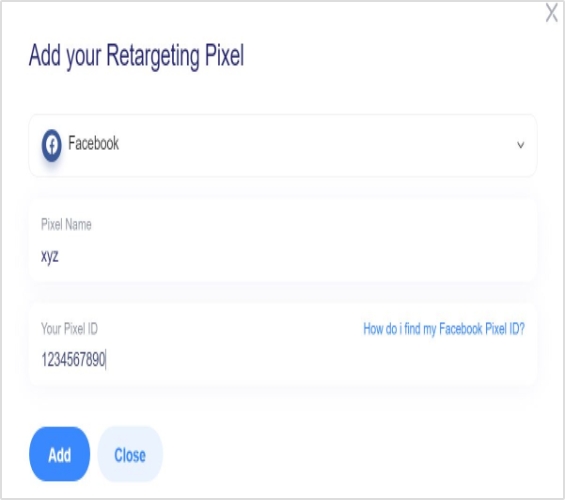
    It has been said before, but it will never be old: make your ads interesting and relatable. There is also a great example of this technique. Mazda and Merchenta worked together to create ads that would attract more potential customers to test drive their cars. Merchenta built customized ads that were based on geographic radius matching individuals to the nearest Mazda dealership. The ads displayed the nearest dealership houses that had the specific Mazda car models that customers viewed online. This, in turn, raised the chances of these people visiting the saloon and test driving the car.


    15. Frequency cap

    Using a frequency cap can prevent overexposure. As Kyna Garrett from Strike Social points out, social media ads are everywhere, so applying a frequency cap can prevent potential customers from being overwhelmed by your ads. In fact, overexposure can be very damaging to your brand, so it is important to determine the right frequency (which is also not that easy). Find the perfect balance by testing different frequencies and then use the one that works best.


    16. Avoid spammy ads

    Patric Kreidler from Power Digital Marketing talks about something very closely related to the previous example. Such ads as pop-ups, countdown ads, ads with sound on autoplay, and so on are seen as spam by many users and usually ignored. Moreover, they often lead to viewers associating them with a bad experience. Obviously, no brand would want that, so avoid using such ads at all costs.


    17. Emotional connection

    It has long been proven that ads that create an emotional connection in viewers are way more powerful than usual ads. For example, Think Engraved uses cute pictures in a combination with cute statements to draw a smile or make the viewer laugh. This draws in potential customers and hooks them onto what else the brand can offer. You can also add an extra something to such ads to make them even more appealing (e.g. a discount or a gift).


    18. Videos & slideshows

    What can be better than visuals that “speak” to the audience? Images are so common that most ads get lost even if they have a stunning design. This is why videos and slideshows are now becoming so popular. However, you must remember to keep your slideshows with no audio and disable autoplay on your videos. Otherwise, they can become annoying.


    19. Relevant sites

    Thomas Budnik from Auto Accessories Garage says that including only those sites that are relevant to your brand will ensure that you don’t waste your money for nothing and target only the relevant audiences. Before letting your remarketing campaign go live, check that only the relevant websites are included or the irrelevant ones excluded.


    20. Content messaging

    Last but not least, Robb Hecht has adopted a social content messaging strategy to help his remarketing efforts. This simply means that you use a special framework that breaks down your ads and serves them to customers at different stages of your sales funnel.

    Bonus Tip: Raising your click-through rates will reduce your click prices. This way, you will be paying for a greater volume of clicks, but they will cost you several times less. Just remember to have image ads rather than text-turned-image ads.


    Final thoughts on content remarketing

    All in all, content remarketing is one of the best techniques to use in your online marketing strategy, and you will definitely get something useful out of it. Make sure to read this article carefully again to refresh your memory about what content remarketing is and how to use it properly.

    Guest blog post by Kristin Savage who nourishes, sparks, and empowers using the magic of a word. Along with pursuing her degree in Creative Writing, Kristin was gaining experience in the publishing industry, with expertise in marketing strategy for publishers and authors. She is a regular contributor to Best Essay Education and WOWgrade.