So you’ve just created an awesome Spotify playlist, and you’re eager to share your musical taste with the world (or maybe just a few friends). Good news – sharing a Spotify playlist is a breeze, and we’re here to walk you through the steps.
Whether you’re jamming on your phone, hanging out on your computer, or even if your friends aren’t Spotify users, we’ve got you covered.
Let’s dive into the simple process of spreading those musical vibes far and wide.
There are three methods to share your Spotify playlist:
Method 1: Using the Spotify mobile app
Method 2: Using the Spotify web player
Method 3: Create a collaborative Spotify playlist
Method 1: Using the Spotify mobile application
Step 1: Launch the Spotify app on your device and make sure you’re logged in to your account.
Step 2: Find the playlist you want to share in your playlists library and open it.
Step 3: On the playlist page, you’ll see three dots (also known as the “More” option). Click on them to reveal a drop-down menu.
Step 4: In the drop-down menu, click on the “Share” option. This will open up the sharing options.
Step 5: You’ll see various options to share the playlist, such as sharing on social media platforms, copying the link, and more.
Step 6: Depending on how you want to share, select the platform. If you choose a social media platform, the Spotify app will likely integrate with that platform’s sharing feature. If you choose “Copy Link,” the link to the playlist will be copied to your clipboard.
Step 7: Follow the prompts to complete the sharing process. If you copied the link, you can paste it into a text message, email, or any other platform where you want to share it.
Note: If you’re inviting collaborators, it’s a good idea to fill out some information first. Select whether to make your playlist public or private, and enter a name, description, and cover art. The first thing you can do is add a few tracks.
Step 3: Click on the “3 vertical dots” then click on “Invite collaborators” to add collaborators to your playlist.
Drive more clicks, conversions, and app installations by deep linking
to your favorite platforms.
Try deep links for free
How to share Spotify playlists using deep links?
Replug’s deep links offer a streamlined way to share content and direct your audience to specific points within apps or websites.
Here’s a step-by-step guide on how to create and use deep links for Spotify playlists using Replug:
Create deep links for Spotify Playlists:
Step 1: Log in to the Replug Application and navigate to the “Replug Links” tab under the “manage” section.
Step 2: Click on the “New Link” button to initiate the process of creating a new link.
Step 3: Here, choose a relevant “campaign” name that helps you categorize and organize your deep links. Then, paste the URL of the playlist you want to create a deep link for into the “URL field.”
Step 4: To enable the Deep Links feature for this link, toggle the state to “on.” If the destination URL is compatible with being used as a Deep Link, an indicator will confirm this.
Note: If the destination URL cannot be used as a Deep Link, a different indicator will be displayed.
Step 5: Once you’ve set up your deep link preferences, click the “save link” button. This action will save your link with the deep linking feature enabled. Your deep link will now be ready for sharing.
By following these steps, you can create powerful deep links using Replug that allow you to direct your audience to specific content within videos and gain insights into how these links are performing. This approach enhances user experience, increases engagement, and provides valuable data for optimizing your content-sharing strategies.
A complete link management solution
for marketing professionals & agencies.
Try Replug for free
FAQs
Can I share my Spotify playlist link directly?
Yes, you can share your Spotify playlist link directly with others. Follow the steps mentioned earlier to generate the playlist link and share it via various platforms.
What are Spotify playlist deep links and how do they work?
Spotify playlist deep links are specialized links that allow you to direct users to a specific song or point within a playlist. When clicked, these links open the Spotify app or web player and take the user directly to the specified song within the playlist.
Are deep links compatible with Spotify playlist sharing?
Yes, deep links can enhance the sharing of Spotify playlists. They allow you to share a link that takes users directly to a specific song within the playlist, providing a seamless and targeted listening experience.
Can I track the performance of my shared Spotify playlist deep links?
Unfortunately, Spotify itself does not offer detailed analytics for tracking the performance of shared deep links. However, using third-party link-tracking tools or services might help you gather insights into link engagement.
How to optimize Spotify playlist sharing using deep links?
To optimize Spotify playlist sharing with deep links, focus on sharing specific songs that resonate with your target audience. Additionally, use descriptive and engaging descriptions when sharing the links on social media or other platforms.
What platforms support Spotify playlist deep links?
Spotify playlist deep links are supported on various platforms, including social media, messaging apps, websites, and more. They allow users to directly access specific songs or points within a playlist, enhancing the listening experience.
Sitemaps are vital roadmaps for search engines like Google. They ensure that every nook and cranny of your website is explored and indexed accurately. Without a sitemap, search engines might miss important pages or content updates.
By providing a clear layout of your website’s structure, you enhance its visibility and accessibility, leading to higher search rankings and better user experiences.
This guide will teach you everything you need to know about understanding, creating, and submitting your sitemaps to Google. Let’s get started!
What is a Sitemap URL?
A sitemap URL is a web address that points to a sitemap.
A sitemap is a list of all the pages on a website. It helps search engines find and index the pages on your website. The sitemap URL is usually in the format of https://www.example.com/sitemap.xml.
When you create a sitemap for your website, you typically save it as an XML (Extensible Markup Language) file. This XML file contains a list of URLs to different pages and sections of your website, along with additional information like when the page was last updated and its importance relative to other pages.
By submitting your Sitemap URL to search engines, you enable them to efficiently crawl and index your website’s content. This helps improve your website’s visibility in search results and ensures that search engines can accurately represent your website to users.
Important note: We are discussing XML sitemaps throughout this guide.
XML Sitemap URL example:
Here’s a simple example of what an XML sitemap might look like:
In this example, each `<url>` element represents a page on the website. The `<loc>` tag contains the URL of the page, `<lastmod>` indicates when the page was last modified, `<changefreq>` specifies how often the page’s content changes (options include “always,” “hourly,” “daily,” “weekly,” “monthly,” “yearly,” and “never”), and `<priority>` indicates the priority of the page relative to other pages (values range from 0.0 to 1.0).
Keep in mind that this is a basic example. Depending on your website’s structure and content, your XML sitemap might include more elements and attributes. Also, the URLs in the example should be replaced with the actual URLs of your website’s pages.
Boost your conversion rates with irresistable CTAs with
To find the Sitemap URL of your website, you can follow these methods:
Check the root domain:
Most websites place their sitemap file at the root of their domain. This means you can access it by adding “/sitemap.xml” to your domain name. For example, http://www.yourwebsite.com/sitemap.xml
Robots.txt file:
Open your website’s robots.txt file. For example, if you want to view the robots.txt file for yourwebsite.com, enter https://www.example.com/robots.txt into the browser’s address bar. This file often contains a line that indicates the location of the sitemap. Look for a line that looks like Sitemap: http://www.yourwebsite.com/sitemap.xml
Google search console:
If you’ve registered your website with Google Search Console, you can find the submitted sitemap URL there. Log in to Google Search Console, select your property, and navigate to the “Sitemaps” section. The sitemap URL should be listed there.
Content management system (CMS):
If you’re using a CMS like WordPress, there might be plugins that generate and manage your sitemap. In some cases, these plugins provide you with the sitemap URL directly in the plugin settings or dashboard.
In WordPress, finding your sitemap URL can be quite straightforward, especially if you’re using popular SEO plugins like Yoast SEO or All in One SEO Pack. Here’s how to find your sitemap URL on WordPress using these plugins:
Using Yoast SEO:
1. Log in to your WordPress dashboard.
2. Navigate to “SEO” in the left-hand menu and click on “General.”
3. Click on the “Features” tab.
4. Look for the “XML Sitemaps” feature and make sure it’s enabled.
5. Once enabled, you can access your sitemap by clicking on the “XML Sitemaps” link that appears.
Using all-in-one SEO pack:
1. Log in to your WordPress dashboard.
2. Go to “All in One SEO” in the left-hand menu.
3. Click on “Feature Manager.”
4. Find “XML Sitemaps” and make sure it’s enabled.
5. After enabling, a new menu item “XML Sitemap” will appear in the All in One SEO menu. Click on it to access your sitemap.
If you’re not using these plugins or want to find your sitemap manually, it’s often located at `http://www.yourwebsite.com/sitemap.xml` (replace “yourwebsite.com” with your actual domain name). However, please note that the actual location of the sitemap might vary based on your website’s setup or theme.
If you’re still having trouble finding your sitemap, consider checking your theme’s documentation or asking your website administrator for assistance.
Submitting a Sitemap URL to Google is an essential step to ensure that your website’s pages are properly indexed and displayed in search results. Here’s a simple guide on how to do it:
Create a Sitemap:
First, ensure you have a sitemap for your website. If you haven’t already, you can create a sitemap using various online tools, plugins, or even manually.
Sign in to Google search console:
If you don’t have a Google Search Console account, you’ll need to create one. Go to the Google Search Console website (search for “Google Search Console”) and sign in using your Google account.
Add your property:
Once logged in, click on the “Add a property” button and enter your website’s URL. Follow the verification process to prove that you’re the owner of the website.
Access the Sitemaps section:
After verifying your property, select your website from the Google Search Console dashboard. In the left-hand menu, click on “Sitemaps” under the “Index” section.
Submit your Sitemap URL:
On the Sitemaps page, you’ll see an “Add a new sitemap” button. Click it and enter just the part of the URL that comes after your domain name. For example, if your sitemap URL is http://www.yourwebsite.com/sitemap.xml, you would enter only /sitemap.xml. Then, click “Submit.”
Check status and errors:
Google will now process your sitemap submission. You can check the status of your submitted sitemap and any potential errors by refreshing the page or checking back later.
Monitor and update:
As your website evolves, it’s a good practice to regularly update your sitemap and resubmit it to Google whenever you add new content or make significant changes.
Remember, submitting a sitemap helps Google crawl and index your website more effectively, which can improve your website’s visibility in search results. If you encounter any issues during the process, Google Search Console provides helpful information and troubleshooting options.
Drive more clicks, conversions, and app installations by deep linking
to your favorite platforms.
Try deep links for free
Can I submit multiple sitemaps for different sections of my website?
Yes, you can submit multiple sitemaps for various sections or content types of your website. This helps Google understand the diverse content your site offers.
What should I do if my sitemap contains errors or broken links?
It’s crucial to fix errors and broken links in your sitemap to ensure proper indexing. Regularly review and update your sitemap to maintain its accuracy.
How often should I update and resubmit my sitemap to Google?
Update and resubmit your sitemap whenever you add new content, make structural changes, or when Google introduces updates that affect indexing.
Do other search engines besides Google also support sitemaps?
Yes, other major search engines like Bing and Yahoo also support sitemaps. Submitting sitemaps to multiple search engines can improve visibility across various platforms.
Picture this: you have a website, and you want to know where your visitors are coming from to improve your strategies. But there’s a tricky kind of traffic called “dark traffic.” It’s like visitors arriving in disguise – you can’t tell where they’re really from. This is a problem because you can’t figure out what’s working or not in your marketing.
Dark traffic happens because sometimes, visitors directly type in your website’s address or use bookmarks. Also, links shared in private messages or some apps can’t be tracked properly. So, even though they’re visiting your site, you don’t know where they’re coming from.
Solving this puzzle is essential. By understanding dark traffic better, you can make your marketing smarter and improve how you reach people.
Let’s dive into the world of dark traffic, learn why it’s a challenge, and find ways to uncover the hidden paths your visitors take to reach your website.
What is dark traffic?
Dark traffic refers to the website or app traffic that is attributed as “direct” traffic in analytics tools, but its true source or origin is not accurately tracked or identified. In other words, it’s traffic that comes to your website or app without clear referral information.
There are several reasons why dark traffic may occur, including:
Direct bookmarks:
Users manually typing in your website’s URL or using a bookmarked link.
Untracked links:
Links shared through private messaging apps or email that are not properly tagged with tracking parameters.
Mobile apps:
Traffic from mobile apps might not pass referral information correctly.
HTTPS to HTTP redirects:
If a user clicks a link on an HTTPS site that redirects to an HTTP site, referral information can be lost.
Social media apps:
Links clicked within social media apps might not always be accurately tracked.
Drive more clicks, conversions, and app installations by deep linking
to your favorite platforms.
Try deep links for free
How to resolve the dark traffic problem?
To deal with dark traffic, consider the following steps:
Implement UTM parameters:
Use UTM parameters in your links whenever you share them online. UTM parameters are tags added to the end of URLs that help track the source, medium, campaign, and other relevant information about the link. This can help you better categorize your traffic and attribute it accurately.
Use analytics tools:
Utilize web analytics tools like Google Analytics or Usermaven to track and analyze your website’s traffic. While these tools may not completely eliminate dark traffic, they can provide insights into trends and patterns that might help you identify sources of direct traffic that should be categorized differently.
Monitor referral sources:
Regularly check your analytics data to identify unexpected spikes in direct traffic. Investigate the source of these spikes to determine if they are the result of dark traffic or if there might be new referral sources that are not being properly tracked.
Educate team members:
Ensure that everyone who shares links on behalf of your organization is aware of the importance of using properly tagged links with UTM parameters.
Improve tagging:
If you’re using social media or other platforms to share links, ensure that these platforms are correctly handling referral information. Some platforms might strip out referral parameters, leading to inaccurate tracking.
Monitor trends:
Keep an eye on traffic patterns and trends. If you notice a consistent pattern of dark traffic from a specific source, it might be worth investigating and finding ways to properly attribute that traffic.
Regularly review and clean data:
Periodically review your analytics data to identify and clean up any discrepancies or misattributions.
While it’s challenging to completely eliminate dark traffic, taking these steps can help you minimize its impact and gain a clearer understanding of your website’s true traffic sources.
Dark traffic scenario
Imagine you’re the owner of a thriving online fashion store, and your website is bustling with activity. You’re excited about the traffic flooding in, but there’s a twist. A significant portion of your website’s visitors fall under the mysterious realm of “dark traffic.”
You log into your analytics dashboard and notice that a substantial chunk of your traffic is labeled as “direct traffic.” This is the category that includes visitors who type in your website’s URL or use bookmarks to access your site. While this is expected to some extent, you suspect that not all direct traffic is as it seems.
You’re aware that social media shares and private messages could be contributing to this direct traffic, but without proper tracking, you can’t pinpoint the exact sources. This puts a wrench in your efforts to measure the effectiveness of your marketing campaigns accurately.
You know that understanding your traffic sources is crucial for making informed decisions. You want to know which campaigns are driving the most visitors and which platforms are performing best. Without proper attribution, your marketing strategies could miss the mark.
Solution: Unmasking the shadows
Armed with the knowledge that dark traffic can skew your insights, you decide to take action:
UTM parameters: You start incorporating UTM parameters into your links whenever you share content. These magic tags allow you to tell Google exactly where the visitors are coming from. Now, whether it’s a link shared on Twitter, in a WhatsApp message, or through email, you’re covered.
Segmentation: You dive into your Google Analytics dashboard and create a segment specifically for direct traffic. This allows you to isolate the dark traffic and understand its impact better.
Page analysis: Navigating to the “All Pages” section, you look for anomalies. Certain pages seem to have unusually high direct traffic. You cross-reference these with your marketing campaigns and recent shares.
Education: You make sure your team is well-versed in using UTM parameters. You emphasize the importance of tagging links correctly to avoid the shadowy realm of dark traffic.
Refinement: Armed with insights from UTM-tagged links, you refine your marketing strategies. You identify which platforms are truly driving traffic and adjust your efforts accordingly.
Continual monitoring: You understand that dark traffic isn’t entirely escapable, but you commit to regular monitoring and adjustments to keep it at bay.
By unveiling the sources of your dark traffic, you’re not only improving your data accuracy but also making more informed decisions about your marketing efforts. The hidden paths are no longer a mystery – you’re shedding light on the shadows and navigating your website’s success with clarity.
Boost your conversion rates with irresistable CTAs with
Dark traffic makes it difficult to understand the true sources of your website’s traffic and the effectiveness of your marketing efforts. Without proper attribution, you might misinterpret the impact of your campaigns.
How does dark traffic happen?
Dark traffic can occur when users manually type in URLs, use bookmarked links or click on links shared through private messages or certain apps. Referral information can be lost in these cases.
What are UTM parameters?
UTM parameters are tags added to the end of URLs to track the source, medium, campaign, and other information about a link. They help in accurately attributing traffic to specific sources.
How can UTM parameters help with dark traffic?
UTM parameters provide a way to tag links shared on different platforms, ensuring that even if the traffic appears as direct, you know its true origin.
What are some common sources of dark traffic?
Direct bookmarks, links shared in private messages, traffic from certain mobile apps, and links clicked within social media apps can contribute to dark traffic.
How can I prevent dark traffic?
To minimize dark traffic, use UTM parameters consistently, educate your team on their importance, and monitor referral sources regularly to identify anomalies.
Can I completely eliminate dark traffic?
It’s challenging to eliminate dark traffic entirely since some direct traffic is legitimate. However, you can take steps to reduce its impact and improve tracking accuracy.
How do I analyze dark traffic in Google Analytics?
Use segmentation to isolate direct traffic. Analyze specific pages that might have unusually high direct traffic. Look for patterns and trends that can indicate the origin of this traffic.
Have you ever noticed a “thank you” page pops up as soon as you complete an online purchase?Sometimes, e-commerce stores recommend products based on your previous purchases or showcase relevant products buyers purchase along with those products.
You might wonder how this happens. Well, the secret behind all this is something called conversion pixels.
I’ll explain the conversion pixels in a jiffy, but let’s discuss the pixels first.
What’s a pixel?
Pixel is a code inserted into a website, mobile app, or email. The purpose behind adding a pixel to a website or any other online real estate is to track a user’s activity.
The pixel observes the user behavior and reports back to the main source. Thus, it opens up a floodgate of opportunities for digital marketers, online businesses, and e-commerce stores to reach out to the same audience through retargeting.
What is retargeting?
Retargeting is an advertising strategy that allows brands and entrepreneurs to remarket the products or services to the audience that has visited their websites or used their apps. All this becomes possible due to the pixel.
Almost all major social media platforms provide pixels for advertisers. It helps marketers track website visitors and better understand how they interact with the products and content.
What’s a conversion pixel?
A conversion pixel is a piece of code placed on e-commerce websites and apps to track the conversions that occur on the websites, sales pages, and emails.
A conversion pixel is crucial to tracking conversions on websites and apps as it reports to the advertiser when a conversion event occurs. Usually, advertisers use conversion pixels to track the sales performances of their marketing campaigns.
Its code is embedded in the “payment successful” or “thank you for the purchase” pages on an e-commerce website.
When the conversion happens, the conversion pixel triggers a signal and the event gets recorded for the advertiser’s record.
If you ever run a Facebook ad campaign for generating sales on your website, the Facebook Pixel is used to track the sales.
Note that a sale isn’t the only conversion metric used by advertisers. In some cases, a successfully generated lead or a downloaded file through an ad is also considered a conversion.
Why use a conversion pixel?
While the primary goal of using a conversion pixel is to keep track of the ad campaign’s performance, there’s more to the story.
Advertisers must know that conversion pixel is imperative to understand the performance of ad units, call-to-actions, and landing pages. Moreover, it doesn’t end here.
Here are four key reasons why to use a conversion pixel:
i. Measure conversion rate
The key benefit of injecting a conversion pixel on your website or landing page is to keep track of your conversion rate, especially after the conversion optimization tactics have been applied. Low or zero conversion is indicative of wrong tactics.
ii. A/B testing Ad strategies
When a conversion pixel is embedded into the website code, it’s pretty clear that the conversions are being closely analyzed. Therefore, it allows advertisers to test out different ad designs, ad copies, and color schemes to see what works the best.
iii. Analyze conversion cost
One of the most underrated metrics is the conversion cost. Some digital marketers pay attention to analyzing the conversion cost, especially if they’re running different marketing campaigns, such as social media advertising and influencer marketing campaigns. It helps them understand which one is outperforming the other one.
iv. Optimize campaigns
When the data of an ad campaign comes up — usually at the end of the campaign — it’s the time to reflect on the situation. Moreover, marketers could optimize campaigns based on the previous ad campaign’s data. This data analysis wouldn’t have been possible without placing the conversion pixel on the site or landing page to track performance.
Use cases for using a conversion pixel
Since conversion pixel provides valuable insights into visitor engagement, it assists brands make data-driven marketing decisions, optimize their digital marketing campaign, and skyrocket the conversion rate.
Here are different areas where marketers can use conversion pixels:
i. Email marketing
Most email marketing softwares have a built-in feature to track the open rate of emails so that users could keep track of their email campaigns’ performances. However, a conversion pixel is also linked with an email campaign to inform the merchant or brand about the action being taken. For instance, users often get confirmation emails when they sign up for a service, it triggers the confirmation signal that a conversion event has occurred.
iii. Online advertising
Running online ad campaigns without any check-and-balance might be a huge mistake. It’s essential to track the performance of an ad campaign. One of the easiest campaign measurement techniques is to place a conversion pixel in the website or landing code.
When advertisers utilize conversion pixels, it assists them track, record, and analyze the output of the ad campaign. As a result, it helps them make informed decisions based on the ROI.
iii. Affiliate marketing
An affiliate marketing campaign would fall flat if there is no conversion tracking available or the conversion pixel isn’t working properly.
The way affiliate marketing works is that an affiliate promotes a product of a merchant and when a web visitor makes a purchase through the affiliate partner’s link, the affiliate earns a commission.
However, the merchant uses the affiliate tracking software to keep track of the affiliate conversions so that the affiliate partners could be paid for their referrals.
iv. E-commerce sales
The most common use case of the conversion pixel is in the e-commerce industry. It assists e-commerce businesses track e-commerce sales.
All they need to do is to place a conversion pixel on their “thank you” or “order confirmation” page to trigger the successful sale signal.
It significantly helps users measure the sales numbers from online ads or any other marketing campaign. More importantly, it’ll give insight into which of the online campaigns or ad platforms are driving the most sales.
v. Track mobile app installations
Startups and mobile app developers can use conversion pixels to track app installs and downloads. Remember to add the conversion pixel to the app download completion page to track the data.
Once it starts working properly, the user can analyze which ad campaigns or marketing channel is driving the most traction.
vi. Lead generation
Lead generation is a process of gathering user details, such as name, phone, and email through a lead magnet or sign-up form.
Businesses and organizations can track the performance of their event registrations landing pages, whether they’re hosting a webinar or a physical event.
Most brands and entrepreneurs use opt-in bribes to generate leads whether it’s access to an email course or a downloadable content.
The conversion pixel comes in handy in lead generation. Without placing a conversion pixel, it won’t be possible to track the conversion of a specific campaign or platform.
For example, if you run a Quora ads campaign, you place Quore Pixel on your website to measure the campaign’s effectiveness.
All they need to do is to paste a conversion pixel, and it will track the performance and effectiveness of the copy, landing page layout design, and ad campaign.
Best conversion tracking tools
Here are some of the best conversion tracking tools to check out:
⦁ Replug
Replug is an all-in-one link management tool that provides a complete toolkit for URL management. The key features include a URL shortener, branded URLs, UTM codes, URL tracking, deep links, retargeting, and more. This tool plays a vital role in setting up a retargeting campaign for brands and advertisers using pixel tracking.
⦁ Optimizely
Optimizely is yet another powerful URL-tracking tool for digital marketers and brands. It assists web developers and digital marketers in analyzing and optimizing landing pages and website content pages. This tool empowers brands and digital marketing agencies to implement visual editing, page optimization, and advanced targeting.
⦁ Google Analytics
Google Analytics is the widely popular website and app analytics tool from the house of the internet tech giant Google. It’s used to collect website visitors’ data, conversion reporting, site traffic sources, bounce rate, page views, and much more.
⦁ Woopra
Woopra is a well-known player in the website conversion optimization genre. It’s a powerful tool that helps users track, analyze, and improve the customer journey. It offers powerful features to empower brands with effective, real-time customer analytics.
How to set up conversion tracking pixel for your website?
Conversion pixels are a must-have tool for measuring the effectiveness of your online advertising efforts and digital marketing campaign.
Let’s shed some light on how to set up a conversion pixel for your website:
1. Create a Conversion Pixel
Most first-timers haven’t had a chance to generate their conversion pixel. So the first step while setting up the conversion pixels is to generate the pixel itself. To do this, marketers need to go to their advertising platforms, such as we have taken Facebook Ads Manager in this case.
If it’s not created before, then select the option to create a new conversion pixel in the conversion tracking area. The process is pretty much the same across all social media ad platforms.
2. Choose a name for the pixel
All you need to do is to choose a name for the pixel and select the type of conversion you want to measure, such as a purchase or lead generation.
3. Generate the pixel code for your website
Once the conversion pixel is generated, grab it for installation on your web or app property. You don’t need to be a website developer to insert this piece of code into your website or application.
4. Add the pixel code to your website
Install your conversion pixel on your website or app by adding it to the source code. If you’re using WordPress, it’s better to use a link insertion plugin.
In some cases, you might have to manually inject the code into the website source. Make sure the code is in the right place on your page, such as the header or footer. Once it’s done, go ahead and connect it with your site.
So this entails adding a short piece of code to the page or website section where conversions are to be tracked. Once the code is added, save the changes and move on to the next step.
Now you can test traffic using Pixel Helper extension.
Setup Facebook conversion API
Click on the “Events Manager” tab in the Business Manager menu.
Click on “Data Sources” in the left-hand menu.
Select or create the event you want to configure for the Conversion API.
Now you have two options
If using Partner Integration, choose the partner and follow the provided instructions.
If using Manual, you’ll need to manually implement the API calls.
Just follow the prescribed steps and you will be done setting up your conversion API. If you still have any confusion, check the detail here..
Conversion tracking using GA4
Two steps for tracking conversions on Google Analytics4.
Create an event for the confirmation page
Mark the event as a conversion
Step 1: Create an event for the confirmation page
Access admin section and choose property:
Begin by accessing the admin section of your analytics tool or platform. Within this section, locate and select your preferred property. For this guide, let’s focus on the “events” property. Navigate to the property options where you can manage and set up events.
Create a new event:
Inside the “events” property settings, you’ll find the option to create a new event. Click on this option to initiate the event creation process. This is where you’ll define the specific event you want to track and analyze.
Enter custom event name:
As part of event creation, you’ll need to provide a unique name for the event. For instance, let’s use the example of tracking a lead generation event. In the “Custom event name” field, input a descriptive name such as “generate_lead.” This name should clearly represent the nature of the event you’re setting up.
Set matching conditions:
Matching conditions help define when the event should be triggered and recorded. In the “Matching conditions” section, you’ll configure these conditions for accurate tracking. Start by entering the first matching condition. For instance, if you want to track an event when a page is viewed, input “event_name equals page_view.”
Add first condition:
After entering the initial matching condition, click on the “Add condition” button. This step confirms the first condition you’ve specified. It’s essential for ensuring the event is only triggered when the specified conditions are met.
Enter second matching condition:
Now, proceed to input the second matching condition. This further refines when the event should be recorded. For the lead generation example, if you want to track a form submission on a specific page, enter “page_location equals https://www.example.com/contact-us-submitted.”
Finalize Event Setup:
After providing both matching conditions, review the details you’ve entered. Make sure the event name and conditions accurately represent the event you’re tracking. This step is crucial for proper data interpretation and analysis.
In the Parameter configuration section, click Add modification twice. Because you are using a recommended event, you need to define each of the required parameters. Otherwise, Google Analytics will treat the event as a custom event.
Step 2: Mark the event as a conversion
To set up a new conversion event in Google Analytics, start by clicking on the “Admin” option from the main menu. This will take you to the administrative section where you can manage various settings for your account.
Ensure that you’re working within the correct Google Analytics account and property. You’ll want to make sure you’re making changes to the right data. In the “Property” column, find and click on the “Conversions” option. This is where you can manage your conversion tracking settings.
Once you’re in the “Conversions” section, you’ll see an option to create a new conversion event. Click on “New conversion event” to initiate the event creation process. This is where you’ll define the specifics of the event you want to track.
Give your new event a descriptive name. For instance, let’s say you’re setting up an event to track lead generation. Enter the name “generate_lead” in the provided field. This name should clearly represent the action or interaction you’re interested in tracking.
Here’s a detailed video of tracking conversion goals in GA4.
That’s it from our side now get started with your conversion tracking process.
FAQs about Conversion Tracking Pixels
Let’s answer some of the frequently asked questions about conversion tracking:
What triggers a conversion pixel?
Any pre-defined action or event that matches the conversion criteria triggers the conversion pixel and ensures that the action or event gets recorded. The conversion pixel is a short piece of code that plays a crucial role in recording a specific event or action.
How do you set conversion pixels?
To set a conversion pixel, create and grab the conversion pixel from the desired social media advertising platform like Facebook ads or Quora ads, and then put it on the website property, such as a landing page or website to start tracking an action or event.
What is pixel-perfect conversion?
Pixel-perfect conversion refers to the process of understanding design principles and front-end development techniques for translating a design into a digital format with absolute precision. The goal is to ensure that the digital version replicates the original design with accuracy and avoids discrepancies in the output.
QR codes are a great way to share information quickly and easily. They can be used to encode various data, including URLs, text, contact information, and more.
To create a QR code, you must choose a QR code generator, enter the information you want to encode, choose a design, download the QR code, and share it.
In this guide, you’ll find out how to create a dynamic QR code quickly and easily.
What is a dynamic QR code?
A dynamic QR code is a QR code that can be updated after it has been created. This is in contrast to a static QR code, which cannot be changed once it has been created. Dynamic QR codes are often used for marketing and advertising purposes, as they allow businesses to track the number of people who have scanned their code and to change the content of the code as needed.
Dynamic QR codes are created using a special type of software that allows the user to enter the desired information that they want to be included in the code. This information can then be changed at any time by simply updating the code in the software.
Dynamic QR codes can be scanned by any QR code reader, and they will typically open a web page or redirect the user to a specific location.
Here’s how to create a dynamic QR code. Follow the step-by-step process below:
Step 1: Choose a QR code generator. There are many free and paid QR code generators available online. In this case, we are using the Beaconstac QR codes.
Step 2: Log in or create an account for free.
Step 3: Choose the type of QR code you want to create. There are two main types of QR codes: static and dynamic. Static QR codes cannot be changed after they are created, while dynamic QR codes can be updated with new information.
Step 4: Click the “+Create” or “Create QR code” button in the top right corner.
Step 5: Choose the information you want to include in your QR code. This can be a URL, text, contact information, or anything else you want people to be able to access when they scan the code.
Step 6: Customize the design of your QR code with colors, logos, and shapes.
Step 7: Download your QR code. Once you have created your QR code, you can download it as an image file.
Step 8: Share your QR code. You can share your QR code online, print it out, or include it in your marketing materials.
Boost your conversion rates with irresistable CTAs with
Important note: A longer URL makes your QR code more complex and difficult to scan. Use our URL shortener tool to shorten long links and download them as QR codes. By doing so, your content will be easier to scan and access.
Note: Replug also provides powerful analytics and tracking features to monitor the performance of your short URLs, and QR codes including click-through rates, geographical data, and other valuable insights.
Static vs Dynamic QR code: What’s the difference?
Static and dynamic QR codes are two types of QR codes that differ in their functionality. Static QR codes are permanent and cannot be changed after they are created.
Dynamic QR codes, on the other hand, can be updated after they are created. This makes dynamic QR codes more versatile than static QR codes, as they can be used for a variety of purposes, such as tracking marketing campaigns or providing access to time-sensitive information.
Here are some of the key differences between static and dynamic QR codes:
Static QR codes are permanent and cannot be changed after they are created. Dynamic QR codes can be updated after they are created.
Static QR codes are typically used for simple tasks, such as directing users to a website or providing contact information. Dynamic QR codes can be used for more complex tasks, such as tracking marketing campaigns or providing access to time-sensitive information.
Static QR codes are typically less expensive to create than dynamic QR codes.
Static QR codes are a good option for simple tasks, such as directing users to a website or providing contact information.
Dynamic QR codes are a good option for more complex tasks, such as tracking marketing campaigns or providing access to time-sensitive information.
Here are some examples of when you might use a static QR code:
To direct users to your website
To provide contact information
To add a product to a shopping cart
Tips for creating a successful QR code:
Ensure the information you encode in your QR code is relevant to your target audience.
Choose a clear and concise design for your QR code.
Share your QR code in places where people are likely to see it and scan it.
Track the results of your QR code campaign to see how well it is performing.
Tired of guesswork in SEO? Embrace the science of SEO split testing!
Discover how small changes to your website’s structure, keywords, and content can have a big impact on search rankings, organic traffic, and user engagement.
Let’s supercharge your website’s organic search results with our SEO split testing guide.
What is SEO Split Testing?
SEO split testing is the process of comparing different versions of web pages to measure their impact on search engine rankings. It’s like a controlled experiment, where you have a variant page with changes and a control page. By tracking the performance of each variant, you can identify the best performing webpage and enhance your website’s visibility in search engines.
The benefits of SEO split testing
Data-driven decision-making: You can make informed decisions based on empirical evidence on the effectiveness of different variations.
Improved user experience: Testing different elements can lead to a better user experience, resulting in higher engagement and improved rankings.
Increased organic traffic: You can attract more organic traffic from search engines by optimizing your website based on test results.
Better conversion rates: Split testing helps identify the most effective strategies to drive conversions.
Adaptation to algorithm changes: It allows you to adjust your SEO strategies in response to algorithm updates.
Stakeholder buy-in: A/B Split test results provide tangible evidence of the impact of SEO efforts.
Why should I split test my SEO strategy?
Below are the benefits of split testing the SEO strategy that might convince you to invest your time in them:
1. Improve Conversion Rates:
Conversion rate optimization (CRO) and SEO are closely related concepts. By split testing your SEO campaign you can increase traffic and conversion rates. You can fine-tune your SEO strategy to enhance user experience and boost conversions by testing various iterations of landing pages and calls-to-action buttons.
2. Optimize SEO Efforts:
By using split-testing, you can compare various iterations of your SEO strategy, including :
Keyword usage
Meta tags/descriptions
On-page optimization
Content organization
This practice allows you to identify which tactic produces the best outcomes. It assists you in determining the best strategies to raise your search engine rankings and increase organic traffic.
3. Keeping up with algorithm changes:
Search engine algorithms are always changing, so what works today might not work tomorrow. Split-testing enables you to modify and polish your SEO approach to conform to algorithm updates. You can make sure your website maintains its search engine optimization and visibility in the constantly shifting environment by being proactive and conducting ongoing testing.
4. Convince stakeholders and quatify Impact:
The impact of SEO can be quantified by measuring key metrics both before and after changes by performing an SEO Split test. This data-driven strategy offers verifiable proof of the efficacy of your SEO strategy, enabling you to convince stakeholders of the value of your optimizations and make wise resource allocation choices.
5. Refine user experience:
Split-testing SEO components can help you improve your website’s overall user experience. By testing various layouts, navigation structures, page load times, and mobile responsiveness, you can find changes that make your website more user-friendly
Factors to consider before performing the SEO Split test?
These several factors must be considered before performing an SEO split test.
Clear objectives: Define clear objectives for your test. What specific aspect of your SEO strategy are you testing?
Testing scope: Determine the scope of your test. Decide whether you’ll be testing a single webpage or multiple pages.
Sample size: Strive for a sample size that provides meaningful insights without being too resource-intensive.
Test duration: Determine the appropriate duration for your test within the time frame of changing dynamics.
Statistical significance: Establish the level of statistical significance you require for your results to be reliable. This helps determine the confidence level you need to make decisions based on the test data.
Choosing the right testing tool: Use a reliable, user-friendly A/B split testing tool with a solid track record.
Consistency in testing conditions: Make sure the testing conditions, such as the user demographics, devices, browsers, and traffic sources, are constant throughout the test.
Segmentation and personalization: Depending on user characteristics, decide whether you want to segment your audience or personalize the variations.
Data collection and analysis: Establish a clear plan for data collection and analysis to derive actionable conclusions.
Documentation and reporting: Document your test process, including the variations tested, metrics measured, and results obtained. This documentation will be valuable for future reference
How do you know if an SEO test is successful?
Keyword rankings:
When it comes to evaluating your SEO results, one important aspect to consider is monitoring your keyword rankings on search engine results pages (SERPs). While rankings should not be the sole focus of your SEO campaign, they provide valuable insights into the performance and effectiveness of your targeted keywords. By regularly checking your rankings, you can track whether they are improving, declining, or remaining stagnant over time. If you find out that you are not ranking for the keywords you targeted, reevaluate whether it is worth continuing to focus on those keywords or considering alternative options.
Organic traffic:
Another way to see whether your SEO test was successful is by analyzing your website’s organic traffic. There are comprehensive tools like Content Studio that help you look for trends and changes in traffic volume, sources, and user behavior. Compare the data before and after implementing SEO strategies to identify any positive impact on organic traffic.
An increase in organic traffic serves as a strong indicator of the effectiveness of your SEO efforts. However, do keep in mind that organic traffic data is more important than overall traffic. It is because factors outside of SEO can influence overall traffic numbers. Conversely, a decrease in organic traffic suggests that your SEO tests are not working.
Backlinks:
Evaluate the quantity and quality of backlinks to your website. Backlinks from reputable and relevant sources can improve your website’s authority and search rankings. When implementing effective SEO practices, it is natural to witness an increase in backlinks. You need to assess whether the number of links and unique domains they originate from is growing, declining, or stagnant. However, quantity alone is not sufficient; the quality of backlinks also holds great importance. Low-quality backlinks can be detrimental to your website’s reputation, similar to having no links at all. Boost your business visibility in local search with professional services from Copify.
Check impressions:
Impressions refer to the number of times your website appears in search results without receiving any clicks. It serves as an initial metric to consider. This is because, when you begin optimizing for keywords, it’s unlikely that you’ll immediately land on the first page of search results.
Starting from lower pages means that even if your website appears in searches, there is a lower chance that it will be clicked. Knowing that you have begun ranking for those keywords will help you keep working toward the top of the page. You can use ‘Social Media Analytics’ by Content Studio to check your organic impressions. If it shows an increase in the number of organic impressions, your SEO tests are working if not better perform the tests again.
Bounce rate:
Another important aspect to consider when evaluating your SEO performance is analyzing the bounce rate of your website. The bounce rate refers to the percentage of visitors who leave your site after viewing only one page. By examining this metric, you can gain insights into how well your SEO tests are working. You should aim to have a lower bounce rate. This means that visitors find value in your content and are more likely to explore multiple pages on your website.
To improve your bounce rate, focus on creating high-quality content that is relevant, informative, and engaging. Ensure that your website is user-friendly, with clear navigation and intuitive design. Additionally, optimize your landing pages to align with the search intent of your target audience, delivering the information or solution they are seeking.
Conversion rates:
Tracking the number of conversions is one technique you can use to gauge the effectiveness of your SEO strategy. Start with form submissions, purchases, sign-ups, and any other desired actions on your website. A rise in conversion rates indicates that your SEO tactics are effectively attracting visitors who are genuinely interested in your offerings. It signifies that your website’s content, user experience, and overall SEO optimization are aligned with the needs and expectations of your target audience.
To calculate the conversion rate, divide the number of conversions by the total number of visitors and multiply it by 100 to get the percentage.
This metric provides a clear indication of how well your website is performing in terms of converting visitors into customers or achieving your desired goals.
A/B Split Testing using Replug
Replug is a comprehensive platform for tracking and URL shortening. It provides many features to help you manage links and improve your marketing. Users can track link performance, shorten and customize URLs, and enhance the user experience.
It allows split A/B testing of various URL variations. By doing this you can determine their effect on click-through rates and overall performance.
Follow the steps given below using Replug and perform A/B split tests.
Once logged in, navigate to the Replug Links page.
Locate and click on the New Link button to initiate the process of creating a new link. Follow the subsequent steps provided to complete the link creation procedure.
Step 2
Before saving the link, activate the A/B Split testing feature by switching on the toggle button. This action will automatically set your destination URL as the initial A/B Testing Link with a weightage of 100%.
To include additional URLs for testing, simply click on the “Add Destination Link” button.
Step 3
You have the flexibility to assign different weights to each URL, as long as the total weightage adds up to 100%.
To simplify the process, you can utilize the “Equalize Weights” button, which automatically distributes the weightage equally among the URLs.
This allows for easy adjustment and optimization of the weight distribution for your A/B testing purposes.
Step 4
After enabling the A/B Testing feature, you are ready to save your branded link. Start engaging your audience by sharing your Replug Link
Now analyze link performance and keep using the best performing one.
Note: It’s important to note that the weightage assigned to each URL is not influenced by previous visits and does not have strict constraints.Whenever the short link is accessed, the final destination URL is selected based on the defined weightage, ensuring a dynamic and varied user experience. However, it’s worth mentioning that if your campaign type is CTA (Call-to-Action) and the specified link does not support iframe functionality, the link cannot be saved for A/B Testing. This limitation is due to the requirement of displaying web page content within another website using iframe. If the source website does not permit iframe inclusion, Replug displays a warning when creating CTA Campaigns.
FAQs
Does A/B Testing hurt SEO?
A/B testing itself does not hurt SEO. It can be a valuable strategy to optimize your website for better search engine rankings. When running A/B tests, it’s important to ensure that the changes you make align with SEO best practices and guidelines provided by search engines. By running tests you can improve your search engine ranking in Google search results.
Most common mistakes to avoid while running SEO split tests
No clear goals/ objectives
Simultaneous testing of multiple variations
Not collecting and analyzing enough data to draw statistically significant conclusions.
Not giving the test enough time to run and produce valid data.
Not documenting and tracking the modifications that were made and their impact on SEO performance.
Ignoring additional outside elements that could affect the test results.
What SEO elements can I test using split testing?
You can test various SEO elements to improve your website’s performance. Some elements you can consider testing include:
Page titles
Meta descriptions
Keyword usage and optimization
Headings and subheadings (H1, H2, etc.)
Content length and formatting
Navigation and site architecture
Calls-to-action
Linking strategies
Image optimization
Mobile responsiveness
URL structure
Site speed
What’s the difference between conducting a split test and an A/B test?
A split test and an A/B test are two different terms used to refer to the same type of experiment. However, the term “split test” is a broader term that encompasses any test where different versions are compared including A/B tests. In other words, it refers to dividing the traffic between multiple variations to measure their impact on key metrics. Whereas an A/B test specifically refers to comparing two versions: a control version (A) and a variant version (B).
Crafting friendly URLs holds utmost importance, as they significantly impact a website’s search engine ranking and overall user experience.
Whether you are a seasoned developer or a beginner, this guide will equip you with the knowledge and best practices to master the art of creating effective and user-friendly URL slugs.
What is a URL?
URL stands for Uniform Resource Locator, which is a web address used to identify and locate resources on the internet. It consists of several components, including the protocol (e.g., “http” or “https”), the domain name (e.g., “example.com” or “example.io”), and the slug (e.g., “keyword”) that identifies a specific resource on the website.
The portion of a URL that follows the domain name and any subdirectories is known as the URL slug. It is a human-readable and user-friendly text used to designate a particular web page. Keywords associated with the page’s content are frequently used in URL slugs, which makes them more descriptive and simple to remember.
URL slugs are vital for SEO. They provide a concise, descriptive, and user-friendly representation of a webpage’s content. This helps search engines and visitors easily understand your pages.
Moreover, including relevant keywords in the slug enhances search engine visibility and improves the user experience by allowing visitors to understand what the page is about before clicking. Well-crafted slugs also contribute to better indexing, readability, and shareability. This further increases the likelihood of attracting organic traffic and earning valuable backlinks from other websites.
Tips for writing SEO-friendly URL slugs
People often think URL slugs are a minor SEO element, but that’s not true. URL Slugs can significantly impact your website’s performance in search engine rankings and user engagement. Creating SEO-friendly URL slugs involves careful consideration of keywords, readability, and user experience. Below are some key actionable tips to help you optimize your URL slugs effectively.
1. Include your keyword in the URL slug
The very first item that comes to mind when discussing SEO is the keyword. In addition to the content, you must include your primary keyword in your URL slugs as well. Slugs are used by search engines to understand the context of your page content. As far as users are concerned, looking at the URL makes it easier for them to identify relevant content.
For example, if your focus keyword is ‘AI Tools for Social Media’, you need to incorporate these keywords in your URL slug, just like ConetntStudio did.
2. Keep them short yet informative
Try to keep your URL slugs short and informative if you want to make them appealing to both users and search engines. Imagine you run a website dedicated to a content curation tool. Instead of having lengthy URL slugs like:
This shorter version conveys the essence of the page’s content while being more user and SEO-friendly.
All that you need to keep in mind is that users are more likely to click on links with concise and relevant URLs, as they can quickly grasp the page’s content before visiting it. Moreover, shareability improves when URLs are shorter, making it easier for people to share your content on other platforms.
3. Use hyphens, not underscores, to separate words
Prioritize the use of hyphens instead of underscores. Hyphens serve as clear word separators that enhance the visual appeal and readability of your URLs. Search engines recognize hyphens as natural dividers between words. This enables them to interpret the content more accurately.
Visibly, the first version presents a tidy and simple URL that users and search engines can process without difficulty. The second version with underscores, on the other hand, seems cluttered and less user-friendly.
4. Make them lowercase
To ensure consistency and avoid problems with duplicate content, always use lowercase letters. Instead of something like “What-Are-Ctas-In-Marketing,” “what-are-ctas-in-marketing” is preferred. URLs are handled case-sensitively by search engines.
This means that “what-are-ctas-in-marketing” and “What-Are-Ctas-In-Marketing” are treated as two separate URLs. This might result in issues with duplicate content and weaken your website’s SEO efforts. Moreover, mixed-case URLs can make it more difficult for users to remember or share them correctly.
5. Keep it evergreen
Use content that will remain relevant and valuable over time when creating URL slugs. More precisely, avoid incorporating time-sensitive details such as specific years or dates in your URL slugs.
❌
✅
Evergreen slugs help improve SEO results because search engines value content that holds its value over an extended period. You can prevent potential broken links and maintain the SEO authority that has developed over time by getting rid of time-sensitive elements from your slugs. This eliminates the need to update URLs with each passing year.
6. Use 1 domain and 1 subdomain
Maintain a clean URL structure by sticking to one primary domain and a minimal number of subdomains. This approach consolidates your website’s authority and prevents content fragmentation. Opt for “blog.example.com” instead of “example.com/blog.”
Moreover, a consolidated URL structure simplifies your website’s maintenance and improves link equity distribution. You avoid the risk of diluting SEO authority across multiple subdomains, ensuring that your primary domain gains maximum value from incoming links.
Source: SEO Sherpa
You can use subfolders instead of subdomains. Subfolders within the main domain consolidate link equity, making the website more authoritative and easier to rank. Many case studies have shown significant traffic increases when moving content from subdomains to subfolders.
Source: Andy Chadwick’s Twitter account (X) Tweet
Source: Stephen Kenw Chadwick’s Twitter account (X) tweet
7. Update old slugs but be careful
Always make sure the right redirects are set up when changing a slug to prevent broken links and maintain the SEO authority from the previous URL.
Because sudden changes can result in broken links and have a negative effect on user experience and search engine rankings, managing URL changes requires careful planning. You can smoothly direct users and search engines to the new URL while transferring the SEO value accrued by the old slug by implementing 301 redirects.
Your website will continue to be user-friendly and search engine optimized if outdated slugs are strategically updated. Furthermore, it aids in maintaining backlinks and search engine rankings while ensuring a steady flow of organic traffic to your updated content.
8. Match slugs to headlines
To further emphasize the relevance of your content, you must ensure that your URL slugs and page headlines are consistent. Both users and search engines will have an easier time understanding the purpose of your page if you align both elements.
This practice assists search engines in associating your content’s main topic with the URL, potentially improving your website’s ranking for relevant search queries. Additionally, users are more likely to click on links that display a clear correlation between the headline and URL, enhancing their browsing experience.
9. Use fewer page categories
Keep your URL slug structure simple by keeping the number of categories to a minimum and avoid keyword stuffing. Slugs that are clear and uncomplicated make it simpler for users to navigate your website and for search engines to comprehend your content.
Let’s take a look at a social media analytics tool web page. Rather than using a long and confusing URL, they chose a short and descriptive URL slug:
This direct method keeps things crystal clear.
10. Opt for HTTP protocol
Secure your website using HTTPS instead of HTTP because search engines prefer secure sites. HTTPS encrypts data exchanged between users and your website. In other words, it allows you to protect sensitive information from potential online threats.
This added layer of security instills confidence in your visitors and encourages them to engage with your content or even make transactions without fear of data breaches. It’s the padlock icon in their browser’s address bar that makes them believe that their connection is secure. This builds their trust in your brand, leading to increased user engagement, longer browsing sessions, and conversions.
Find a memorable domain name and pair it with a relevant URL slug. By doing this, you can enhance your band’s recognition and reinforce your website’s theme.
The combination in the picture above exemplifies how a cohesive URL structure can align with your brand’s identity.
When users encounter a radio domain name that resonates with their interests, such as “contentstudio.io,” they are more likely to remember and revisit your website. This instant recall plays a significant role in building a loyal audience base.
Adding a relevant URL slug like “/content-marketing” further enhances user engagement. It communicates the content focus, guiding visitors to the specific section they are interested in. This targeted approach saves users time and effort, fostering a positive user experience.
6 major mistakes to avoid while creating URL Slugs
As discussed before, URL slugs play an important role in enhancing your website’s SEO and user experience. However, there are common mistakes that can impact your website’s performance and rankings. Below are six major mistakes that you need to avoid when crafting URL slugs for your web pages.
1. Avoid stop words
Common words like “and,” “the,” “of,” “a”, etc. are stop words and they add very little to the meaning of a URL. Avoid using them in your slugs because doing so will lengthen them and make them less readable. For example:
The use of specific dates in URL slugs can result in out-of-date content and affect SEO. Rather than
“/product-launch-2023,”
use
“/latest-product-launch”
or
“/new-product-release.”
In this manner, you can avoid updating your URLs annually and ensure their continued relevance.
The biggest issue is that when you need to change the date from 2023 to 2024, you need to change the slug and redirect the old URL to the new one. This process can be time-consuming and may lead to broken links if not handled correctly.
Moreover, these URL redirects can be suboptimal. They may result in less link juice passing through to the destination URLs. This means that the SEO value of your old URL might not fully transfer to the new one. By leaving out numbers and using descriptive slugs, you avoid the need for frequent redirects and maintain a consistent flow of link equity to your content.
3. Avoid using special characters
Including special characters like question marks, exclamation marks, or dollar signs can cause issues with URL encoding in your slugs. Certain characters are replaced with encoded strings, making the URL less readable. Furthermore, some special characters may not be universally supported by all browsers and platforms, potentially causing compatibility issues for some users.
You can use hyphens to separate words in your slugs. Hyphens are considered word separators, providing better readability for search engines and users alike. Hyphen-separated slugs contribute to a cleaner and more professional appearance for your URLs.
4. Avoid trailing slash issues
Adding a trailing slash at the end of a URL can inadvertently create duplicate content problems for your website. Confusion and a negative effect on SEO may result from search engines treating URLs with and without the trailing slash as separate pages. Maintaining consistency in your URL structure is essential for mitigating this problem.
You can guarantee that users and search engines always access the preferred version of your content by consistently using one format for your URLs and implementing the appropriate redirects.
Making changes to your URL structure or slugs is a common practice, but it’s critical to handle these changes carefully to avoid broken links and maintain a consistent user experience. Setting up 301 redirects from the old URLs to the new ones is essential when changing a URL.
Users who are trying to access your content may become frustrated if you neglect to implement proper redirects. Broken links not only have a bad effect on the user experience, but they also give the wrong impression to search engines, which could lower the ranking of your website.
6. Avoid ranking cannibalization
Ranking cannibalization is a phenomenon where multiple pages on your website vie for the same keyword. As a result, there is internal competition in the search results. Concentrate on making sure that each URL slug targets a different and specific keyword or topic to prevent ranking cannibalization. Conduct keyword research and use different variations for each page.
You can improve each page’s content’s clarity and relevance in the eyes of search engines by allocating unique URL slugs to particular keywords or topics. This enables search algorithms to better understand the purpose and intent of your pages, leading to improved rankings for relevant search queries.
How to optimize URL slugs?
Your links will be easier to read, remember, and navigate with a well-optimized URL slug, which will increase click-through rates and engagement. This section will examine URL slug optimization using a practical example and the Replug Shortener campaign.
You’ll land on a dashboard. Create your brand here by clicking on the ‘New Brand’ button.
Step 3
Click on ‘Manage’ and select ‘Campaigns’ from the drop-down menu and fill in details to create your campaign.
Step 4
Once you’re done creating your campaign, select ‘Replug Links’ from the drop-down menu to optimize your long URL slug.
Step 5
Copy or edit the new link to your preference, select Update, and you’re done in steps 1 through 5.
How to change your slug in WordPress?
WordPress is known for its user-friendly interface and flexibility, making it a popular choice for website development. Changing a URL slug in WordPress is a simple process that can be done within the platform’s settings by following the steps below.
Step 1
Before starting you must ensure that your permalink structure allows for user-friendly URL slugs. Navigate to “Settings” and then to “Permalinks.”
You can choose one of the standard permalink structure types or create your own. However, it is recommended to use the”Post name” structure.
Step 2
Open the editor of the post or webpage and look for the “URL” section in the rightmost panel. Click on the automatically generated slug and edit it the way you want to. That’s it.
The strengthening of your website’s search engine optimization is one of the main advantages of using SEO-friendly URL slugs. Search engines can learn a lot about the content of your page when you use relevant keywords in the URL slugs of your URLs. The ability of the search engine to index and rank your pages for pertinent search queries is subsequently improved.
2. Increase shareability
Concise, descriptive, and simple-to-remember URL slugs are more likely to be shared on various platforms. Users are more likely to share valuable content with their friends, coworkers, or social media networks when the URLs are simple and clear.
When the reader comes across your URL, which is to the point (has the focus keyword), they can easily copy and paste the URL. The user-friendly and shareable URL slug allows others to access the same content quickly and effortlessly.
3. Enhance click-through rates
An SEO-optimized URL slug can also improve click-through rates (CTR) from search engine results pages (SERPs). When users see a relevant and well-structured URL slug that matches their search intent, they are more likely to click on the link, expecting it to lead to content that aligns with their needs. The user-friendly and keyword-rich URL slug assures the user that the page contains the desired information, thus increasing the likelihood of a click.
Let’s say someone is searching for “best smartphone deals”. He’ll click on a URL with a slug like “/best-smartphone-deals” rather than a generic one like “/products/abc123.”
Concluding remarks
URL slugs play a pivotal role in the world of Search Engine Optimization (SEO). These user-friendly, descriptive segments of URLs not only enhance the overall user experience but also significantly impact a website’s search engine ranking and visibility.
Optimize URL slugs with relevant keywords, using hyphens as separators, and keep them concise. In this way, you can signal search engines about your content’s focus and improve your chances of ranking higher in search results.
FAQs on URL Slugs
Why is it called a URL slug?
It’s called a URL slug due to its historical resemblance to the slimy, segmented part of a slug, reflecting its compact and descriptive nature in a URL.
What is permalink vs slug?
A permalink is the full URL of a webpage, while a slug is the portion of the permalink that represents the page’s content.
What is the URL slug parameter?
The URL slug parameter is the user-friendly, human-readable portion of a URL that identifies a specific page’s content.
Smart URLs, also known as dynamic URLs, are generated automatically based on a set of rules. This contrasts static URLs, which are manually created and do not change. Smart URLs can be used to improve the user experience, track website traffic, and improve search engine optimization.
Smart URLs can be valuable for businesses of all sizes.
They can help businesses to:
Improve the user experience by making it easier for users to find the information they are looking for.
Track website traffic and see how users are interacting with the website.
Improve search engine optimization and make it easier for websites to rank higher in search engine results pages (SERPs).
Before using smart URLs, consider:
Make sure that the rules for generating smart URLs are clear and easy to understand.
Use a consistent naming convention for smart URLs.
To create a smart URL link, you can use a URL shortener service such as our Replug. Replug allows you to create short, easy-to-remember links for long URLs. When you create a smart URL link, you can also add keywords and other information to it. This can help people find your link more easily when they are searching for information online.
Here’s how to create a smart URL link using Replug:
Make sure that the link is easy to remember and type.
Use keywords in the URL slug so that people can find it easily when they are searching for information online.
Keep the link short so that it is easy to share.
Track the number of clicks on your link to know how it’s performing.
Maximize marketing ROI
by transforming ordinary URLs into branded short links that convert.
Try Replug for free
Replug link analytics: Track your link’s performance
Replug empowers you to unleash the true potential of your links by providing a comprehensive suite of analytics.
No more flying blind – with Replug’s data-driven insights, you can make informed decisions that amplify your marketing efforts.
Picture this: a dashboard that paints a vivid picture of your link’s journey across the web.
From the number of clicks and unique visitors to geographical data, referral sources, and even the devices your audience prefers – it’s all there at your fingertips.
A smart URL is a short, descriptive URL that is easy to remember and share. It is also more likely to be clicked on than a long, complex URL. Smart URLs are often used for marketing and advertising purposes, as they can help to increase website traffic and brand awareness.
What is the difference between hyperlinks and smart links?
Hyperlinks are simply links that point to another web page. They are typically used to provide additional information or to direct users to a related resource.
Smart links, on the other hand, are more sophisticated. They can be used to track user behavior, personalize content, and even trigger actions.
Are smart links safe?
The safety of smart links depends on the platform or service that generates them. Some smart links are designed to track users and collect data, while others are simply a way to shorten long URLs. It is important to be aware of the risks associated with any smart link before clicking on it.
If you think the clash between Musk and Zuckerberg has cooled down, you’re wrong, as the show has just begun with the launch of Instagram Threads.
Now, we’re guessing you’re here because exploring Threads has left you exhausted. Or you may be curious to discover its hidden features!
Don’t worry; we wrote this handy guide to help you get started. Discover new features, and develop your account in no time.
First, let’s begin by defining Threads, discovering its hidden characteristics, its future, and comparing it with Twitter.
What is Threads?
Threads is a text-based social app launched by Mark Zuckerberg in integration with Instagram on the 5th of July, 2023.
Over 100 million people have signed up on the app so far. However, the total number of active users is undefined yet. With Threads, users can create, share or repost multiple types of content, such as short-term texts, images, videos, URLs, etc.
Moreover, the new software is tied to Instagram, so users can automatically be able to connect with all the people they follow on Instagram.
How to use Instagram Threads?
Threads offer a variety of popular features that are currently trending in the realm of social media. And have a very user-friendly interface.
However, some of you may be experiencing challenges when trying to sign up for your Threads accounts or when attempting to post a Thread.
Allow me to assist you here.
How do I sign up?
You can sign up directly from your Instagram account. The software will automatically fetch all your data from Instagram, such as your name, username, login credentials, block lists, followers, etc. Additionally, the app can be downloaded for free on iOS and Android devices in over a hundred nations.
Is Threads linked with Instagram?
Yes, Threads is fully integrated with Instagram. It’s like having a mini social network within Instagram.
I don’t have an Instagram account; can I still use Threads?
Currently, the only way to join Threads is through your Instagram account. So, if you want to sign up on the app, you must have an Instagram account first.
Is it safe to use Instagram threads?
One of the most important aspects of any social media platform is privacy, and Threads doesn’t disappoint in this regard. Just like Instagram, this app offers a range of privacy features that allow you to have control over your interactions. For instance, you have the power to block or report any user who may be causing you discomfort or violating your privacy.
You may have seen standard thread features like sharing text-based messages, images, video visuals, or reposting your threads post. But below are some hidden features on threads you may not know;
1. Managing replies
When you post a thread, a dialogue box will appear on your keyboard in the reply section. When you press that button, a menu with three choices will appear. Choose the one which suits you.
2. Modified shortcut
If you press return three times, a new thread shortcut will be created immediately, just below the last thread you posted.
3. Fast open the search bar
If you long-press the search icon. It brings up the search bar and pulls up the keyboard alongside. Or you can double-tap on the search tab to search.
4. Quick account following
To quickly follow an account, simply tap the Profile Icon on the user’s profile.
5. Mute a profile without unfollowing
If you don’t want to see threads from a specific user again. You can mute the user profile by tapping the three dots on the extreme right section of the profile that you want to mute.
Now just tap Mute and the selected user will be muted
Note: You’d still be following the user, but none of their Threads will show up in your feed until you unmute him.
6. Time limits option
Go to your profile by tapping the Profile icon at the bottom corner of the Threads feed
On the top right corner, tap on the right horizontal bars similar to the Hamburger Icon to navigate to the settings menu
Tap on Account
Tap on Take a break
Set the reminder as per your necessity, i.e. from every 10 minutes to 30 minutes
Now the app will remind you to take a break every 10 to 30 minutes after use.
Note: The earlier issues with the app have been resolved. The app now runs smoothly on iOS 17. Also, users can facepile, pill polish, expand pictures on profiles, make extra tall photos that are now fully viewable, trim the binary size, etc. However, Meta is still working on new features, such as following feeds, hashtags, editing posts, post search, web presence, like lists, translations, and many more.
Limitations in the Threads app
But even with all these perks, users are experiencing some limitations listed below.
If someone replies to your thread and you delete the Thread later on, that person’s reply will not be removed.
You can only post a thread text of up to 500 characters.
You won’t be able to view a response to your thread if it comes from a private profile you don’t follow.
Thread feeds show you a mix of posts from people you follow and posts suggested by AI.
You cannot send direct messages to other users.
Currently, no web version of the Threads service is available.
You can only post up to 10 media items (visuals such as images, videos, gifs, etc).
What does Adam Mosseri have to say about Instagram Threads?
There are a lot of rumors and chatter of forthcoming modifications going about the app right now. Such as how Meta will modify Threads. What will happen to Twitter? Is Threads for politics and business? etc.
Adam Mosseri says Threads is for public conversation, not business or politics.
He says in a statement that
“Politics and hard news are important, I don’t want to imply otherwise,”
Further, he says,
“But my take is, from a platform’s perspective, any incremental engagement or revenue they might drive is not at all worth the scrutiny, negativity (let’s be honest), or integrity risks that come along with them.”
After that, users were confused about what to put on Threads and how to develop a network on that platform.
In response to this, Mosseri said…
What are the key differences between Twitter and Threads?
Below are the key differences between Twitter and Threads;
You won’t hear anyone calling Instagram Threads the “Twitter Killer” other than Twitter itself.
In contrast to Twitter’s public, real-time, and open character, Threads provides a platform for private chatting and exchanging information with close pals.
Twitter is widely used because of its general nature, rapid news publication, and accessibility. So, both systems can coexist, with users taking advantage of each for interaction and content creation.
Elon’s rage against Instagram Threads
Musk has threatened to file a lawsuit against the platform(Threads), accusing it of recruiting former employees to work on a ‘copycat’ software to compete with Musk’s original company.
Musk tweeted,
“Competition is fine, cheating is not.”
Twitter lawyer Alex Spiro wrote in a letter:
‘Twitter has serious concerns that Meta Platforms (Threads’) has engaged in systematic, willful, and unlawful misappropriation of Twitter’s trade secrets and other intellectual property.
However, Meta has denied the claims, stating that no current or former Twitter workers are working within the Threads team.
“very optimistic about how the Threads community is coming together.
Competition between the two has become fierce. With Elon Musk rebranding Twitter’s bird logo with “X”. Musk has also repurchased its”X.com” domain (i.e. now redirected to Twitter’s original domain). This shows the intensity will only rise between the two platforms going forward.
The Threads app has already seen 70% decline in its daily active users. While many of the Twitter (now X) users are hating the rebranding of the Twitter app. However, Threads is in its new stages, while Twitter is going through some drastic branding changes, so only time will tell who is going to win this battle.
FAQs
How do you delete your Threads account?
You can delete your account on Threads; however, to do so, you will also need to erase your account on Instagram. After getting complaints from end-users over this issue, Mosseri announced that the organization is “looking into a way to delete your Threads account separately.“
What is the difference between Threads and Instagram?
Threads is a social media app primarily using texts, while Instagram focuses on multimedia content, particularly visuals.
What can you do on Instagram Threads?
You can actively share images, videos, and text updates on Instagram Threads and effortlessly share real-time updates with your close contacts.
Are there any well-known people posting on the Threads?
On Threads, there are a lot of well-known names, like Selena Gomez, who has more than 5.1 million followers. Kim Kardashian has more than 5 million followers; Mr. Beast has more than 4.6 million followers; and many other famous people.
Digital marketers, SEOs, and affiliate bloggers play around with links all the time. Sometimes, these experts use short URLs, masked URLs, or redirect URLs. Different link management strategies are used to achieve desired results.
If you’re into affiliate marketing, you must have come across link cloaking. It’s also known as URL masking.
If you’re curious about URL masking or why it’s important to understand or who should be using this link management technique, then stick around.
What Does it Mean to Mask a URL?
URL masking is a process of altering the appearance of the URL without changing the destination URL. When a URL is masked, it may appear different on the outside, but it takes the visitor to the pre-defined destination.
URL redirection has an important role in the URL masking process. The redirection helps website owners and bloggers to allow URL masking to work. I’ll shed some light on the URL redirects in a second.
There are several other use cases of URL masking that you’ll witness going forward.
One of the reasons why marketers and SEOs mask URLs is to beautify the look of the URLs, especially if they want to promote content on social media or email newsletters.
Most bloggers and affiliate marketers cloak affiliate links to hide the hideous affiliate links and mask them with their short, beautiful links to increase CTR and engagement.
What are URL Redirects?
URL redirects are traffic forwarding parameters to direct the visitors and bots toward the destination URL. The purpose of setting up redirects is to push the visitors or bots in the right direction.
Sometimes, a company rebrands itself into a new name and pushes the website traffic toward the new domain. This is where the URL redirection comes in handy.
Moreover, a permanent redirect is also used to tell the search engine bots that a page or website has moved to a new URL.
URL redirection is extremely helpful in blogging, affiliate marketing, and SEO. Therefore, it’s vital to understand how it works and the difference between different types of redirects.
When to Mask a URL?
Now you know how URL masking works and why it’s important. So let’s discuss when to apply URL masking.
Here are different scenarios where URL masking would be helpful:
Inserting affiliate links: Most affiliate experts mask URLs when they have to promote affiliate products on their blogs. They use a URL masker so that their affiliate links look more natural and non-spammy.
Dealing with long URLs: We’ve established the fact that long and clunky URLs don’t appeal to website visitors due to their spammy and sketchy appearance. Therefore, marketers and bloggers mask such URLs when they have to deal with long product URLs or affiliate offer links.
Hiding free web hosting URLs: A lot of beginners prefer free web hosting and free sub-domains for launching their websites or blogs. However, most of them try to hide those free sub-domains through link shortening or URL masking. For instance, blogger.com and wordpress.com provide free sub-domain and web hosting for setting up free blogs.
Increasing tracking parameters: Whenever a brand wants to keep track of its links’ performance, they have to add certain tracking parameters to the URLs in question. Therefore, it’s necessary for them to insert additional tracking parameters using a URL tracker to make it happen.
These were some of the situations where users might want to consider masking the URLs so that they could benefit from this link management strategy.
Advantages of URL Masking
Here are some perks of using a URL masking tool:
i. Security
A lot of companies try to hide their sensitive information or deny the accessibility to sensitive files to maintain security. Data theft, malware transfers, and code injections are a few of the challenges websites, blogs, and e-commerce sites have to be aware of to survive.
So this is why it’s important to understand and implement URL masking when or where it’s inevitable. You can also apply data masking in Salesforce to manage customer data, especially during sandbox testing or internal reviews, where exposing real records could pose risks.
They say the first impression is the last impression. You might not want website visitors to feel overwhelmed when looking at your links. URL masking may help improve your links’ appearance to some degree.
Social media influencers, bloggers, and affiliate marketers strive to position themselves as genuine, authentic, and real.
However, when they come across awkward, untrustworthy links to publish on their sites or social media, they fashion something to make those links look better.
URL masking helps marketers and brands create short, user-friendly links that don’t look sketchy at all. And that’s a huge advantage of link cloaking.
As a result, most influencers and creators with massive followers base use short links to promote the products or sell their own products.
iii. Hide unnecessarily long destination URL
One of the benefits of using any URL masker is to hide long destination URLs. These long URLs might not necessarily be affiliate links or e-commerce product links. Sometimes, website pages or blog posts have relatively longer URLs that don’t look very nice.
Have you ever come across a social post that has a long URL as a call-to-action?
I’m sure we have all seen something like that on social media or SMS. The point is that nobody would ever click on such a link.
Brands, marketers, and affiliate bloggers need short and trackable URLs. The reason is that these experts know that readers despise long links in the article or social media posts etc.
URL masking provides these professional marketers and bloggers with a shield to get away with this.
This way, brands, websites, and bloggers can get more engagement and clickability on their websites. Here’s an example of Coca Cola’s URL branding example.
iv. Adds the ability to track link performance
It’s impossible to grow an online business or blog without a proper website tracking and reporting system. One of the benefits of URL masking is that it allows users to track the clickability of the shortened links. Thus, it helps in determining the conversion rate of a website or blog.
Website tracking assists website owners to analyze content performance, user engagement, and conversion rate. Links are added to the content or social posts so that readers click them while going through the content.
It’ll be a shame if clicks are happening, but there is no click tracking in place to analyze the links’ performance.
It’s safe to say that link performance tracking is crucial to establishing a successful link management strategy whether you’re managing social media channels or running an email marketing campaign.
URL masking does help marketers and affiliate bloggers to track link performance across different platforms.
v. Improves click-through rate on affiliate links
An affiliate marketing campaign has numerous aspects that make conversion happen. The affiliate offers on a blog don’t convert just because they have been added.
In fact, the conversion happens because readers need the solution or they trust the author or the recommendation makes sense.
URL masking does have a huge impact on the click-through rate of any brand or website. You must have known by now that readers find it hard to click on an untrustworthy link.
While some readers chicken out when they aren’t sure about the link they’re supposed to click, others leave it to decide later.
I have personally been using link-cloaking tools to hide the affiliate offers on my blogs because I don’t to showcase my unpretty links.
On the flip side, adding short URLs to your blogging system dramatically improves the click-through rate on your website.
vi. Branding
Branding isn’t just about the name, logo, and colors – it’s a wholesome package that shapes how a brand is perceived by the audience. Links are an essential part of the branding composition. Pay close attention to your links from the branding perspective. No wonder a lot of brands use short custom domains for URL shortening.
URL masking & URL branding is quite common in digital marketing and affiliate marketing areas. Publishers, bloggers, and affiliate marketers try to mask affiliate or lengthy URLs to make the user experience as smooth as possible.
Perhaps, long and bulky URLs scare readers off. Therefore, it’s necessary to make your links look beautiful and catchy with your branded keywords.
A complete link management solution
for marketing professionals & agencies.
Try Replug for free
How Do I Create a Masked URL?
You don’t have to be a website developer need to create a masked URL. In fact, it’s not that difficult, considering you have access to the right tools for the job.
Speaking of the tools, I’ll be sharing how you can do URL masking using a URL shortener. Let me tell you a little bit about this URL shortener.
It is an all-in-one URL shortening tool that provides digital marketers, affiliate bloggers, and social media experts with a bunch of link management tools.
The key features of Replug include social media bio links, branded short links, URLs shortener, retargeting visitors, mobile deep links, QR marketing, UTM parameters, and more.
Create a masked URL using Replug URL Shortener:
Note: Skip to step 3 as integrating a custom domain is not mandatory to create a customized URL slug. Unless you want to use your brand name in your domain with your slug, then follow the given steps.
Step #1: Register your short domain
First things first, register a short domain that is suitable for your brand. A lot of companies and experts pick the short version of their brand name to register for setting up their short domain.
For instance, youtube.com has youtu.be, Amazon has amzn.to, and Replug has rplg.co. So these are a few examples of short domain names that companies have registered for different purposes.
To register your short domain, go to your favorite domain registrar services like Namecheap or Godaddy and look out for a perfect, short domain name.
Once you’ve registered the domain name, move on to step number two.
Step #2: Integrate your custom domain with Replug
After registering the short domain name, there are some integrations that need to be done before you could start using your branded short URL.
This integration is a two-step process to make it work. Start with adding the DNS records for your custom domain to configure it with Replug.
To do this, log in to your domain registrar account and look out for the DNS settings. You’ll see an option like “Add New Record” or “Add Record,” depending on the domain registrar you’re using.
The idea is to add a CNAME record in your domain setting to configure it with your Replug account.
So click on the “Add New Record” option to include a new record. Provide the following details:
Record type
Hostname
Point to (Address)
CNAME
@ or www
*short domain*
Most domain registrars allow adding a CNAME record. However, if your domain registrar doesn’t allow it, you can use the A -Address option instead.
Record type
Hostname
Point to (Address)
A
@ or www
*Domain IP address*
Once you’re done on the domain registrar front, head over to the Replug account.
Now it’s time to add a custom domain to your Replug account.
Log in to your Replug account and open the drop-down settings menu from the top right corner.
Head over to the dashboard to start shortening the URLs using your short, branded domain.
FAQs About URL Masking
Here are some burning questions about URL masking:
Is there a way to mask a URL?
Sure, there is more than one way to mask a URL. The most common method for bloggers and affiliate marketers to mask links is by using plugins.
Moreover, you could also use link cloaking to mask a URL. It essentially changes the appearance of the URL to make it look decent, but the destination URL remains the same. It requires URL redirection to direct the visitors to the destination page.
What is the difference between URL masking and redirecting?
The URL redirection pushes the visitors to a different page or a new website with clear directions for search engine bots to follow. However, URL masking is more of a URL-hiding strategy to avoid unnecessary suspicion on the user’s end.
What is the difference between URI and URL?
The URI is an abbreviation for Uniform Resource Identifier. It’s a series of characters employed to specify and differentiate a logical or physical resource, commonly associated with the internet, from other resources.
Whereas, a URL is short for Uniform Resource Locator. It’s a distinctive identifier employed to pinpoint the location of a resource on the Internet. It’s also known as a web address.


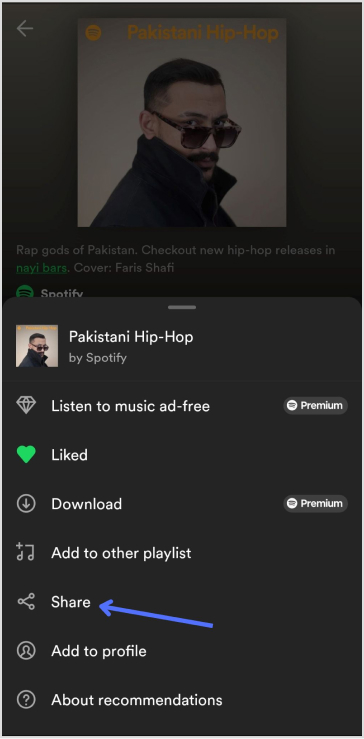

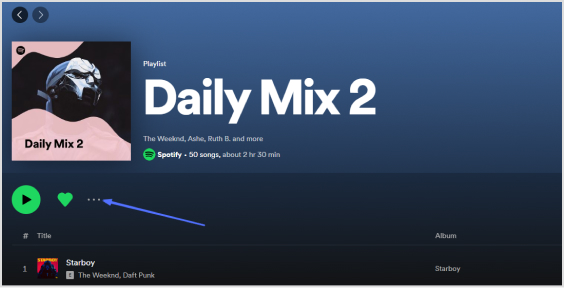
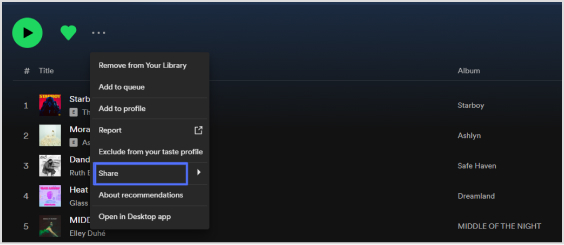

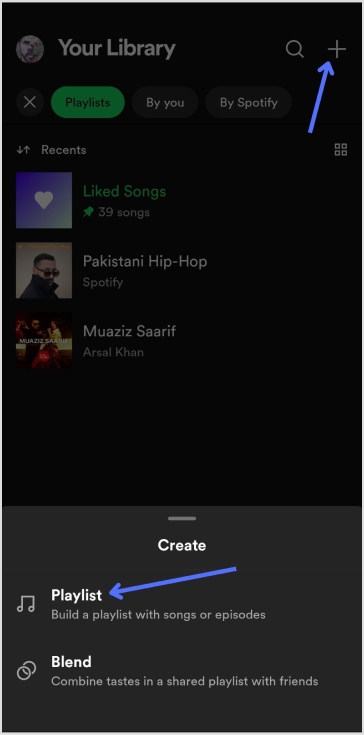
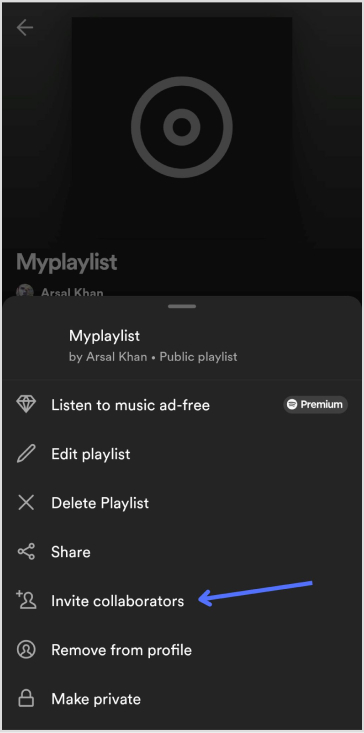
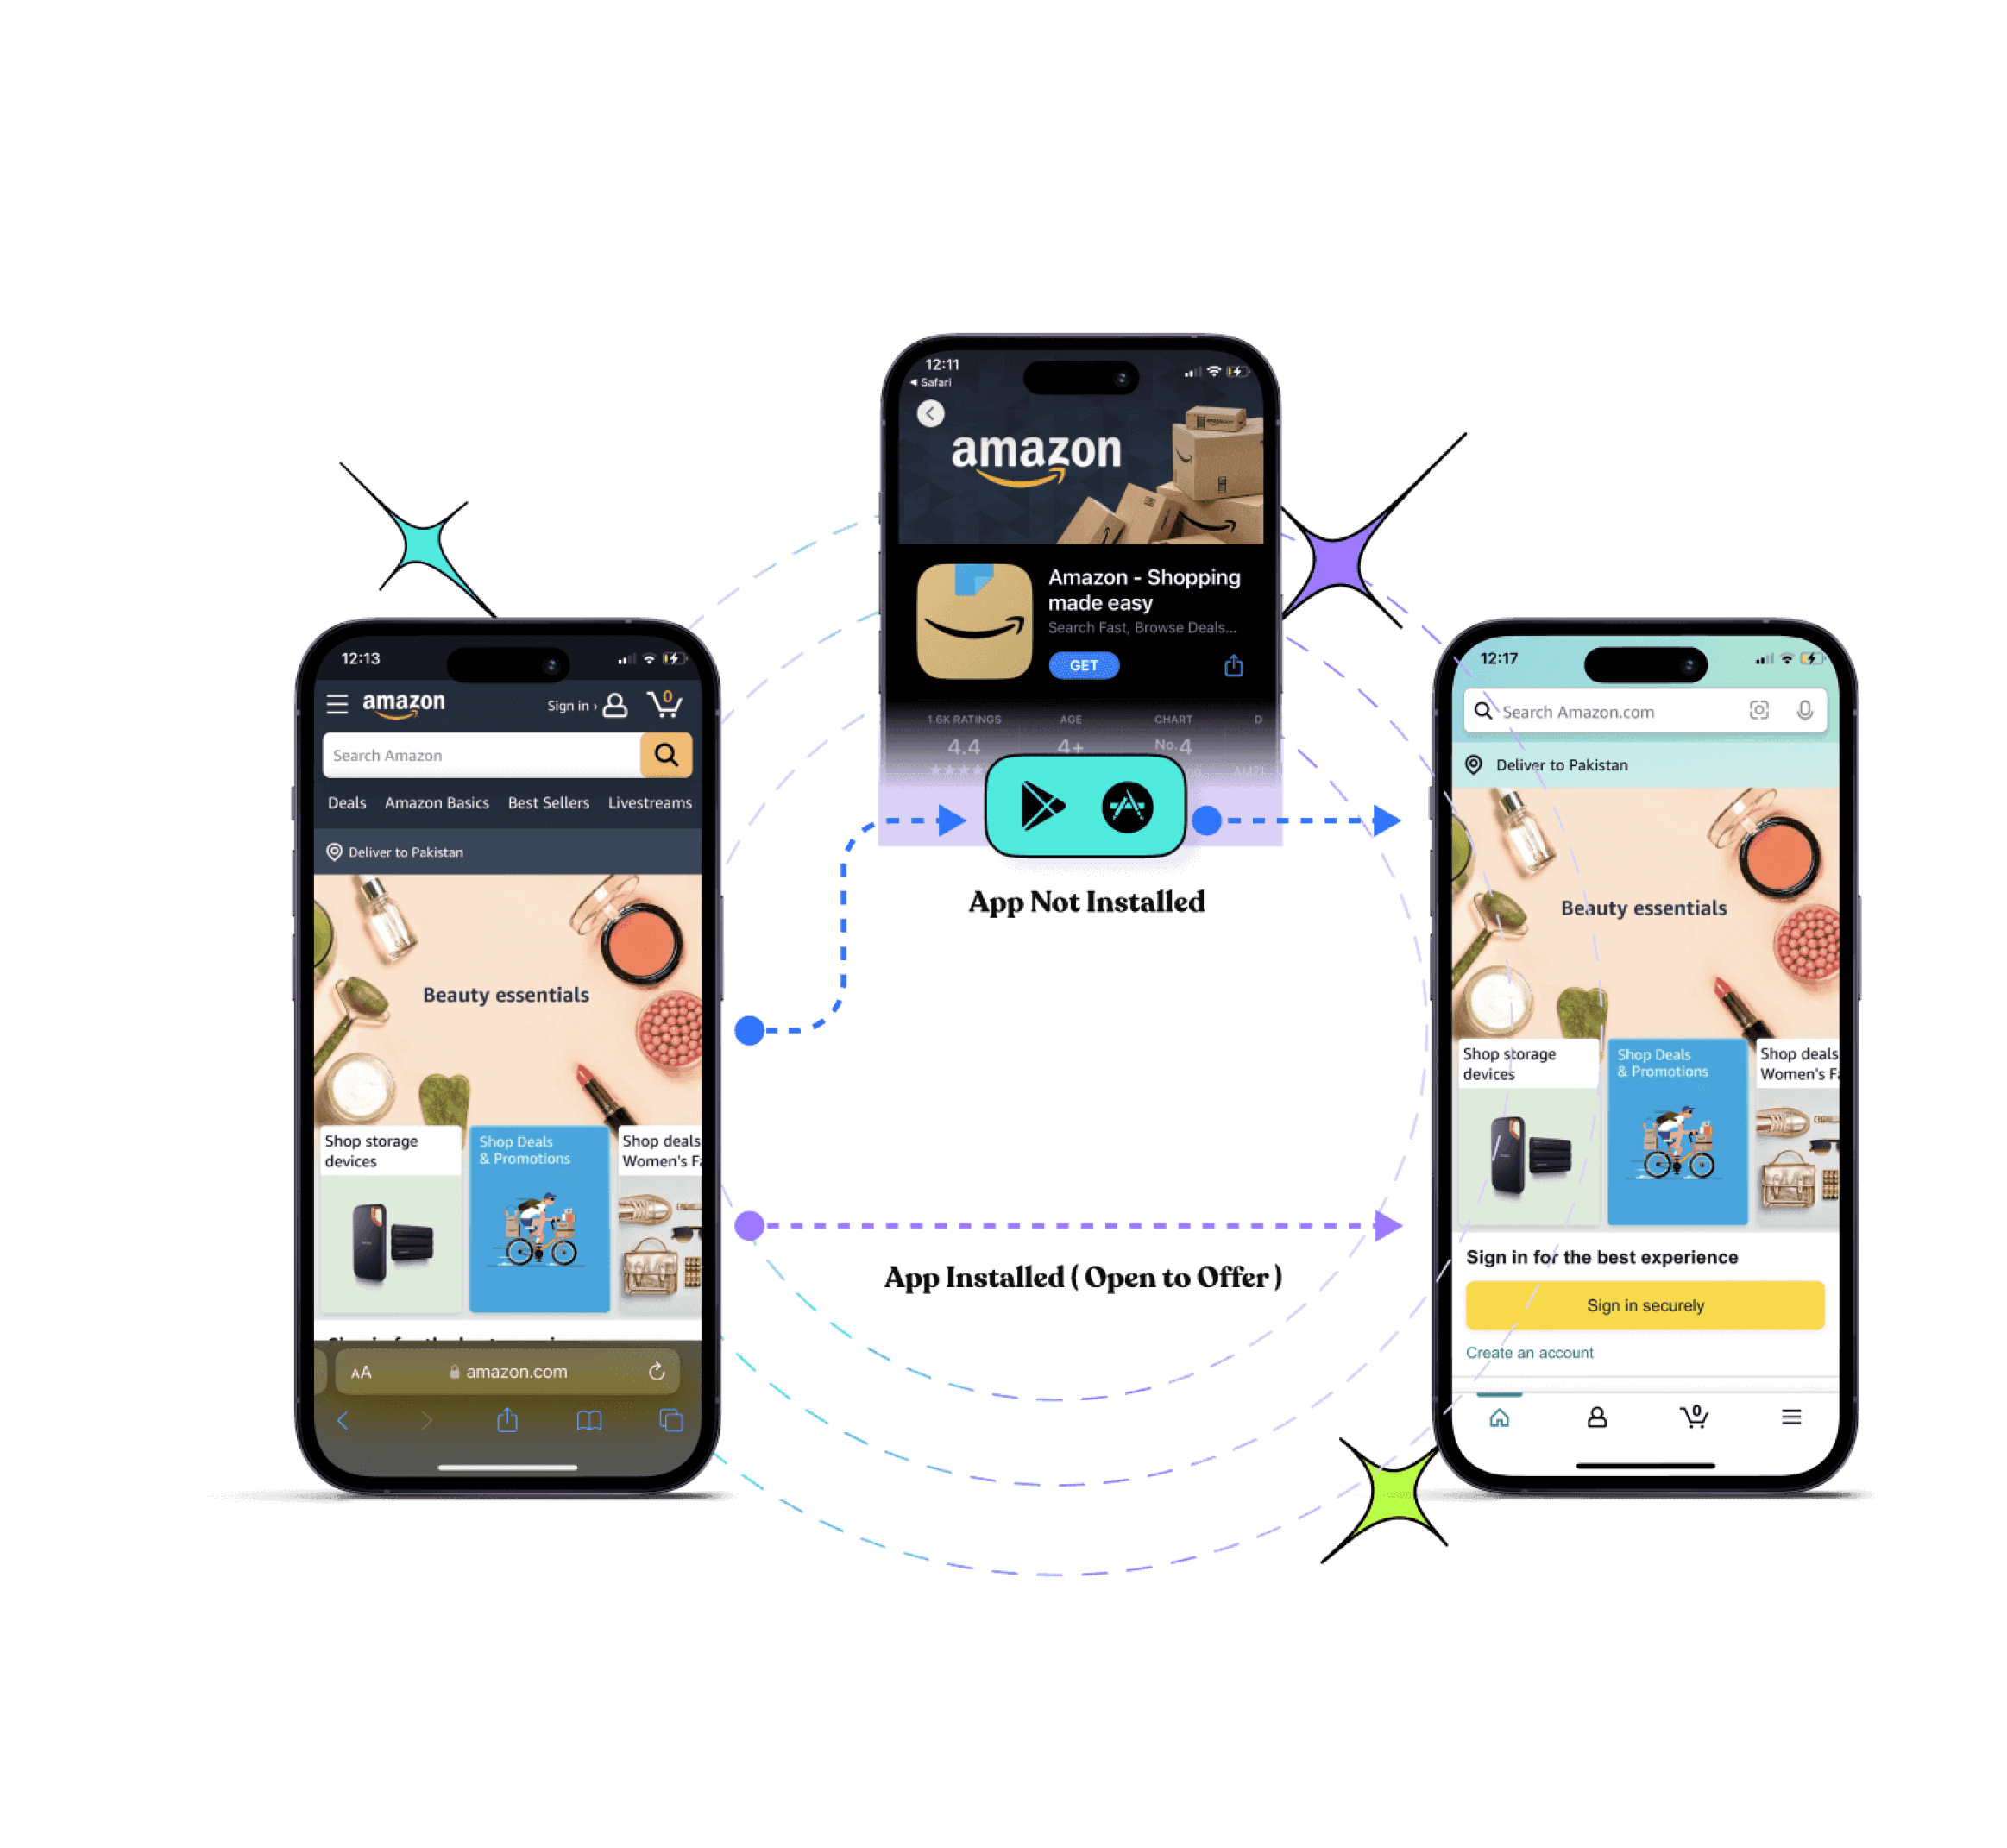
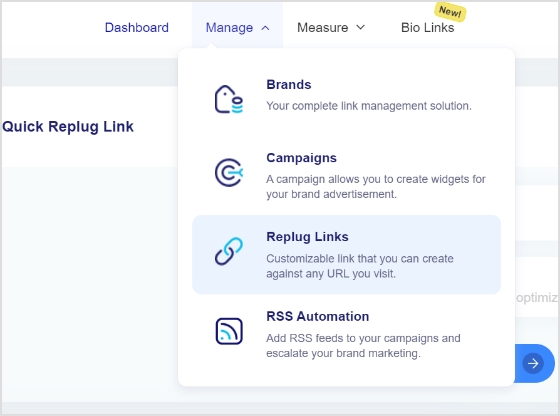
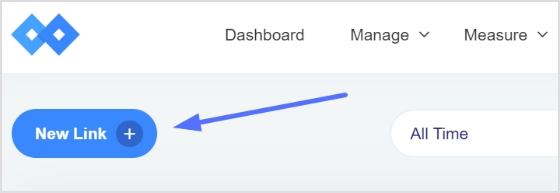
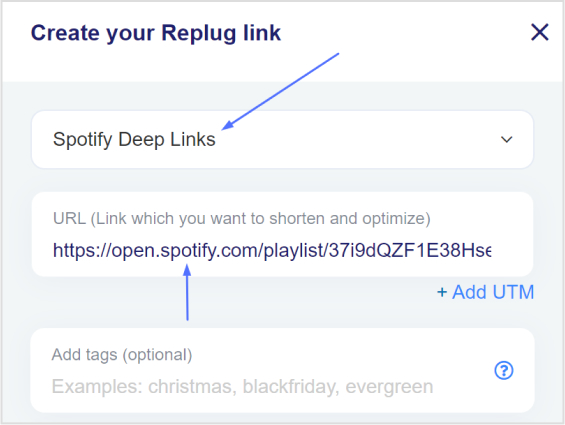
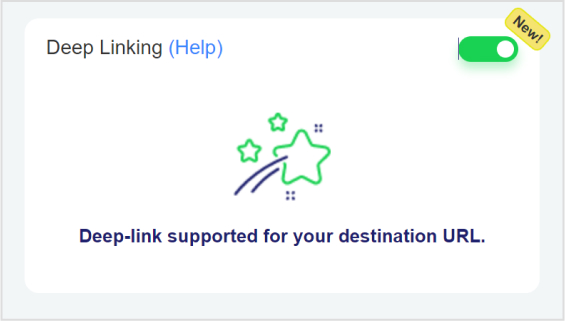
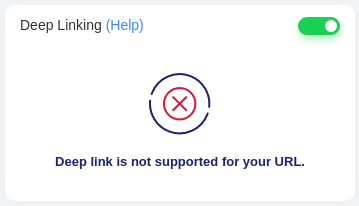


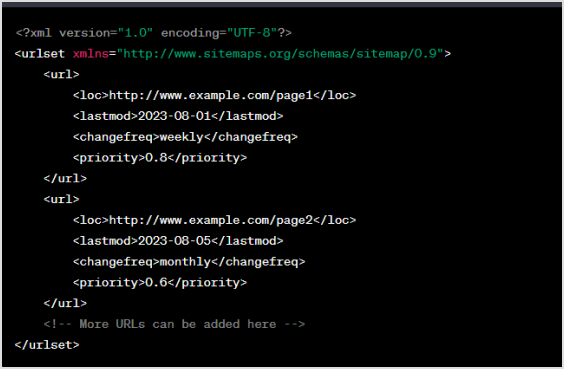
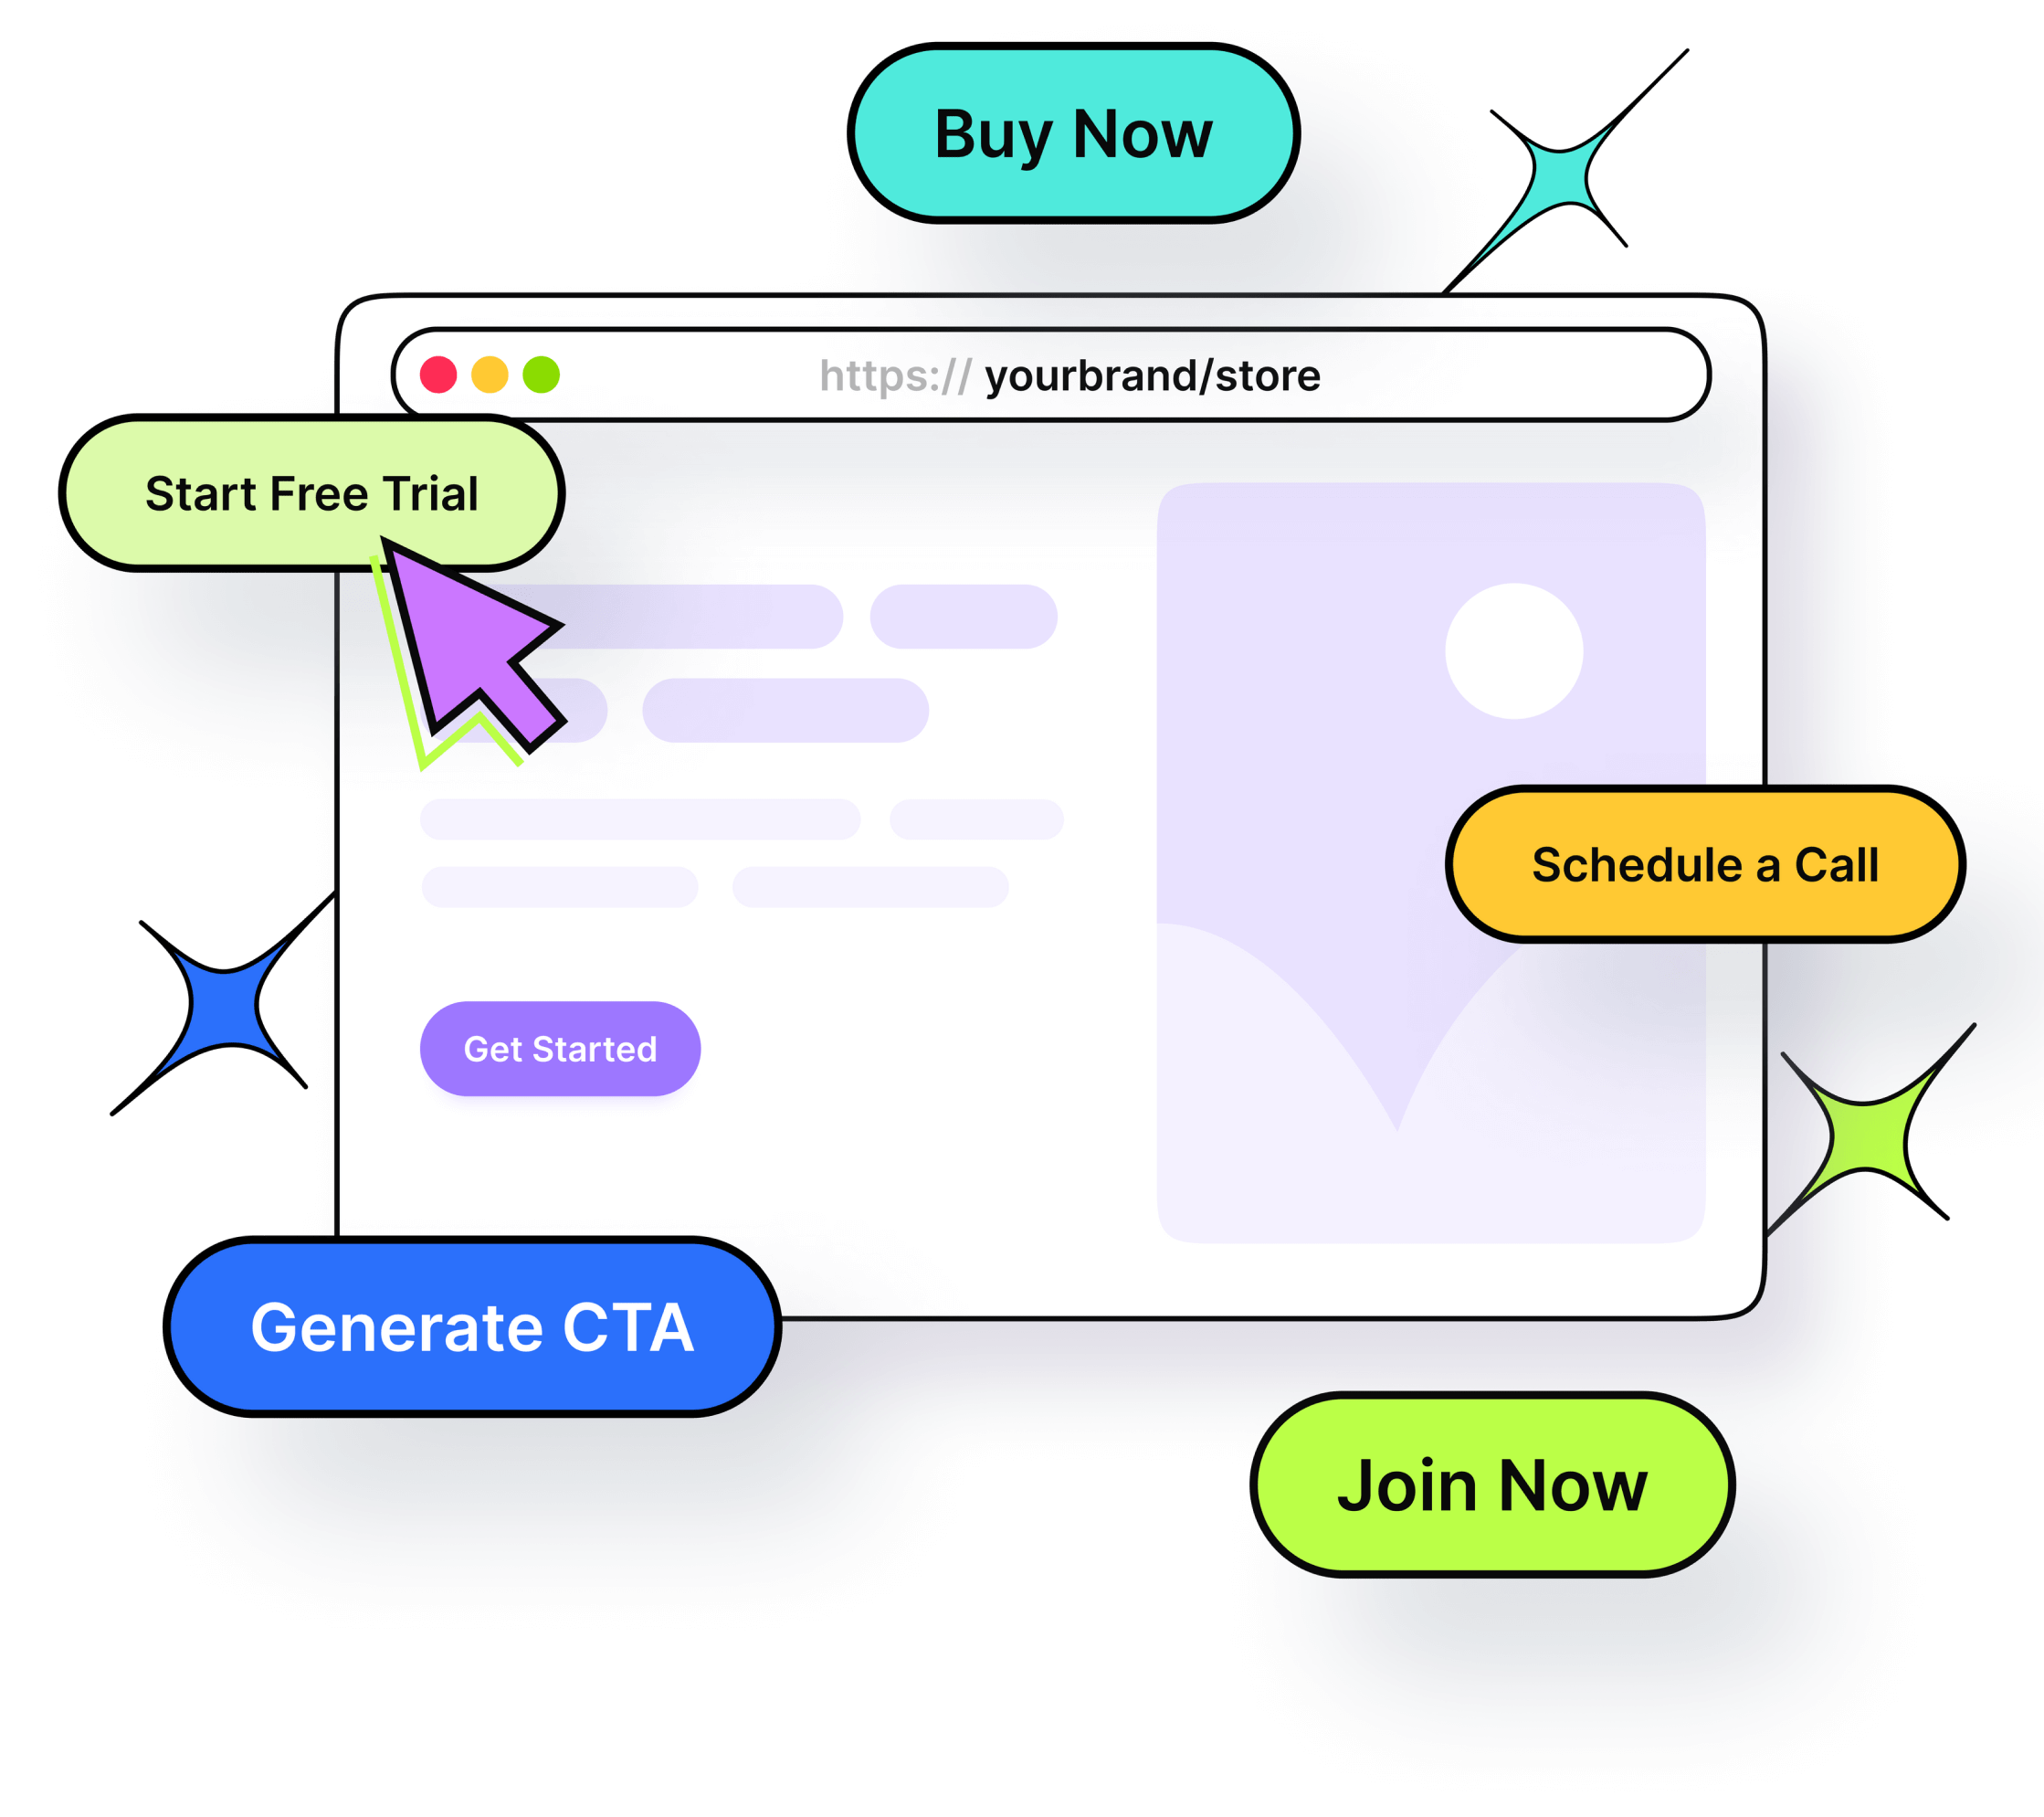


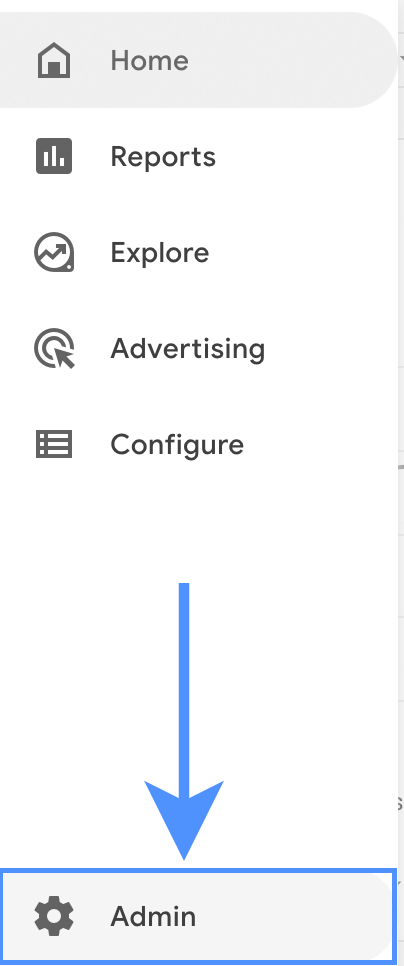
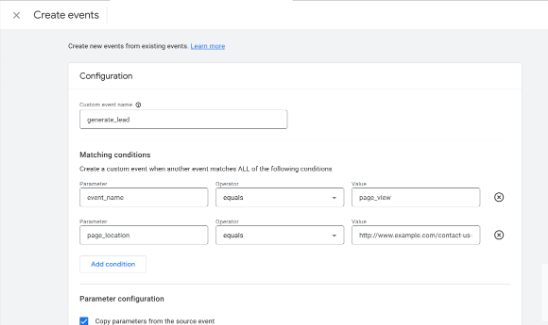

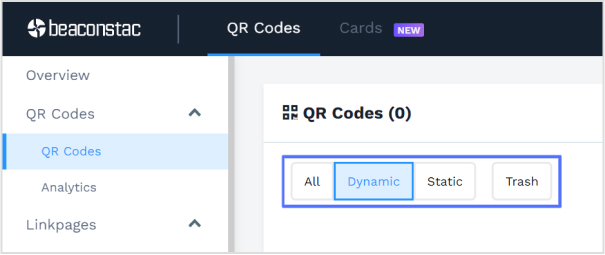
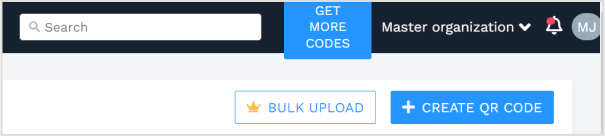
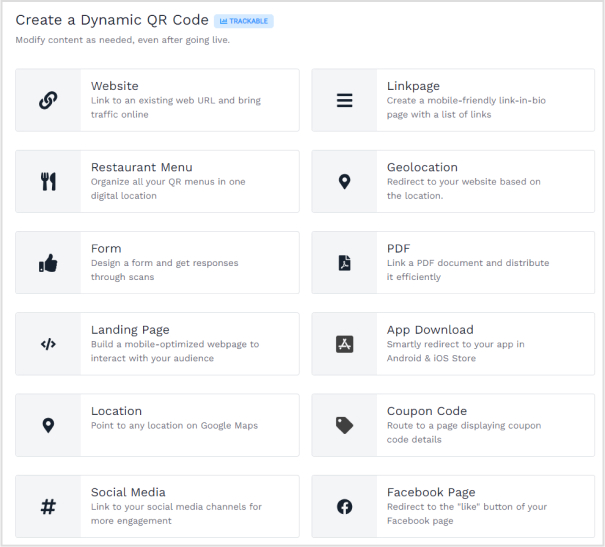
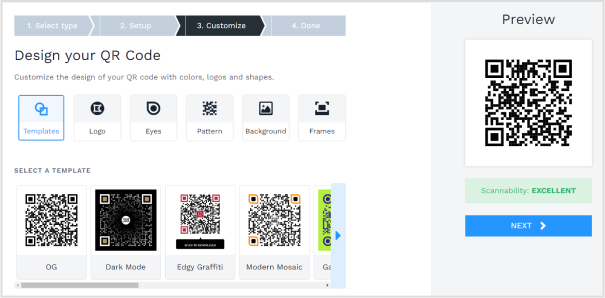
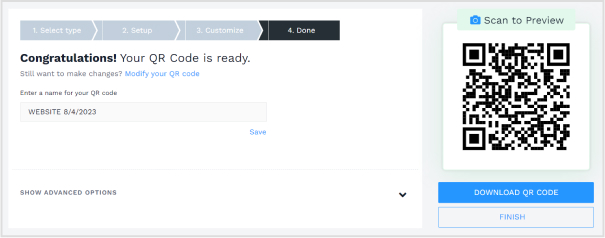
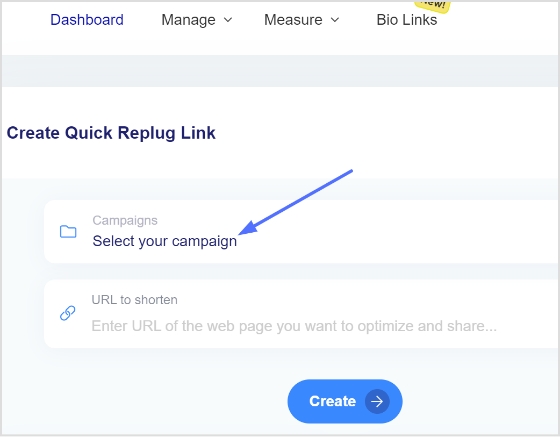
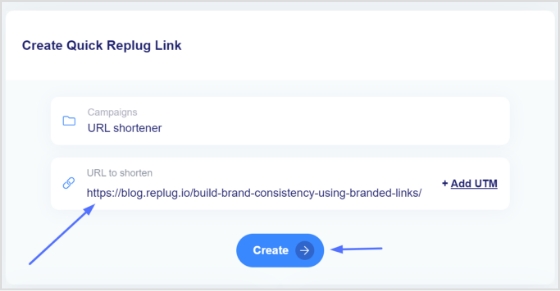
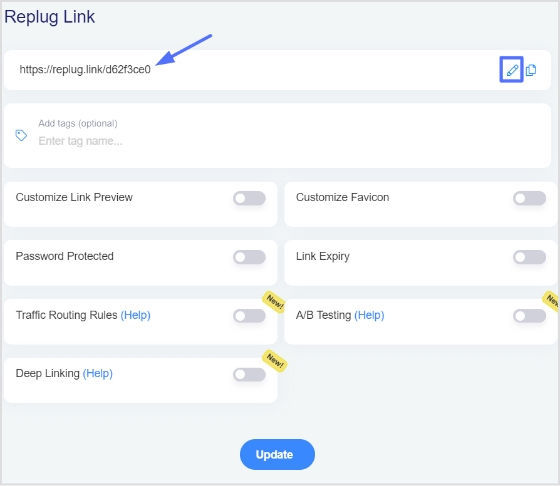
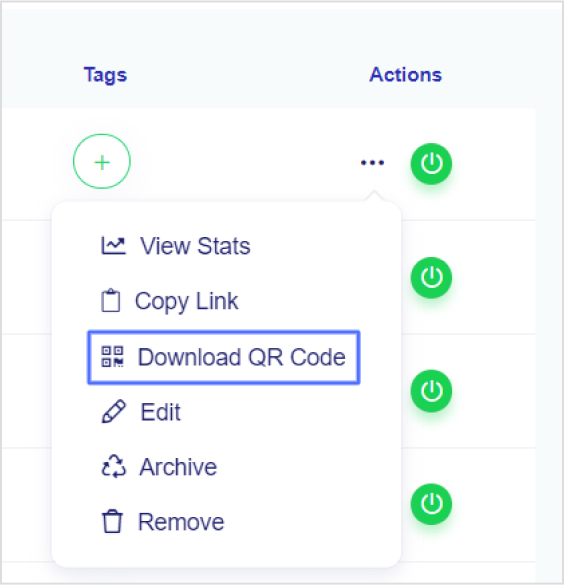


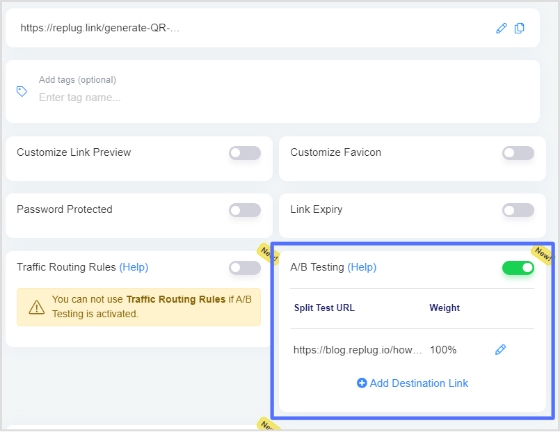
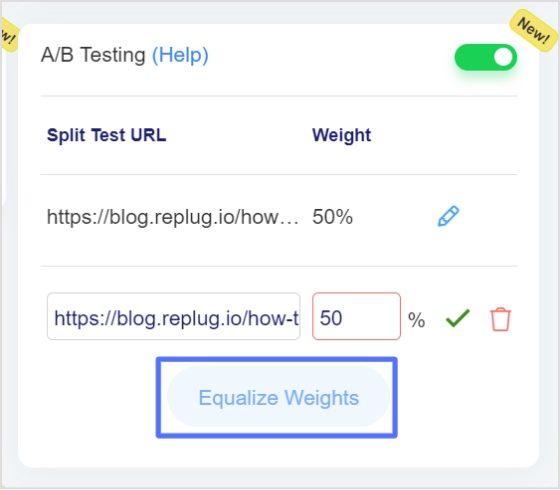
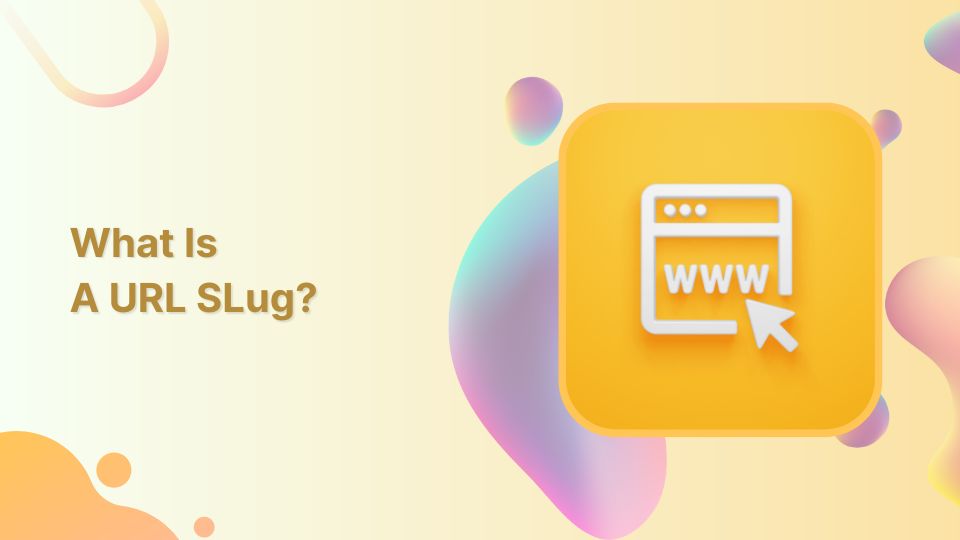
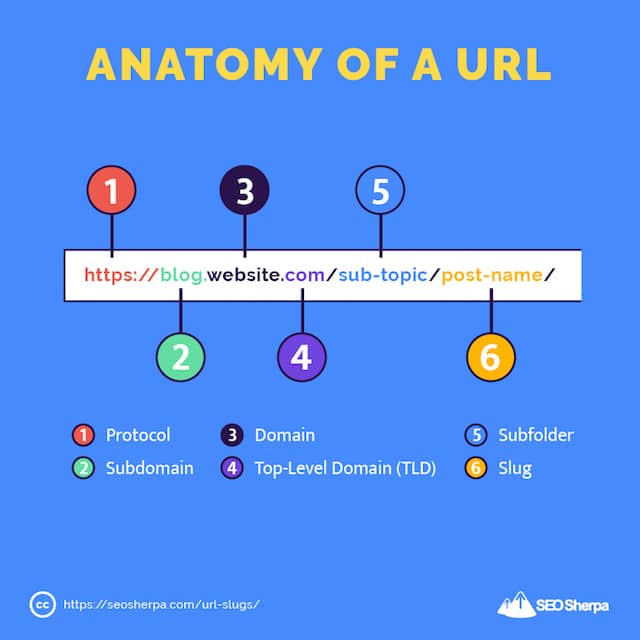

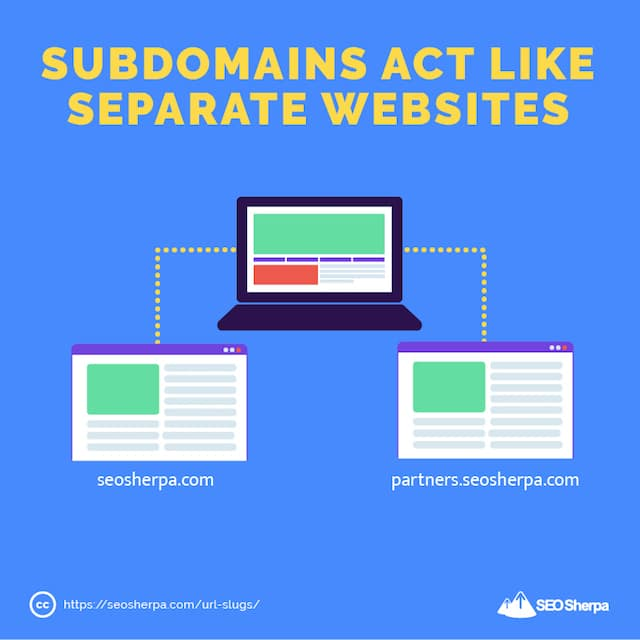
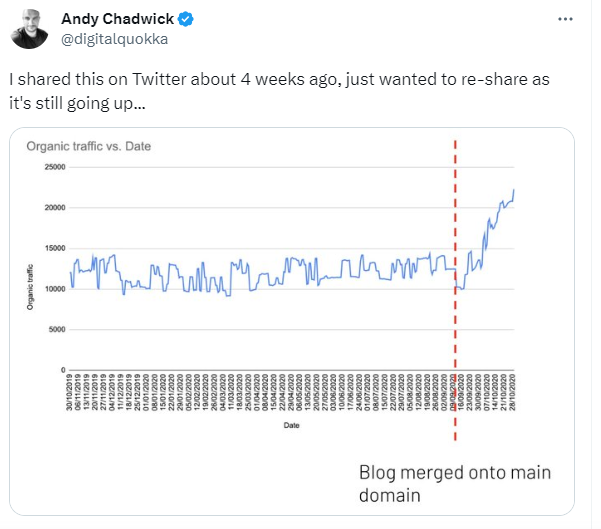
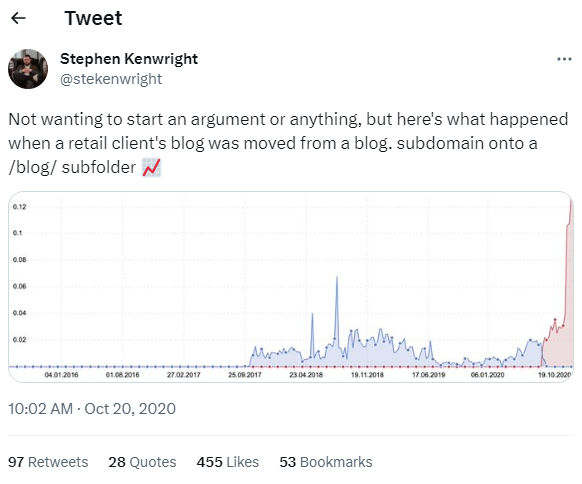
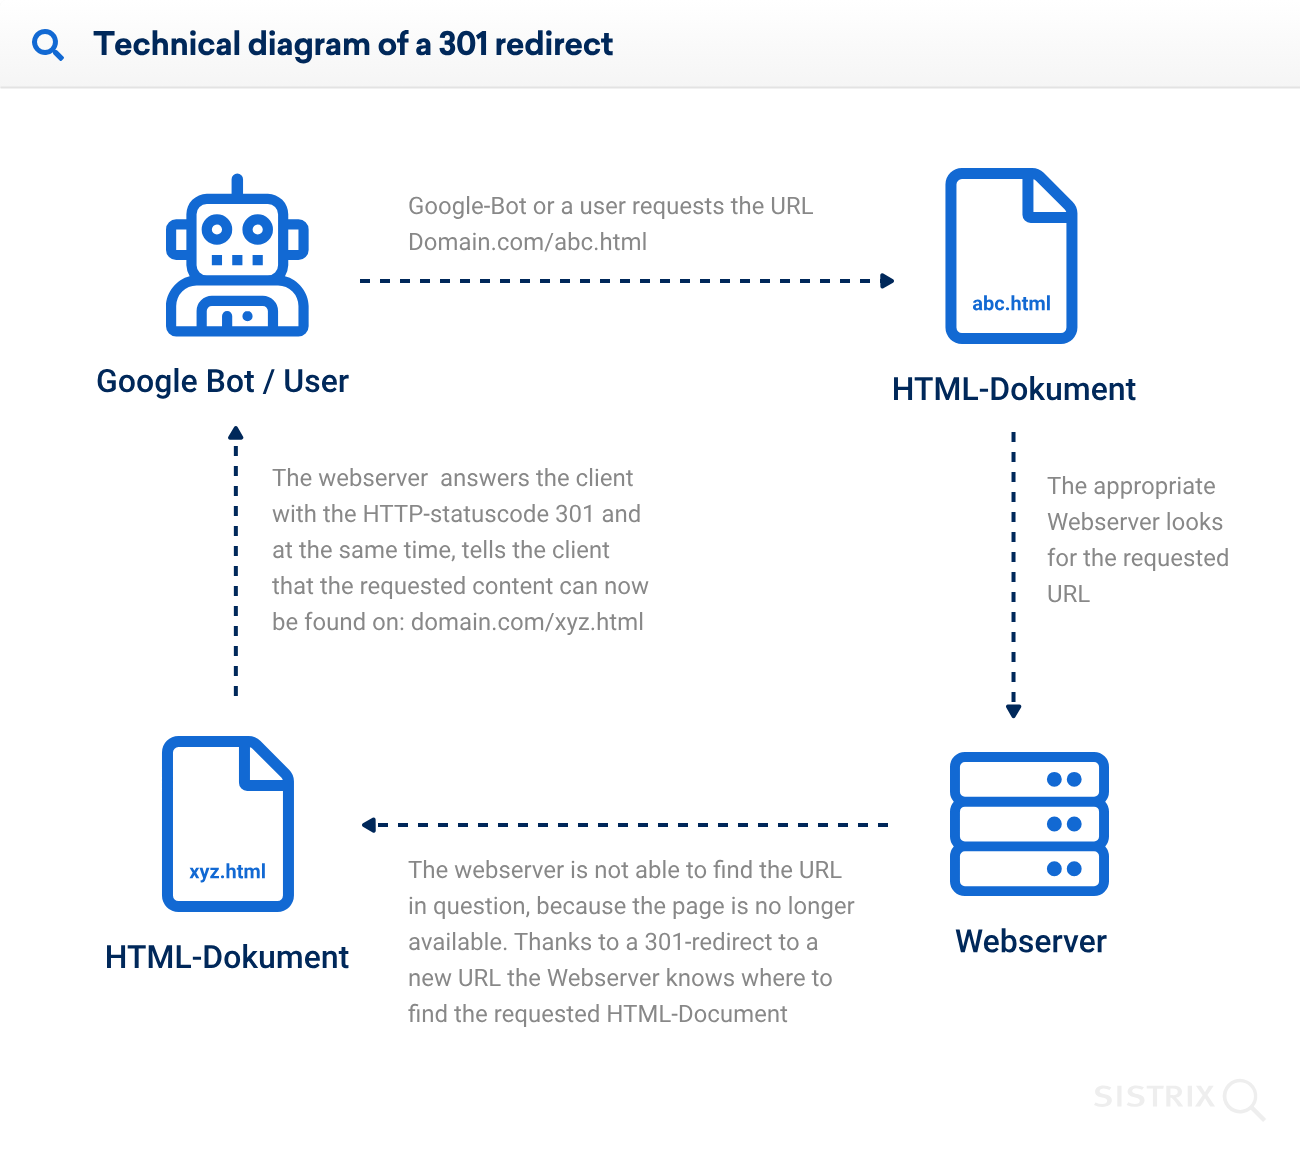
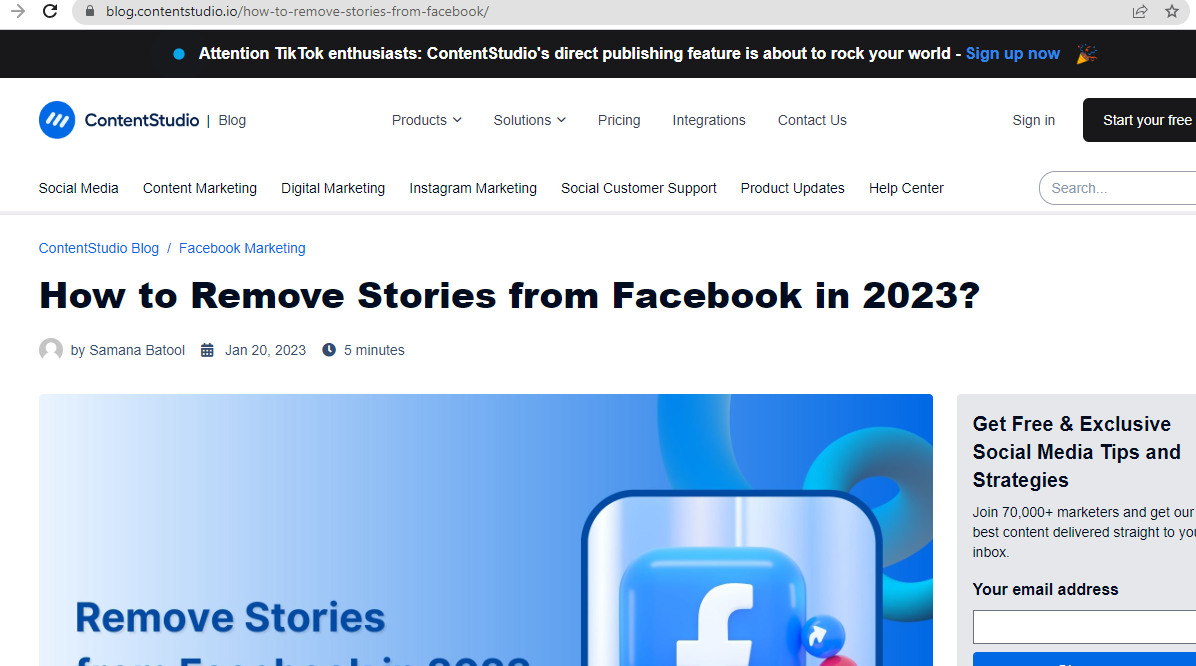


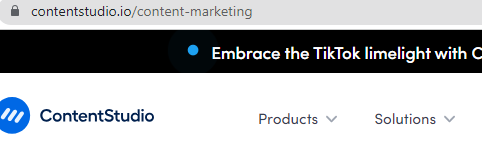
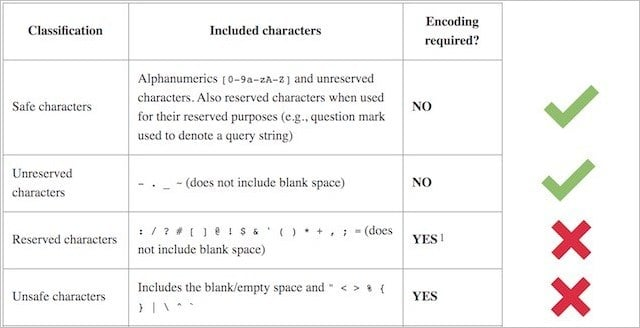
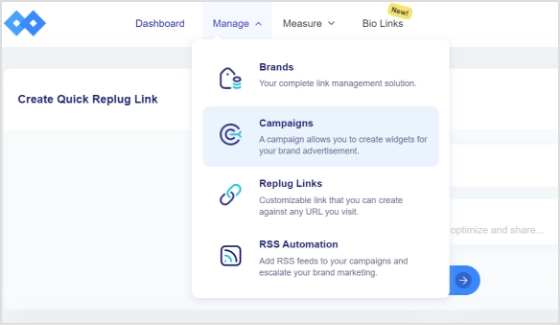
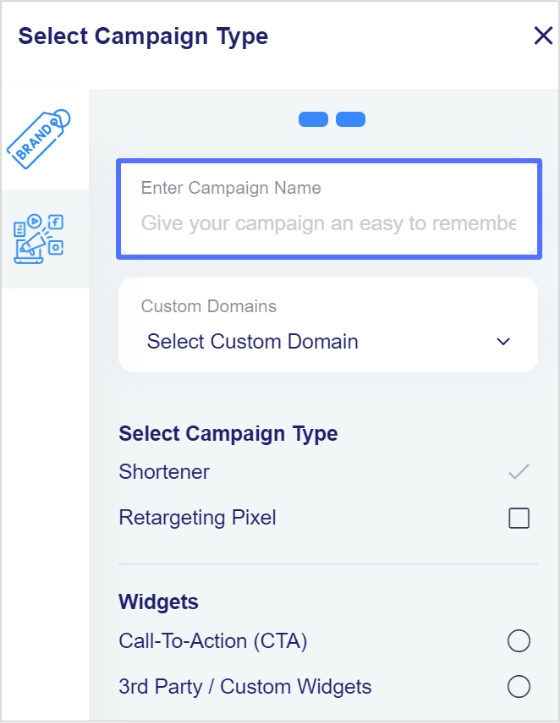
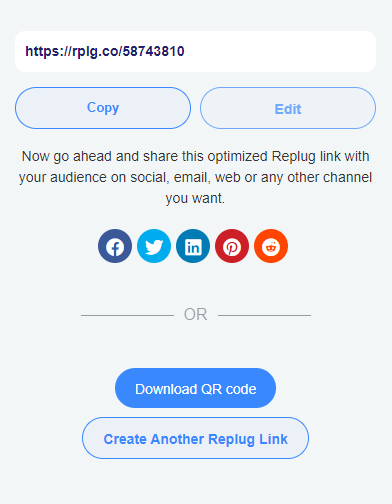
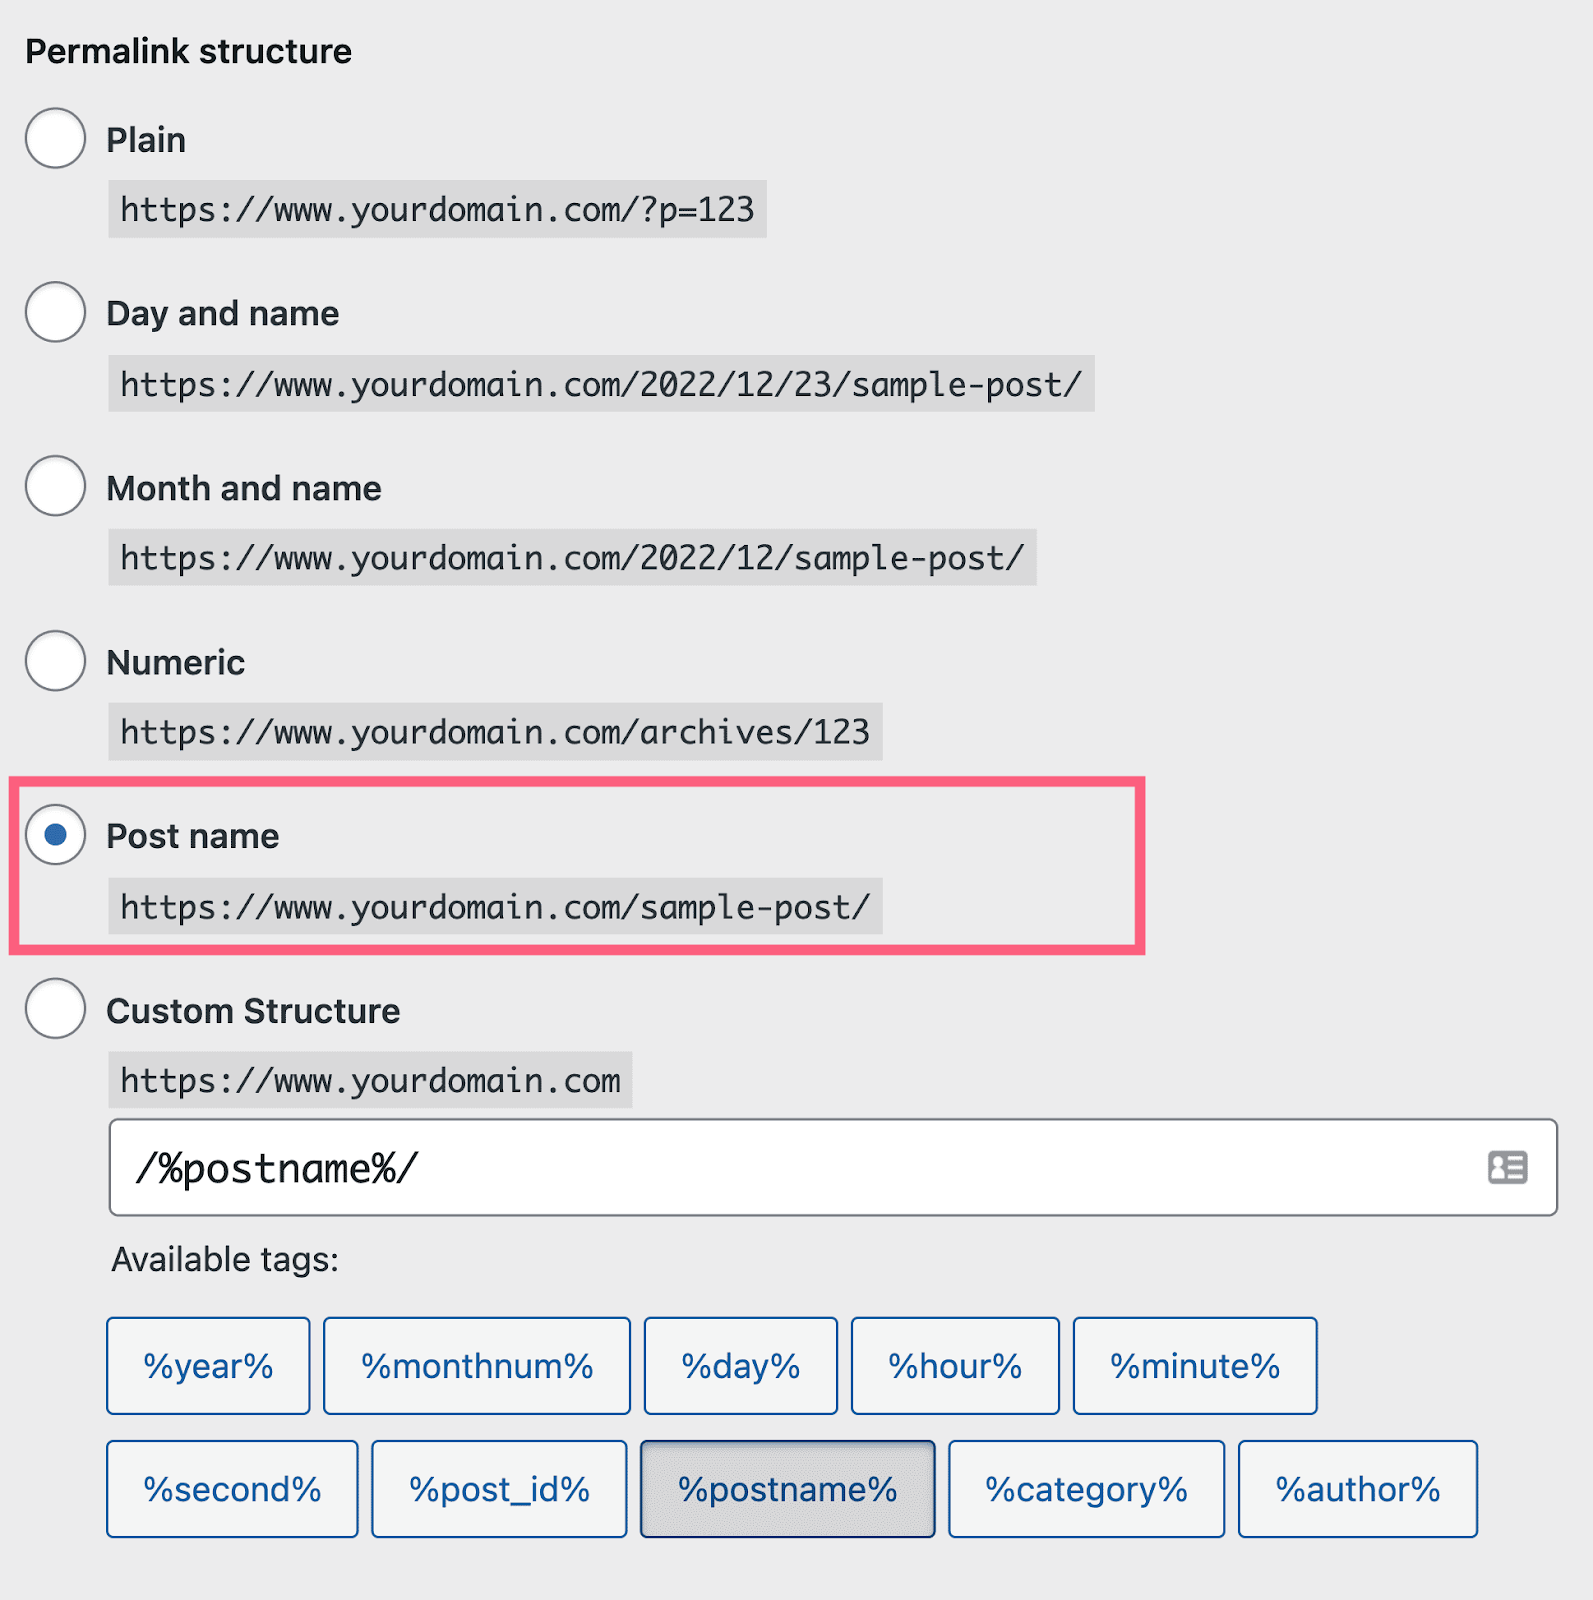
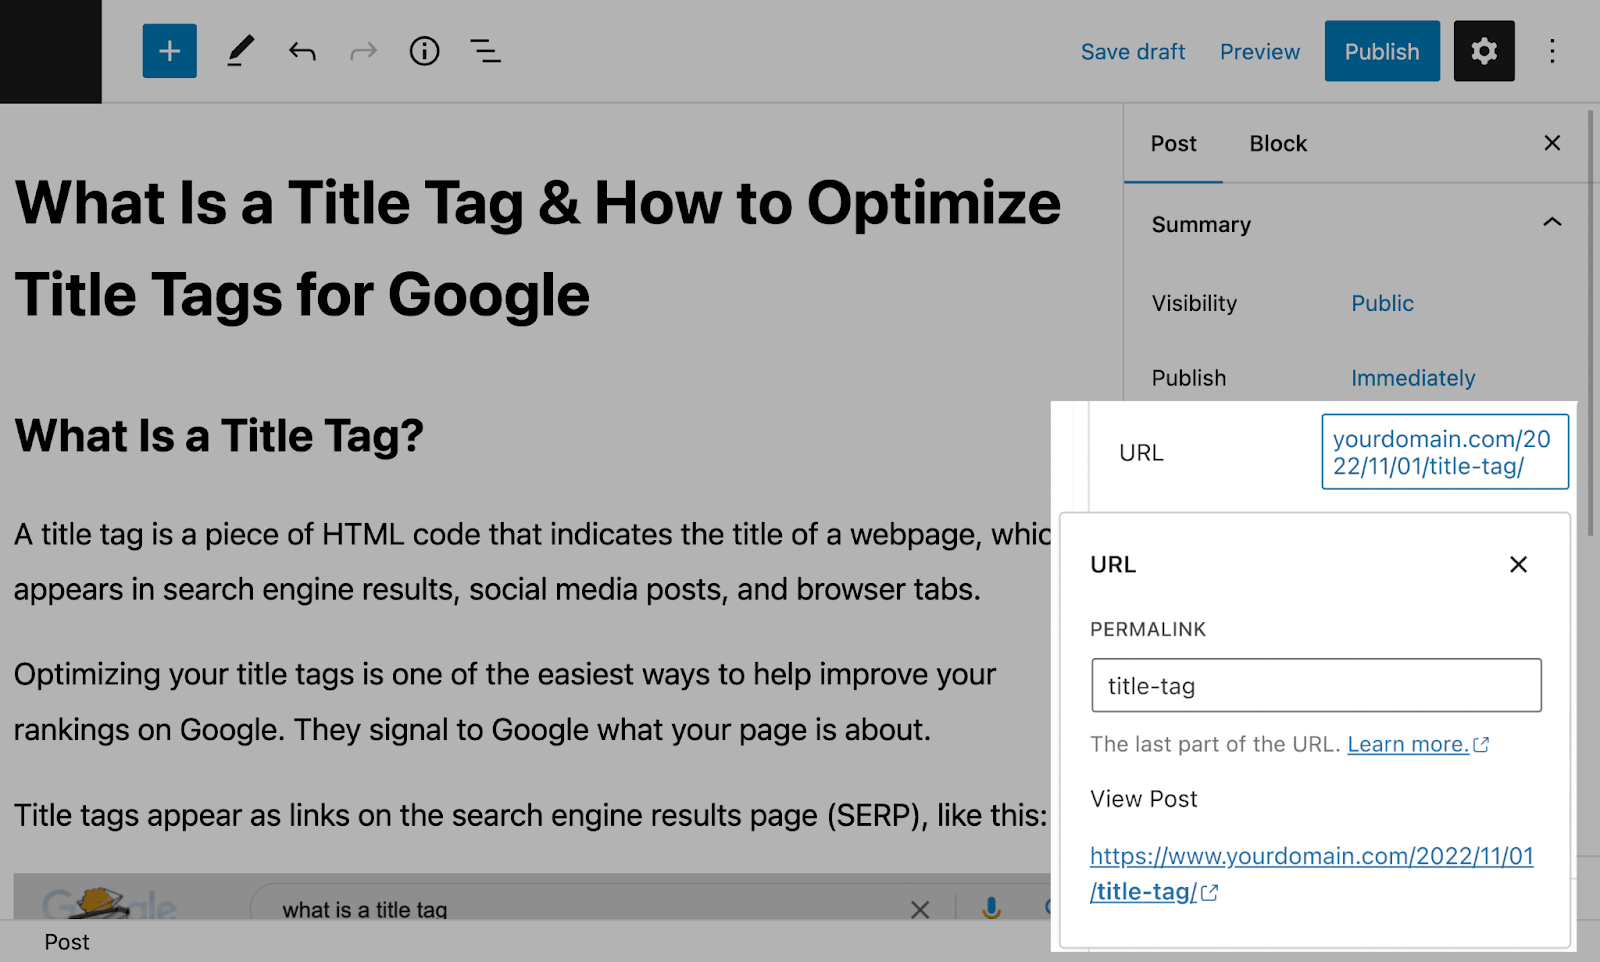

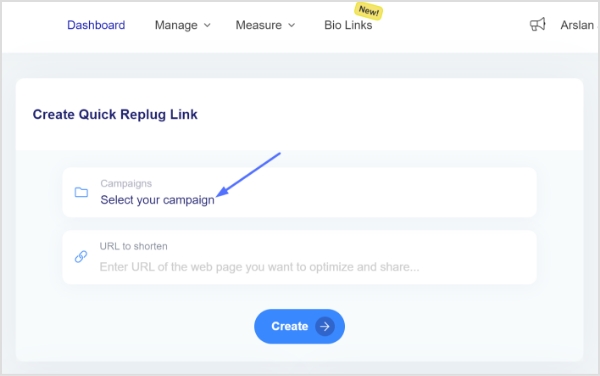
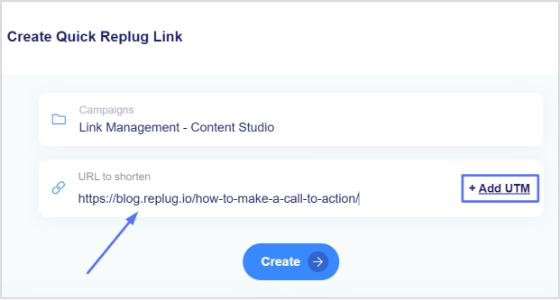
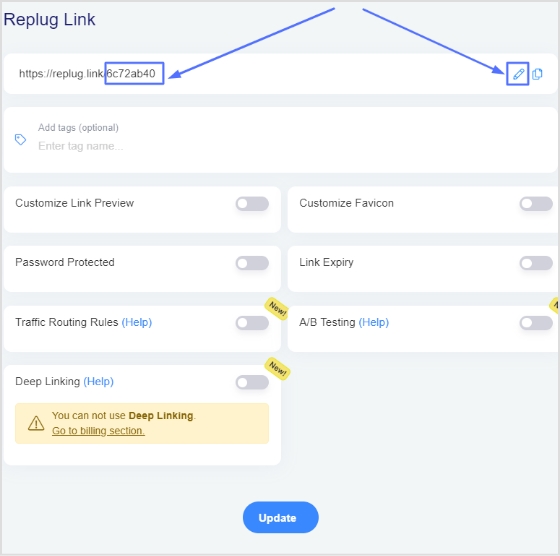
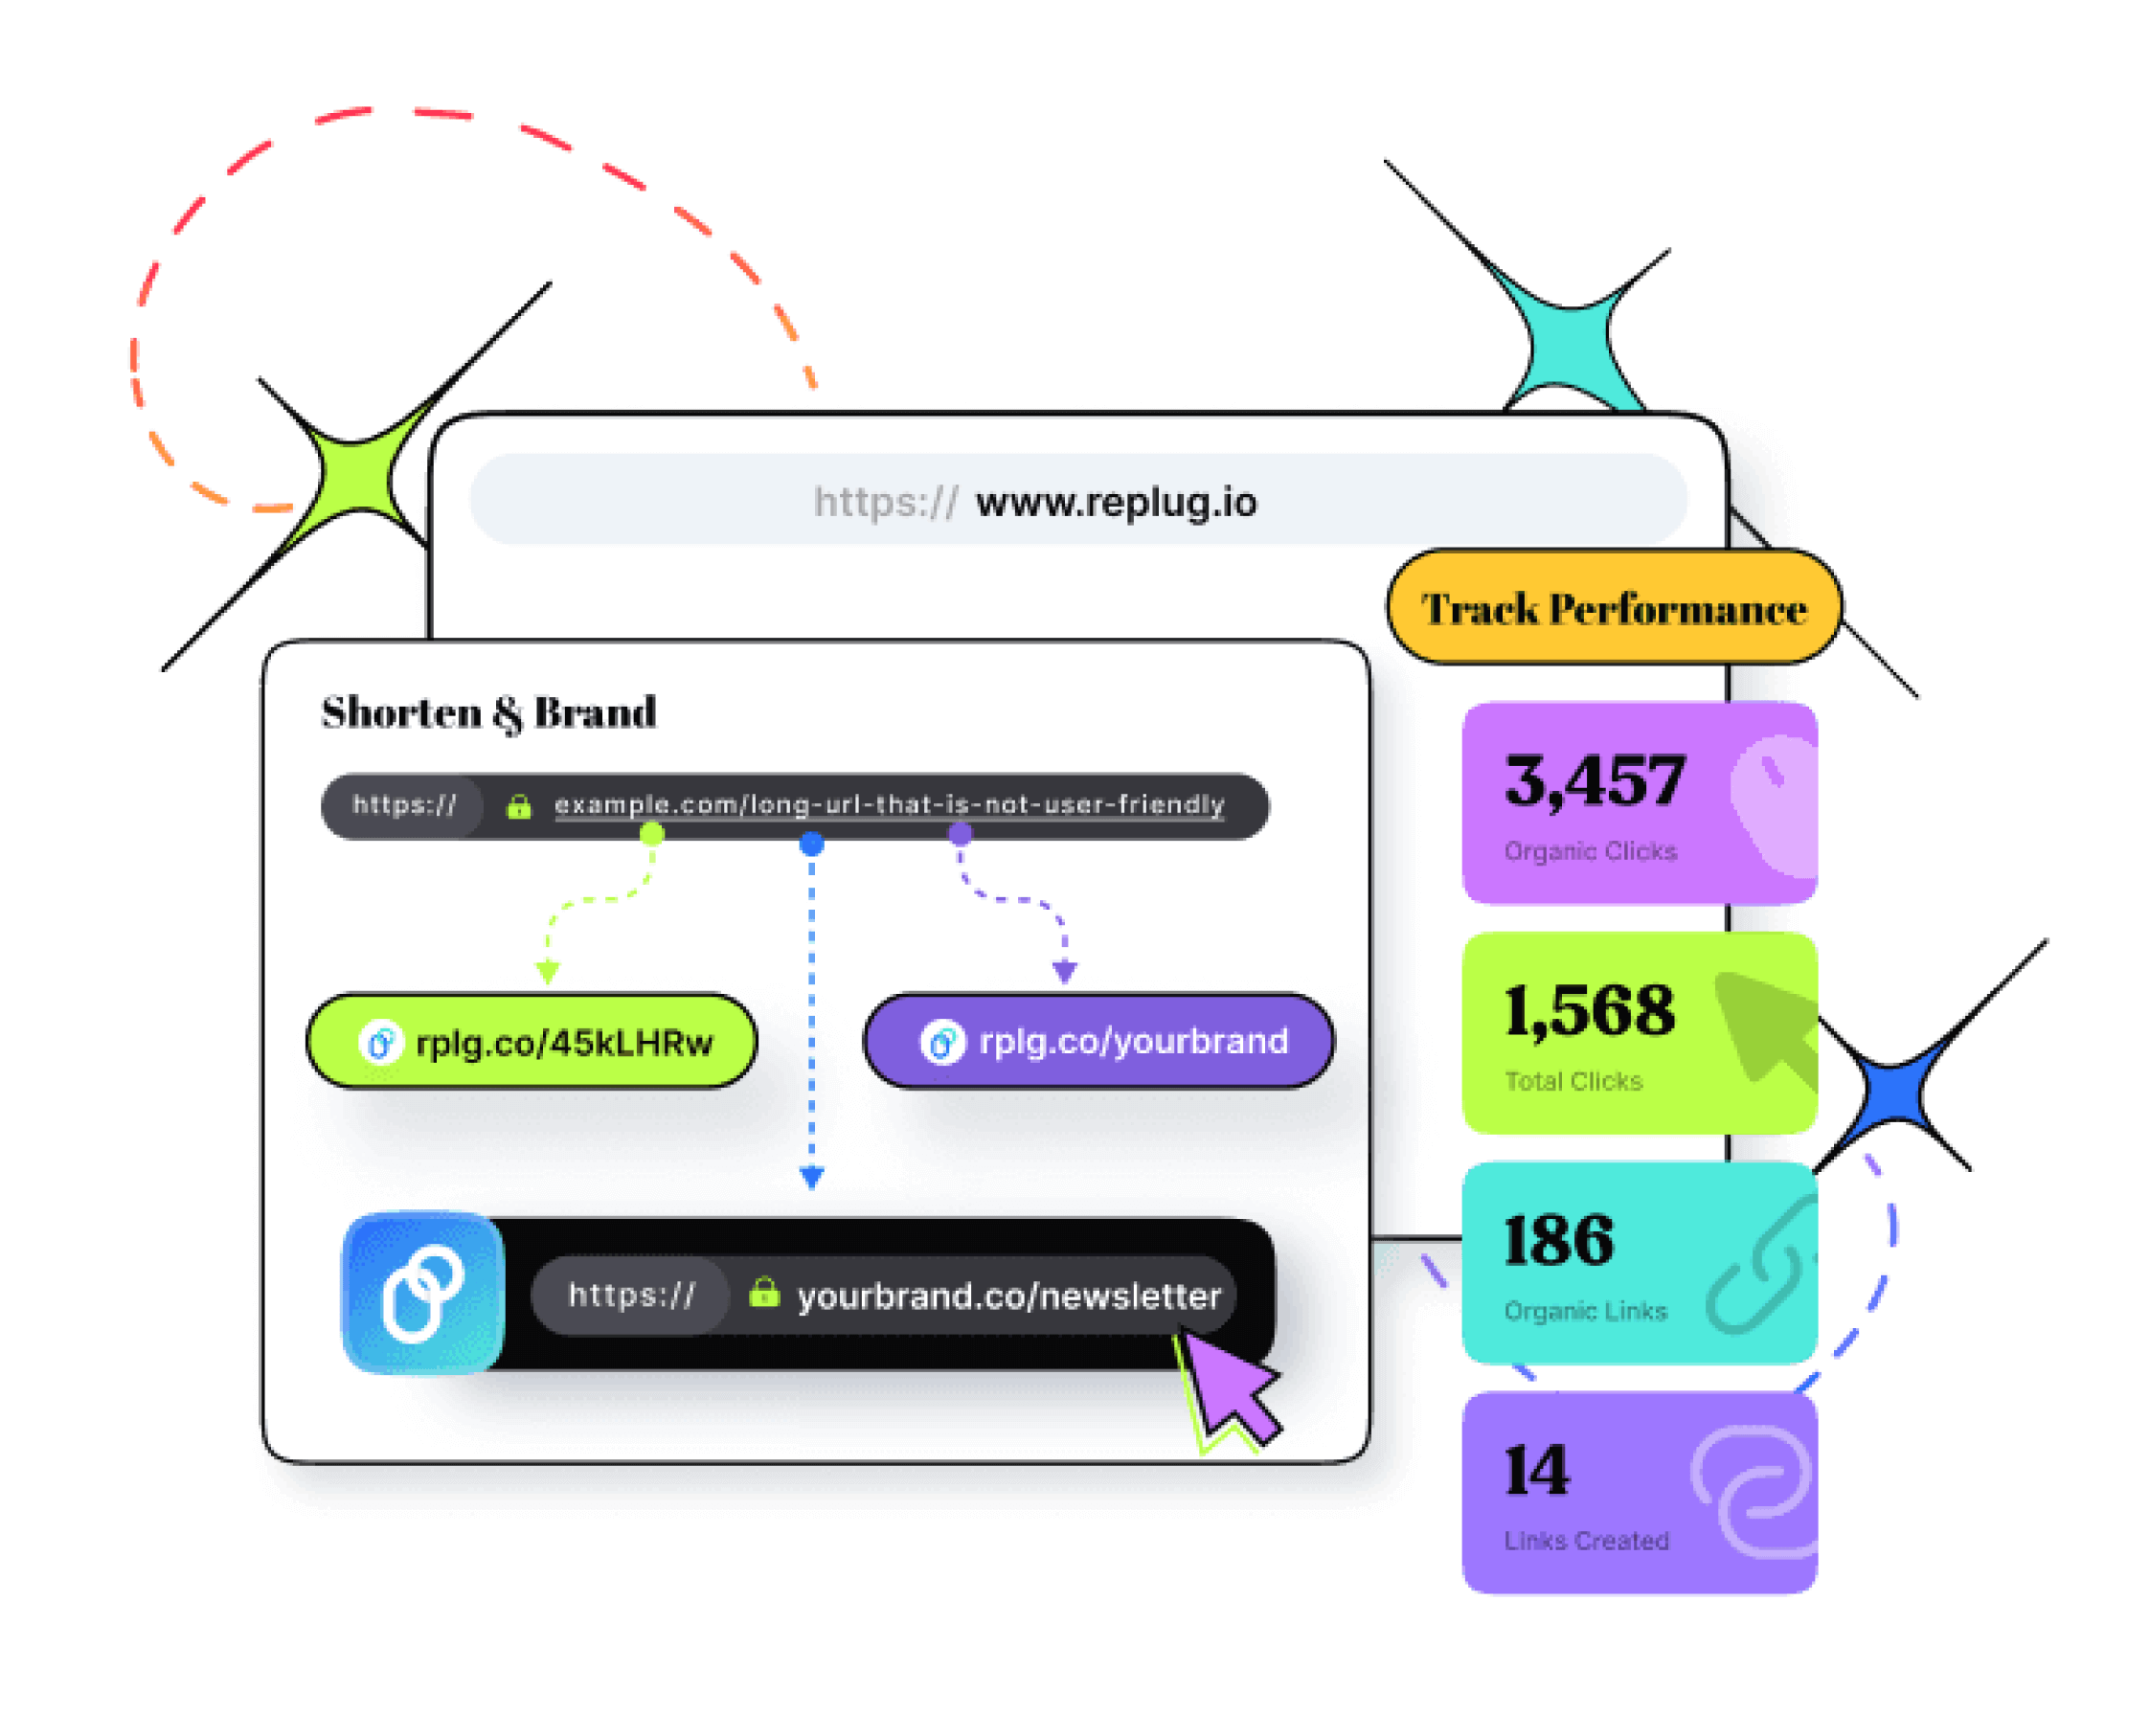

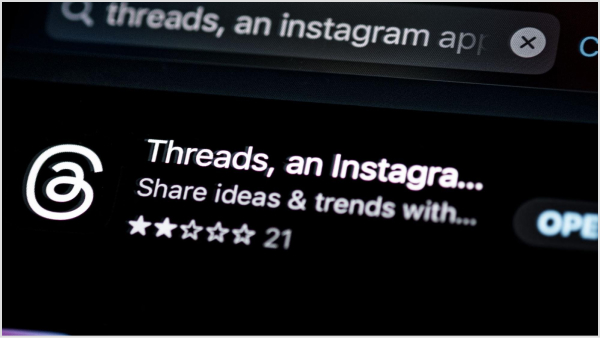

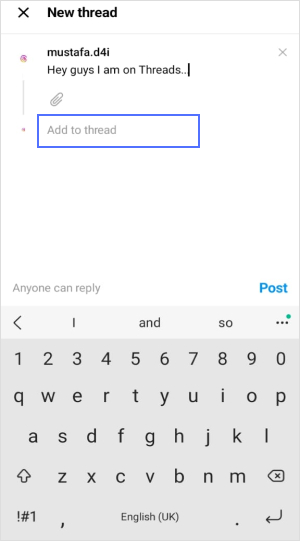
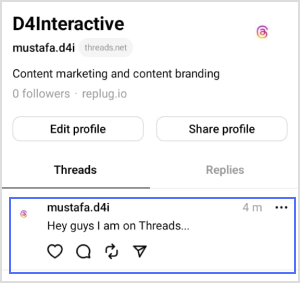

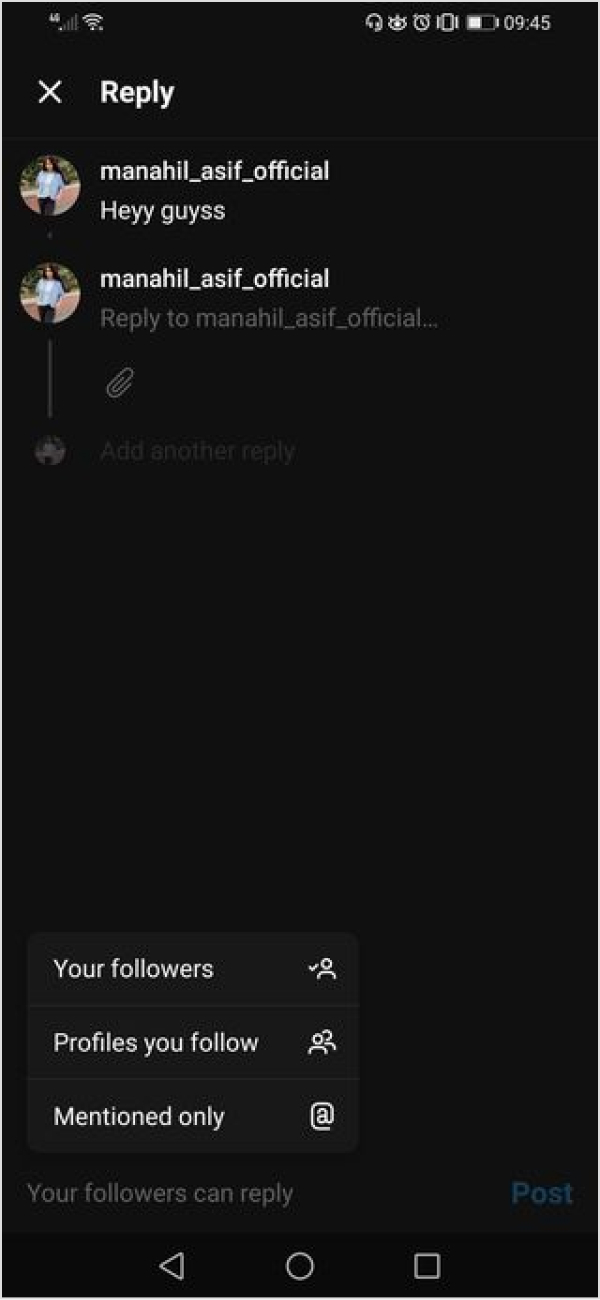


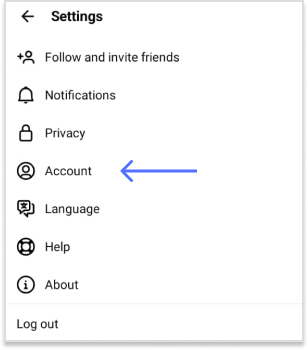
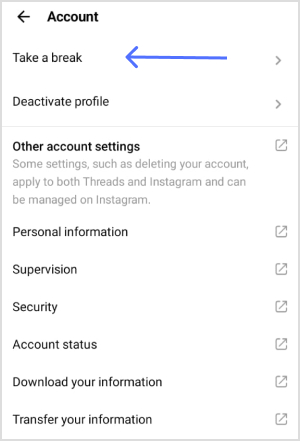


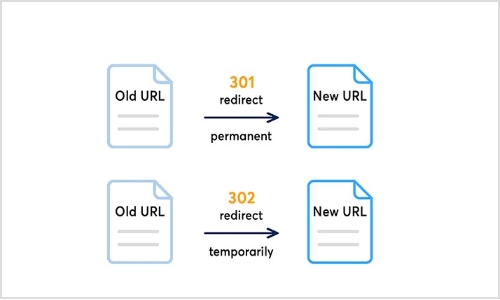

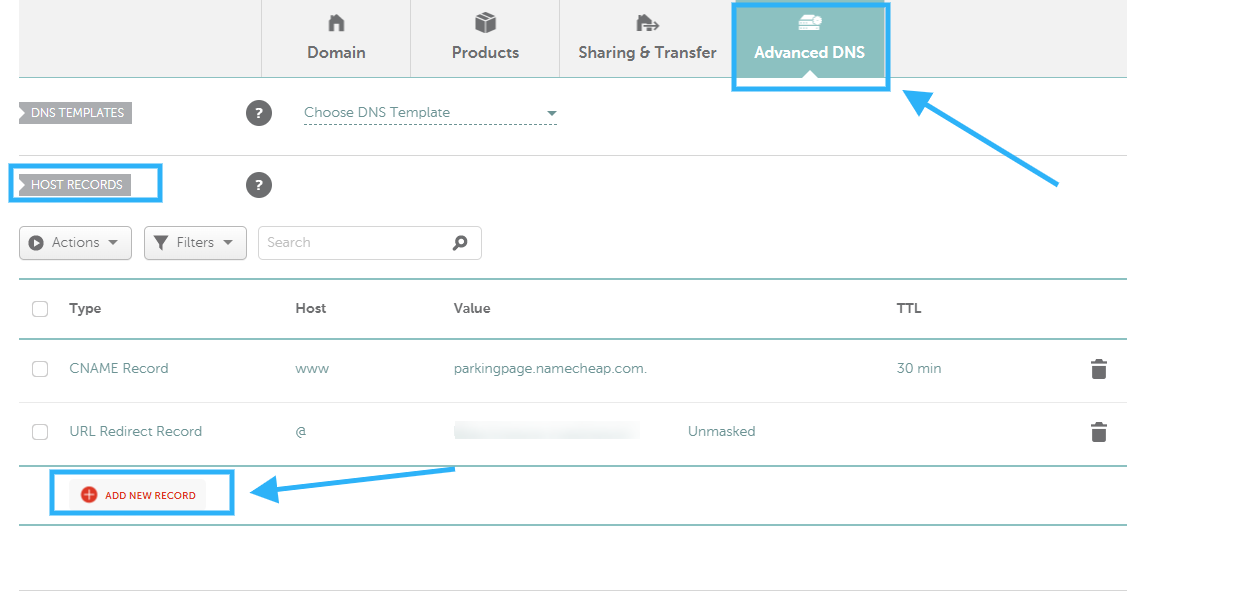
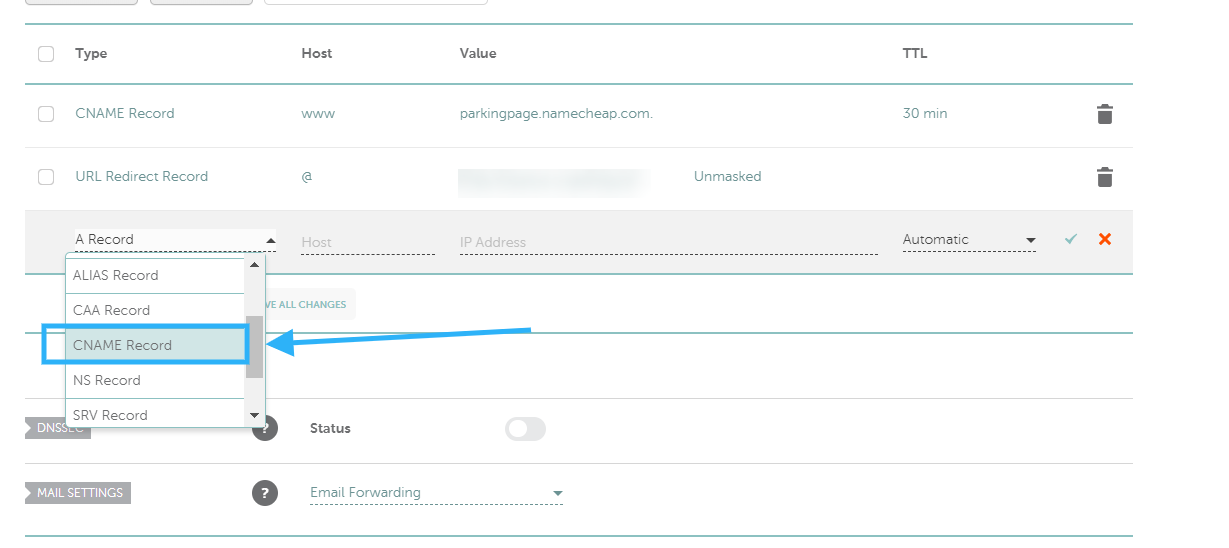
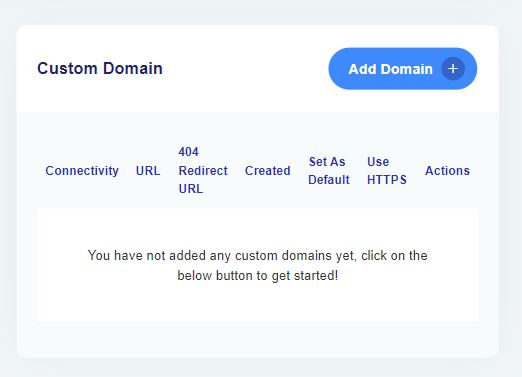
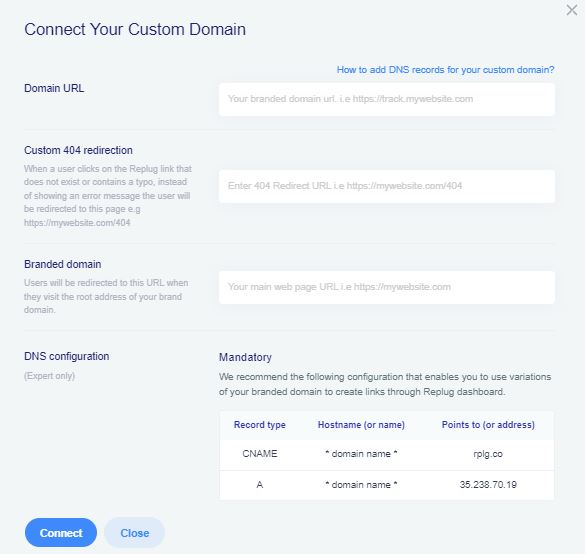
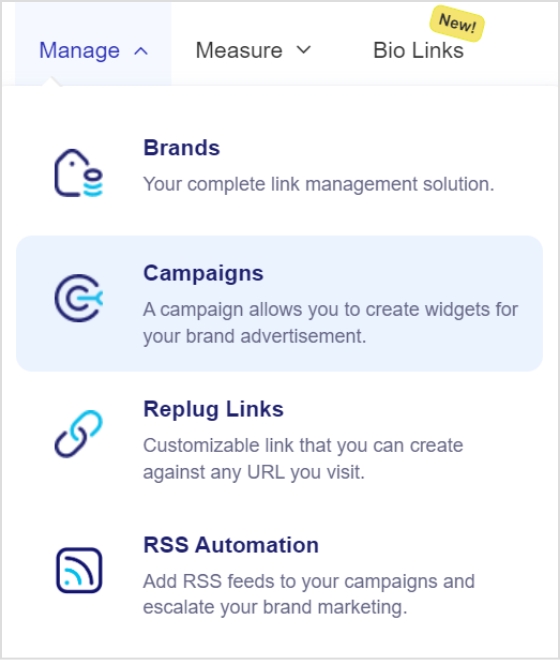
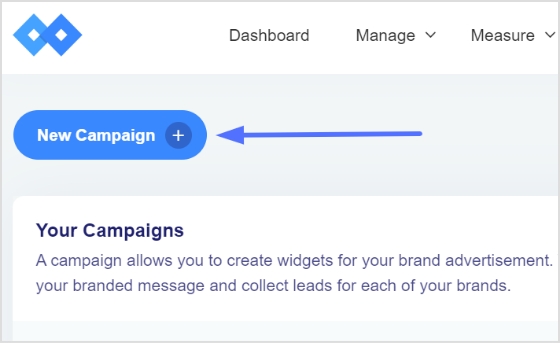
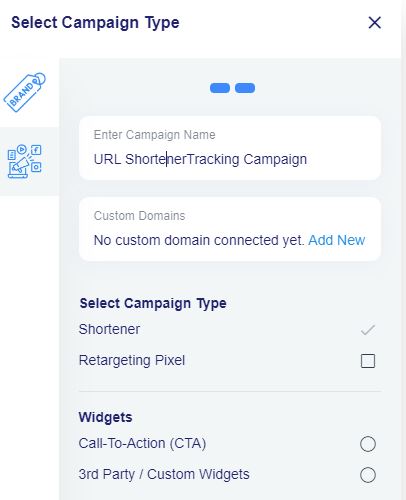