Category: Social Media

Browse blogs on social media strategies, content, and trends. Stay ahead with tips to grow engagement and reach.

  • Getting Started with Meta Pixel: The Key to Successful Retargeting

    Getting Started with Meta Pixel: The Key to Successful Retargeting

    What is a Meta Pixel?

    Meta Pixel, previously known as Facebook Pixel, is a small piece of code that can be added to the back-end of a website, mobile app, or partner application to track user’s footprints, making it easier for advertisers to retarget them on Facebook.
    Moreover, the Meta Pixel assists brands, organizations, entrepreneurs, and marketers with Facebook pages in determining and enhancing their return on investment from the largest social network in the world.

    While e-commerce has never been this popular, social media platforms are adapting to the latest technologies and advancements.
    Since Facebook is the number one social media platform with over one billion monthly active users, digital marketers and online advertisers need to tighten their grip on every aspect of Facebook ads.
    In a world full of AI tools and chatbots, it’s crucial to figure out the basic online marketing techniques that could give you a slight edge over the competition.
    Let’s dive deep into Meta Pixel and understand more about it.

    Why is the Meta Pixel called “Pixel”?

    Since Meta Pixel is a powerful analytical tool that tracks website visitors‘ activities. The way it works is that it uses a short code that leaves a cookie on each website visitor and helps advertisers track them via Facebook ads.
    Pixel is the industry-standard name for retargeting code that sits on the advertiser’s website or app and provides them with insights into consumer behaviors, actions, and choices.
    Meta Pixel helps identify Facebook advertisers and how users are interacting with the content or products on their website.
    Installing a pixel, whether you’re running Quora ads or Facebook ads, is vital to remarketing the previous website’s visitors and understanding the audience’s behavior toward your ad.

    What are the benefits of installing the Meta Pixel?

    Digital marketing gurus and online advertising experts rave about retargeting and often consider it one of the most important aspects of e-commerce sales growth.
    Installing the Meta Pixel in your website or app can provide various benefits that can help improve your Facebook advertising efforts – no question about it.
    So let me shed some light on the capabilities and benefits of installing or using the Meta Pixel:

    Essential for Facebook remarketing:

    Retargeting or remarketing is the core reason why meta-pixel is a thing now. With the help of the Meta Pixel, you can track the behavior of users who have visited your website or app, and target them with specific ads to encourage them to return to your site or complete a desired action.

    Track and improve conversions:

    Advertisers can track user behavior on their websites or apps and analyze the effectiveness of their advertising campaigns. The data can help them identify areas where they need to improve their campaigns and optimize their ads to increase conversions.

    Helps build custom audiences:

    Marketers and advertisers could create custom audiences based on the actions users take on their website or app. This can help them create targeted ads for specific groups of users and improve the relevance of their advertising campaigns.

    Assists in building lookalike audiences:

    By analyzing the behavior of users who have interacted with your website or app, the Meta Pixel can help advertisers identify similar audiences that are likely to be interested in their products or services. It can easily expand the reach of the advertising campaigns and help target new potential customers.

    Measures the results of your ad campaigns:

    The Meta Pixel provides advertisers with detailed data about the performance of your advertising campaigns. They can track the number of clicks, conversions, and other metrics that help them understand the effectiveness of their ads.

    Enables advertisers to show ads to the right audience:

    It gets easier to track user behavior with such a facility. Therefore, the advertisers could create targeted ads that are shown to the right people at the right time. It can significantly improve the relevance of their advertising campaigns and increase the chances of users taking action.

    How does the Meta Pixel work?

    meta-pixel

    The Meta Pixel works by inserting a one-time code into your website or app source so that it could track the users and allows you to remarket them using Facebook retargeting ad campaigns.
    To use the Meta pixel effectively, you must first install it on the website or app – wherever you’re trying to capture the audience footprints for Facebook retargeting.
    The retargeting pixel goes into the header section of the website or the source code of your app and helps you monitor, analyze, and track the audience visiting the pages/sections with the code on it.
    For example, an author is selling an ebook through a website and has already set up a landing page, a checkout page, and a thank you page for the campaign. The Meta Pixel would be installed on all three pages to record the buyer’s journey.
    In most content management systems (CMS), the header and footer are common on all pages. Therefore, adding any piece of code into the header or footer section means it’s been added to all pages eventually.

    What does Meta Pixel collect?

    Facebook-ads

    The Meta Pixel is a powerful tool that enables advertisers to collect valuable data that can be used to improve the effectiveness of your Facebook ad campaigns.
    The data collection using Meta Pixel begins by installing the Meta Pixel on the back end of your website or app. Once it’s added, you can monitor and track conversions on the website/app.
    This valuable data can be used to optimize your ad campaigns, ensuring that they are delivering the best possible results.
    The reason why advertisers collect data is because of its ability to facilitate remarketing to people who have already taken some kind of action on your website.
    By tracking the actions of visitors, such as adding items to a cart or completing a purchase, the Meta pixel can help facilitate the delivery of targeted ads to those individuals.
    Furthermore, one of the benefits of using the Meta pixel is that it allows you to build targeted audiences for future ads. As visitors interact with your website, their actions are recorded and analyzed by the Meta pixel.
    This empowers you (or the advertiser) to create audience segments based on specific behaviors or interests, which can then be used to target future ads. This process is called retargeting or remarketing.
    So the Meta Pixel collects valuable information about the website visitors so that the advertiser could design or create a relevant ad campaign to target the right audience.

    What are Meta Pixel Events?

    Meta has provided several “Events” for conversion optimization. If you’re new to Facebook advertising jargon, then let me make it easier for you.
    Events are defined as any type of action that takes place on your website after the visitor lands on the website as a result of the ad.
    There are several “Standard events” which are predefined by Meta and advertisers could use them to log user activities, conversion analysis, and build an audience.
    Besides the “Standard events,” there are “Object properties” that are also predefined by Meta and can be included with “Standard events” based on compatibility. For more clarification on Meta Pixel or to access the event codes, check out this page.

    How to setup Meta Pixel?


    Setting up the Meta Pixel is not a complex process unless you haven’t done any Facebook ad campaigns before or you never edited even a simple HTML code.
    I’ll try to break down the process into brief sections so that it gets easier for an average Joe to digest, comprehend, and implement it.
    Before I head over to the next part, just remember that Meta Pixel is a code that works as a cookie and helps advertisers target the website audience on Facebook.
    Since you have already learned about the Meta Pixel by now, it’s important to know how you can create it. It’s not a complex process so no need to panic.
    Here are the steps involved in creating a meta pixel:

    Step 1: Access the ads manager

    Ads Manager is a platform provided by Facebook that allows you to manage and create advertisements for your business.

    To create a meta pixel, you need to first access the Ads Manager by logging in to your Facebook account and clicking on the “Ads Manager” button in the top left corner of the screen.

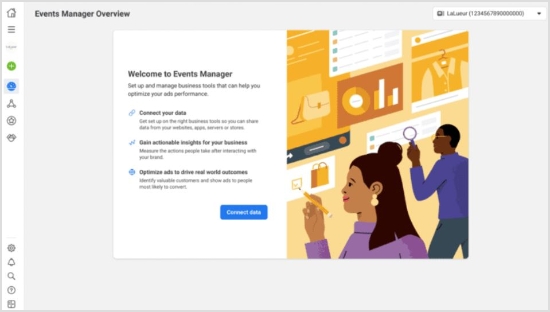
    Step 2: Go to the events manager

    Once you are in the Ads Manager, you need to navigate to the Events Manager section. This can be done by clicking on the “Events Manager” button in the left-hand menu.

    Step 3 Connect a data source:

    Connect-Data-Source

    After accessing the Events Manager, you need to connect a data source. A data source can be any platform that you use to collect data related to your websites or apps, such as Google Analytics or Shopify.
    By connecting a data source, you can collect information about user behavior on your website or app and use it to create targeted ads.

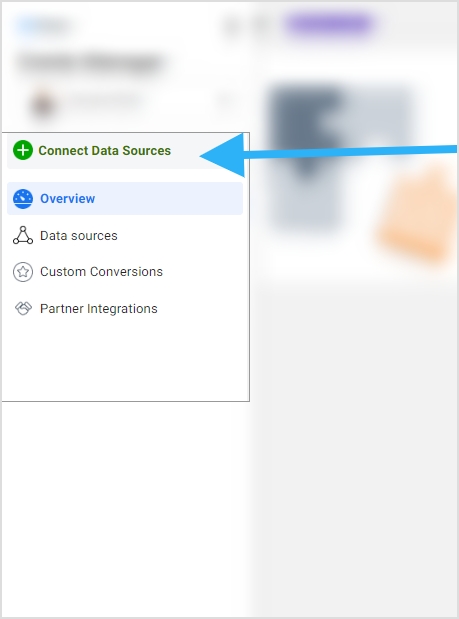
    Step 4: Choose the data source

    Choose-data-source

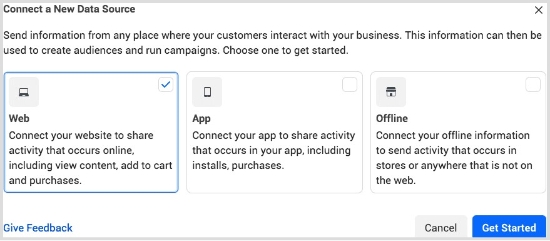
    Lastly, you need to choose the data source that you want to use for creating your meta pixel. This can be done by clicking on the “Connect Data Sources” button in the Events Manager. In most cases, the data source is the website, so you’ll need to provide the URL of your website.
    You may also like: How to rename a link using Replug?

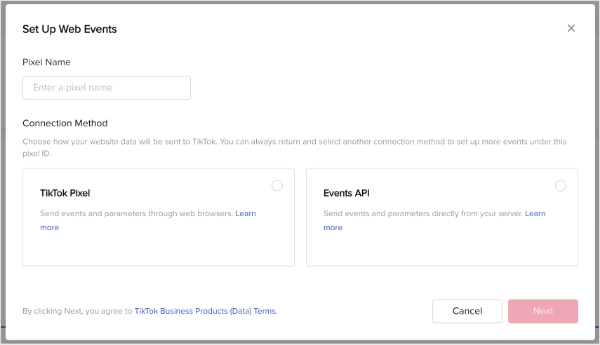
    Step 5: Select connection methods

    Select-connection-method

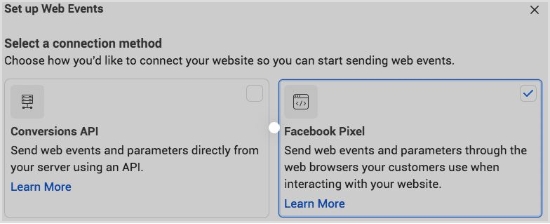
    You can either connect through the Conversion API method or Facebook Pixel method. For the said case we have selected the Facebook Pixel method.

    Step 6: Connect website activity using Facebook Pixel

    Connect-Website-Activity-using-Facebook-Pixel

    Once you have chosen the data source and followed the on-screen instructions to complete the process of creating a meta pixel, you’ll be able to generate your meta pixel for installation on your website or landing page.

    How to install the Meta Pixel on your website?

    Connect-website-Activity-using-pixel

    There are two basic ways of installing the meta pixel on your website.

    i. Insert Meta Pixel code manually

    The simple yet basic method of inserting the meta pixel code into your website is by accessing the source code of the website and putting the code into it. It’s usually done by editing the HTML or PHP file using a code editor and pasting the code into it.
    Make sure to add it to the pages that need the most or else you won’t be able to track the conversion. If your website is built with PHP, you might have a header.php file, just insert the code into it and it’ll be available/accessible on every page of the website.
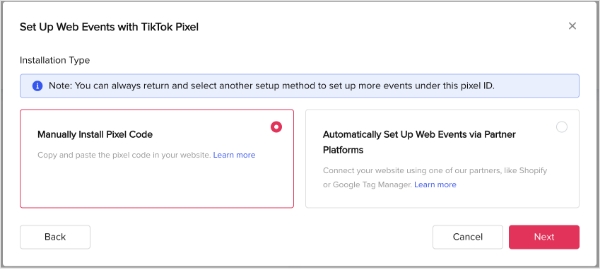
    Below are the steps to follow to install the Meta Pixel code manually.

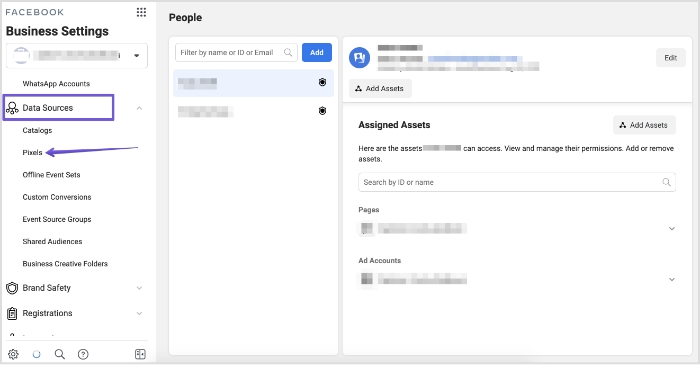
    1.Naviagte to the Events Manager in your FB Business Suite and click the Data Sources.

    2. Select the Meta Pixel you want to setup, and click Continue Pixel setup.

    3. Select Meta Pixel and click Connect.

    Connect-website-Activity-using-pixel

    4. Select Install code manually

    5. Copy the pixel base code.

    copy the pixel code
    -put-Meta-Pixel-code-on-website-header-


    6. Paste the pixel code at the bottom of the header section above the closing header tag in your CMS or web platform.
    Note: Ensure to toggle on Automatic Advanced Matching 

    ii. Add Meta Pixel code via Partner Integration

    The second method is more convenient than the previous one. It will work only if you’re using a CMS like WordPress, Drupal, or Shopify. All you need is to edit the source file and insert the meta pixel into your website’s code.
    Most people use WordPress for building their websites, blogs, and landing pages. So you could use any code insertion WordPress plugin for that matter. All you have to do is to install such a plugin and paste the code into it. The plugin would do the rest of the process of code placement on the website.
    Here are some of the popular code insertion plugins:
    ⦁ WPCode
    ⦁ Woody code snippets
    ⦁ Header Footer Code Manager
    Below video by digital marketer Jacob Lee explains the steps to add Meta Pixel code via WordPress partner integration.

    Here’s a video by Metics Media explaining the steps to add Meta Pixel code via the Shopify partner integration.

    How to find the Meta Pixel ID?

    install-code-header
    Facebook-Pixel-Id-

    Locating the meta pixel ID might be difficult for beginners, but it’s quite simple. If you have created your meta pixel ID, then it won’t be difficult for you to find and access it.
    However, if you’re new to Facebook ads, then it might seem intimidating at first. Don’t worry because I’ve got your back.
    To find the Meta Pixel in the Facebook Ads Manager, you can follow these steps:
    i. Log in to your Facebook account and go to the Ads Manager.
    ii. Click on the hamburger menu icon (three horizontal lines) in the top left corner of the screen.
    iii. Select the “Events Manager” option from the list of available options.
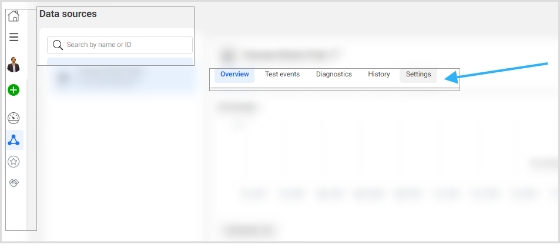
    iv. In the Events Manager section, click on the “Data sources” tab in the left-hand menu.
    v. Once you click on the data source button, you will be taken to your pixel page. Here, you can see the pixel ID, view the pixel code, and make any necessary changes to the pixel settings.
    vi. If you want to use the pixel to track specific events on your website or app, you can click on the “Settings” button next to the top menu and access the specific option. This is the area that will give you access to the cookies set, event setup, and conversion API.
    That’s pretty much it!
    Now you have successfully found your Meta Pixel in the Facebook Ads Manager and can now use it to track user behavior on your website or app and create targeted ads.

    How to setup Events using the Event setup tool?


    Setting up Events is an essential step in optimizing and improving the ad campaign as it directly influences the customer base targeting. Since retargeting is all about reaching out to the audience that has shown some interest in your website, setting up the right event helps identify the intent of the website visitors.
    To start using Events, you first need to set them up. Facebook has a dedicated section for Events setup, and it’s called Event Setup Tool.
    Let’s head over to the Ads Manager once again for showcasing how to set up events using the Events Setup Tool. Here’s the step-by-step guide on how to do it:

    Step 1: Go to the Ads Manager
    The first step in setting up events using the Event Setup Tool is to log in to the Ads Manager. If you don’t have an account, you can create one for free by going to the Facebook Ads Manager.

    events-manager

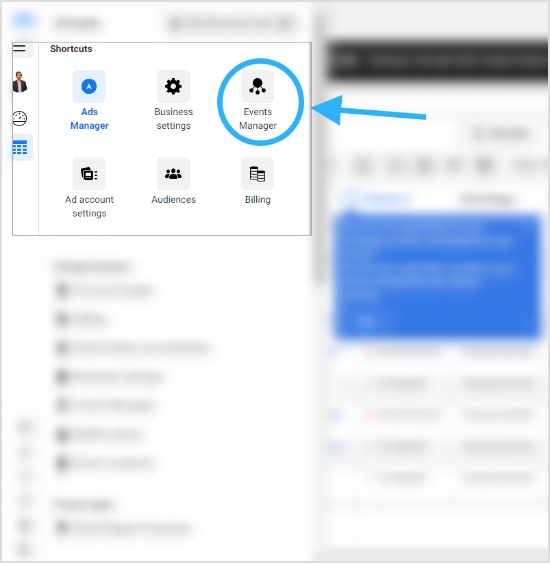
    Step 2: Open the Events Manager
    Once you have logged in to the Ads Manager, you will need to navigate to the Events Manager. You can do this by clicking on the hamburger icon in the top left corner of the screen and selecting “Events Manager” from the menu that appears.

    connect-data-sources

    Step 3: Access the Data Sources

    Once you have opened the Events Manager, you will see a menu on the left side of the screen. From here, click on “Data Sources,” which will take you to a page where you can manage your data sources, such as your website, app, or offline events.

    settings-data-sources

    Step 4: Go to the Settings Section
    After accessing the Data Sources page, you will see a list of your data sources. Select the data source you want to set up events for and click on its name. This will take you to the Settings section for that particular data source.

    event-setup
    setup-events-popup-window

    Step 5: Open the Events Setup Tool

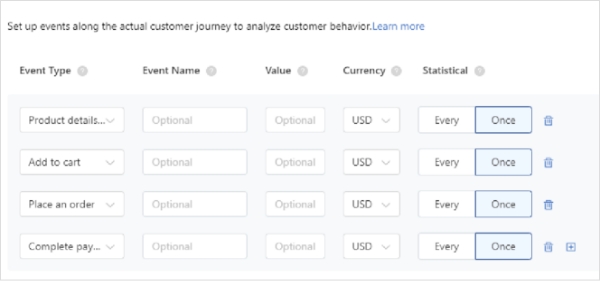
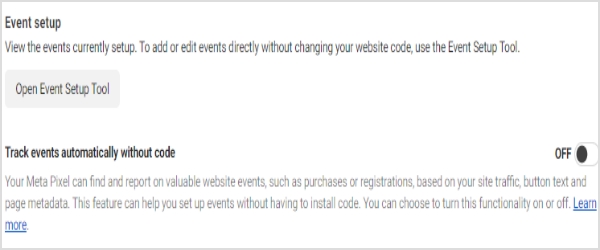
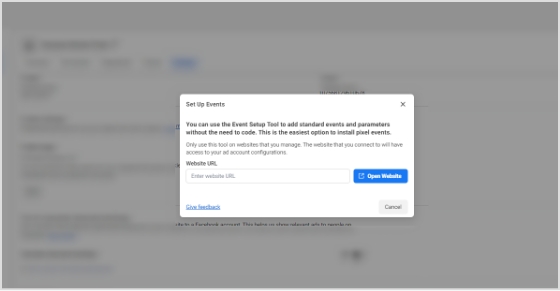
    Within the Settings section, scroll down until you see the “Events” section. Here, you will find the option to open the Events Setup Tool.

    Once you click on this button, you will be taken to a page where you can create and manage the events that you want to track on your website.

    How to confirm that the Meta Pixel is working using the Meta Pixel Helper?

    Facebook-Pixel-Helper-Extension
    Pixel-Helper-

    The Meta Pixel Helper is a convenient Chrome browser extension that can be used to check for the presence of Meta Pixel code on websites without any hassle.
    This browser extension operates in the background and doesn’t bother the script or performance of the website. Plus, it is quite easy to install even for newbies.
    After installation, an icon resembling </> – the Pixel Helper icon – will appear in the upper right corner of the browser alongside the address bar.
    When a website has a Meta Pixel installed, the Pixel Helper icon will change color from grey to blue, and a badge will appear showing the number of Pixels found on the page.

    If the icon does not turn blue, it means that there are no Meta Pixels installed on that particular webpage. To access the Pixel Helper, click on the Pixel Helper icon and a small popup will appear containing information that can be used to verify, troubleshoot, and improve the Pixel.
    Therefore, the Pixel Helper is a helpful tool for confirming the installation or existence of the Meta Pixel on the website. To download this Chrome extension, visit this page.

    How to use Meta Pixel with Replug?

    Replug is a powerful URL shortener that offers several features such as URL shortening, branded short URLs, retargeting, deep links, and bio links.

    You already know by now that Meta Pixel is used for retargeting people through Facebook ads. Since Replug also provides a retargeting feature, it’s time to figure out how the combo of Meta Pixel and Replug plays out.
    You can use the short links created with Replug to reach out and retarget the users that click on your short URLs through Facebook ads.
    Here are the steps involved in using Meta Pixel with Replug:

    i. Grab the Pixel ID from Facebook

    Facebook-Pixel-Id-

    You’d surely know by now where to get the pixel ID from your Facebook account. Here’s a quick guide if it all seems intimidating or too much to digest:

    • Go to the Ads Manager section and click on the Events Manager button from the options.
    • Then, go to the Data Sources from the left menu and you’ll see the Facebook pixel.
    • Open the settings area of your pixel and copy the pixel ID from there.

    ii. Login to your Replug Account

    add-retargeting-pixel

    Now go to the Replug website and log in to your Replug account.

    In case, you haven’t signed up for a Replug account, I highly recommend doing it now. Replug has a 14-day free trial. Try Now!

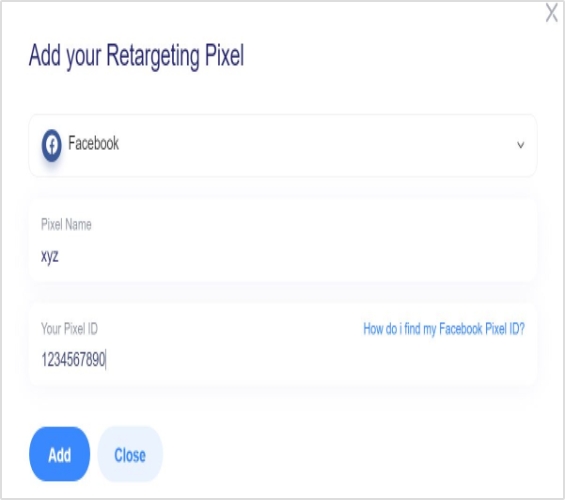
    iii. Add a Retargeting Pixel in Replug

    add-retargeting-pixel
    Click-Add-Pixel
    add-retargeting-pixel

    Once you’re in, access the profile settings from the top-right corner. Just click on your profile icon to do so.
    A drop-down menu would appear; click on the Retargeting Pixels.
    You’ll land on the Retargeting Pixels page. Now click on the “Add Pixel” button.
    Once you click the Add Pixel button, a popup window would appear. Choose Facebook, provide your pixel name, and paste your Facebook pixel ID.
    Once it’s done, click on the “Add” button to proceed.

    iv. Create a retargeting campaign

    Create-Retargeting-Pixel-Campaign
    select-brand-for-retargeting-campaign

    The next up is creating a new campaign for retargeting the Replug audience, meaning the visitors who click through your short links, so you could start retargeting them through Facebook ads.
    To do this, go to your Replug dashboard and access the Campaign section.
    Click on the “New Campaign” button to create a new campaign for this purpose.

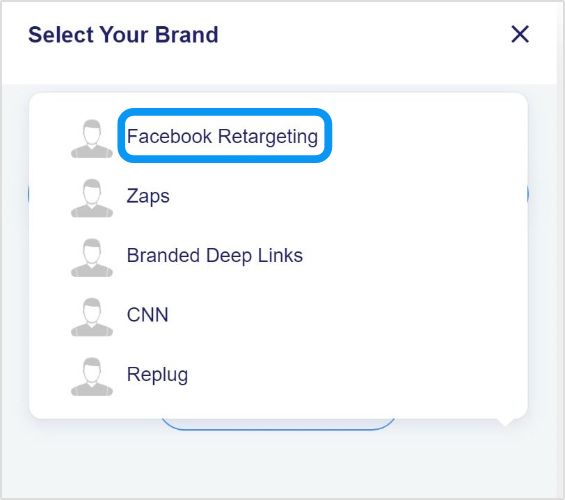
    Select the appropriate brand or create a new one for this campaign.

    Add-retargeting-codes-for-campaign-

    Name this campaign and select the campaign type. You must check the “retargeting” option at this stage to let Replug know that it’s a retargeting campaign.

    Choose the retargeting script afterwards.

    In this case, it’ll be the one associated with Facebook. Choose the Facebook pixel you created earlier in your Replug account.

    Now save the campaign and you’re done with creating a new campaign using Replug.


    You may also like: 14 Crazy-Effective Ways to Boost E-commerce Sales Through Retargeting

    How to change the Meta Pixel’s name?

    Changing the meta pixel’s name might not be on your mind, but you should know whether or not you can do it, just in case.
    It’s possible to change the meta pixel’s name. All you have to do is to follow a few simple steps to do this:
    i. Go to your Ads Manager account after logging in to your Facebook account.
    ii. Access the Events Manager section from the Ads Manager.
    iii. Open the Data Sources to access your already created meta pixel. (Remember that you could create only one meta pixel per account).
    iv. Now click on the edit button next to your meta pixel’s name. This is where you could change the meta pixel’s name.
    That’s it.
    Easy-peasy!

    FAQs about Meta Pixel

    Is meta pixel a cookie?

    The Meta Pixel is a pixel code that helps advertisers target the audience who have visited their websites through Facebook ads. A cookie also does the user-tracking on the websites, but may not be directly influencing the retargeting like the meta pixel.

    How do I create the Meta Pixel?

    Log in to your Facebook account, go to the Ads Manager, access the Events Manager, and click on the Data Sources. You’ll see the option to create your meta pixel.

    Is the Meta pixel different from than Facebook pixel?

    No. The Meta Pixel and the Facebook Pixel are the same. The Meta Pixel was formerly known as the Facebook Pixel.

    What is Meta pixel in Facebook ads?

    It’s a pixel code that helps advertisers track the website visitors and empowers them to advertise to those visitors using Facebook ads by retargeting them.

    What is a Facebook Pixel notice?

    This is by no means legal advice, but a lot of countries require websites to display the cookie consent notification which tells the website visitors that this website is using cookies to track visitors.
    When a website is using Meta Pixel or any other user tracking tool to track website visitors’ activity, performance, and behavior, they must notify the website visitors about this.
    Have you ever seen a cookie consent notification on websites, especially when you visit it for the first time?
    The website is trying to tell you that they’re using some tracking tools or softwares to track the visitors’ activities and behaviors – it’s a very common website management practice.
    I’m no expert on GDPR or CCPA, so you should consult your lawyer for more clarity. However, I simply use a cookie consent WordPress plugin on my website that displays a cookie consent notification on the website.
    Some several tools and plugins automatically add cookies consent notices to the websites, but here are some of the popular website plugins for this purpose:
    ⦁ Cookie Notice & Compliance for GDPR / CCPA
    ⦁ Cookies and Content Security Policy
    ⦁ Cookie Script
    You May Also Like:
    Campaign Tracking: Data-Driven Tools for Marketers
    15 Proven Facebook SEO Techniques To Increase Brand Visibility

  • How to share LinkedIn URL?

    How to share LinkedIn URL?

    You can expand your professional network by sharing your LinkedIn URL with other professionals in your industry. This can lead to new business opportunities, mentorship, and collaborations. It can also help you stay informed about your field’s latest trends and developments.

    For job seekers, sharing your LinkedIn URL can be useful in the job search process. It allows potential employers to learn more about your qualifications and experience and can help to showcase your skills and accomplishments.

    For businesses, sharing a LinkedIn URL can be a useful tool for marketing. It allows businesses to promote their products or services and reach a wider audience. It also allows businesses to establish themselves as thought leaders in their industry, which can lead to new business opportunities.

    Finally, for freelancers, creatives, and entrepreneurs, sharing a LinkedIn URL can be a good way to showcase their work and portfolio. It allows them to promote their skills and accomplishments to a broader audience, which can lead to new business opportunities and collaborations.

    Read Now: How to Shorten a link using a URL shortener?

    Let’s start by going over how to share LinkedIn URL:

    How to share LinkedIn URL in LinkedIn messages?

    On a computer device:

    Step 1: Log in to LinkedIn on your computer device and click the profile “Me” icon at the top. 

    me icon

    Step 2: Click “view profile” from the drop-down menu.

    view profile

    Also read: How to shorten LinkedIn URL?

    Step 3: Click the “more” button on your profile page, then click “send profile in a message.” 

    send profile in a message

    Step 4: Enter in the names of the people with whom you want to share your profile, and click send.

    new message

    Also read: How to Create The Perfect LinkedIn Content Strategy in 10 Easy Steps [Advanced Tactics Included]

    On a mobile device: 

    Step 1: Log in to LinkedIn on your mobile phone and tap the “profile icon” in the top left corner.

    profile icon

    [branded_short_links]

     Step 2: Tap “view profile” from the menu to open your profile. 

    view profile

    Also read: 20 Best LinkedIn Post Ideas

    Step 3: Tap “three dots” next to add section button, then tap “share profile via message.”

    share profile via message

    Step 4: Enter the names of the person to whom you want to share your LinkedIn URL.

    names of persons

    Step 5: Tap the send icon to send your profile via message. 

    send icon

    Also Read: LinkedIn Retargeting using Matched Audiences; A Complete Guide

    How to share LinkedIn URL on other platforms?

    Follow this method to share your LinkedIn URL outside LinkedIn. It could be any social media platform other than LinkedIn. You just need to copy your LinkedIn URL and for that, follow the steps below:

    On a computer device:

    Step 1: Log in to LinkedIn on your computer device and click the profile “Me” icon at the top. 

    me icon

    Step 2: Click “view profile” from the drop-down menu.

    view profile

    Also read: A Comprehensive Guide to Generate Leads With Social Media

    Step 3: Copy the URL in the URL bar, and you’ll have your Linked URL. Share this URL on any platform of your choice.

    url bar

    Also Read: How to change Shopify URL for sharing on social media?

    On a mobile device:

    Step 1: Log in to LinkedIn on your mobile phone and tap the “profile icon” in the top left corner.

    profile icon

    Step 2: Tap “view profile” from the menu to open your profile. 

    view profile

    Step 3: Tap “three dots” next to add section button, then tap “share profile via.”

    share profile via

    Step 4: Tap the copy URL button to copy the URL or share directly to your intended platform.

    copy url

    Read Now: What Is A Vanity URL &; How To Track It?

    FAQs

    How to share LinkedIn URL on the resume?

    You can add your LinkedIn URL to your resume by including it in the contact section. This is typically located at the top of the resume and includes your name, address, phone number, and email address. You can add “LinkedIn: [Your LinkedIn URL]” or simply “LinkedIn: www.linkedin.com/in/[Your Profile Name].”

    How to shorten LinkedIn URL?

    LinkedIn has its own feature to shorten the LinkedIn profile URL, and you can follow these steps to shorten your URL:

    • Log in to your LinkedIn account.
    • Click on me icon in the top bar and select view profile.
    • Click on the edit public profile & URL button on the right side of the top of your profile.
    • Scroll down to the Public Profile URL section, and click the Edit button on the right side.
    • You can customize your public profile URL by clicking on the Edit button and then changing your URL to something easy to remember and share.

    Alternatively, you can use link-shortening services like Replug to shorten your LinkedIn URL if you want it to be more memorable or to fit in a limited space.

    Trending:

    How to Create The Perfect LinkedIn Content Strategy in 10 Easy Steps [Advanced Tactics Included]

    How do I find my URL on Youtube?

    How To Save TikTok Videos Without The Watermark?

    How to check analytics on TikTok?

  • How to get your TikTok Profile URL?

    How to get your TikTok Profile URL?

    Are you a TikTok user looking to share your profile with others or promote your content on other social media platforms? Or maybe you’re just curious about how to access your TikTok profile link? Either way, you’ve come to the right place. 

    In this article, we’ll guide you through the process of getting your TikTok profile URL. TikTok URLs are important for building a following, sharing content, and engaging with viewers. By the end of this article, you’ll have the knowledge necessary to easily find and customize your TikTok profile URL, allowing you to share your content and grow your TikTok presence. 

    So, let’s dive in and learn how to get your TikTok URL!

    Also read: How to create a TikTok account?

    What is my TikTok URL?

    A TikTok URL is a link that directs you to a specific TikTok user’s profile or video. 

    Every TikTok user has a unique URL associated with their profile, which can be shared with others to allow them to view their content or follow them on the platform. The TikTok URL for a user’s profile typically includes their username and the TikTok domain, such as “tiktok.com/@username”.

    TikTok URLs can also be used to direct viewers to specific videos on the platform. Each TikTok video has its own unique URL, which can be found by clicking on the “Share” icon on the video and selecting “Copy Link.” This link can then be shared with others or posted on social media platforms.

    How to get TikTok Profile URL?

    There are two methods to get a TikTok profile link on mobile devices.

    1. From the edit profile button 
    2. From setting & privacy

    Follow the steps below for both of the methods to easily get your profile link. 

    Also read: How to get more followers on TikTok?

    Method 1: From the edit profile button

    Step 1: Open the TikTok app on your mobile device.

    Step 2: Tap on your profile icon at the bottom right corner of the screen.

    profile-icon

    Also read: TikTok Bio Ideas &; Hacks to Drive Traffic

    Step 3: Tap the “Edit profile” button. 

    edit-profile

    Step 4: Tap your profile URL below your username to copy your profile URL. 

    profile-url

    Also read: How To Save TikTok Videos Without The Watermark?

    Method 2: From setting and Privacy

    Step 1: Open the TikTok app on your mobile device.

    Step 2: Tap on your profile icon at the bottom right corner of the screen.

    Step 3: Tap three horizontal lines at the top right of the screen. 

    horizontal-lines

    Also read: How to delete a TikTok account?

    Step 4: Tap on “setting and privacy”. 

    setting-&-privacy

    Step 5: Tap on “share profile”. 

    share-profile

    Also read: How to delete TikTok videos?

    Step 6: Copy your profile link or share it directly on social media platforms. 

    copy-link

    Also read: How to check analytics on TikTok?

    How to change your TikTok Profile URL?

    Changing your TikTok Profile URL is a straightforward process. Follow these steps to change your TikTok Profile URL:

    Step 1: Open the TikTok app on your mobile device.

    Step 2: Tap on your profile icon at the bottom right corner of the screen to open your profile. 

    Step 3: Tap “Edit Profile.”

    edit-profile

    Also read: How to link Instagram to TikTok?

    Step 4: Tap on your TikTok username.

    user-name

    Step 5: Enter a new username for your profile. Make sure it’s unique and not already taken.

    edit-username

    Step 6: Click “Save” to update your username.

    Also read: TikTok Trends for Businesses, Brands, and Others

    Note: Once you’ve updated your username, your TikTok Profile URL will also be updated with your new username. This process may take a few minutes to reflect the changes, so don’t worry if your old username still appears for a short time.

    It’s important to note that you can only change your TikTok username once every 30 days. So, make sure to choose a username that you’re happy with and that represents your brand or personality. Additionally, changing your username may also affect the discoverability of your content, as users may have saved or shared your previous username.

    FAQs

    How do I add a clickable link to my TikTok bio?

    You can add a clickable link to your TikTok bio by going to your profile, clicking “Edit profile,” and then entering the URL in the “Website” field. Note that this feature is only available to users with over 1,000 followers.

    Also read: How To Put A Link In TikTok Bio?

    How do I use a TikTok URL to direct viewers to a specific video on the platform?

    You can use the specific video’s URL to direct viewers to a specific video on TikTok. Just copy the URL of the video you want to share and share it with your viewers.

    How do I find the TikTok URL for a specific video?

    You can find the TikTok URL for a specific video by clicking on the “Share” icon located on the video’s page and selecting “Copy Link.”

    Can I change the URL for a specific TikTok video?

    No, you cannot change the URL for a specific TikTok video.

    Can I use my TikTok profile URL to promote my brand or business?

    Yes, you can use your TikTok profile URL to promote your brand or business by sharing it on other social media platforms or using it in your marketing materials.

    How do I check the analytics for my TikTok URL and track clicks and engagement?

    You can view your TikTok analytics by going to your profile, clicking on the three dots in the top right corner, and selecting “Analytics.” From there, you can view metrics like views, engagement, and follower growth. 

    Trending:

    How to Make Money on TikTok?

    What is a Vanity URL and Why You Need One?

    Track Your Success: How to Create a Tracking Link?

    How to add a Twitter link to Instagram bio?

    How To Put A Link In TikTok Bio?


  • How to find live videos on Instagram?

    How to find live videos on Instagram?

    Instagram, like all social media platforms, constantly changes and evolves. In October 2021, one of the biggest updates was the removal of IGTV. Previously, users could find all live videos on Instagram by searching the hashtag #IGTV.

    Live videos on Instagram are now integrated into the “Stories” feature. After a live video ends, it is only available for replay for 24 hours, after which it is stored in the user’s “Video Archive.” Whether the video is republished or deleted is up to the discretion of the content creator.

    Also Read: How To Turn Off Vanish Mode On Instagram?

    Here’s how to find live videos on Instagram:

    How to find live videos on Instagram? 

    There are two ways to find live videos on Instagram:

    • Find Instagram live videos from the accounts you follow
    • Find random live videos on Instagram

    Let’s begin:

    Find Instagram live videos from the accounts you follow:

    You can easily view the live streams of the accounts you follow without much effort. Follow the steps below to find the live videos from the people you follow:

    Step 1: Open the Instagram app on your mobile phone, or log in to Instagram from a browser. 

    Step 2: Live video will appear in the stories feed with a colorful ring around it and the word Live. 

    Step 3: Tap on the live video to see the live broadcast from the people you follow. 

    During the live broadcast, you can interact by: 

    When watching a live broadcast, remember that the broadcaster and other viewers may see you’ve joined. 

    Leaving a comment (tap Comment on the app or Add a comment on the website), liking a comment, replying to a comment, reacting to the video with an emoji, or sharing the video. All actions taken during the broadcast, such as liking or commenting, are visible to other viewers.

    [branded_short_links]

    How to find random Instagram live videos?

    Discovering random live streams on Instagram can be frustrating if you don’t get any results. However, you can try the following steps for searching for random live streams:

    On Instagram mobile app:

    Step 1: Open the Instagram app on your mobile phone. 

    Step 2: Tap the “search icon” at the bottom menu. 

    search icon

    Also Read: How to link Instagram to TikTok?

    Step 3: Enter the intended live video keyword in the search bar and tap the search button on your mobile keypad. 

    enter search

    Step 4: Tap the “accounts” tab to open accounts with the live videos. 

    accounts

    Step 5: Tap the profile icon with the “live” to open the live stream. 

    On a web browser:

    Step 1: Log in to Instagram from your browser. 

    Step 2: Click “search” in the left side menu. 

    Search

    Step 3: Enter the intended keyword in the search bar and look for the “live” profile.  

    enter keyword

    Also Read: Instagram Story Hacks: 30 Ways To Boost Your Engagement

    How to start a live video on Instagram?

    Follow the steps below to start a live broadcast on Instagram:

    Step 1: Open the Instagram app and tap the “add icon” in the bottom menu. 

    add icon

    Step 2: Swipe left to go to live and tap the live button to start the live video. 

    live button

    Step 3: The device will check for the internet connection momentarily, then you’ll see the “you are now live” message on the screen. 

    Step 4: Tap the “exit (X)” on the top right corner to end the live stream. 

    exit live

    Step 5: Tap the “end video” button and confirm to end the live stream. 

    end video

    Also Read: How to Increase Followers on Instagram: Share Custom links

    Step 6: You will see the following options: View in Live Archive, Discard media or Share. Make your selection according to your preference.

    archive share discard

    FAQs

    Why can’t I find live videos on Instagram?

    There could be several reasons why you are not able to find live videos on Instagram:

    • Your account may not have access to live videos. Instagram has certain restrictions and requirements to access live videos.
    • The person you are trying to view the live video may not be broadcasting.
    • The person you are trying to view the live video of may have a private account, and you may not be following them.
    • Your internet connection may be slow or unstable, affecting the live video quality.
    • There could be a technical issue with the Instagram app or your device.

    Try troubleshooting these issues, or contact Instagram support for further assistance.

    Trending now:

    How To Save TikTok Videos Without The Watermark?

    15 Proven Facebook SEO Techniques To Increase Brand Visibility

    How To Put A Link In TikTok Bio?


  • How to get the Snapchat URL?

    How to get the Snapchat URL?

    Snapchat is one of the most popular social media platforms in the world, known for its unique features that allow users to share pictures and videos that disappear after a set amount of time. With millions of daily active users, Snapchat has become a go-to platform for sharing candid moments with friends and family. 

    However, have you ever wanted to share your Snapchat profile with someone who doesn’t have the app, or include your Snapchat handle on your website or social media profiles? 

    In this article, we will show you how to get your Snapchat URL and share it with the world, so that you can connect with more people and expand your social circle. 

    So, whether you’re a seasoned Snapchat user or just getting started, keep reading to learn how to get your Snapchat URL and make your profile more visible to others.

    Also read: How to create a QR code for a URL?

    How to get your Snapchat URL?

    Getting your Snapchat URL on a mobile device is a quick and easy process that can be completed in just a few simple steps. Here’s what you need to do:

    Step 1: Open the Snapchat app on your mobile device.

    Step 2: Tap on your profile icon in the top left corner of the screen to access your profile.

    profile icon

    Also read: How to find my Twitter URL on mobile and desktop?

    Step 3: Tap the share icon in the top right corner. 

    share-icon

    Also read: How do I find my URL on Youtube?

    Step 4: Tap the “copy” button at the bottom left corner and that’s all there is to it.

    copy-link

    Whether you’re looking to connect with new friends, promote your brand or business, or simply share your Snap stories with a wider audience, having your Snapchat URL readily available can be a great way to expand your reach and build your online presence.

    Also read: How to Shorten a link using a URL shortener?

    FAQs

    What is a Snapchat URL?

    A Snapchat URL is a link to your Snapchat profile that can be shared with others. It allows people who don’t have the Snapchat app to view your profile and connect with you.

    Is my Snapchat URL public?

    Your Snapchat URL is not public by default. However, if you share your URL with others, they will be able to view your profile and connect with you.

    Can I get my Snapchat URL on both mobile and computer devices?

    No, you cannot get your Snapchat URL on computer devices. You can only get your Snapchat URL on a mobile device. 

    What is my Snapchat username?

    Your Snapchat username is the unique identifier that you created when you signed up for your Snapchat account. It should be the name that appears in your profile, and it’s also the name that your friends can use to add you to the app. If you’re not sure what your Snapchat username is, you can open the Snapchat app and check your profile to see what name appears at the top of the screen.

    Trending:

    How to create a call to action using a URL shortener?

    What is a Vanity URL and Why You Need One?

    How to add a Twitter link to Instagram bio?

  • How to get the URL of a photo in seconds?

    How to get the URL of a photo in seconds?

    A picture is worth a thousand words, but sometimes you need the URL of that picture to make it work for you. Whether you want to share a hilarious meme, add an image to your website, or simply want to save a photo for later, knowing how to get the URL of an image can be a game-changer. 

    In this article, we’ll reveal some simple yet effective methods to help you get the URL of any image you come across, even if it seems impossible at first glance. 

    Also Read: How to find my Twitter URL on mobile and desktop?

    Here’s how to get the URL of a photo on different devices:

    How to get the URL of an image on a computer?

    Step 1: Open Chrome and go to images.google.com on your computer device. 

    go to google images

    Also Read: How to create a QR code for a URL?

    Step 2: Enter a word or phrase (keyword) related to the image you’re searching for in the Google images search box and press enter. 

    type image name

    Step 3: In the image results, click the image you are looking for. 

    images results

    Also Read: How to shorten LinkedIn URL?

    Step 4: Click three horizontal dots in the top right, then click share. 

    3dots and share

    Step 5: Click “Click to copy link,” and you will have the image URL.

    click to copy link

    Also Read: How do I find my URL on Youtube?

    How to get the URL of a photo on a mobile:

    Here’s how to get the URL of a photo on a mobile device:

    Step 1: On your phone or tablet, open the Google app, Chrome app Chrome, or Firefox.

    Step 2: Go to “images.google.com” to open google images. 

    search bar

    Also Read: How to Shorten a link using a URL shortener?

    Step 3: Search for the image you’re looking for by entering the keyword in the Google images search box. 

    enter keyword

    Step 4: In the image results, tap on the image you want to get a larger version. 

    image results

    Step 5: Tap three dots in the upper right corner of the image, then tap share. 

    3dots and share (1)

    Step 6: Tap “copy URL,” and you’ll have the image URL.  

    copy url

    Also Read: What is a Tracking URL and How Does it Work?

    FAQs

    What is an image URL?

    An image URL is a web address that identifies the location of an image file on the internet. It is a unique address that allows you to access and display the image on a webpage or in an application.

    How can I test if an image URL is valid?

    To test if an image URL is valid, you can simply paste the URL into a web browser and try to load the image. If the image loads successfully, then the URL is valid. If the image fails to load or returns an error, then the URL may be invalid, or the image may no longer be available at that location.

    Can I change the URL of an image without affecting its content?

    No, changing the URL of an image will affect its location on the internet and may make it unavailable or difficult to find. If you need to change the URL of an image, you should use a redirect or update the links to the new URL to ensure that it remains accessible.

    How can I optimize the URL of an image for SEO?

    To optimize the URL of an image for SEO, you should use descriptive and relevant keywords in the file name and folder structure of the image URL. This can help search engines understand the context and content of the image and improve its ranking in search results. Also, understanding color theory can enhance the visual appeal of your images, making them more engaging for users.

    What is the difference between an absolute and relative image URL?

    An absolute image URL includes the complete web address of the image, including the protocol (HTTP or HTTPS), domain name, and file path. A relative image URL includes only the file path, which is relative to the web page that is linking to the image. Relative URLs are typically shorter and easier to maintain but may be less reliable if the location of the image changes.

    Trending: 

    How to Quickly Increase Social Media Conversions in 2022

    TikTok Bio Ideas & Hacks to Drive Traffic

    How to add YouTube links to Instagram story?
    How To Save TikTok Videos Without The Watermark?

  • How to download Instagram videos?

    How to download Instagram videos?

    Instagram does not allow users to download videos directly from the platform, but there are a few ways to download Instagram videos. Here are some methods:

    Method 1:

    Download using a video downloader website:

    Many websites allow you to download Instagram videos. Here’s how to download Instagram videos using a video downloader website:

    Also Read: How to link Instagram to TikTok?

    Step 1: Open the Instagram app and find the video you want to download.

    Step 2: Click on the three dots in the upper right corner of the video and select “Copy Link.”

    copy link

    Also Read: How to add YouTube links to the Instagram story?

    Step 3: Go to a video downloader’s website, like “Snapinsta,” and paste the link into the search bar.

    Step 4: Click download, and the video will be downloaded to your device.

    Snapinsta

    Also Read: How To Turn Off Vanish Mode On Instagram?

    Method 2:

    Download using a third-party app:

    Here’s how to download Instagram videos using a third-party app:

    Many third-party apps allow you to download Instagram videos. Here are some popular ones:

    Video Downloader for Instagram: This app is available on iOS and Android. It allows you to download videos from Instagram by copying the video link and pasting it into the app.

    video downloader for instagram

    [branded_short_links]

    InstaSave: This app is available for Android and allows you to download Instagram videos by copying the video link and pasting it into the app.

    instasave

    Method 3:

    Use a screen recording tool:

    If the above methods don’t work, you can use a screen recording tool to record the video as it plays on your screen. Here’s how:

    Step 1: Open the Instagram app and find the video you want to download.

    Step 2: Start a screen recording on your device (the method varies by device).

    Step 3: Play the Instagram video and let it play in full.

    Step 4: Stop the screen recording and save the video to your device.

    It’s important to note that some of these methods may violate Instagram’s terms of service, and downloading copyrighted content without permission is illegal. Make sure you have the necessary rights to the content before downloading.

    Also Read: How to create a QR code for a URL?

    FAQs

    How to download Instagram reels?

    There are several ways to download Instagram reels, and I’ll outline some of the most common methods:

    • Using a third-party app: Many third-party apps allow you to download Instagram reels. Some popular ones include InSaver, Video Downloader for Instagram, and InstaSave. To use these apps, copy the link to the reel you want to download, paste it into the app, and follow the instructions to download the video.
    • Using an online downloader: Several websites allow you to download Instagram reels. Some popular ones include InstaDownloader, InstaOffline, and DownloadGram. To use these websites, copy the link to the reel you want to download, paste it into the website, and follow the instructions to download the video.
    • Using the built-in download option: Instagram has recently added a built-in download option that allows you to download your reels. To use this feature, open the reel you want to download, tap the three dots in the top right corner, and select “Save Reel.” The reel will be saved to your camera roll.
    • Trending:
    • Why Your Business Needs a Custom URL Shortener?
    • 15 Proven Facebook SEO Techniques To Increase Brand Visibility
    • TikTok Bio Ideas & Hacks to Drive Traffic
    • How To Save TikTok Videos Without The Watermark?
  • What Is a TikTok pixel & learn how to set it up

    What Is a TikTok pixel & learn how to set it up

    What is a TikTok Pixel?

    TikTok Pixel is a tracking pixel code on your website to track conversion events. It also helps advertisers track user behavior on their website after clicking on a TikTok ad.

    It is similar to the tracking pixels used by other social media platforms, such as Facebook Pixel. With the Pixel installed, you can track everything from page views to purchases, allowing you to understand your audience better and tailor your TikTok ads accordingly.

    If you want to make a splash on TikTok and maximize its potential as an advertising platform, you need to jump on the pixel bandwagon.

    But setting up the TikTok Pixel can be a head-scratcher, especially if you’re new to digital marketing. 

    That’s why we’ve created this comprehensive guide that walks you through everything you need to learn about the TikTok Pixel – what it is, how it works, and step-by-step instructions on how to set it up.

    Whether you’re a seasoned digital marketer or new to TikTok advertising, this guide will provide the details and tools you need to set up TikTok pixel on your website. And you’ll be ready to start measuring your conversions in no time! 

    Also Read: How to Build a TikTok Marketing Strategy for Your Business?

    Why use a TikTok tracking pixel? What is the TikTok Pixel used for?

    why use tiktok pixel?

    Well, there are several reasons.

    • First and foremost, TikTok Pixel helps you with TikTok analytics and measures the effectiveness of your ad campaigns. Let’s say you’re running a TikTok ad campaign to promote a new product on your website. By using it, you can see how many people have clicked on your ad, visited your website, and how many of them made a purchase. This information can help you determine the ROI of your ad campaign and whether it’s worth continuing to invest in.
    • Secondly, it allows you to optimize your ad campaigns. Using the data collected by it, you can identify which ads are performing well and which ones aren’t. For example, if you see users spending more time on a particular page of your website after clicking on an ad, you can use that information to create more ads that drive users to that page.
    • Finally, it enables you to retarget users. Let’s say someone visits your website after clicking on a TikTok ad, but needs to make a purchase. With TikTok Pixel, you can retarget that user with a follow-up ad tailored to their interests. For example, you could show them an ad for the product they were looking at on your website.

    Benefits of using TikTok Pixel

    benefits of tiktok pixel

    Here are some of the fantastic benefits that TikTok Pixel offers to advertisers.

    • Track Conversions

      It allows you to track user actions on your websites or apps, such as purchases, form submissions, and downloads. This data can be used to measure your advertising campaigns’ effectiveness and identify improvement opportunities. 

    For example, a hotel chain can use TikTok Pixel to track bookings made by users who clicked on their ads, helping them to calculate the return on their ad spend.

    • Create Custom audiences

      With TikTok’s Pixel, you can create custom audiences based on user behavior on your website or app. This allows you to target users who have already shown an interest in your product or service and are more likely to convert.

    For example, a skincare brand can create a custom audience of users who have visited their website in the past 30 days but have yet to purchase it. They can then display ads to this audience on TikTok, promoting a special offer to incentivize them to buy.

    • Optimize campaigns

      It allows you to optimize your campaigns for specific objectives, such as conversions or clicks. This means the platform will automatically adjust your campaign settings to deliver the best results based on your chosen goal. 

    For example, if you’re running a campaign to drive website traffic, you can optimize your TikTok ad delivery to show your ads to users who are likely to click through to your site.

    • Enhanced ad retargeting

    It also enables you to retarget visitors who have interacted with your brand in the past, such as users who have visited your website or engaged with your TikTok ads. This helps to keep your brand top of mind and can increase the likelihood of conversion.

    Let’s take Retargeting ad examples of a clothing brand that uses TikTok Pixel to track the pages a user visits on their website and use this information to display ads for specific products to that user on TikTok.

    • Attribution modeling

      It allows you to attribute conversions and other user actions to specific advertising campaigns, ad groups, or even individual ads. This helps you to understand which of your campaigns are driving the best results and make data-driven decisions about where to invest your ad budget.

    How does TikTok Pixel work?

    how tiktok pixel works?

    TikTok Pixel works by placing a small code on your website or app. This code is a snippet of JavaScript that will run on every page of the website where it’s installed.

    Once the Pixel is installed, it will start collecting data about user behavior, such as page views, sign-ups, and purchases. This data is then sent back to TikTok, where you can access it through your TikTok Ads Manager to gain insights into the TikTok analytics and ad campaign’s performance and optimize it for better results.

    How to set up your TikTok Pixel?

    Setting up your Pixel is relatively simple. Here’s the step-by-step process on how to do it.

    Step 1: Create a TikTok Ads account

    Go to the TikTok business homepage and click “Create now” to create your account.

    tiktok ads

    Step 2: Sign up

    Sign up with your email address, phone number, or TikTok account. 

    sign up with your phone number or email

    Step 3: Set up your Pixel

    After logging in to your account, click Event under “Assets” in TikTok Ads Manager. Then choose Web Events.

    setup your pixel

    Step 4: Name your Pixel

    Give a name to your Pixel that will help you remember its purpose. For instance, if you’re using it to track conversions on your website, you can name it “Conversion Pixel”.

    The maximum character length for a Pixel name is 128 characters, including spaces.

    After naming, ​select TikTok Pixel as your connection method.

    name your pixel

    Step 5: Add the Pixel to your website

    To add the Pixel to your website, you can either manually install the TikTok Pixel code on your website or use a tag manager like Google Tag Manager to add the Pixel.

    add the pixel to the website

    Also Read: Find Your Google Pixel ID

    Step 6: Test your Pixel

    After adding the Pixel to your website, test it to ensure it works correctly. You can do this using the TikTok Pixel Helper, a Chrome extension that helps verify your Pixel.

    Step 7: Set up your events

    Once you’ve verified that your Pixel is working correctly, you must set up the events you want to track. TikTok Pixel supports a range of standard and custom events you can follow on your website.

    setup your events

    Step 6: Verify and publish your Pixel

    After setting up your events, you should verify your Pixel to ensure it tracks events correctly. Once you’ve verified your Pixel, you can publish it and start tracking data.

    And that’s it! Your TikTok Pixel is now set up, and you can start tracking conversions and optimizing your TikTok Ads for better performance.

    You might also like: Lead Generation with Retargeting pixels

    How to install TikTok Pixel?

    To install the Pixel on your website, add the pixel code to your website’s header section. This code is provided to you when you create your Pixel in TikTok Ads Manager. 

    Here’s the step-by-step process to install the Pixel:

    Step 1: Go to your TikTok Ads Manager account and click “Assets” in the left-hand menu.

    Step 2: Click “Pixels” and “View Pixel.”

    Step 3: Copy the pixel code that’s provided. Or you can download it as well by clicking on ‘Download Pixel Code.’

    Your pixel base code will look like this:

    pixel code

    Step 4: Add the pixel code to the header section of your website. Website headers start with the <head> tag and close with the </head> tag.

    For example:

    <!—Example___><!DOCTYPE html > <head> “INSERT TIKTOK PIXEL CODE HERE” </head></html>

    Step 5: Save your changes.

    And that’s it! Your Pixel Code is now installed on your website, and you can start tracking conversions.

    Also Read: Find Your Quora Pixel ID

    How to uninstall TikTok Pixel?

    If you want to uninstall TikTok Pixel, remove the pixel code from your website’s header section. Here are the steps:

    Step 1: Go to your website’s code editor and navigate the header section.

    Step 2: Delete the Pixel code.

    Step 3: Save your changes.

    And that’s it!

    Also Read: Find Your Twitter Pixel ID

    How to track TikTok Ads: TikTok Pixel VS Custom Tracking Solution


    Some advertisers prefer a custom tracking solution, which can offer more flexibility and control over the tracking process. With a custom tracking solution, advertisers can track specific events unique to their business and tailor their tracking to their particular needs. This can be very useful for companies with complex sales funnels or multiple conversion points.

    So which option is better – the TikTok Pixel or a custom tracking solution? The answer to this query will vary depending on various factors, including the size of your business, the complexity of your sales funnel, and your overall ad strategy. 

    One of the significant pros of using TikTok Pixel is that it’s an all-in-one solution that’s easy to set up and use. You don’t need technical skills to install it, and it works seamlessly with TikTok’s advertising platform. Once it’s installed, you can start tracking conversions right away. It also offers a variety of conversion events you can follow, such as add-to-cart, checkout, and registration, which gives you a comprehensive understanding of how users interact with your website.

    By using the pixel, you can optimize your campaigns and ensure that you get the best possible results for your advertising efforts.

    Also Read: Find Your LinkedIn Pixel ID

    Track Pixels Using Replug URL Shortener

    Replug URL shortener offers multiple features such as bio links, deep links, A/B testing and others. One of the features marketers can make most of is the feature of retargeting ad pixels. For this, you just need to run a retargeting campaign for the selected shortened link. It will fire a pixel to the selected socials.
    Before you create a retargeting campaign, you need to create a shortened link.
    Once done creating a shortened link then move on with the process to create a retargeting campaign in Replug.
    In order to retarget your audience in Replug Tool which is coming through the shortened links, your pixels must be placed on those shortened links.

    To do so, navigate to the right top corner, click your name to open the settings menu, and further click on Retargeting Pixels  to add your Tiktok Pixel.

    retargeting-pixel

    Then on the new window, click on “Add a Pixel” which will open up a pop window, select the desired social network i.e. TikTok in this case and add your Pixel ID and click save.
    Amazing thing about Replug is that you can add multiple retargeting pixels to the same short link.

    TikTok-Pixel

    Why do websites use TikTok trackers?

    Now, when it comes to TikTok trackers, websites use them because TikTok is a massively popular social media platform. Many websites want to take advantage of this popularity by integrating TikTok content into their site, such as embedding TikTok videos or allowing users to share TikTok content directly.

    To do this, websites must use TikTok trackers to gather user data and track their behavior. This data can be used to optimize the user experience by recommending more relevant TikTok content to users based on their interests and behaviors. 

    In addition, using TikTok trackers can also provide insights into how users interact with TikTok content on the website. For example, website owners can see which TikTok videos are getting the most views and engagement and use this data to inform their content strategy and improve their overall performance.

    It can help websites to monetize their content more effectively. By tracking user behavior, websites can better understand their audience and target ads more effectively. This can increase the likelihood of users clicking on ads, generating revenue for the website owner.

    Those are some of the reasons why websites use TikTok trackers. While there are certainly valid concerns about user privacy and data protection, it’s clear that there are also many benefits to using trackers that can help websites to offer a better user experience and monetize their content more effectively.
    Also Read: Find Your Pinterest Pixel ID

    Best practices for TikTok conversion tracking

    tiktok tracking pixel

    If you’re looking to use TikTok conversion tracking, there are a few best practices you should keep in mind to ensure you’re getting the most out of your efforts. Here are a few points to help you get started:

    • Set clear goals: Before you start tracking conversions on TikTok, you must have a clear idea of what you want to achieve. Whether you’re looking to drive more traffic to your website, increase sales, or boost brand awareness, having a specific goal in mind will help you to track and measure your progress more effectively.
    • Use the right tracking tools: TikTok offers a range of tracking tools that can help you to measure your conversions and track the effectiveness of your campaigns. Be sure to use these tools to their fullest extent, and consider integrating them with your existing analytics and reporting tools for a more comprehensive view of your performance.
    • Test and optimize your campaigns: Like any marketing campaign, TikTok conversion tracking requires testing and optimization to ensure you get the best results. Try experimenting with different ad layouts & formats, targeting options, & messaging to see what works best for your audience. Use the data from your tracking tools to inform your decisions.
    • Monitor your metrics regularly: To get the most out of your TikTok conversion tracking efforts, it’s essential to monitor your metrics periodically and make adjustments as needed. Keep an eye on your click-through rates, conversion rates, and other key performance indicators, and use this information to make data-driven decisions about optimizing your campaigns.
    • Consider working with a TikTok partner: If you’re new to TikTok conversion tracking or need help optimizing your campaigns, consider working with a TikTok partner. These companies specialize in helping businesses to achieve their goals on TikTok and can offer expertise in maximizing your efforts.

    Interested in using TikTok Pixel in your marketing strategy?

    We’ve covered a lot of ground, from what TikTok Pixel is, to how it works and the step-by-step guide to help you quickly get started.

    However, TikTok Pixel is not the only advertising tool available. If you want to take your advertising game to the next level, consider exploring Replug’s Link Retargeting Pixels

    With Replug, you can track and retarget every link you share online, turning your content into a powerful advertising tool. So why not check it out and see how it can help your business grow?

    FAQs

    Why does TikTok get glitchy?

    There can be a few reasons why TikTok gets glitchy. It could be due to an outdated app version, poor internet connectivity, or a bug in the app itself. Sometimes, restarting the app or clearing the cache can resolve the issue. If the problem continues, you can try uninstalling and reinstalling the app or contacting TikTok support for assistance.

    What are some alternatives to TikTok Pixel?

    While TikTok Pixel is a powerful tool for tracking conversions and optimizing ad campaigns, there are a few alternatives that you can consider if you’re looking for something different. For example, Google Analytics offers robust tracking capabilities and can be integrated with other Google marketing tools like Google Ads. 

    Facebook Pixel is another popular option for tracking conversions and measuring the effectiveness of Facebook ads. Additionally, third-party tracking tools can provide various tracking and analysis features. Ultimately, the right tool for you will depend upon your specific needs and goals, so it’s worth exploring a few different options to find the one that’s best for your business.
    You may also like:
    How to get more followers on TikTok?
    TikTok Bio Ideas & Hacks to Drive Traffic
    How To Get More TikTok Views? 15 Hacks That Work
    How To Put A Link In TikTok Bio?

  • How to Add Instagram Link to Facebook Bio?

    How to Add Instagram Link to Facebook Bio?

    If you’re looking to promote your Instagram profile and boost your online presence, adding your Instagram link to your Facebook bio can be a highly effective strategy. By doing so, you can reach a broader audience and potentially attract more followers, which can help you take your social media game to the next level. 

    In this guide, we’ll explore the steps involved in adding an Instagram link to your Facebook bio on both computer and mobile devices, as well as some tips on how to make the most of this feature.

    Also Read: How to link Instagram to TikTok?

    How to add Instagram link to Facebook bio on a mobile device?

    Here’s a step-by-step guide on how to add your Instagram link to your Facebook bio on a mobile device:

    Step 1: Open the Facebook app on your mobile and tap your profile icon. 

    profile icon

    Also Read: How to add YouTube links to Instagram story?

    Step 2: Tap the “edit profile” button.

    edit profile

    Step 3: In the edit profile section, scroll down to the “links” section and tap “edit”. 

    links-edit

    Also Read: How To Turn Off Vanish Mode On Instagram?

    Step 4: Tap the “add social link” button. 

    add social link

    Step 5: Tap the “platform” button and choose Instagram from the list. 

    select Instagram

    Step 6: Enter your Instagram account “user name” and tap save

    enter username & save

    Also Read: How to Change Facebook URL on Mobile and Desktop?

    Boost ROI with branded URLs - Replug dashboard showing performance metrics and branded URL creation
    Replug Logo
    Turn your bio links into click-boosting machines
    Check

    Drive up to more clicks than plain URLs

    Check

    Share multiple destinations with one link

    Check

    Turn every profile visit into traffic

    Create bio links free

    How to add Instagram link to Facebook bio on a computer device?

    Step 1: Log in to Facebook on your computer browser. 

    Step 2: Click on your profile name on the top left side. 

    profile name

    Step 3: Click “about”, then “contact and basic info”

    about-basic info

    Also Read: How to Quickly Increase Social Media Conversions in 2022

    Step 4: Click the “add website button” under the “website and social links” section. 

    add website

    Step 5: Paste your Instagram URL in the URL field and click save. You’ll have your Instagram link in the Facebook bio. 

    paste url

    Also Read: 15 Proven Facebook SEO Techniques To Increase Brand Visibility

    FAQs

    How to add Instagram link to Facebook post?

    To add an Instagram link to a Facebook post, follow these steps:

    1. Open Facebook and start creating a new post.
    2. Click on the “Add a link” option located below the post text box.
    3. In the link field, paste the URL of your Instagram profile.
    4. Wait a moment for the link preview to generate. You should see a preview of your Instagram profile with your profile picture and a brief description of your account.
    5. If you want to customize the link preview, you can click on the preview image and edit the title, description, and image thumbnail.
    6. Once you’re satisfied with the link preview, you can add any additional text to your Facebook post and then click the “Post” button to publish your post.

    That’s it! Your Facebook post should now contain a clickable link to your Instagram profile.

    Also Read: How to add utm code to the URL using a link shortener?

    Why can’t I see my Instagram link in my Facebook bio?

    If you cannot see your Instagram link in your Facebook bio, make sure you have added it correctly by following the steps above. Also, check that your Instagram account is not set to private, as private accounts cannot be linked to Facebook bios.

    Why is my Instagram link not clickable in my Facebook bio?

    If your Instagram link is not clickable in your Facebook bio, it may be because you have not entered the link correctly, or your Instagram account may be set to private.

    Trending:

    How To Save TikTok Videos Without The Watermark?

    How To Add A Instagram Link In Bio?

    How to create a QR code for a URL?

    TikTok Trends for Businesses, Brands, and Others

  • How to link Instagram to Facebook?

    How to link Instagram to Facebook?

    In today’s digital age, social media platforms have become a powerful tool for individuals and businesses to connect with their audience and grow their online presence. 

    Instagram and Facebook are two of the most popular social media platforms, with millions of users worldwide. While both platforms are distinct and have unique features, linking your Instagram account to Facebook can provide numerous benefits, including cross-promotion, increased visibility, efficiency, and access to insights. 

    Let’s discuss how to link Instagram to Facebook and why you want to do so.

    How to link Instagram to Facebook?

    When you link your Instagram account to Facebook, you can take advantage of the integration of the accounts centre. The accounts centre is a feature that allows you to manage your connected accounts in one place, including Instagram and Facebook. Adding your Instagram account to your duplicate accounts centre as your Facebook account allows you to easily share your Instagram content directly with Facebook.

    Also Read: How To Add A Instagram Link In Bio?

    Here’s how to link your Instagram to Facebook via the accounts center:

    On a mobile phone:

    Step 1: Open the Instagram app on your mobile device.

    Step 2: Go to your profile by tapping the profile icon at the bottom right corner of the screen.

    profile icon

    Step 3: Tap the three horizontal lines at the top right corner of the screen to access the options menu.

    3 horizontol lines

    Step 4: Tap on Settings on your mobile screen. 

    setting

    [branded_short_links]

    Step 5: Scroll down and tap on the accounts centre. 

    accounts centre

    Also Read: How To Utilize Replug for Facebook Retargeting Ads?

    Step 6: Tap on accounts under account settings.

    accounts

    Step 7: Here, you can add or remove an account. Also, you can add multiple Facebook and Instagram accounts. Tap add account and follow the instructions. 

    add or remove accouunt

    Also Read: How to Quickly Increase Social Media Conversions in 2022

    On a computer device:

    Step 1: Log in to Instagram from your computer device. 

    Step 2: Go to your profile by clicking the profile at the bottom of the left-side menu. 

    profile

    Step 3: Click on more with three horizontal lines at the left bottom side, then click setting. 

    more and setting

    Also Read: How to add utm code to the URL using a link shortener?

    Step 4: Scroll down on your profile section and click accounts centre. 

    account centre

    Step 5: Now, click on accounts. 

    accounts

    Step 6: You can add or remove an account in the account section. Add an account by clicking on add accounts and following the instructions.

    add accounts

    Important note:

    Linking your Instagram account to Facebook and using the Accounts Centre is an effective way to streamline your social media marketing efforts and improve your online presence. 

    By adding your Instagram account to the same Accounts Centre as your Facebook account, you can easily manage your connected accounts in one place and share content, such as stories and posts, directly from Instagram to Facebook. This can save you time and effort while helping you reach a wider audience and gain new followers and engagement on both platforms. 

    Integrating Instagram and Facebook through the Accounts Centre is a valuable tool for individuals and businesses looking to improve their social media presence and expand their reach.

    Also Read: How to Shorten a link using a URL shortener?

    FAQs

    Why should I link my Instagram account to my Facebook page?

    Linking your Instagram account to your Facebook page allows you to cross-promote your content and reach a wider audience. You can also manage both accounts from a single location, making sharing content and tracking your analytics easier.

    Can I link multiple Instagram accounts to a single Facebook page?

    Yes, you can link multiple Instagram accounts to a single Facebook page. To do this, repeat the linking process for each Instagram account you want to connect.

    Trending:

    Social Media Risks For Brands. How To Avoid Them?

    How To Save TikTok Videos Without The Watermark?

    How to create a call to action using a URL shortener?