You’ve got a hot product, and your online store makes few weekly sales. It’s time to turn the dial on your Shopify game and set your sales on a growth trajectory. But how? That’s the million-dollar question.
This guide has your back, delivering straightforward techniques that drive traffic and boost sales. And the best part? They’re quick and easy to implement!
So, let’s dive into the strategies that will boost your Shopify success without any unnecessary fuss.
Why do you need to increase your Shopify sales?
Shopify is an ecommerce platform that empowers entrepreneurs to launch and quickly grow their online stores. It’s user-friendly, packed with features, and highly customizable to suit many businesses. In fact, Shopify stores have collectively generated over $1 trillion in global sales, making it a powerhouse in online retail! Mindblowing, isn’t it?
That being said, with the stats to back it up, increasing your sales on Shopify could be the cherry on top to level up your ecommerce game. Also, consumer behavior has shifted drastically after the pandemic, with more people shopping online than ever before. This makes optimizing your Shopify store the ultimate game-changer for your business.
That’s exactly why we’re blessing you with this golden content: to help you win the Shopify Hunger Games.
But before we spill the tea, let’s take a moment to pinpoint the reasons why you might be falling behind. Time to turn those weaknesses into winning strategies!
Related: 25 Ecommerce Marketing Tools For Successful Marketing
Why isn’t Your Shopify store making sales?
If you own a Shopify store but are struggling to generate sales, check out Tan Choudhury’s insightful video on this topic:
Here are the 3 top reasons to consider why your Shopify store isn’t making sales:
- Choosing random products to sell your e-commerce store.
- Not spending quality time on writing a good product description and copy.
- Using low-quality product pictures.
Quick tips to increase sales on Shopify
Here are some quick tips that will positively impact your Shopify sales:
- Take advantage of Shopify’s built-in marketing tools.
- Use social media to drive traffic to your store through Shopify links.
- Use an email marketing tool to send regular newsletters to your customers and include strong calls to action.
- Offer discounts and free shipping incentives to encourage people to buy from your store.
- Provide excellent customer service so that people have a positive experience shopping with you and are likely to return in the future.
Related: Best Apps For Shopify To Create a Surge In Your eCommerce Sales
25 winning strategies to increase sales on Shopify
- Focus on your niche & target audience
- Enrich the customer experience
- Streamline and optimize your checkout process
- Create a convincing web copy
- Enhance website navigation
- Make your store load fast
- Create a landing page that converts
- Design a great CTA (Call-to-action)
- Optimize product pages
- Focus on customer retention
- Optimize for mobile users
- Build brand trust
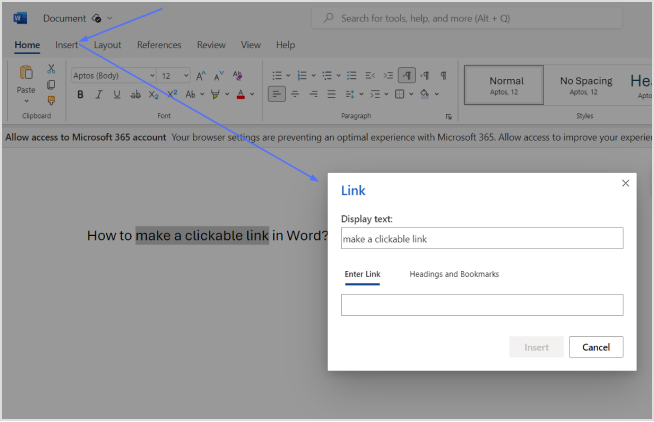
- Craft branded URLs for distinctive branding
- Highlight the main selling points
- Use SEO to increase your discoverability
- Leverage social media to increase sales
- Consider paid advertising
- Content marketing for organic growth
- Use Bio Links on social media
- Encourage customer referrals
- Leverage Email Marketing
- Building customer relationships and brand loyalty
- Monitor your inventory for smooth operations
- Up-sell and cross-sell to boost your sales
- Retargeting ads for Shopify stores
1. Focus on your niche & target audience
To succeed in online marketing, focusing on a specific niche and target audience is essential. Trying to appeal to everyone often dilutes your efforts. Instead, identify your ideal customer and tailor your marketing message to resonate with them. This increases engagement and improves conversion rates. You need to:
- Attract the right customers: Craft your message to meet your ideal customer’s needs and pain points.
- Boost conversions: When your marketing is relevant, you’re more likely to turn visitors into loyal customers.
- Use first-party data: Understand your audience better and refine your targeting using data like customer behavior, purchase history, and interactions.
Unlike third-party data, which is less personalized, first-party data allows you to create more effective marketing strategies. Here’s a video by Dan Shaffer from WebFX, sharing tips on how first-party data can amplify ecommerce sales:
2. Enrich the customer experience
For an ecommerce platform, positive customer experience is crucial for retaining customers and driving repeat sales. From the first interaction with your brand to post-purchase support, each touchpoint shapes their perception of your business. Customers encountering difficulties or dissatisfaction along the way are more likely to look elsewhere. Here’s how you can enrich the customer experience:
- Create a streamlined shopping journey: Ensure your website is easy to navigate, with clear product descriptions and simple checkout processes.
- Responsive customer support: Offering timely and helpful support can resolve issues quickly and build customer trust.
Here’s an example of Walmart’s responsive customer support. Their excellent customer service is one of their biggest secrets behind ecommerce success:
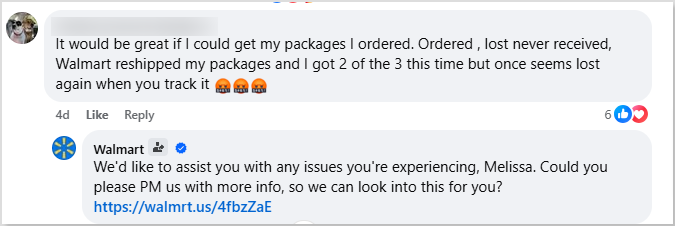
The key to keeping customers happy is providing exceptional customer service. If you go the extra mile, customers are more likely to return and recommend your brand, leading to long-term success.
3. Streamline and optimize your checkout process
To reduce cart abandonment and boost conversions, simplify your Shopify checkout with these key strategies:
- Allow guest checkout: Allow users to make purchases without registration to reduce friction.
- Minimize steps: Eliminate unnecessary form fields or pages to make the process quicker.
- Offer clear payment options: Ensure an intuitive, easy-to-follow process with progress indicators.
- Enhance page design: Keep it clean, easy to navigate, and visually appealing.
- Use secure payment gateways: Ensure a reliable and safe transaction.
For registered or returning customers, a one-step checkout can further streamline the process and encourage completion. Here’s an example of Bath & Body Works:
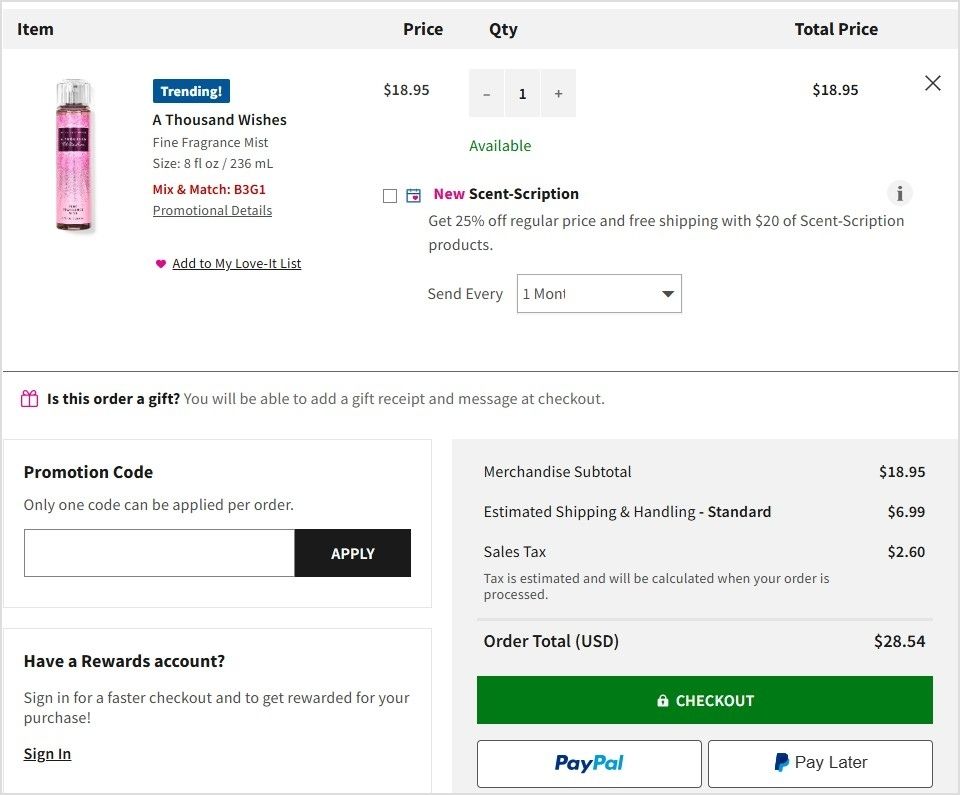
Following the above strategies can easily improve user experience and increase sales on your Shopify store!
Also read: Top 7 E-commerce Payment Trends
4. Create a convincing web copy
Your website copy plays a pivotal role in converting visitors into customers. It should be clear, concise, and persuasive, guiding users to take the desired actions, whether it’s making a purchase, signing up, or getting in touch.
- Focus on benefits: Clearly articulate how your product or service improves your customers’ lives. Instead of just listing features, explain the specific, tangible benefits they’ll experience.
- Use a conversational tone: Speak directly to your audience in a way that resonates with them. A friendly and approachable tone can make your message more relatable and engaging.
- Proofread for perfection: Small errors like typos or grammatical mistakes can undermine your credibility and professionalism. Ensure your copy is polished before it goes live to maximize its effectiveness.
You’ll build trust and increase Shopify sales by refining your web copy to address your audience’s needs and showcase your offering’s true value. When paired with a E-commerce SEO agency’s expertise, your website can become a powerful tool for driving conversions.
5. Enhance website navigation
A smooth and intuitive website navigation keeps visitors engaged and increases conversions. Studies show that the average bounce rate benchmark is approximately 55.43%, hence, making it easy for customers to find what they’re looking for is essential.
- Use a straightforward, visible menu: Your homepage should feature a prominent navigation menu that’s easy to spot and use. Include categories like vendor, product type, or tags so users can quickly narrow their search.
- Organize products logically: Group similar items together to help customers easily find related products. This improves the browsing experience and boosts sales by encouraging additional purchases.
Here’s an example of Target:
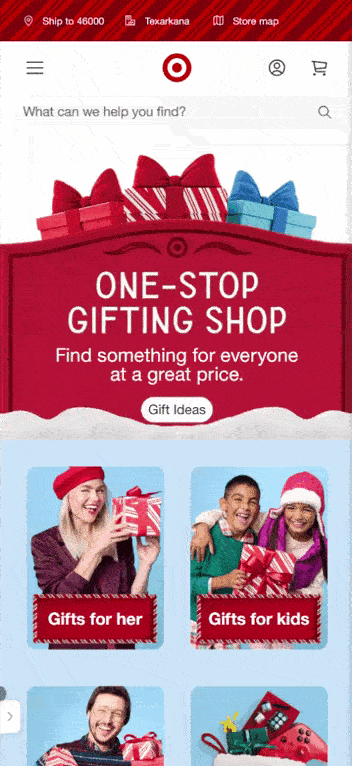
Streamlining the navigation makes it easier for customers to explore your products, increasing engagement and ultimately leading to more conversions.
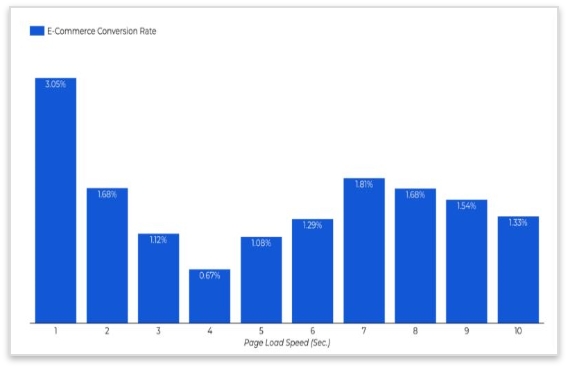
6. Make your store load fast
A fast-loading ecommerce store is crucial for both customer satisfaction and SEO performance. Here’s why it matters:
- Customer experience: A slow-loading site frustrates users and leads to high bounce rates. Visitors may leave before they even have a chance to explore your products.
- Search engine ranking: Google favors fast-loading websites, meaning slow speeds can hurt your visibility.
- Business sense: Fast sites run more efficiently, improving user experience and operational effectiveness.
Research shows that conversion rates can drop by an average of 0.3% for every second of delay in load time. So, making sure your site loads quickly directly impacts your sales.
To improve speed:
- Choose a reliable hosting service that can handle high traffic volumes.
- Optimize your images to reduce load time without compromising quality.
- Ensure your URLs are SEO optimized for faster indexing.
- Clean up your code to ensure smooth site performance.
A fast store enhances user satisfaction, boosts conversions, and improves search engine rankings, helping you increase sales on Shopify.
7. Create a landing page that converts
A well-designed landing page can significantly boost your sales on Shopify. Here’s how to make sure your page works to convert visitors into leads or customers:
- Attention-grabbing headline: Make sure your headline clearly communicates the value of what you’re offering and grabs visitors’ attention immediately.
- Clear and concise offer: Ensure that your offer is easy to understand. Visitors should immediately know what they will get in exchange for information or purchase.
- Strong CTAs: Use compelling calls-to-action that motivate visitors to take the next step. Make the action clear, such as “Buy Now” or “Sign Up for Exclusive Offers.”
By focusing on these key elements, you can create a Shopify landing page that not only attracts visitors but also converts them into customers.
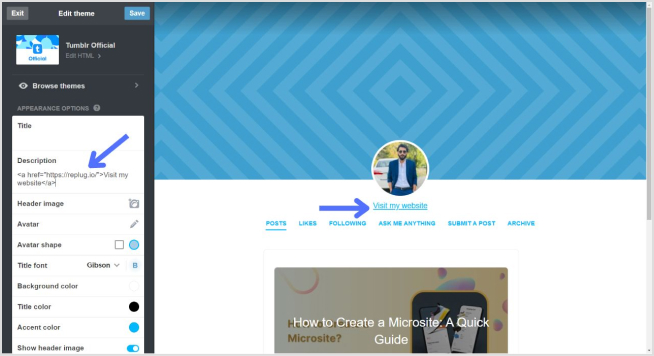
8. Design a great CTA (Call-to-action)
A well-designed call-to-action phrase is essential to driving conversions and guiding visitors to take action. Here’s how to make your CTAs compelling:
- The offer: Ensure you’re offering something valuable or desirable to your audience. Whether it’s a discount, free trial, or more information, the offer should align with their needs.
- The copy: Use clear, action-driven language. Words like “Get Started,” “Buy Now,” or “Claim Your Offer” give readers a clear direction on what to do next.
- The design: Make your CTA button stand out. Use contrasting colors, enough whitespace, and clear visuals so it grabs attention without overpowering the rest of the content.
- The prompt: Consider CTA buttons like “Get a Demo” or “Book Your Demo,” especially when the customer journey involves more touchpoints.
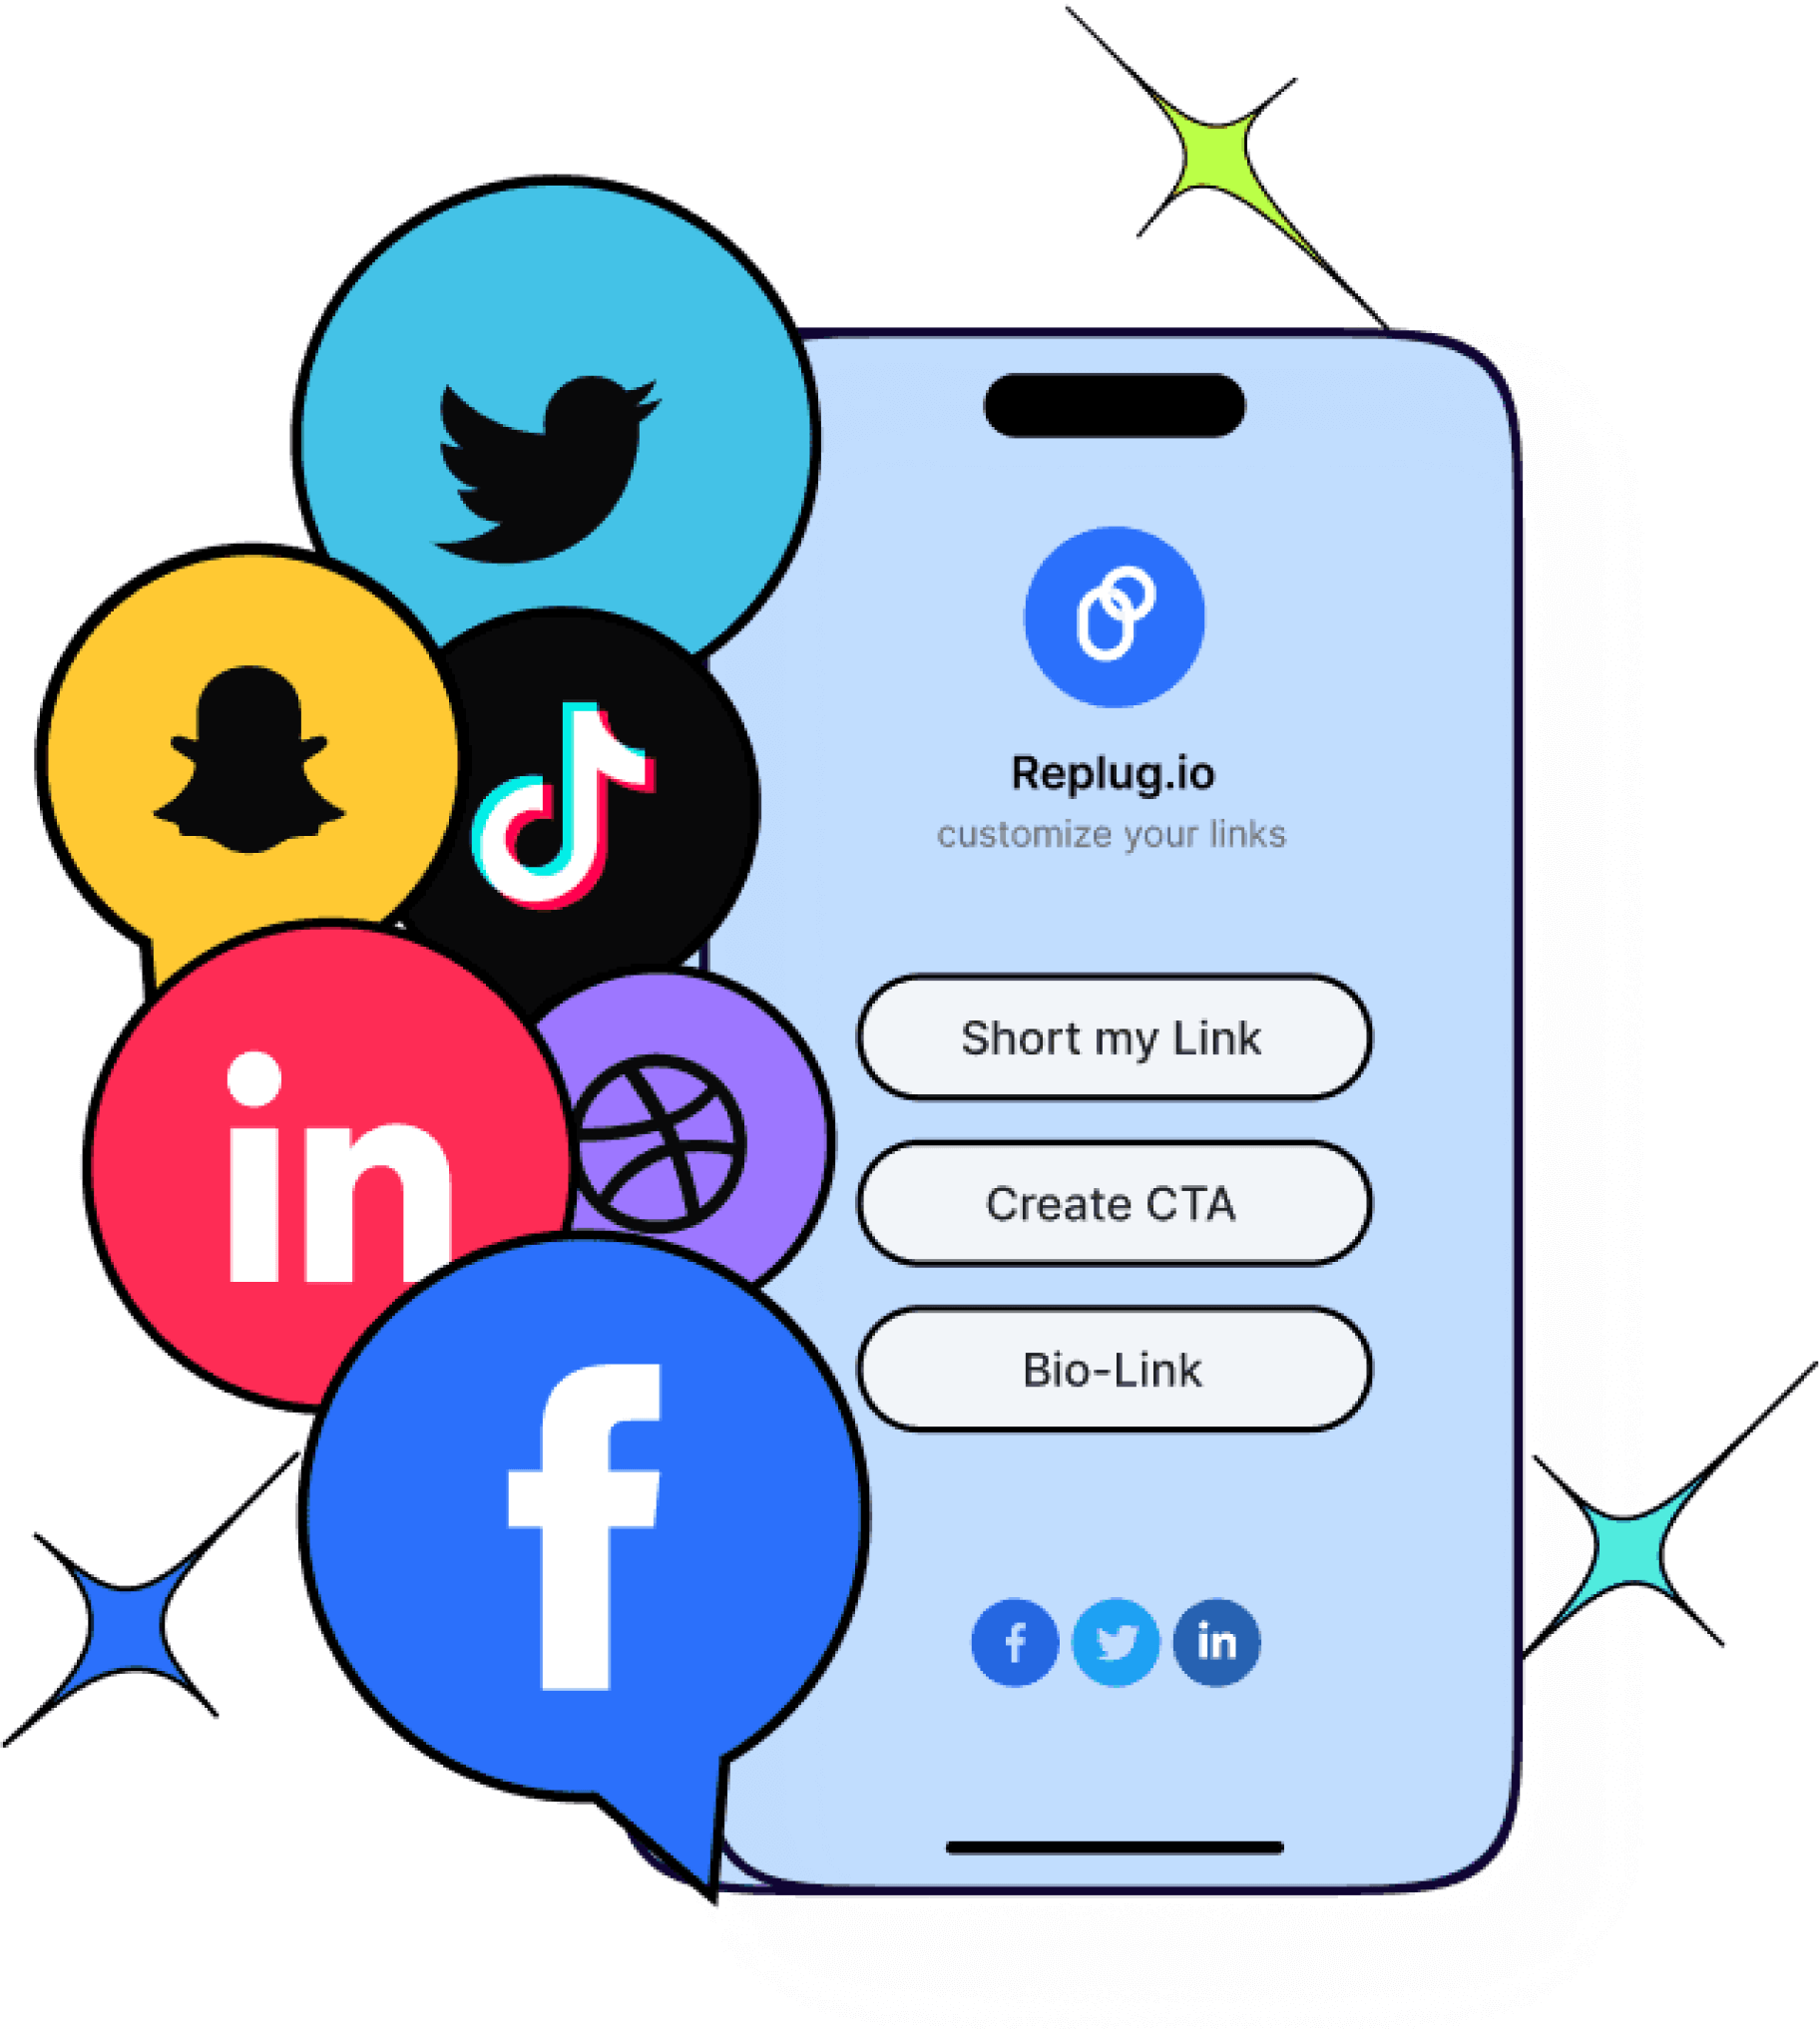
Here’s an example of Replug’s catchy call to action:
By designing CTAs that are appealing, action-focused, and strategically placed, you’ll increase engagement and drive sales.
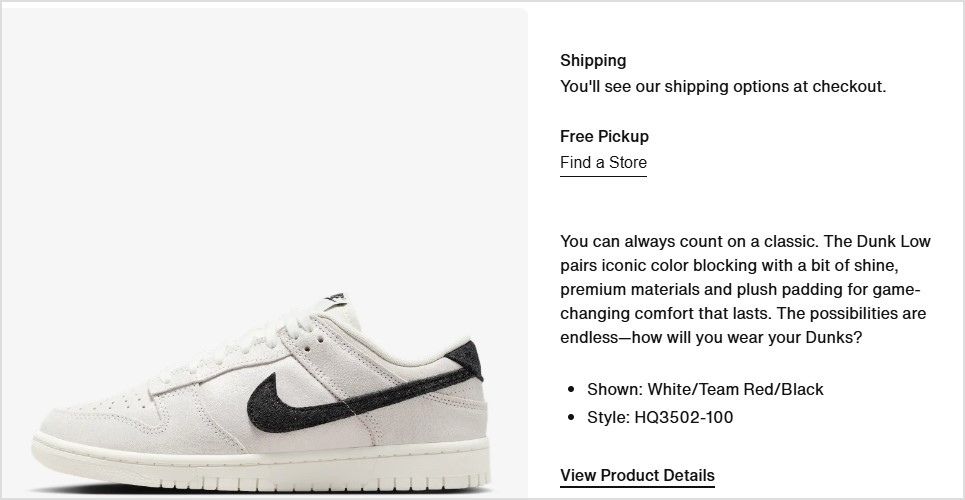
9. Optimize product pages
Optimizing your Shopify product pages is key to driving conversions. Here’s how you can elevate your product pages:
- Clear, detailed descriptions: Ensure your descriptions are informative, covering size, material, color, and usage. Here’s how Nike is doing it:
- High-quality images: Use 4-5 images from different angles to view your product comprehensively. High-quality visuals increase trust and make your offerings more attractive.
- Infographics: Use infographics to explain product benefits or provide comparisons in a visually engaging way.
- Videos: Create product demos or behind-the-scenes content to build trust and connect with customers.
For your Shopify store, it’s essential to use visuals that grab attention and enhance the shopping experience. By crafting well-optimized product pages on Shopify, you help customers quickly find what they need, encouraging them to make a purchase and boosting your sales.
Here’s an example of Apple’s unique and interactive product page:
Killer tip: Incorporate GIFs! These dynamic, eye-catching animations can showcase product features or add a playful touch, making your store stand out and keeping visitors engaged longer.
10. Focus on customer retention
Retaining customers is key to increasing Shopify sales. Keeping them happy encourages repeat business, reducing the need for constant new customer acquisition. Here are ways to increase customer retention:
- Loyalty incentives: Offer discounts or rewards for repeat purchases.
- Stay in touch: Send follow-up emails or personalized messages to maintain engagement.
- Refunds: A hassle-free return policy builds trust and encourages future shopping.
- Free shipping: Offering free shipping, especially on high-margin products, boosts conversions and customer loyalty. 62% of customers don’t purchase without free shipping costs, so consider incorporating shipping costs into product prices to create a more transparent and appealing checkout experience.
Zappos generated a total of $1,063.9M in global net sales by focusing on customer retention through free shipping and incentives.
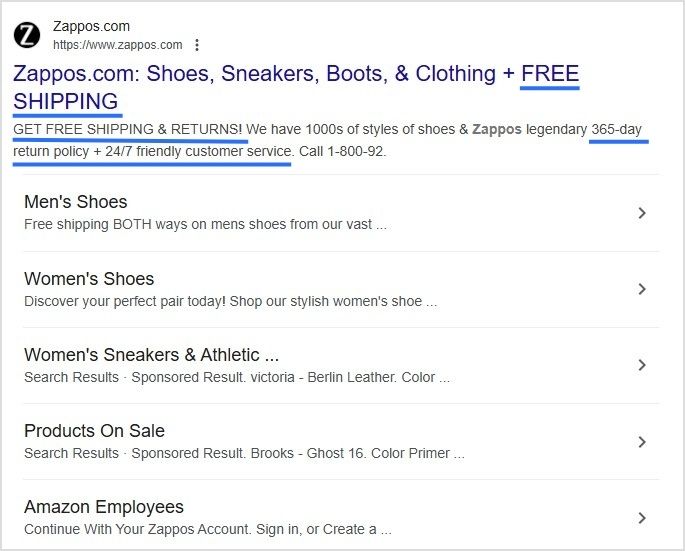
Source: Zappos
11. Optimize for mobile users
Smartphones constituted around 68 percent of online shopping orders in 2024, so providing a seamless mobile experience is crucial. Here’s how to optimize your Shopify store:
- Responsive design: Ensure your site adjusts perfectly to all screen sizes.
- Fast loading speed: Mobile users expect quick page loads. So, optimize your images and reduce unnecessary elements.
- Easy navigation: Simplify menus and ensure buttons are easy to click.
- Mobile-friendly checkout: Optimize for mobile and integrate dynamic QR codes to let customers easily complete purchases.
Optimizing for mobile devices improves user experience and boosts engagement and conversion rates.
12. Build brand trust
Building trust with your customers is essential for driving conversions. Here’s how you can do it:
- Professional design: Ensure your Shopify store has a clean, well-organized layout that reflects your brand’s quality and professionalism.
- Social proof: Display customer reviews and testimonials prominently on product pages and throughout your site. Positive feedback from satisfied customers reassures new visitors that your products and services are reliable. Here’s an example of ContentStudio:

- Trust signals: Use security badges (such as SSL certificates) and clearly state your return policy, shipping terms, and satisfaction guarantees. These elements make customers feel more secure about making a purchase.
Since over 99.9% of customers read reviews when they shop online, showcasing social proof builds credibility and enhances customer loyalty, leading to increased conversions and repeat business.
Also read: Conversion tracking: Best tools, tips, and tricks
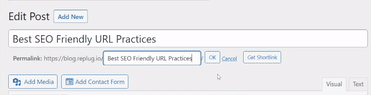
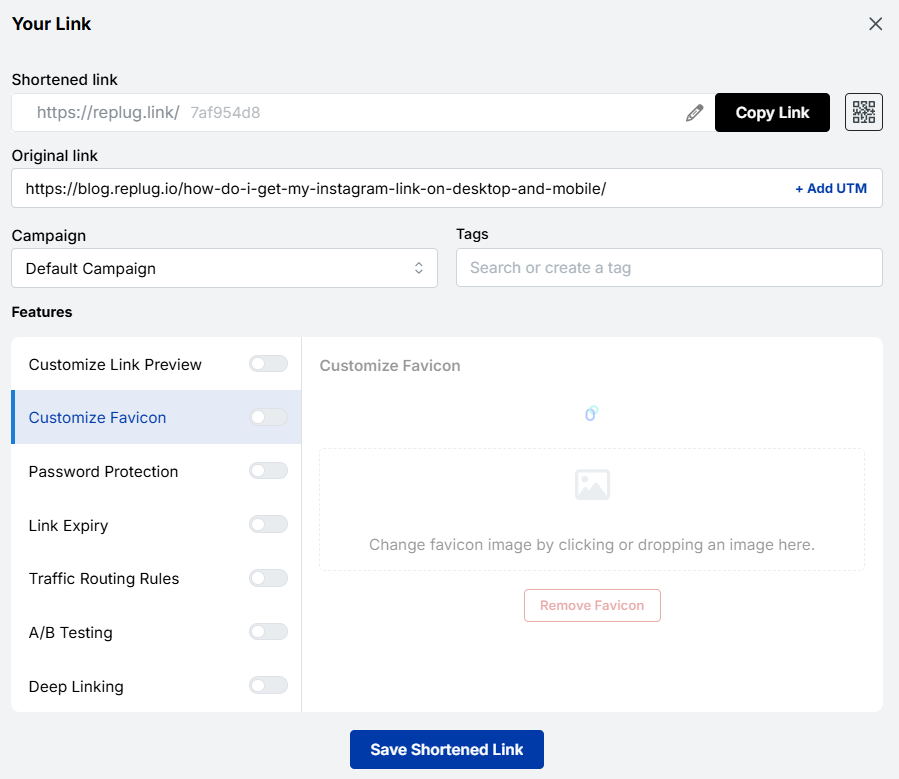
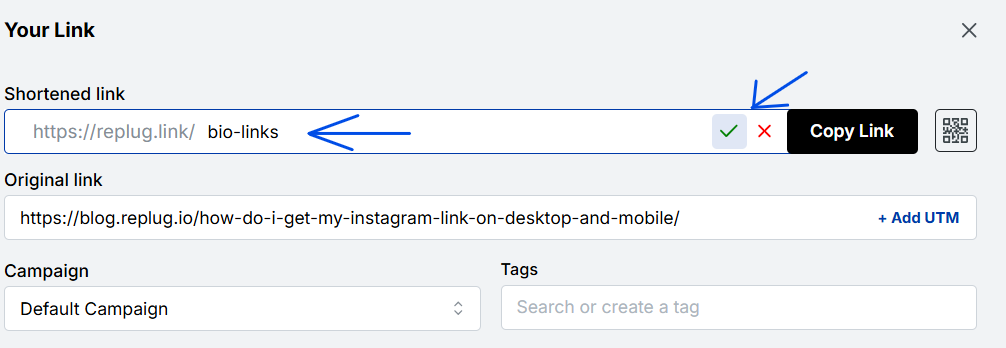
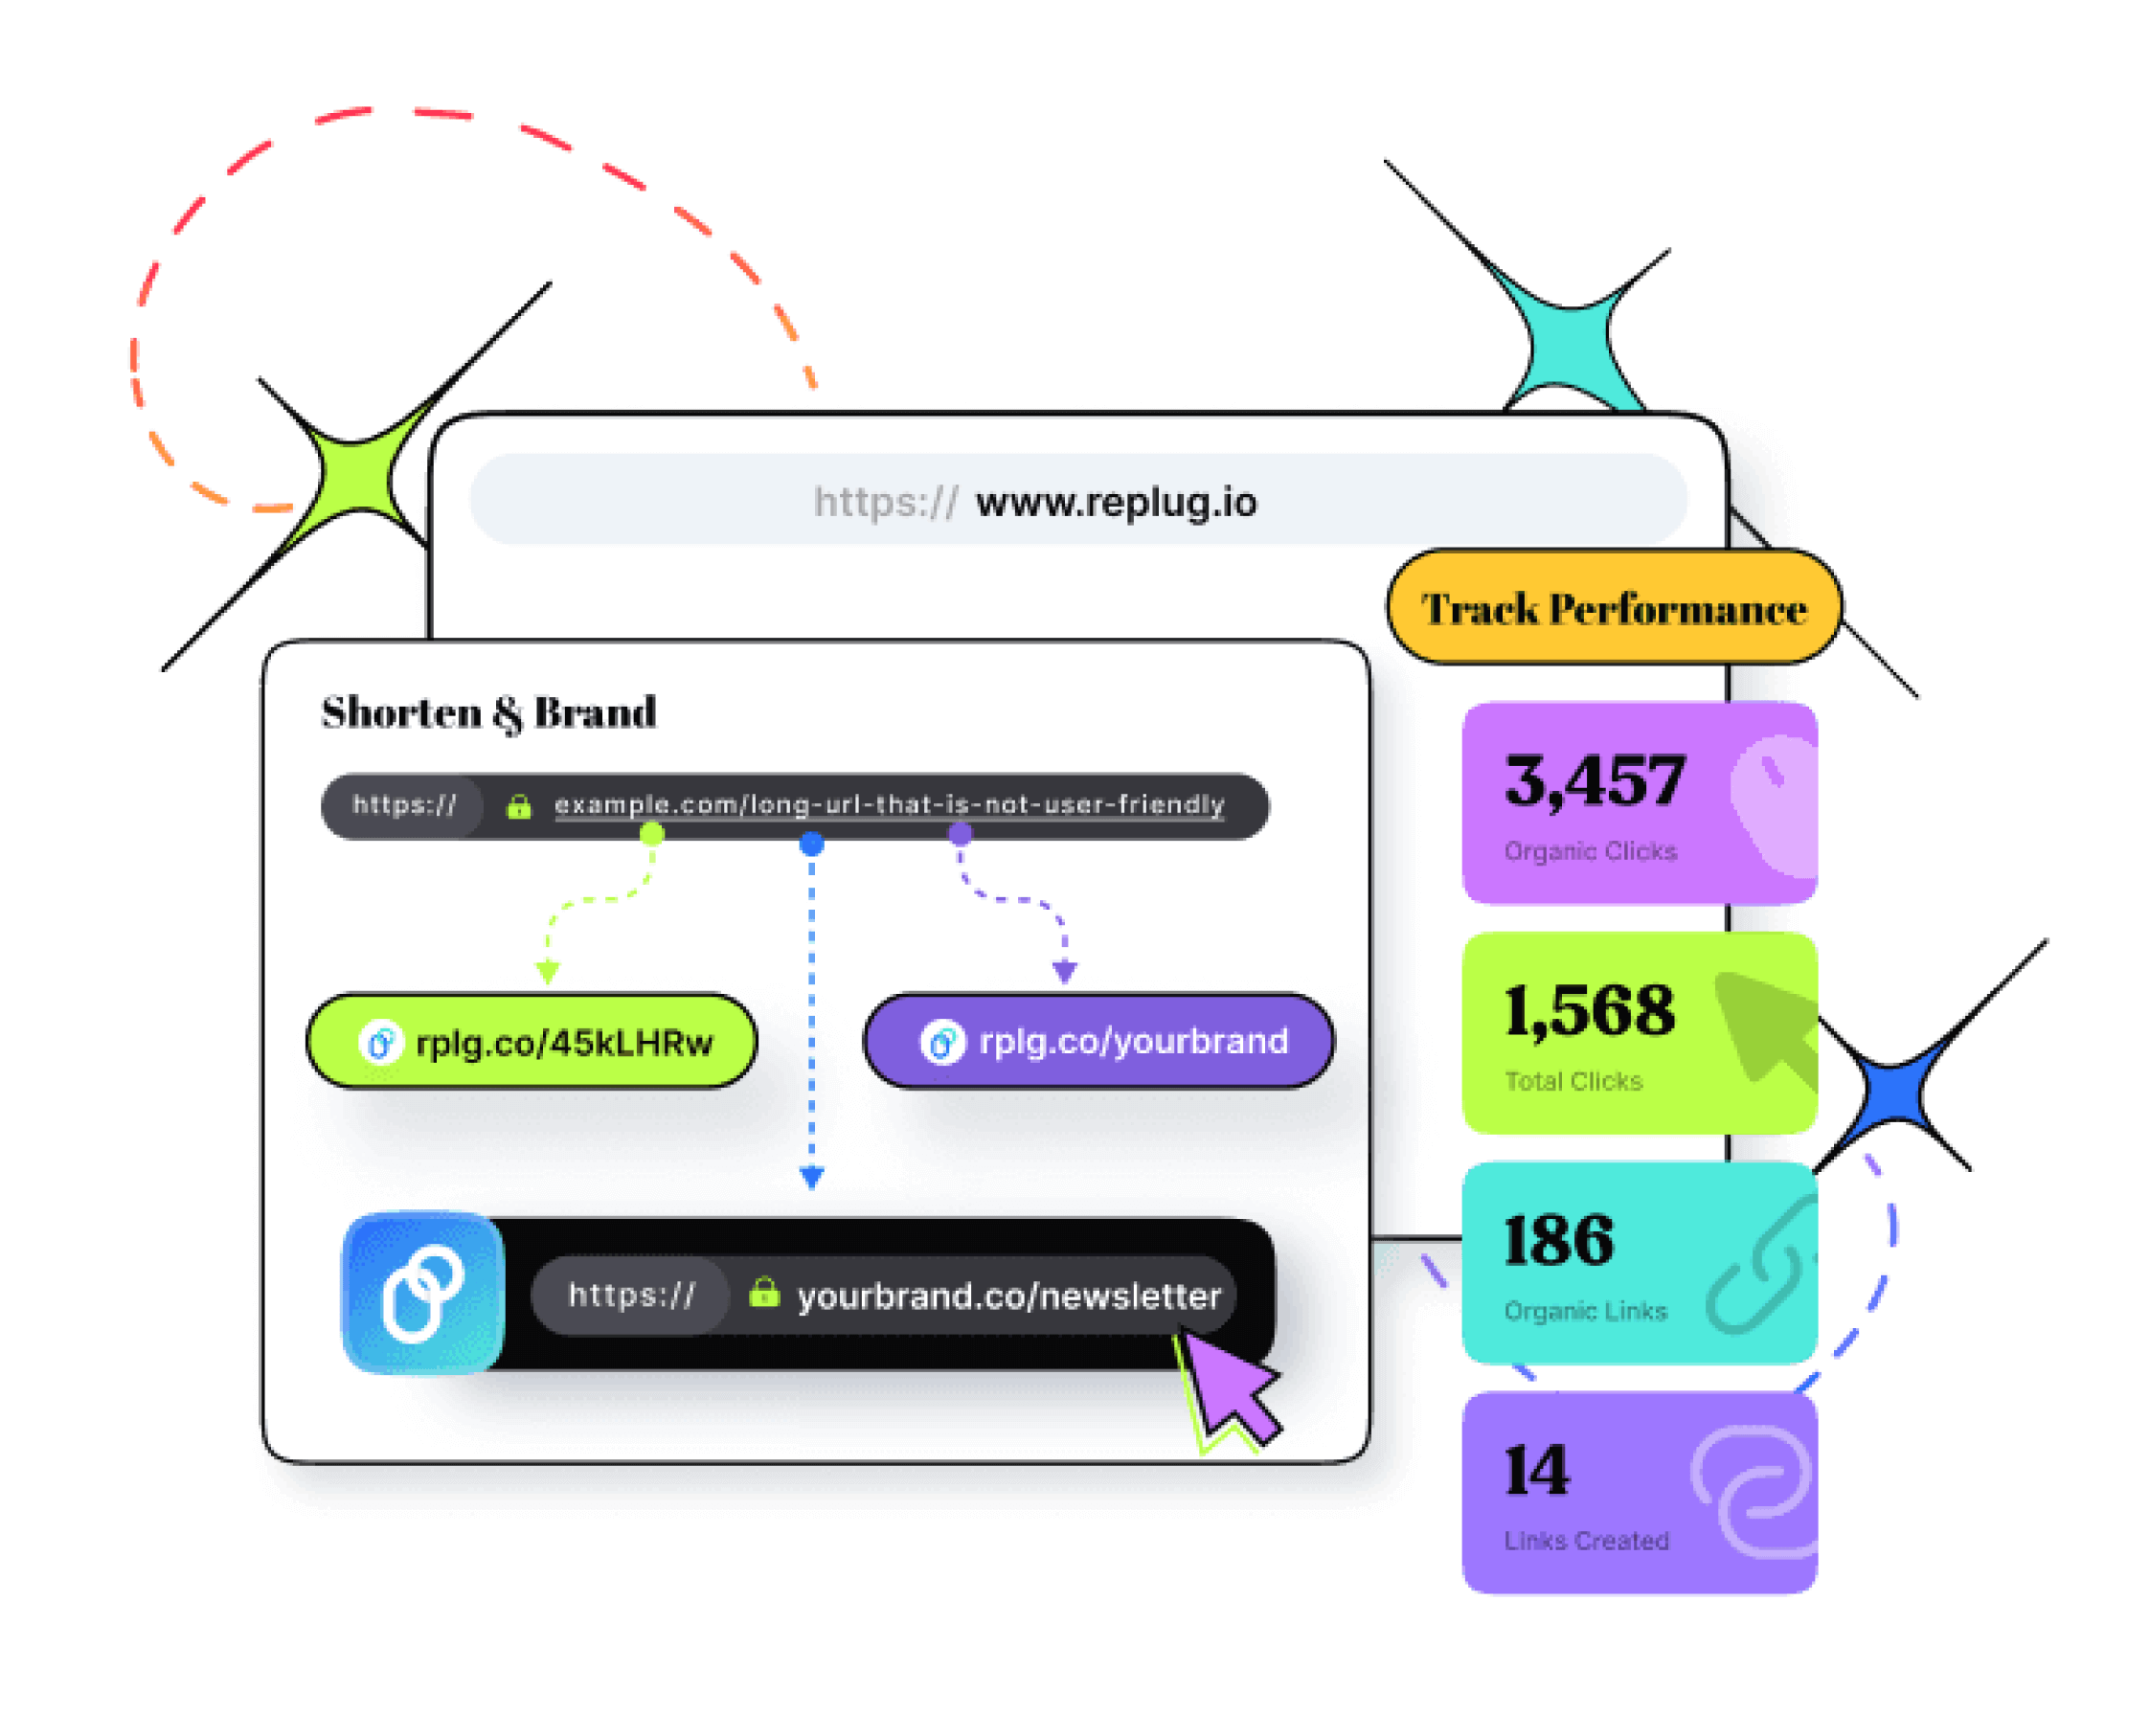
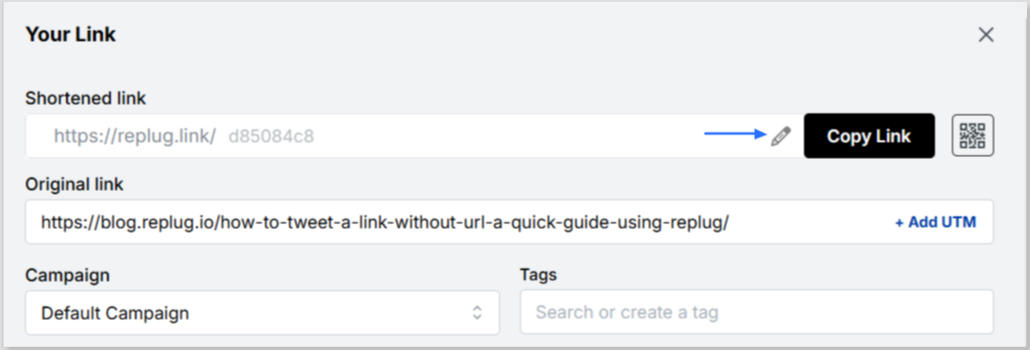
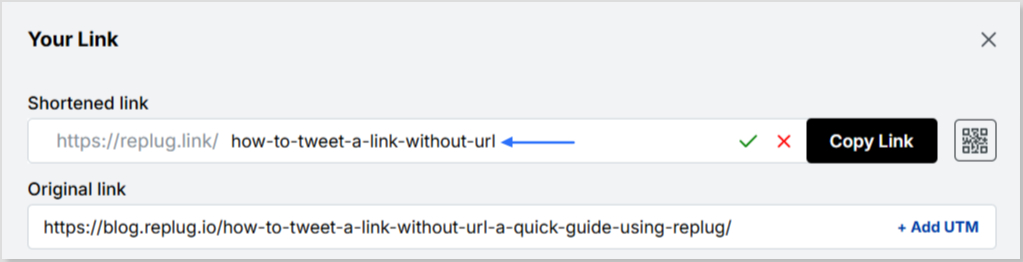
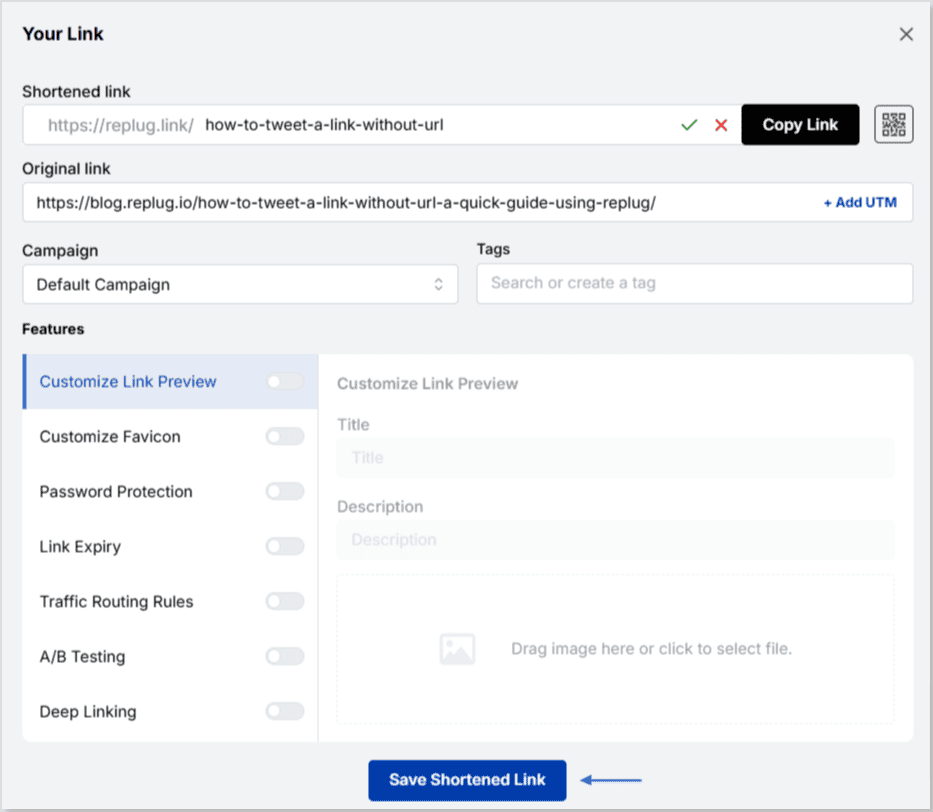
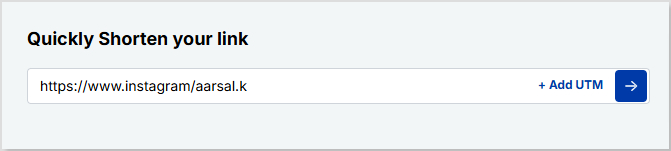
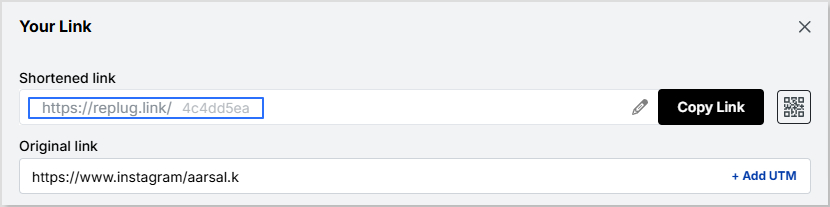
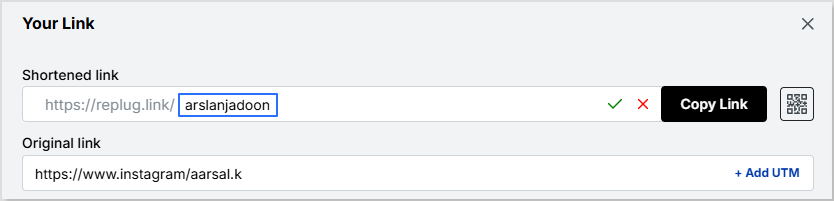
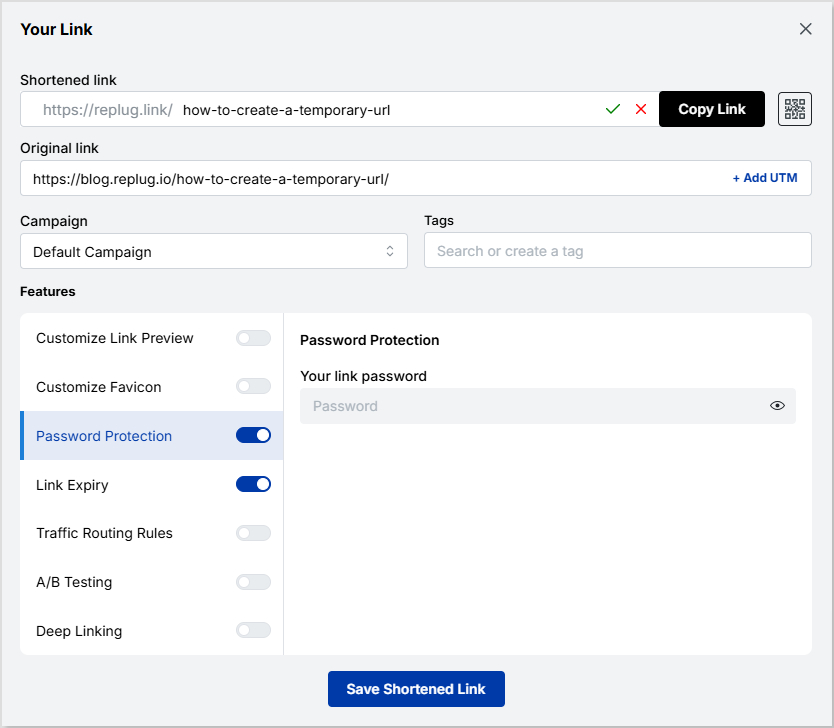
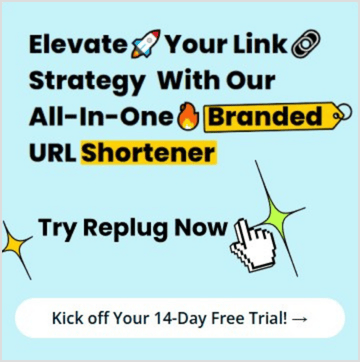
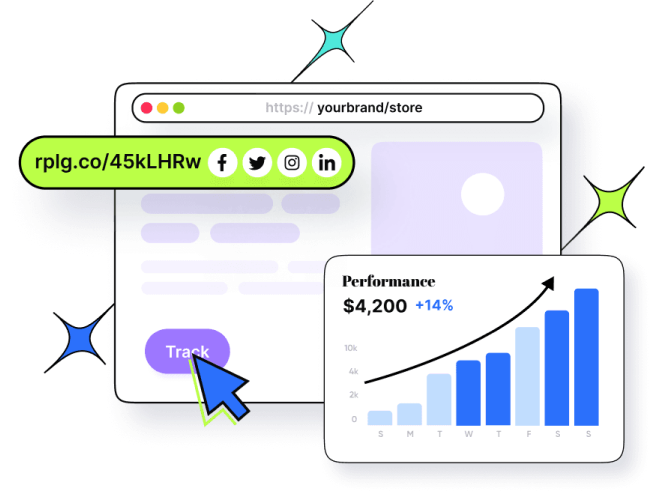
13. Craft branded URLs for distinctive branding
Customized URLs are a powerful way to enhance your branding efforts. By using branded URLs, you can create links that reflect your brand’s identity while boosting click-through rates.
- Stand out with your brand: Replug’s Link Management allows you to craft personalized URLs that align with your branding, making your links more memorable and professional.
- Track performance: With built-in click-tracking capabilities, you gain valuable insights into how your links and campaigns are performing, helping you refine your marketing strategy.
Branded URLs go beyond simple link shortening; they offer a more sophisticated and effective way to distinguish your brand in the crowded online marketplace.
14. Highlight the main selling points
To stand out in the competitive ecommerce space, it’s crucial to communicate your main selling points clearly. Whether it’s your competitive pricing, superior quality, strong brand identity, fast delivery, or problem-solving capabilities, ensure these strengths are front and center in your marketing efforts.
- Focus on what matters: Identify the key benefits that set your store apart from the competition and weave them into your product descriptions, ads, and website content.
- Create a consistent message: Reinforce your unique value proposition across all customer touchpoints to ensure that your brand message is clear and resonates with your audience.
Check out how Usermaven, a product and website analytics tool, highlights its selling point on its website:

You can build trust and loyalty by emphasizing your strengths, ultimately driving more sales and conversions for your Shopify store.
Also read: Online Branding: The Roadmap to Stand Out and Succeed Online
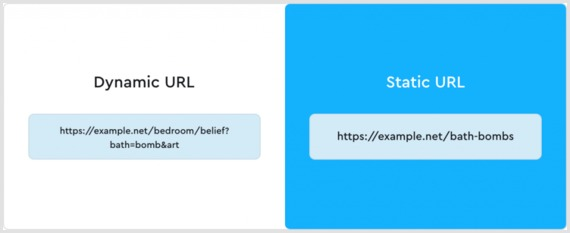
15. Use SEO to increase your discoverability
Search engine optimization (SEO) drives organic traffic to your Shopify store. You can attract more visitors and generate more sales by improving your site’s ranking in search results. Here’s how to optimize for SEO:
- Use relevant keywords: Integrate keywords naturally into product titles, metadata, and URL slugs. This helps search engines understand your products and boosts your rankings.
- Leverage content marketing: Create valuable content like blog posts, guides, and other resources targeting specific keywords. This not only enhances SEO but also attracts more visitors who are interested in your products.
- Optimize product listings: Ensure each product listing is optimized for SEO and conversions. Use compelling descriptions, titles, and high-quality images to entice potential customers and improve your search ranking.
- Drive traffic through SEM: Consider using search engine marketing (SEM) to pay for placement in search results, making it easier for customers to find your store.
By focusing on SEO and optimizing your store for search engines, you can increase its discoverability, improve traffic, and ultimately boost Shopify sales.
16. Leverage social media to increase sales
Social media is a powerful way to drive sales and strengthen customer relationships. You can turn followers into loyal customers by actively engaging with your audience and leveraging key strategies. Here’s how:
- Engage with your audience: Monitor comments, host live streams, and run polls to connect and understand customer preferences. Tools like Talkwalker help monitor and track consumer sentiments.
- Find and nurture leads: Use hashtags to discover new customers, engage authentically, and build trust.
- Sell everywhere: Expand your reach by selling on multiple platforms. Tools like ContentStudio and Replug simplify inventory and performance tracking.
- Seal the deal: Close sales through direct messages or personalized interactions.

With the right approach, social media can turn followers into loyal customers and drive real results.
Related: Top 10 social media management tools to watch in 2024
17. Consider paid advertising
Paid advertising (PPC) is vital to boosting the visibility of your store:
- Paid advertising: Use PPC to appear at the top of search results by bidding on relevant keywords. Ads on Google and social media platforms like Facebook, Instagram, and Pinterest help target specific audiences and increase visibility.
- Social media ads: Engage customers through creative ads on platforms like Facebook and Instagram to raise brand awareness and drive traffic.
Here’s an example of paid Google search ads of Mascaras by different brands:
Paid advertising can maximize your reach and effectively engage with customers, driving immediate traffic and long-term growth.
Also read: Basics of e-commerce marketing, key strategies, and more
18. Content marketing for organic growth
Content marketing helps attract customers organically. By creating valuable content, you can boost your store’s visibility and strengthen your brand.
Content creation: Produce original and engaging content like blogs, videos, and social media posts that resonate with your brand and products. This helps define your brand while improving SEO.
SEO benefits: Quality content boosts search rankings, driving organic traffic to your store.
Brand awareness: Engaging content builds trust and visibility, leading to increased customer engagement.
Start using content marketing today to improve SEO, engage customers, and increase Shopify sales!
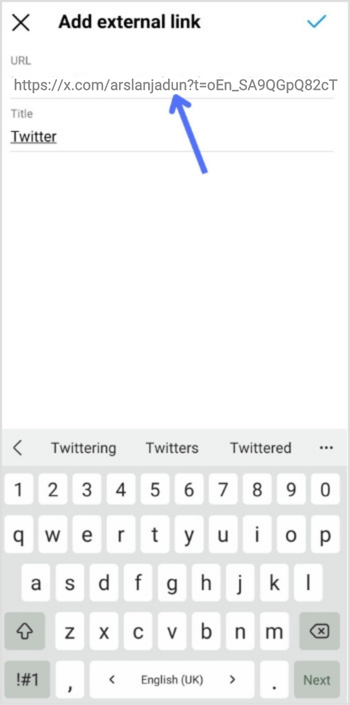
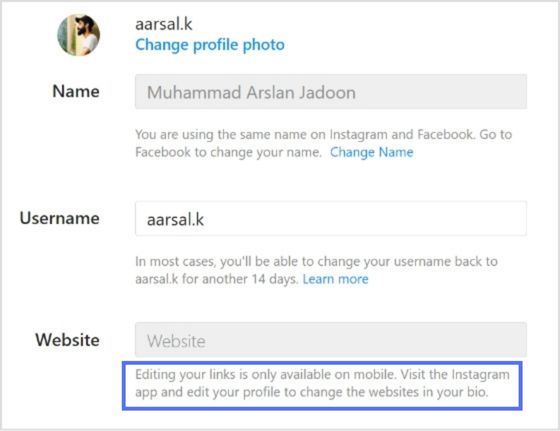
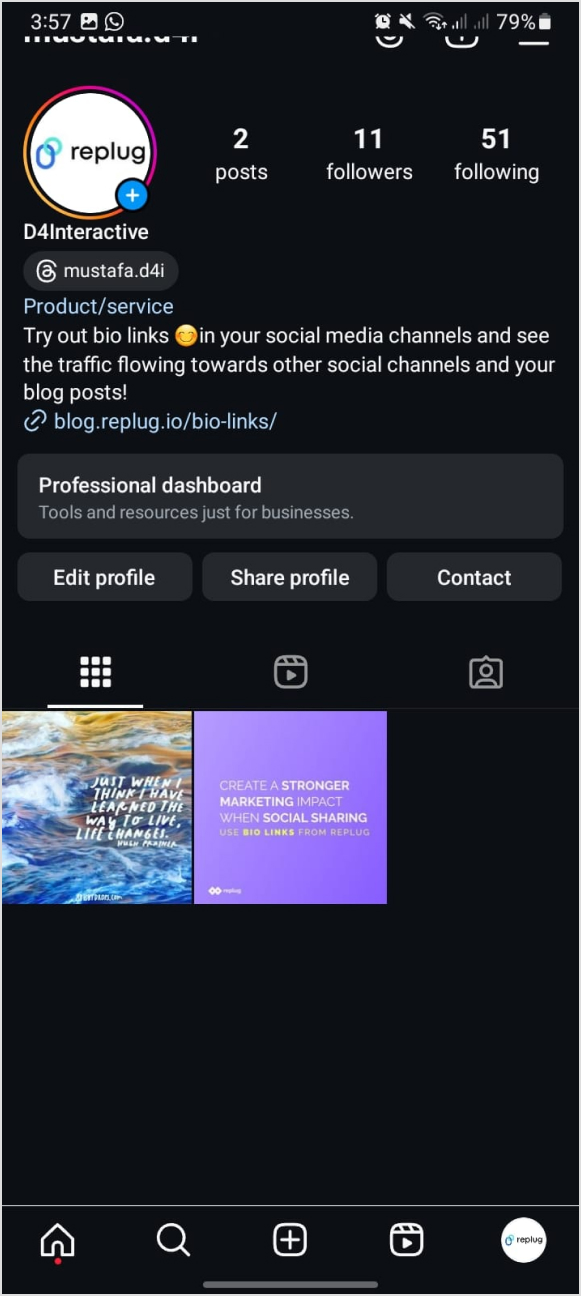
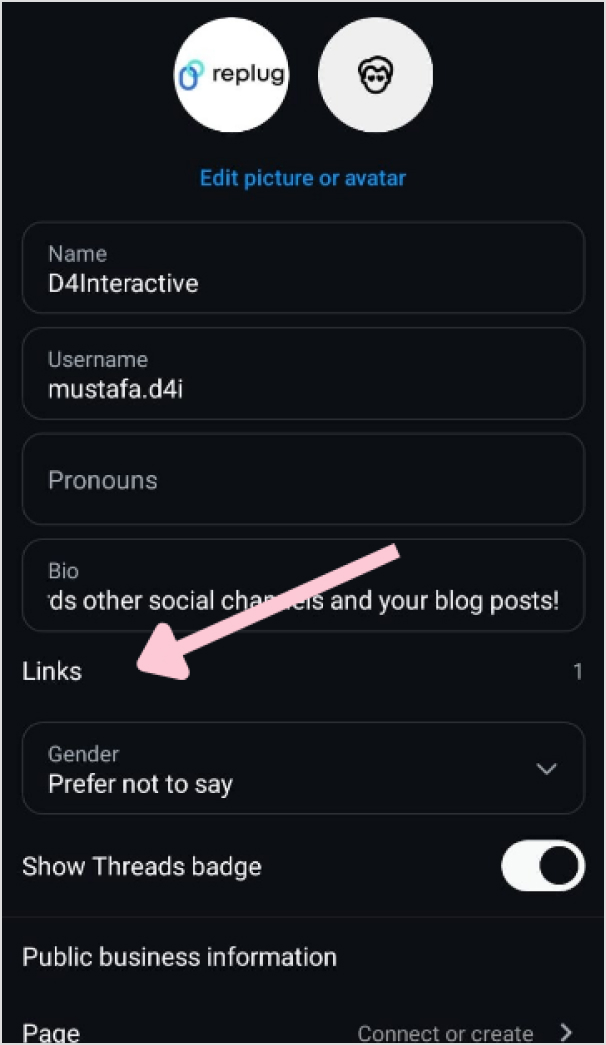
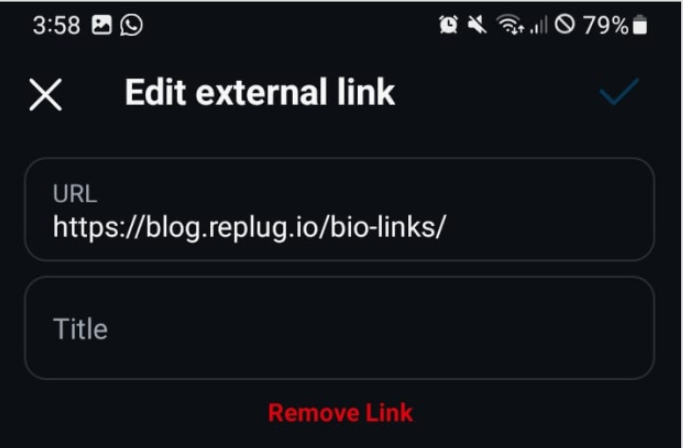
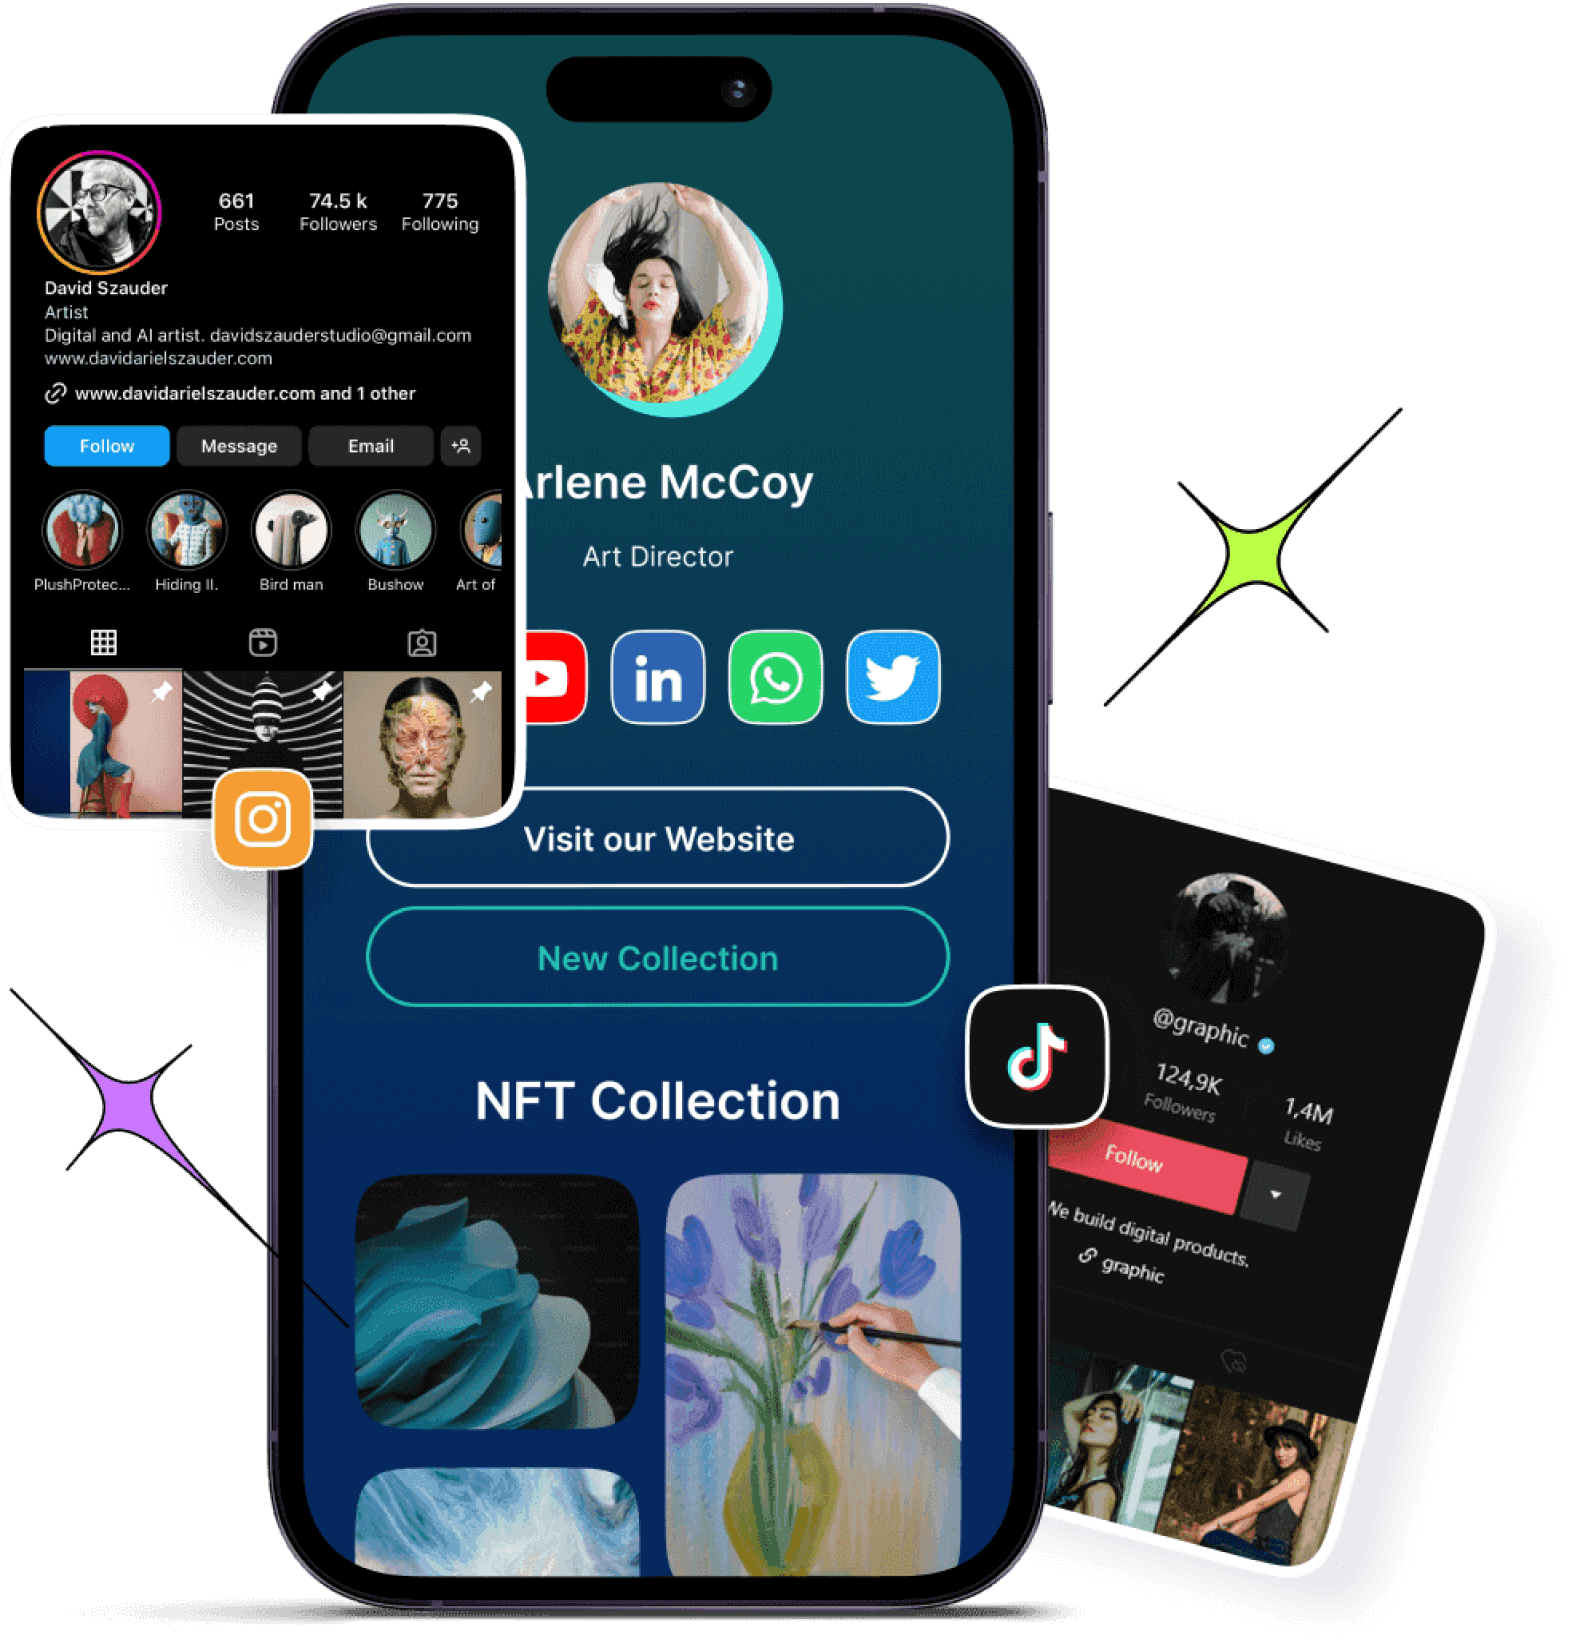
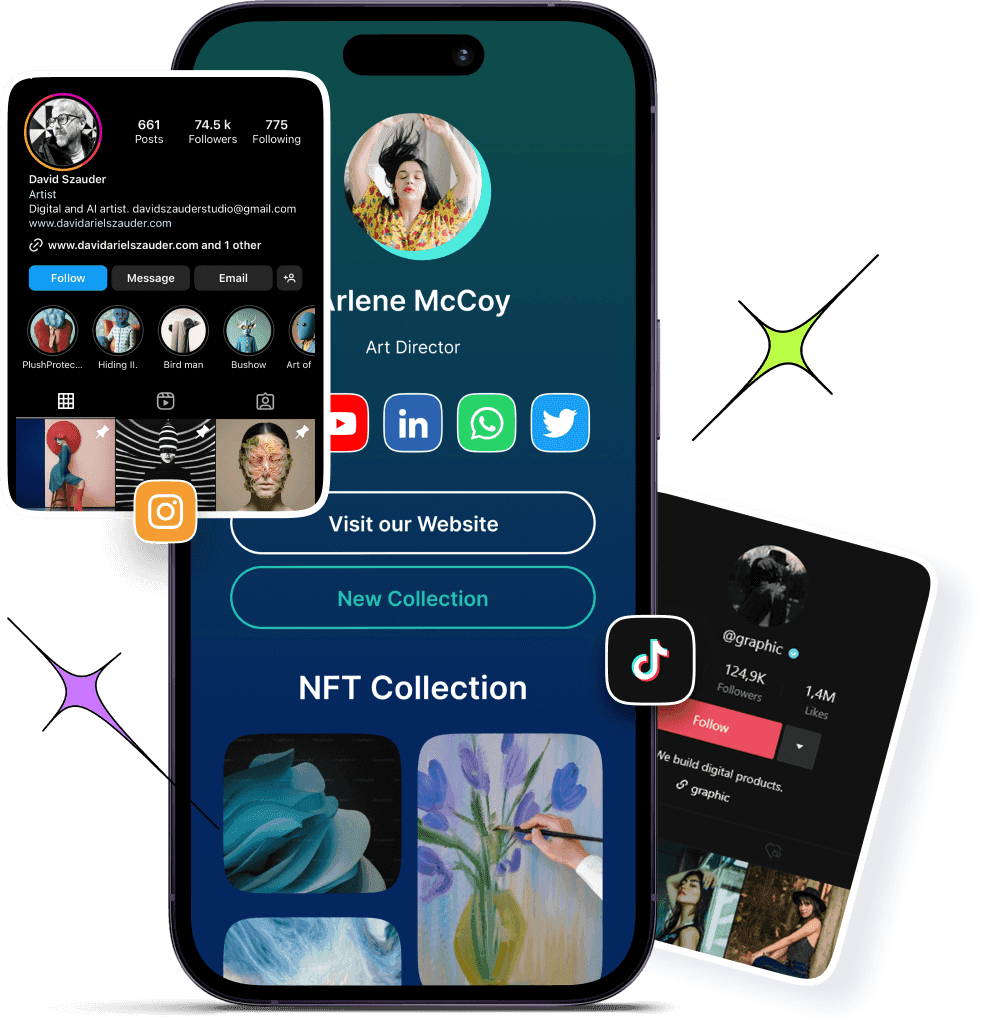
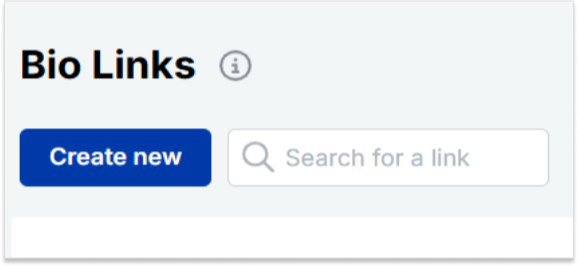
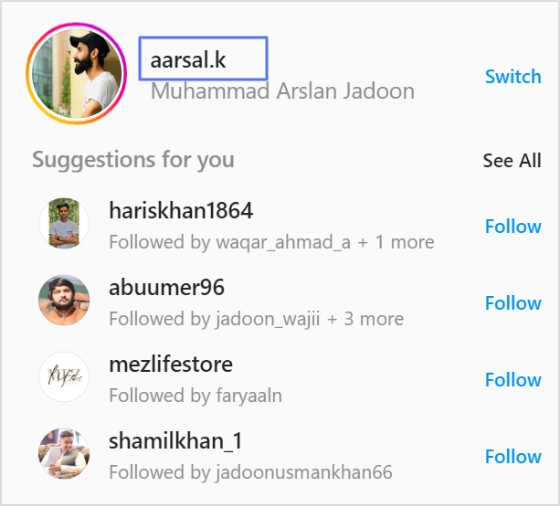
19. Use Bio Links on social media
Maximize your sales on Shopify by leveraging the bio link feature, particularly on platforms like Instagram. Here’s how to use it effectively:
- Update regularly: Keep the link fresh by updating it to highlight specific products, promotions, or important content on your Shopify store.
- Guide your audience: Use the link to drive users directly to key areas of your store, enhancing their journey and improving conversions.
- Capitalize on engagement: Turn your social media activity into sales by linking to relevant pages, ensuring seamless navigation from your posts to your store.
Here’s an example of Canva’s bio link page:
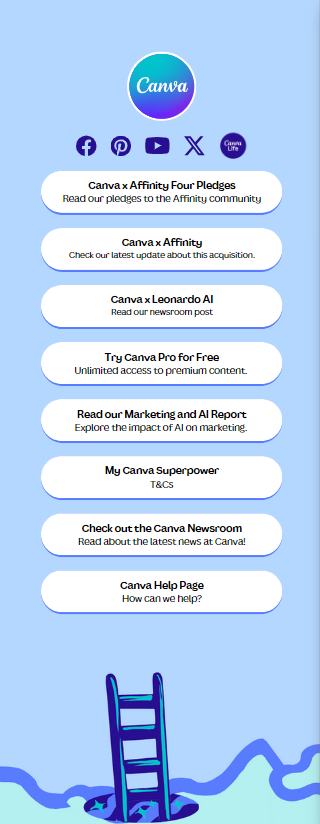
Using bio link strategically can help you drive more traffic and sales from your social media platforms.
20. Encourage customer referrals
Harness the power of referrals by turning your satisfied customers into advocates:
- Exceed expectations: Deliver exceptional service and products that exceed your customers’ expectations.
- Offer incentives: Provide rewards, such as discounts or free products, to encourage customers to refer friends and family.
- Encourage reviews: Ask for reviews and testimonials to build credibility and attract new customers through positive feedback.
Here’s an example of Toms:
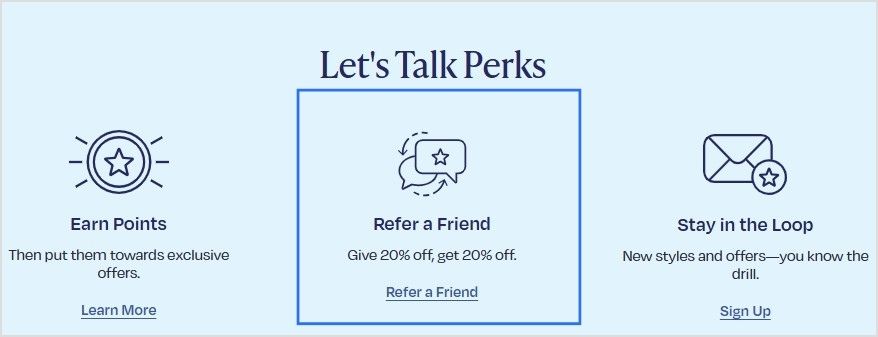
By promoting customer referrals, you create a strong network of brand advocates that can help increase Shopify sales.
Also read: How to Increase Brand Awareness: 9 Best Strategies
21. Leverage Email Marketing
Email generates $42 for every $1 spent. That’s a staggering 4,200% ROI! Building a strong email list and sending targeted, personalized messages can increase sales, maintain customer recall, and enhance brand loyalty.
Here’s how to make the most of email marketing:
- Build a high-quality email list: Acquire genuinely interested subscribers in your products or services. Use pop-ups, landing pages, and lead magnets to capture email addresses.
- Send targeted emails: Craft relevant content based on customer interests and needs. For example, offer special promotions, share product launches, or provide tips that align with customer preferences.
- Special offers & reminders: Email marketing is perfect for promoting sales, special offers, and new products. Regular updates keep customers informed and connected, increasing loyalty.
Here’s a vibrant and unique email subscription example of Passionfruit:

By utilizing email marketing, you can drive conversions on your Shopify store, boost customer engagement, and stay top of mind.
22. Building customer relationships and brand loyalty
Building strong customer relationships and brand loyalty are crucial for long-term business success. Here are effective ways to nurture these connections after the sale:
- Send a thank-you note: A simple, personalized note can go a long way in showing appreciation and building trust.
- Follow-up: Checking in with customers through emails, phone calls, or social media ensures satisfaction and shows you care about their experience.
- Offer discounts: Providing exclusive discounts or coupons for future purchases rewards customers and encourages repeat business.
- Ask for feedback: Demonstrating openness to improvement by soliciting feedback helps enhance the customer experience and shows you value their input.
- Reward loyalty: Implement loyalty programs offering perks like early access to sales, discount codes, and exclusive offers to keep customers engaged and coming back.
- Use user-generated content: Featuring content from your customers on social media makes them feel valued and strengthens brand loyalty.
We absolutely love how Blume is building customer relationships through their loyalty program, Blumetopia:

Check out the full page here for inspiration: Blumetopia
By focusing on these strategies, you’ll turn satisfied customers into loyal advocates, leading to increased sales for your Shopify store.
23. Monitor your inventory for smooth operations
Keeping track of your inventory on Shopify is essential to meet customer demand and prevent stockouts. Here’s how to effectively manage your stock:
- Review sales data: Use Shopify’s sales analytics to understand which products sell well, helping you identify high-demand items to restock.
- Track inventory levels: Shopify’s inventory management system makes it easy to monitor stock levels, ensuring you never run out of popular products.
- Reorder in time: Leverage Shopify’s inventory alerts and trend analysis to reorder products before they run out, ensuring continuous availability.
By staying on top of inventory management on Shopify, you can maintain a seamless shopping experience for your customers while avoiding lost sales opportunities.
24. Up-sell & cross-sell to boost your sales
Up-selling and cross-selling are powerful techniques to increase your revenue by encouraging customers to purchase more. Here’s a quick breakdown:
- Cross-selling: This involves offering a related product to complement the customer’s initial purchase, like pairing a burger with chips. The goal is to suggest products that enhance the customer’s experience.
- Upselling: Upselling encourages customers to upgrade their purchase, such as upgrading from a 500ml Coke to a 1000ml Coke. It’s about offering a higher-value version of the original item, often with added benefits.
Here’s an image to demonstrate:
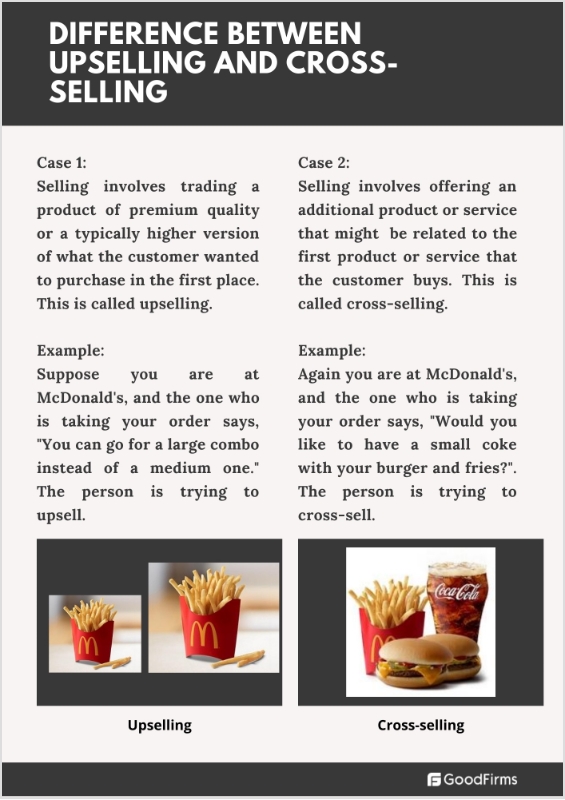
Source: goodfirmsdotco
25. Retargeting ads for Shopify stores
Retargeting ads are a powerful tool to re-engage visitors who’ve shown interest in your products but left without making a purchase. By displaying ads for products they’ve already viewed, you increase the chances of bringing them back to your Shopify store.
Benefits of retargeting ads:
- Reduces cart abandonment: Target shoppers who’ve added items to their cart but didn’t complete the purchase.
- Increases conversions: Show ads with relevant products to keep your store top-of-mind to increase Shopify sales.
Here is an example of a Facebook retargeting ad run by Myfix Cycles. The ad boosted their CTR by 6.38% and gained a revenue of $3,043.20 from an ad spend of $199.07, meaning that they earned $15 for a $1 ad spend.
Check the retargeting ad below:

How to set up retargeting ads:
- Use platforms like Facebook/Google ads: Integrate your Shopify store with these platforms to easily set up retargeting campaigns.
- Segment your audience: Create different campaigns targeting users based on their actions such as cart abandoners or product page visitors.
- Design engaging ads: Highlight the products users were interested in and include incentives like discounts or free shipping to encourage them to return.
Retargeting ads can significantly increase your Shopify store’s sales by bringing back potential customers who are already interested in your products. Tools like Replug allow you to add retargeting pixels to recover lost sales.
Conclusion
Increasing sales on Shopify is about implementing tactics and building a sustainable strategy that focuses on customer experience, brand trust, and data-driven decisions. By combining niche targeting, optimized websites, SEO, and personalized customer interactions, you can create a holistic approach to driving growth.
Whether leveraging social media, crafting compelling web copy, or utilizing tools like email marketing and retargeting ads, these strategies will help you stand out in a competitive market.
Remember: Consistency and customer-centricity are the keys to long-term success!
FAQs for how to increase sales on Shopify
1. What are the most effective strategies to increase Shopify sales?
Focus on niche targeting, optimizing product pages, using SEO, and implementing social proof. Combining these strategies with personalized customer experiences can significantly increase conversions.
2. How can I improve my Shopify store’s checkout process?
Simplify the checkout process by minimizing steps, allowing guest checkouts, and integrating secure payment gateways. A one-step checkout for registered users can also enhance the experience.
3. How does social media help to increase Shopify sales?
Social media enables you to engage with your audience, promote your products, and direct traffic to your store using bio links, hashtags, and targeted advertising. It’s a cost-effective way to build customer relationships and drive conversions.
4. Why is SEO important for my Shopify store?
SEO improves your store’s visibility in search engines, driving organic traffic and increasing sales. Use relevant keywords in product descriptions, meta tags, and URLs to enhance discoverability.
5. How can I retain customers for repeat purchases?
Offer loyalty programs, personalized follow-ups, and exclusive discounts. Providing excellent customer service and seamless shopping experiences also encourages repeat business.
6. Are paid ads worth investing in for Shopify?
Yes, paid ads can drive immediate traffic and sales by targeting specific audiences. Platforms like Google Ads and Facebook Ads help boost visibility and engage customers effectively.