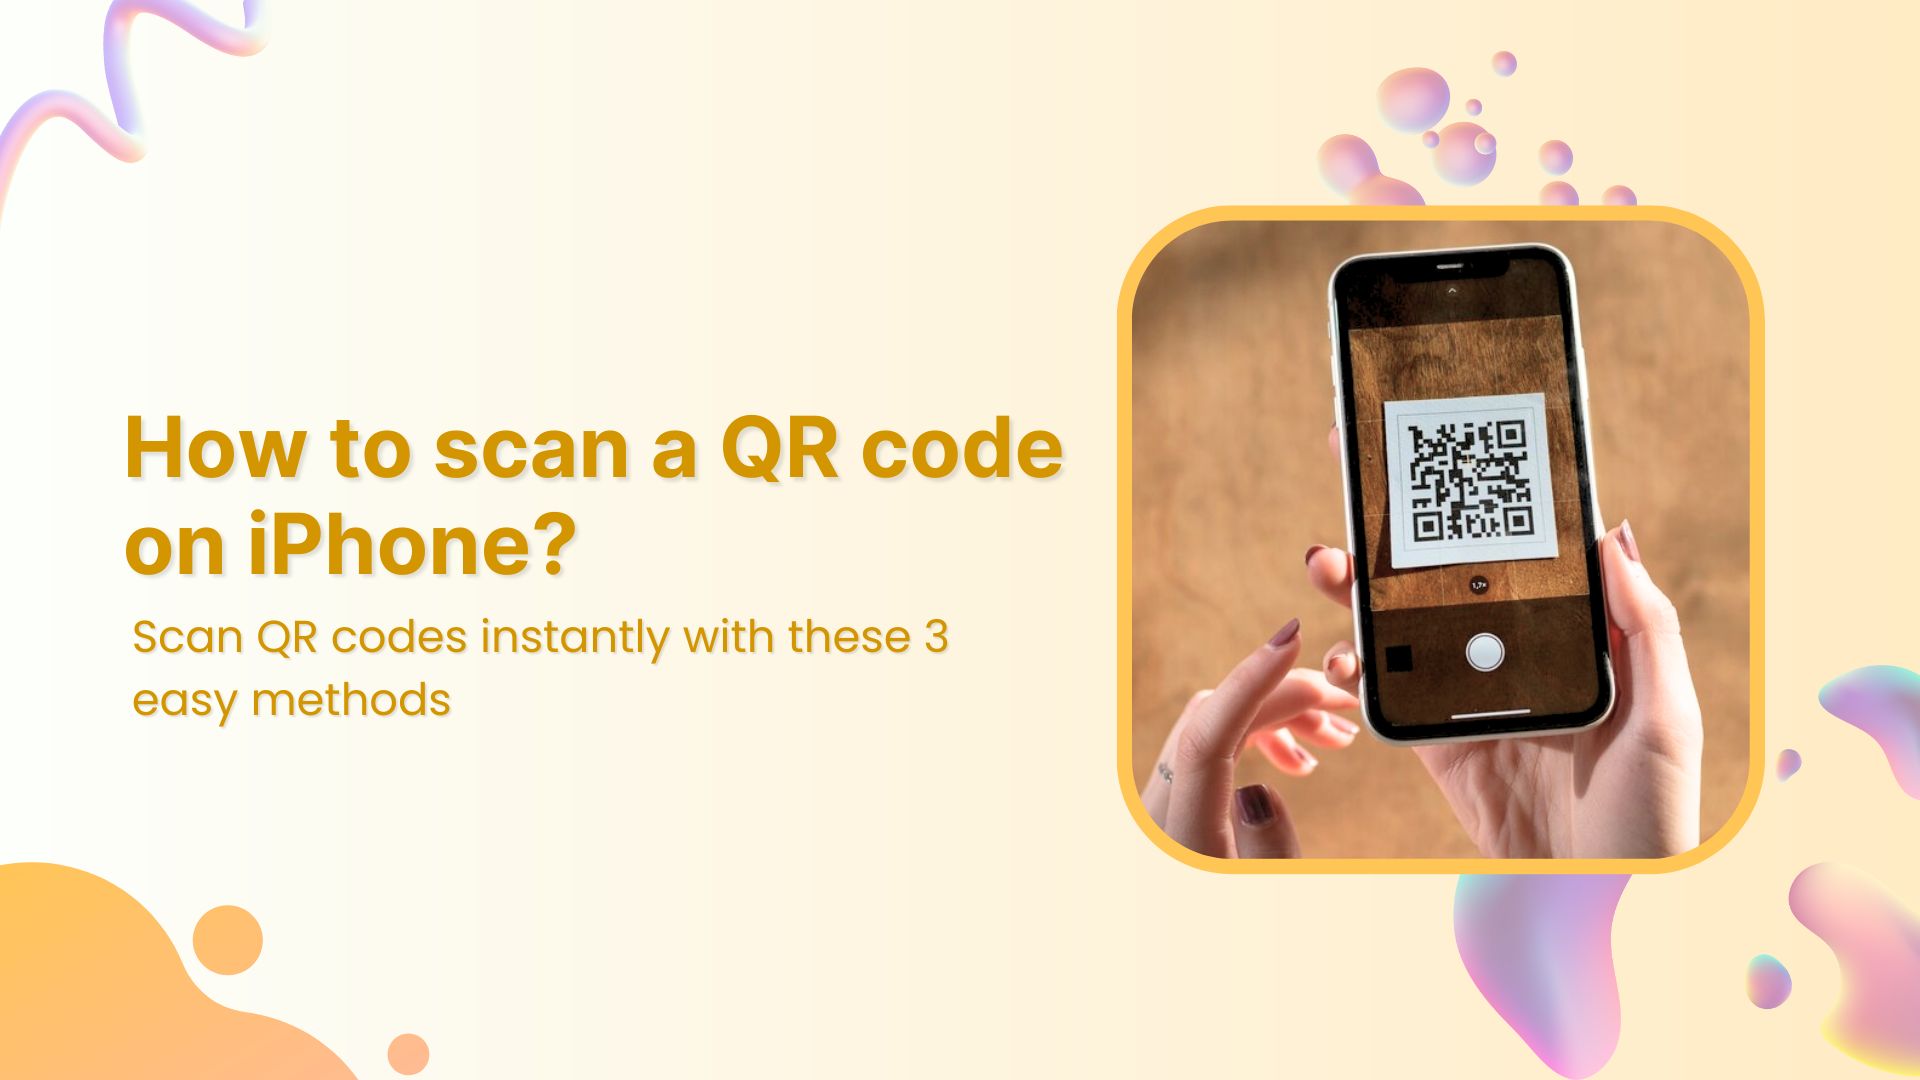
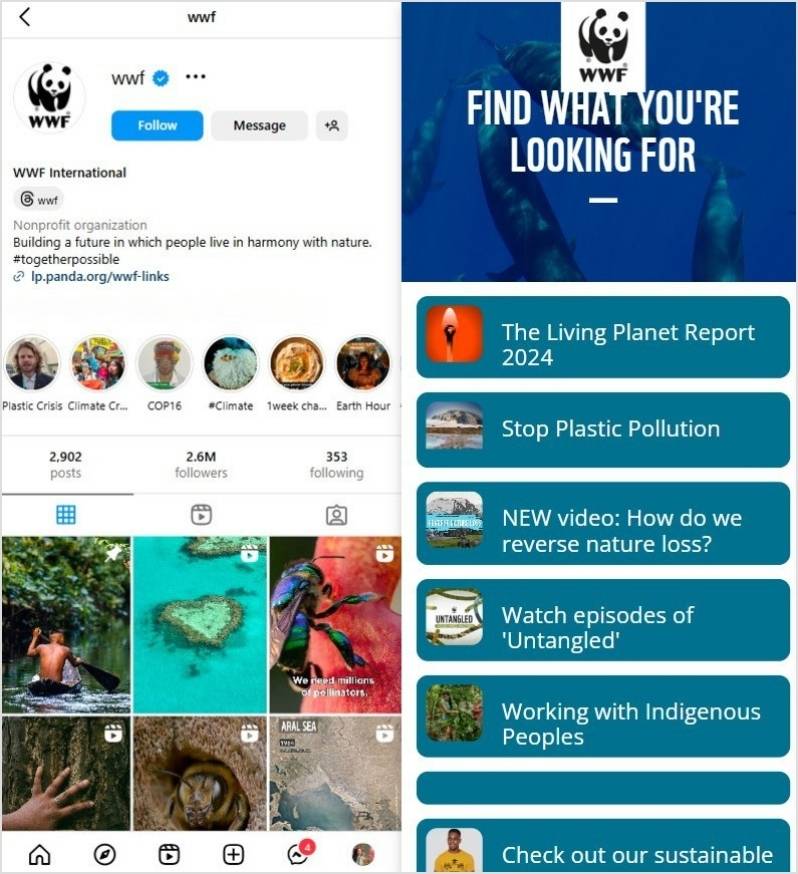
QR codes make accessing links, menus, and information effortless. Whether you’re on the go or browsing a menu, QR codes simplify the process. If you’re using an Apple device, scanning a QR code on your iPhone is a breeze, thanks to the built-in scanner in the Camera app.
Below, we’ve outlined three simple methods to scan a QR code using your iPhone’s camera.
3 methods to scan a QR code on an iPhone
Method 1: Using the Camera app to scan QR Codes
Apple has made QR scanning a breeze. Just follow these steps:
Open the Camera app.
Point your camera at the QR code, ensuring it’s within the frame.
Hold still for a moment—your device will recognize the code and display a notification banner at the top.
Tap the banner to open the link or perform the action associated with the QR code.
Note: If your camera doesn’t pick up the code immediately, try adjusting the distance or ensuring there’s good lighting.
Note: If your device doesn’t support QR scanning through the camera, you can always download a third-party QR scanner app from the App Store.
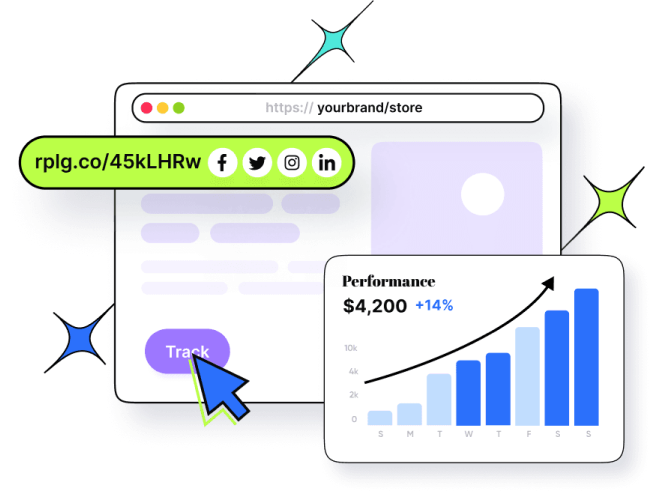
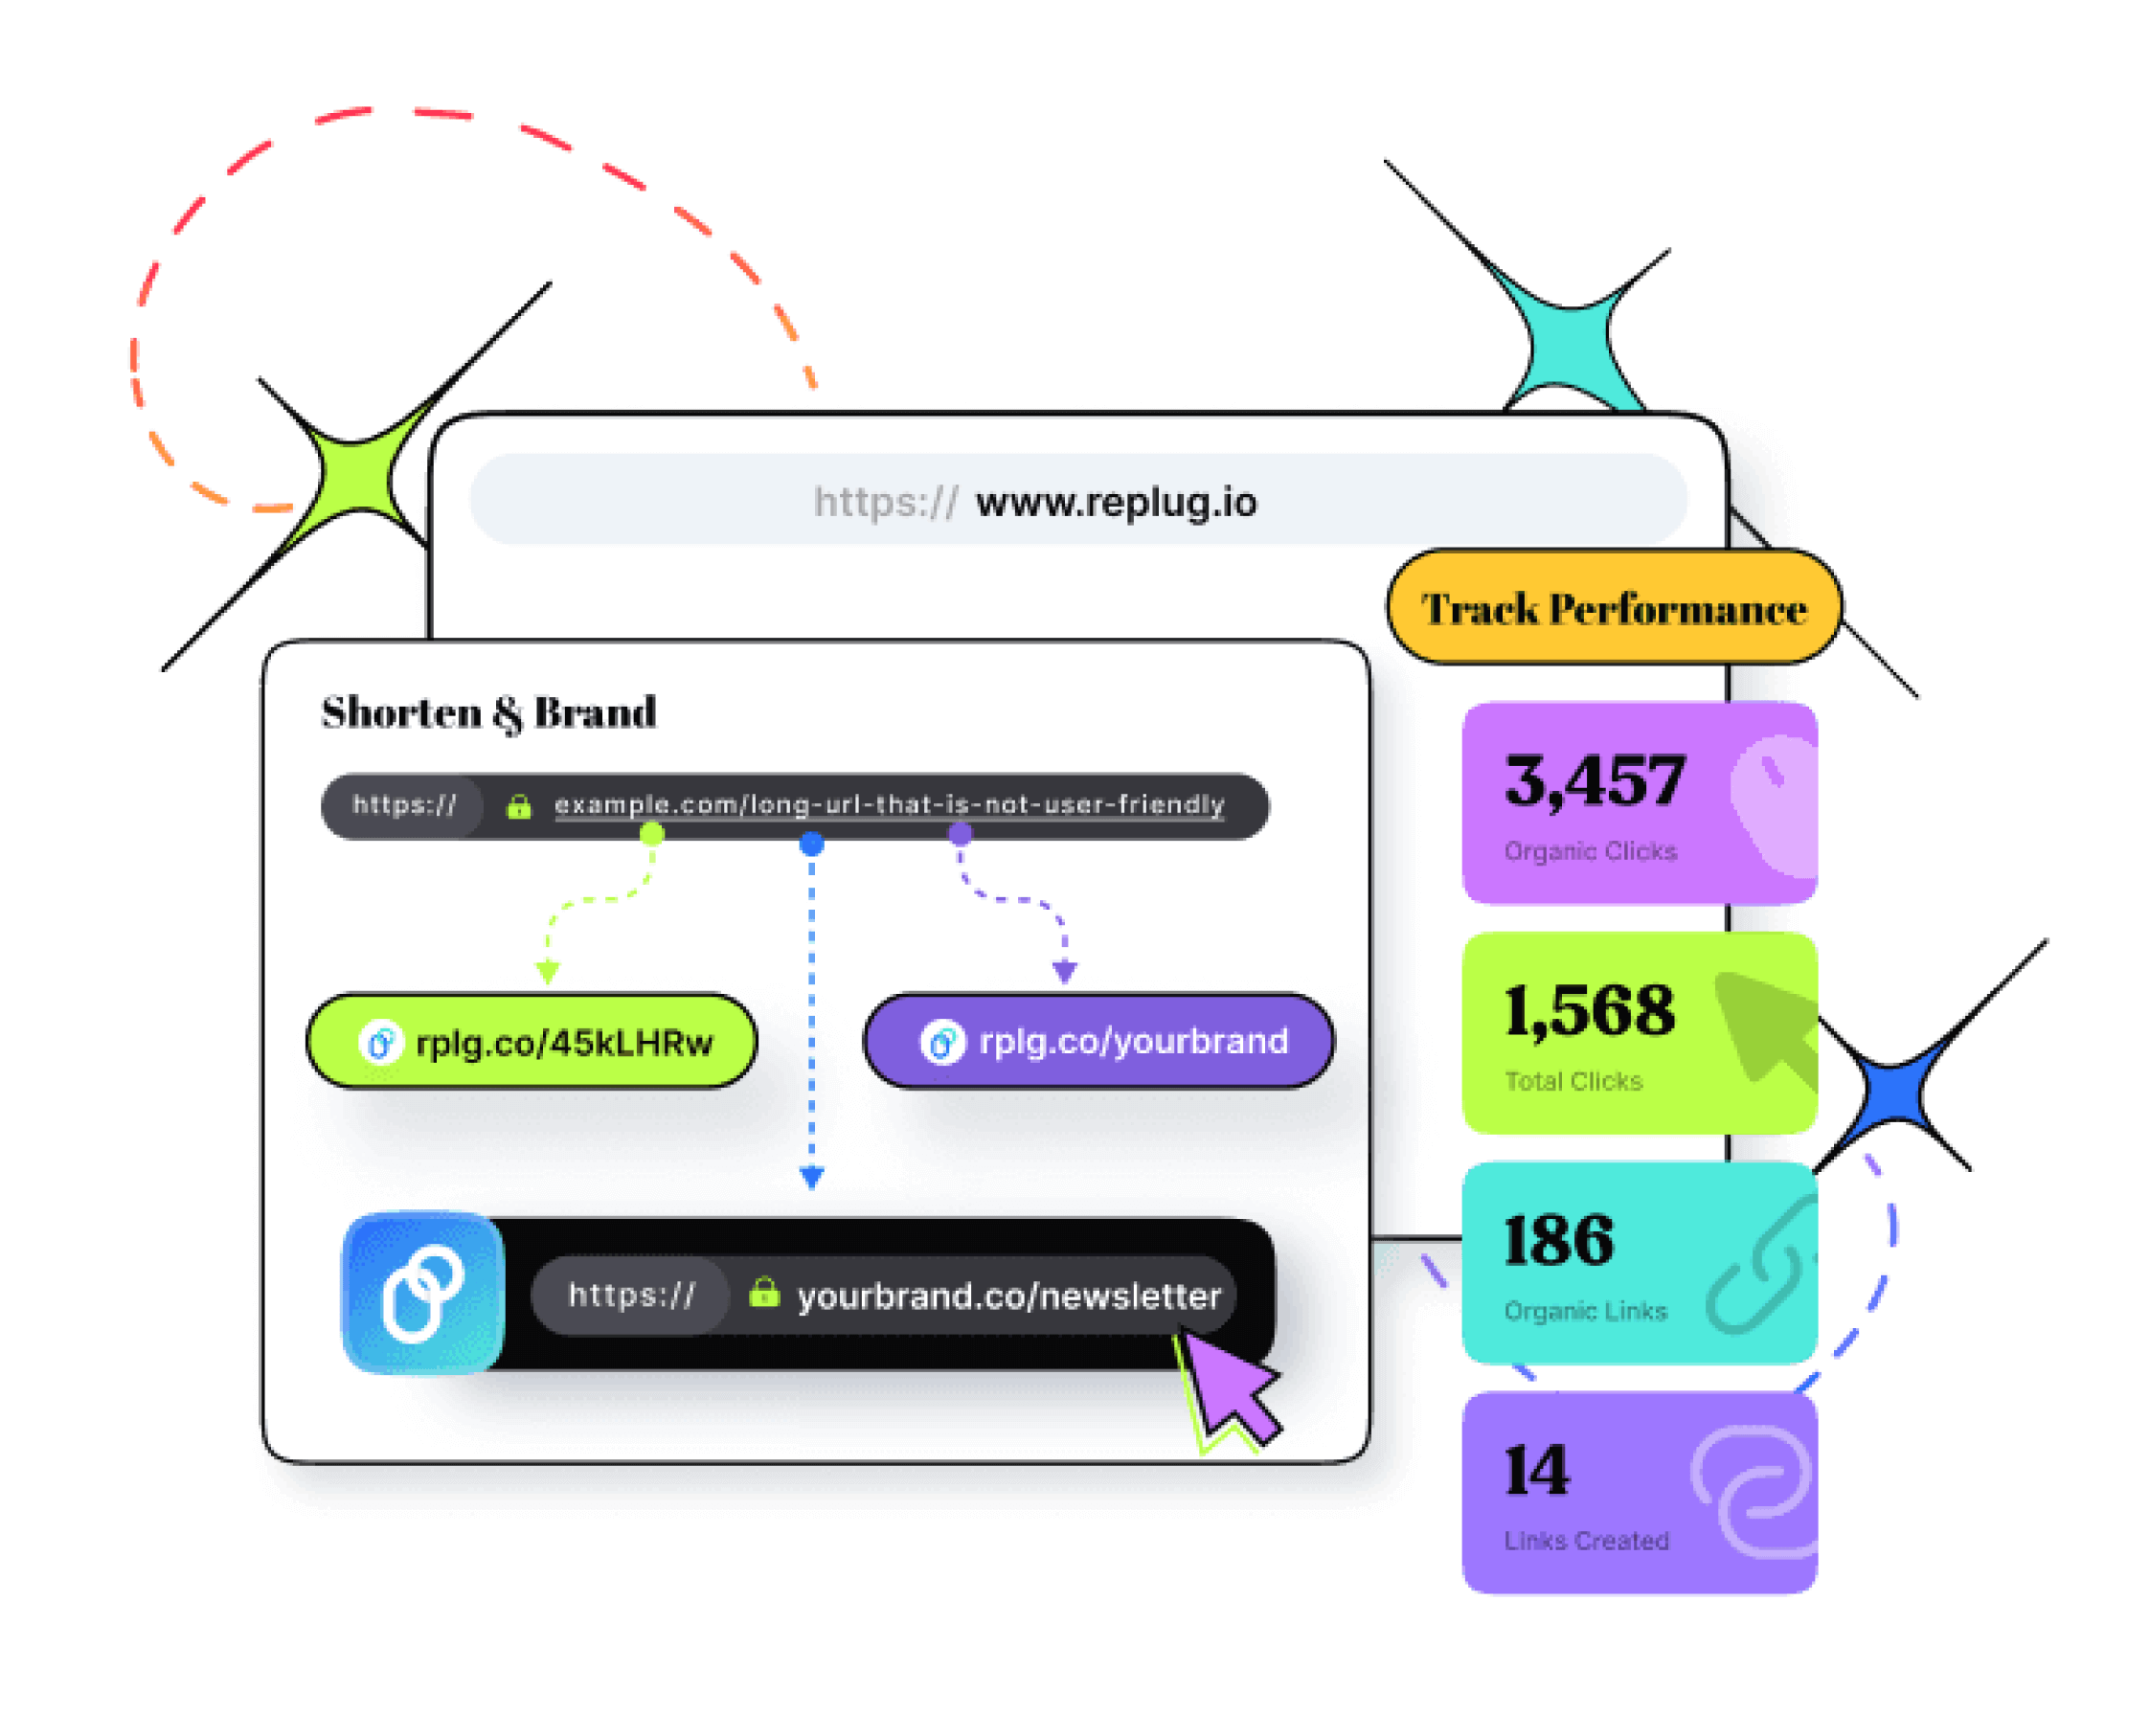
Scan, track, and optimize Your QR Codes with Replug
QR codes are more than just a way to share links—they’re a powerful marketing tool when used strategically. With Replug, you can go beyond basic QR generation and track every scan, analyze performance, and optimize your campaigns for better results.
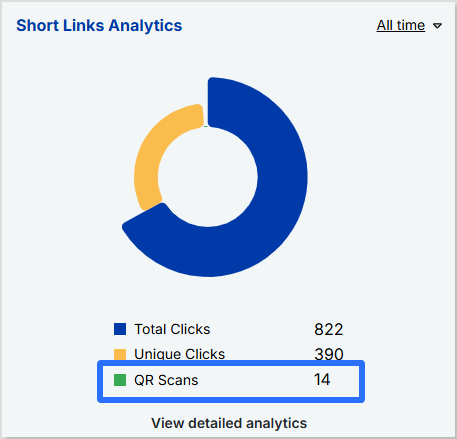
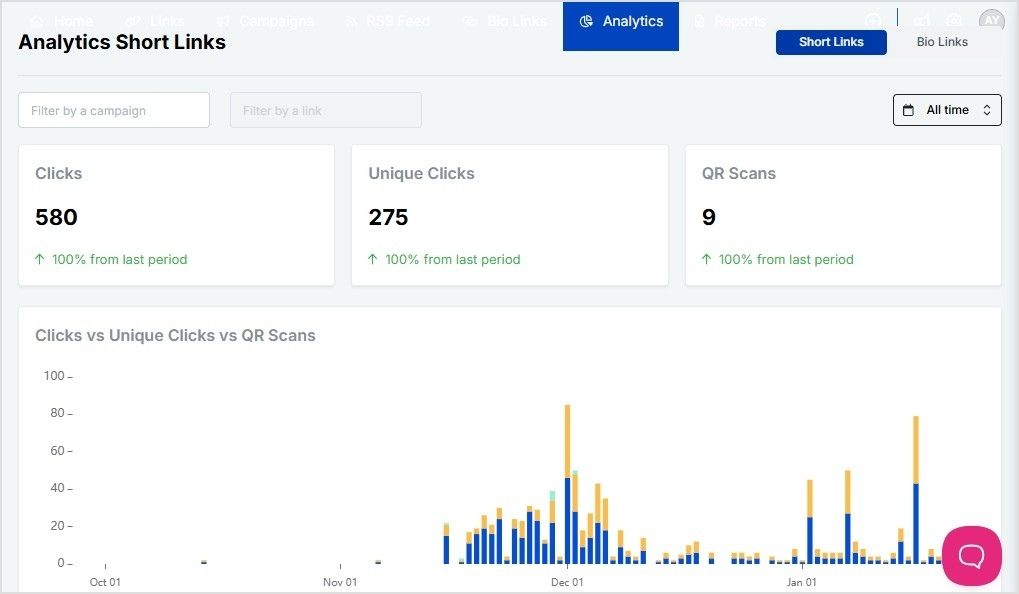
Track every scan in real-time
Monitor QR scans, unique clicks, and total interactions.
Get insights into scan locations, devices, and referral sources.
View QR graph charts to analyze trends and optimize performance.
Optimize for maximum impact
Create dynamic QR codes that allow you to update the destination URL without reprinting the code.
Add UTM parameters to track campaign effectiveness across different marketing channels.
Download your QR codes in multiple formats (PNG, SVG) for high-quality use.
Final thoughts
Scanning QR codes on an iPhone is incredibly easy, whether through the Camera app, Control Center, or even from saved images. For businesses and marketers, using tools like Replug can take QR code functionality to the next level by providing tracking, analytics, and customization options.
FAQs for how to scan a QR code on your iPhone
How can you scan a QR code on an iPhone without a camera?
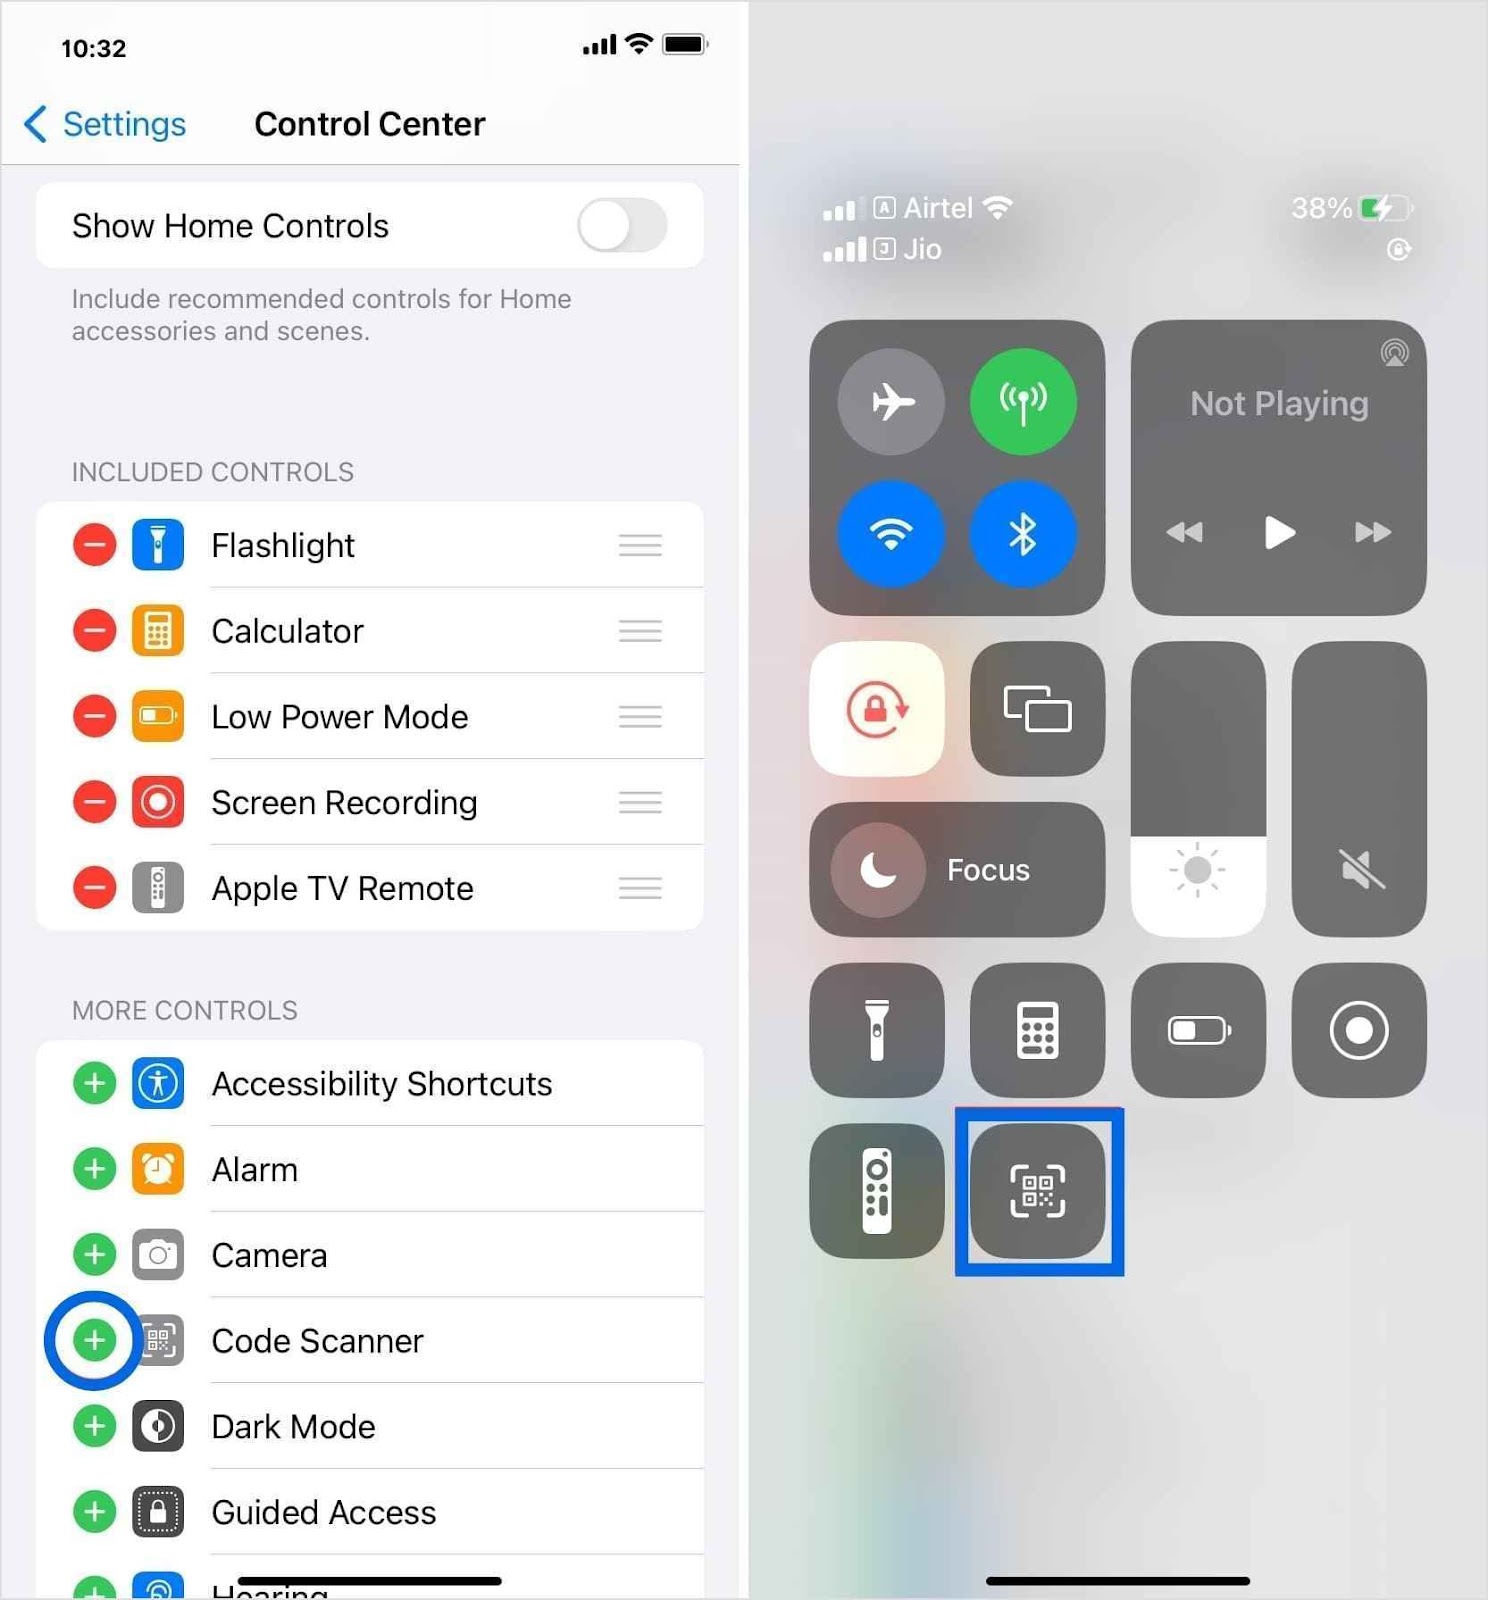
If your camera isn’t working or you prefer an alternative method, you can use the Code Scanner in the Control Center or a third-party QR scanner to scan codes directly from images or files.
How do I scan a QR code inside my phone without using another phone?
You can scan a QR code from an image stored on your iPhone by using the Live Text feature in the Photos app or a third-party QR scanning app that allows you to upload and scan codes effortlessly.
Can I customize my QR code’s appearance?
Yes! While iPhones can scan basic QR codes, tools like Replug let you customize colors, add logos, and even create branded QR codes to match your business identity.
How to scan QR code iPhone from a photo?
1. Open the Photos app and select the image containing the QR code. 2. Tap and hold the QR code until a pop-up appears. 3. Select the option to open the link or take action.
How to scan a QR code on your screen?
If you come across a QR code while browsing online, take a screenshot and follow the steps to scan a QR code from a photo.
How can I track the number of times my QR code has been scanned?
Apple’s default scanner doesn’t track scans, but Replug lets you monitor scan activity, view analytics, and measure engagement in real-time.
We all know that a link-in-bio tool lets you share multiple links through a single URL. And we’ve already talked about how Replug stacks up against other options.
But here’s a question: do you know what a “linktree” actually is?
Most people assume it’s just the name of a tool. But in reality, a linktree refers to any landing page that gathers multiple links in one spot, making it easier for people to access your content, shop, or connect with you.
So, if you’ve clicked on an Instagram or TikTok bio and landed on a page full of links, that’s a linktree. But how does it actually work? And how can you use it to your advantage?
In this guide, we’ll break it down, keeping it light, easy to follow, and packed with useful insights. Whether you’re a social media pro or just getting started, you’ll walk away knowing exactly how to make the most of your linktree.
What is a linktree?
A linktree (also called a link-in-bio or bio link page) is a landing page that holds multiple links in one place.
Instead of being stuck with just one clickable link in your social media profile, you can create a hub with buttons that lead to different pages—your latest blog, YouTube video, online store, or anything else you want people to check out.
A well-structured linktreeboosts clicks and engagement since it helps visitors find exactly what they need without extra searching.
Linktree setups are simple to create and work on Instagram, TikTok, X (Twitter), and other platforms. When someone taps your linktree URL, they land on a clean, easy-to-navigate page with all your important links. Whether you’re promoting a podcast, selling products, or driving traffic to multiple platforms, a linktree makes sure everything is just one tap away.
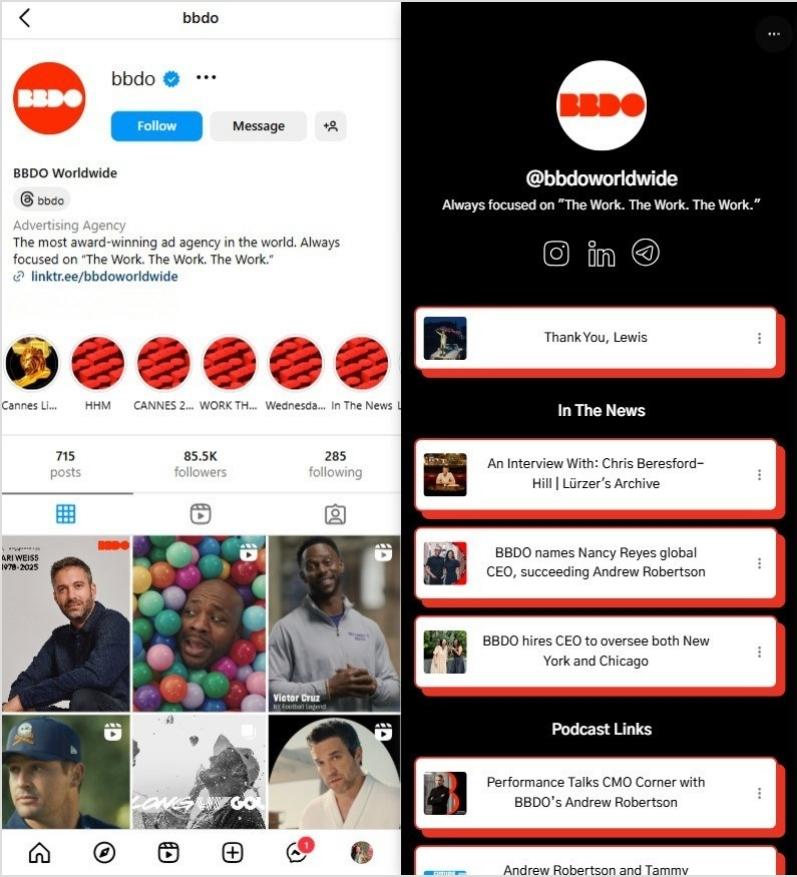
For many creators and brands, Instagram is the go-to place for a linktree since the platform only allows one link in the bio. Instead of constantly swapping links in and out, a linktree keeps everything in one place—making life easier for both you and your audience.
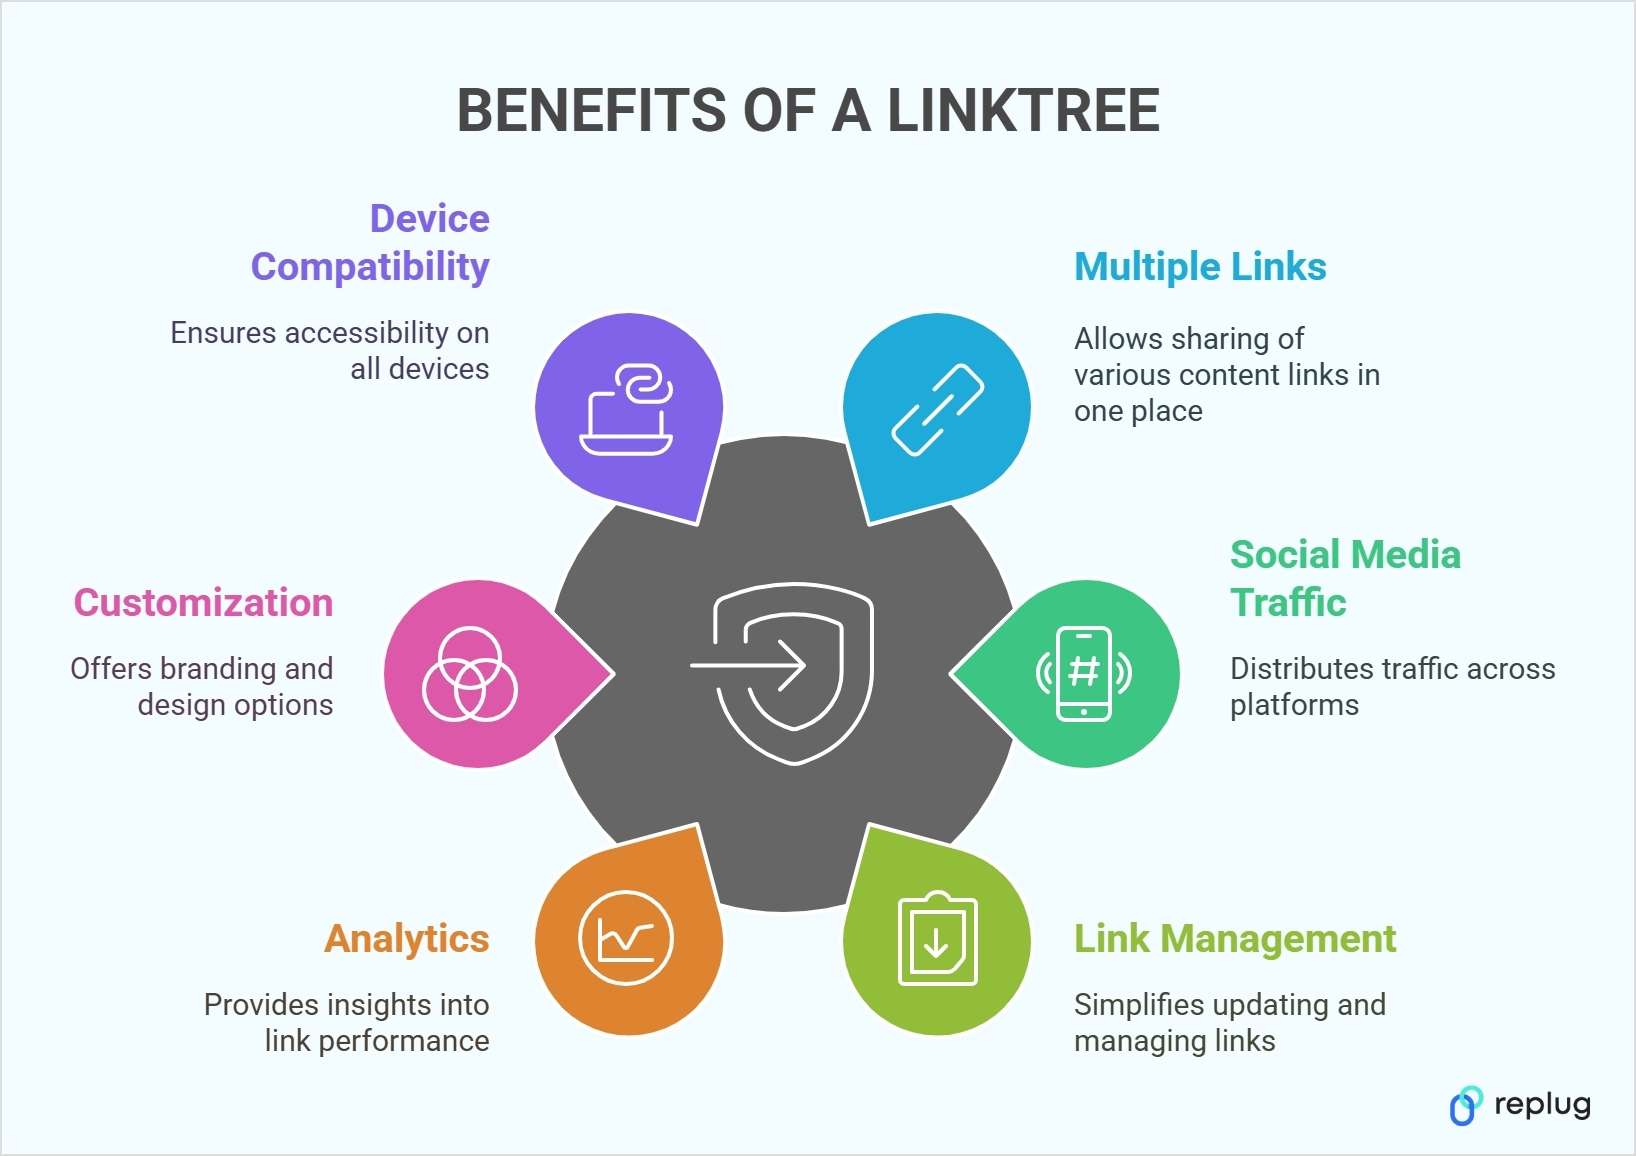
You can share multiple links: A linktree lifts lets you add as many links as you’d like in your social media bios. That can mean product pages, sign-up forms, blog posts, or any other relevant content.
Maximize social media traffic: A single linktree can drive visitors to multiple platforms, helping you distribute traffic across various channels.
Simplify link management: No need to update your bio link constantly. Instead of replacing links every time, you can simply update your linktree dashboard, making the process seamless and efficient.
Analytics and insights: A linktree can collect data on how many views and clicks each link receives. Tracking these numbers can reveal which pieces of content resonate most with your audience.
Customization options: Some tools allow deeper customization, including custom background images, color palettes, and even the ability to add your branded domain.
Designed for mobile and desktop: Linktree pages are responsive, ensuring they look neat and readable on any device.
Various integrations: Many link-in-bio tools support integrations, like embedding videos or adding an email sign-up form straight onto your page.
Consistent branding: Matching your Linktree’s landing page look to the rest of your brand identity can make your channels feel more unified.
Save time and effort: Managing all your important links in one place reduces hassle and streamlines the user experience.
Now let’s discuss how to create a stunning linktree using Replug:
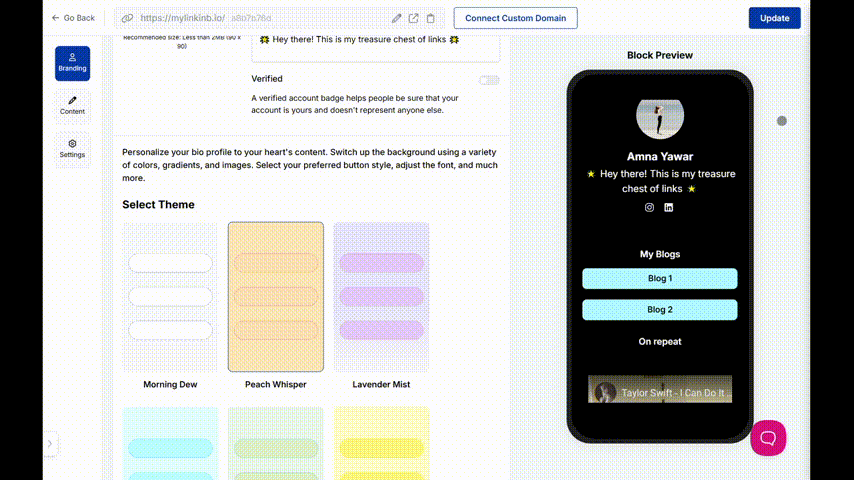
Create your account: Instead of settling for a basic linktree tool, choose a platform that gives you more control. Create an account on Replug to create a branded linktree experience with built-in tracking and retargeting options.
Set up your profile: Once inside your Replug dashboard, upload your profile image, add a compelling bio, and customize your landing page to reflect your brand.
Unlike traditional linktree tools, Replug offers custom domain options, ensuring your link-in-bio matches your brand identity.
Add and organize your links: Replug allows you to add multiple links, but with a twist. You can track clicks, analyze engagement, and even A/B test your links to maximize conversions.
Share your link: Copy your Replug bio link and place it in your social media bios across Instagram, TikTok, X (Twitter), Pinterest, LinkedIn, and more. With Replug’s analytics, you can track which platform drives the most traffic to your links.
Experiment with advanced features: While basic linktree tools offer simple customization, Replug goes beyond by enabling retargeting and deeper branding options. Whether you want to add a call-to-action pop-up or integrate remarketing pixels, Replug ensures your bio link works harder for your business.
Best practices for link management
Managing your linktree effectively ensures your audience finds what they need without confusion. Here are some key best practices:
Keep your links fresh: Regularly update your linktree to reflect new products, blog posts, or announcements. A stale link page can lead to missed opportunities.
Use clear and engaging text: Instead of generic phrases like “Click here,” use compelling, action-driven labels such as “Get 20% off” or “Watch my latest video.”
Prioritize your most important links: Place your most valuable links at the top so they’re seen first. Whether it’s a new launch, a limited-time offer, or an event registration, make sure it stands out.
Keep it clean and organized: Avoid overwhelming visitors with too many links. If you have a long list, rotate them based on priority or group them strategically.
Leverage mobile tools: Need to make quick updates? Some link-in-bio tools offer mobile apps for easy link management on the go.
By following these best practices, you ensure your linktree remains effective, user-friendly, and optimized for engagement.
If you need more than link sharing, like retargeting, A/B testing, or advanced analytics, Replug goes beyond just creating a linktree. It offers short links, conversion tracking, and remarketing pixels, making it a powerful choice for marketers and businesses.
YouTube channels, blogs, and social feeds can be shared in one neat menu. This approach is easier than asking followers to dig through different links themselves.
If you have special discounts, new product collections, or various sales channels, linktree can showcase them all side by side. This setup helps shoppers decide where to go next.
Portfolios, rate sheets, and client testimonials can be grouped together on one landing page. This setup helps clients access the full scope of your services.
Linktree offers a stress-free way to centralize your links. Instead of juggling different URLs across platforms, you can direct people to one well-organized menu. Whether you’re a business, content creator, or marketer, this approach saves time and keeps things clear for visitors.
As the concept of link management grows, it’s worth an advanced tool like Replug for creating a linktree. It includes link shortening, retargeting features, and detailed performance metrics. Exploring which tool fits your needs best can save you trouble and keep your promotional efforts running smoothly.
A complete link management solution
for marketing professionals & agencies.
Try Replug for free
FAQs on linktree
What is the difference between a linktree and a link-in-bio page?
A linktree is a specific tool that provides a link-in-bio landing page, but the term “linktree” is also used generically to describe any page that consolidates multiple links into one.
Does using a linktree impact SEO?
While most link-in-bio tools do not directly improve SEO, using a custom domain can enhance brand authority. Additionally, analytics tools can help you optimize which links get the most engagement.
How many links can I add to my linktree?
Most link-in-bio tools allow unlimited links, but the number may depend on your plan. With Replug, you can add multiple links while tracking clicks and engagement to optimize your strategy.
Can I customize my linktree page?
Yes! Many platforms offer customization, including background colors, fonts, and button styles. Replug allows even deeper branding, such as adding a custom domain and link analytics.
Where can I use my linktree link?
You can place your linktree URL in social media bios (Instagram, TikTok, Twitter, LinkedIn, etc.), email signatures, business cards (via QR codes), and even YouTube video descriptions.
Sharing videos shouldn’t be a struggle. No one likes huge files, slow uploads, or email limits.
So, what’s the solution? Convert your video into a simple, shareable link! It makes sharing easier, keeps things organized, and makes your content accessible on any device.
In this guide, we’ll walk you through how to convert a video to a link in a few easy steps. Plus, we’ll show you how Replug can help you enhance your video-sharing experience with branded links, analytics, and more.
Whether you need to convert a video to a URL online or you’re looking for free methods, we’ve got you covered.
Why convert a video to a link?
Let’s be real: Sending large video files is a hassle.
Attachments take forever to upload, emails have size limits, and some messaging apps compress videos into a blurry mess.
But you don’t have to worry about that anymore. Converting a video to a link solves all these problems. Here’s why it’s a game-changer:
Easy sharing: A simple link lets anyone access your video instantly.
Saves storage: No need to clog up your device with massive files.
No quality loss: Unlike compressed videos, links keep the quality intact.
Better accessibility: Anyone with the link can view it without downloading.
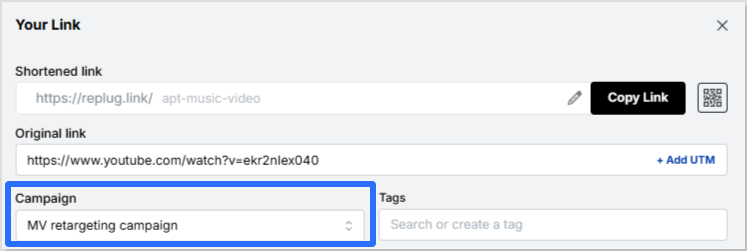
Step 3: Shorten the video link (optional, but recommended)
A long URL can look messy, especially if you’re sharing it on social media or in marketing campaigns. Using a link shortener like Replug makes it clean and clickable.
Here’s how to shorten your video link with Replug:
Create a custom URL if you want. This will give your video link a more branded look and feel. Here, we decided to shorten the YouTube music video link for APT. by Rosé and Bruno Mars.
Copy your shortened link and share it anywhere!
With Replug, you can also track link clicks, engagement, and performance, making it a great tool for marketers, content creators, and businesses.
Boost ROI with branded URLs!
Enhance your marketing campaigns by creating shareable, trackable, and fully multi-purpose
customizable branded URLs.
These tools work well if you need a quick, free way to convert a video to a URL link online.
How to share your video link
Now that you have your link, you can share it anywhere! Here are a few ways:
Social media: Post it on Facebook, Twitter, LinkedIn, or Instagram.
Emails: Add it to your newsletters or personal messages.
WhatsApp & Messenger: Send it directly in a chat.
Websites & blogs: Embed the link in your content.
Enhance your video links with Replug
If you’re using Replug, you’re not just sharing a video—you’re optimizing it for maximum reach, engagement, and conversions. Here’s how you can do it:
Re-engage viewers with retargeting pixels: Add tracking pixels to your video links to retarget users across platforms like Facebook, Google, and LinkedIn.
Track performance with advanced analytics: See who’s clicking, where they’re coming from, and how they interact with your video with Replug’s link analytics.
Create branded, short video links: Replace long, clunky URLs with branded short links that look professional and boost credibility.
Maximize marketing ROI
by transforming ordinary URLs into branded short links that convert.
Try Replug for free
Enhance visibility with a bio link page: Add your video link to a Replug bio link page, giving your audience a single destination to access all your content.
Leverage deep linking for seamless navigation: Guide users straight to the right platform or app where your video is hosted with deep links. No extra clicks, no confusion.
Generate scannable QR codes: Convert your video link into a QR code that people can scan to watch instantly. This is perfect for business cards, posters, and in-person events.
Replug turns your video into a powerful marketing asset that drives results.
Final thoughts
Converting a video to a link is the easiest way to share content without dealing with large files or quality loss. Whether you use Google Drive, YouTube, or a free online tool, the process is quick and simple. If you want a professional touch, don’t forget to shorten your link with Replug for better branding, tracking, and engagement analytics.
Ready to make video sharing effortless? Convert your videos to links today and simplify your workflow!
FAQs on how to convert a video to link?
Can I convert a video to a link without uploading it?
No, the video must be uploaded somewhere to generate a link. However, you can use temporary file-sharing services like WeTransfer if you don’t want long-term hosting.
What’s the best free platform to convert a video to a URL link online?
Google Drive and YouTube are the best free options. If you want a quick, no-login solution, try Streamable or File.io.
Will my video lose quality when I convert it to a link?
Not necessarily. If you upload it to platforms like Google Drive or Dropbox, it retains the original quality. YouTube and other social platforms may compress the video slightly.
How long will my video link be available?
It depends on the platform. Google Drive and Dropbox links stay active as long as the file exists, while WeTransfer and File.io links may expire after a set period.
Can I make my video link private?
Yes! Google Drive, Dropbox, and Vimeo allow you to set privacy controls, so only certain people can access your video.
How can I track video link performance?
Using a link management tool like Replug, you can track clicks, engagement, and audience insights to see how your video is performing.
Which video format is best for online sharing?
MP4 is the best format for online sharing due to its balance of quality and compatibility across most platforms.
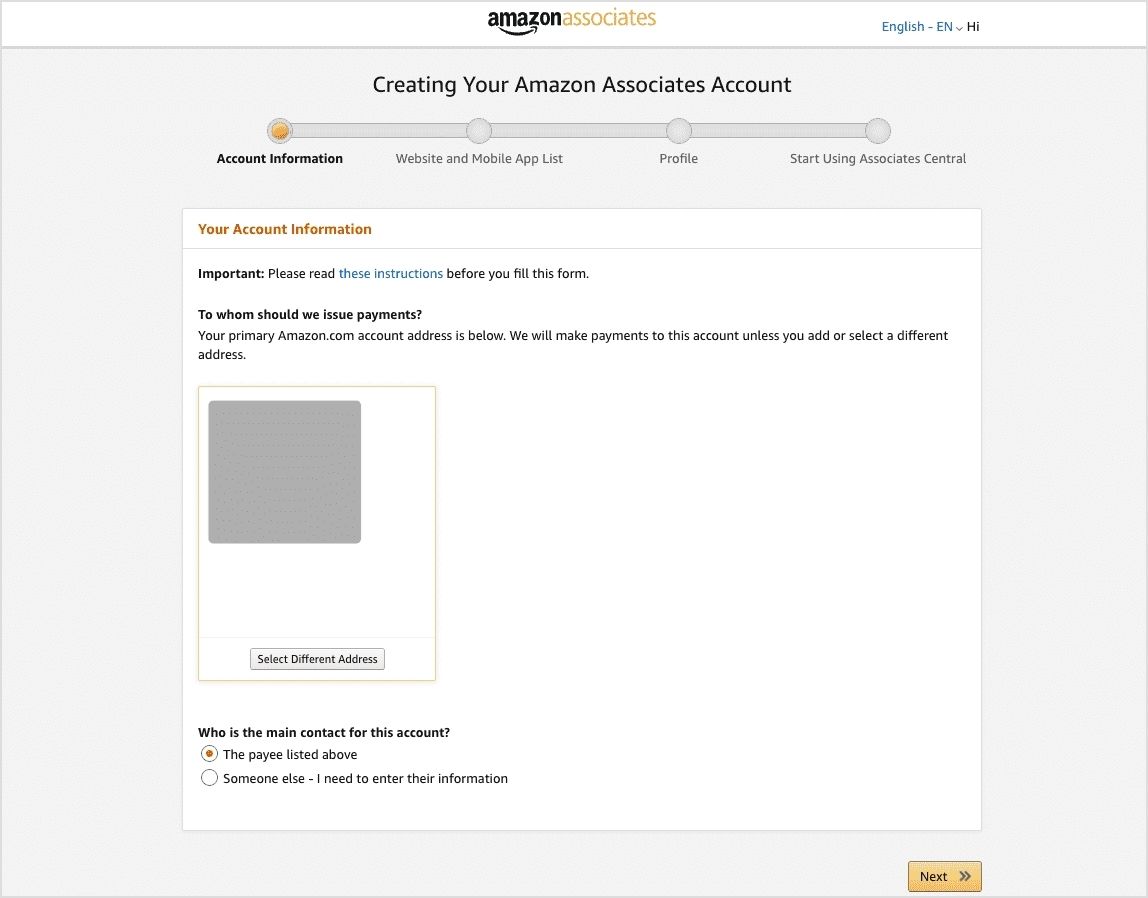
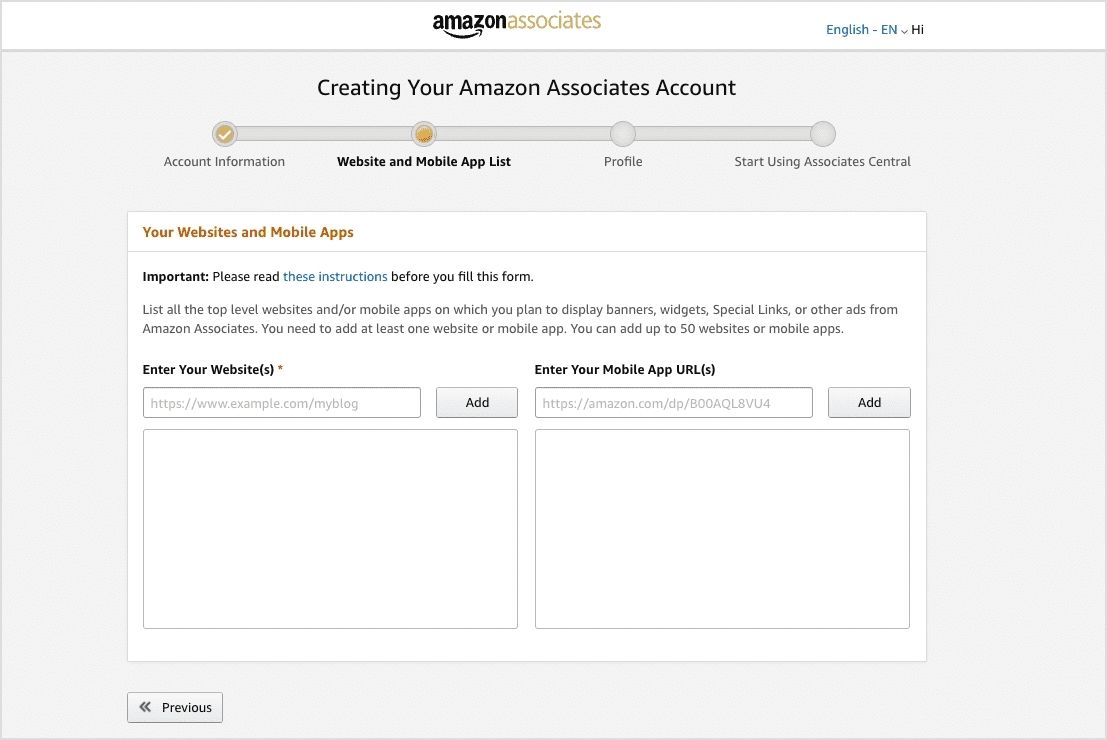
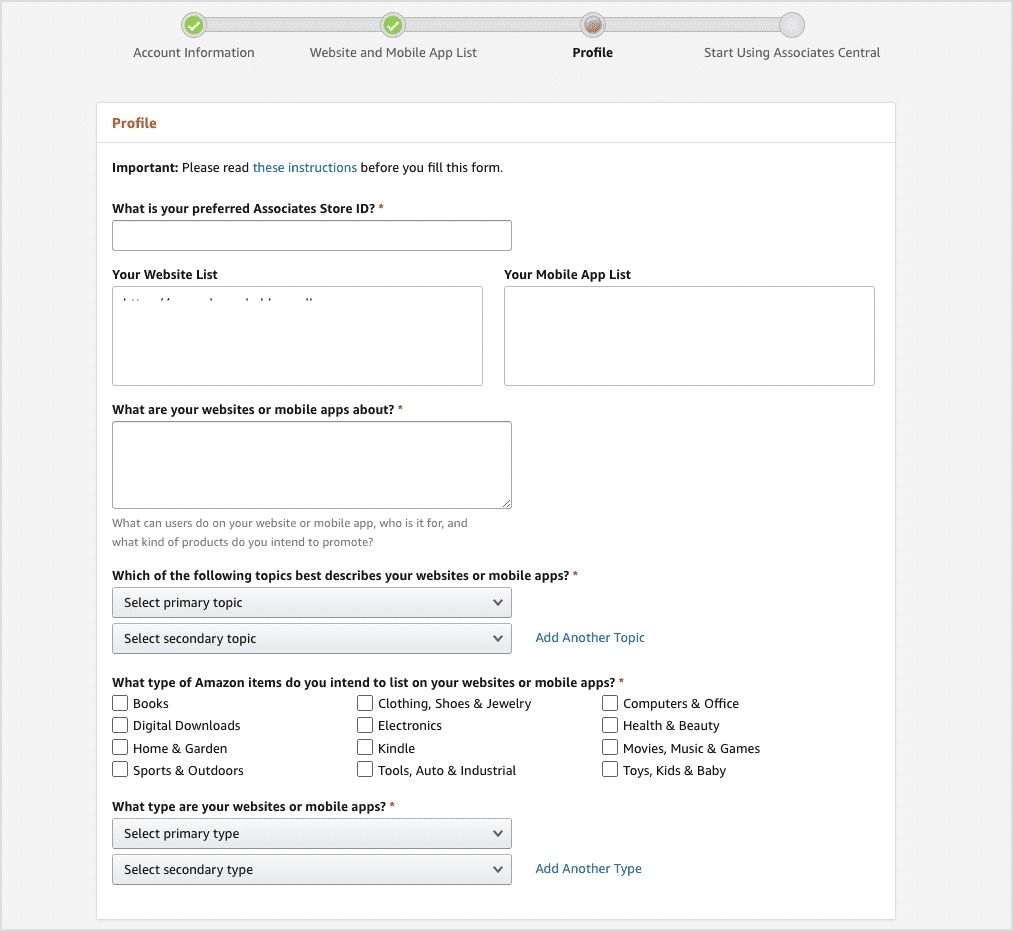
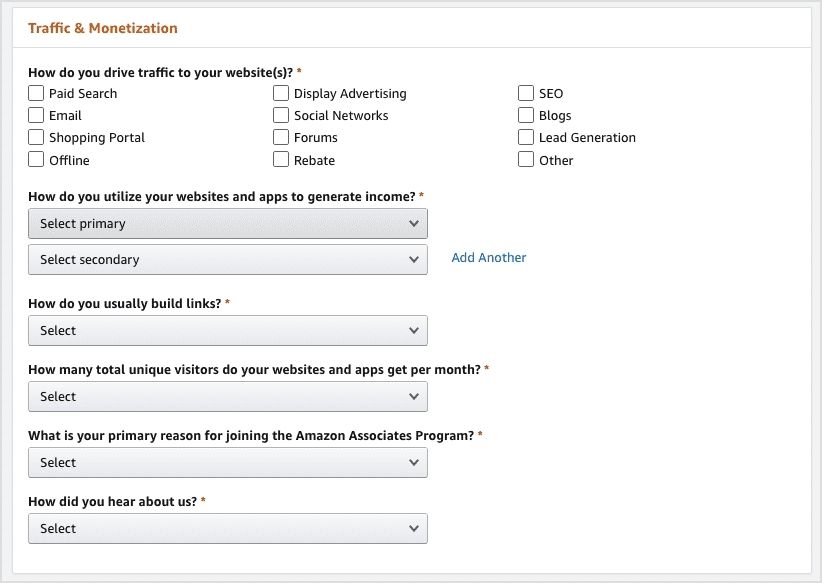
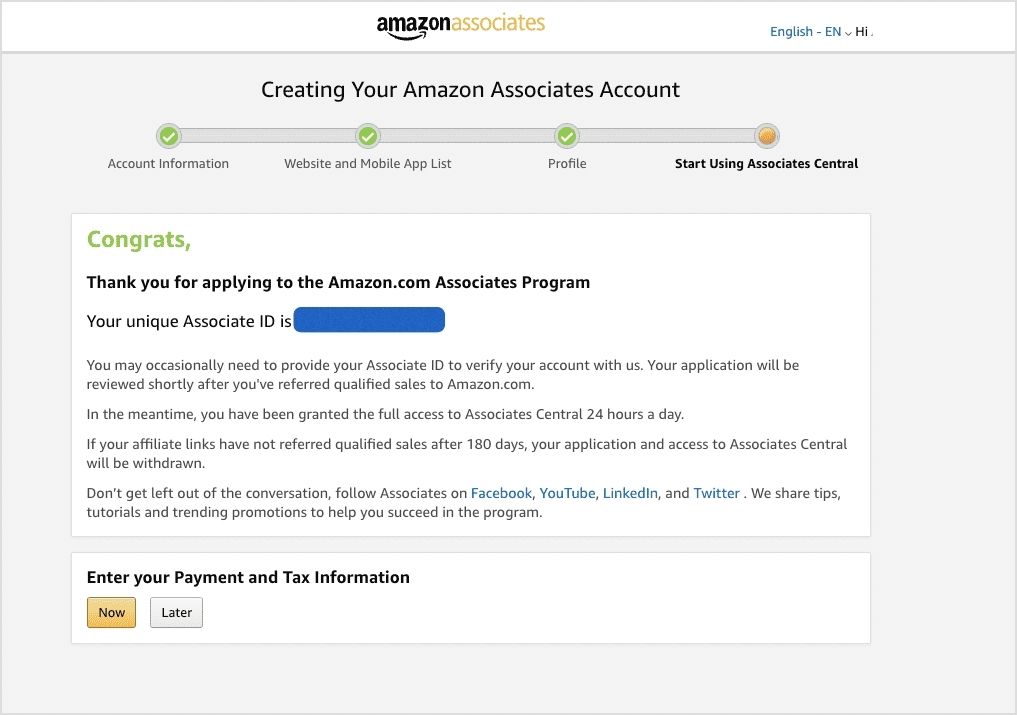
If you’re looking to monetize your online presence, affiliate marketing is one of the most effective ways to do so. And when it comes to affiliate marketing, Amazon offers one of the largest and most trusted programs: Amazon Associates.
Amazon accounts for nearly half of the affiliate marketing industry, with more than 900,000 affiliate partners leveraging its vast marketplace. With millions of products available and a high consumer trust factor, Amazon makes it easy for affiliates to drive traffic and earn commissions.
This guide will walk you through everything you need to know about becoming an Amazon affiliate, from signing up to maximizing your earnings.
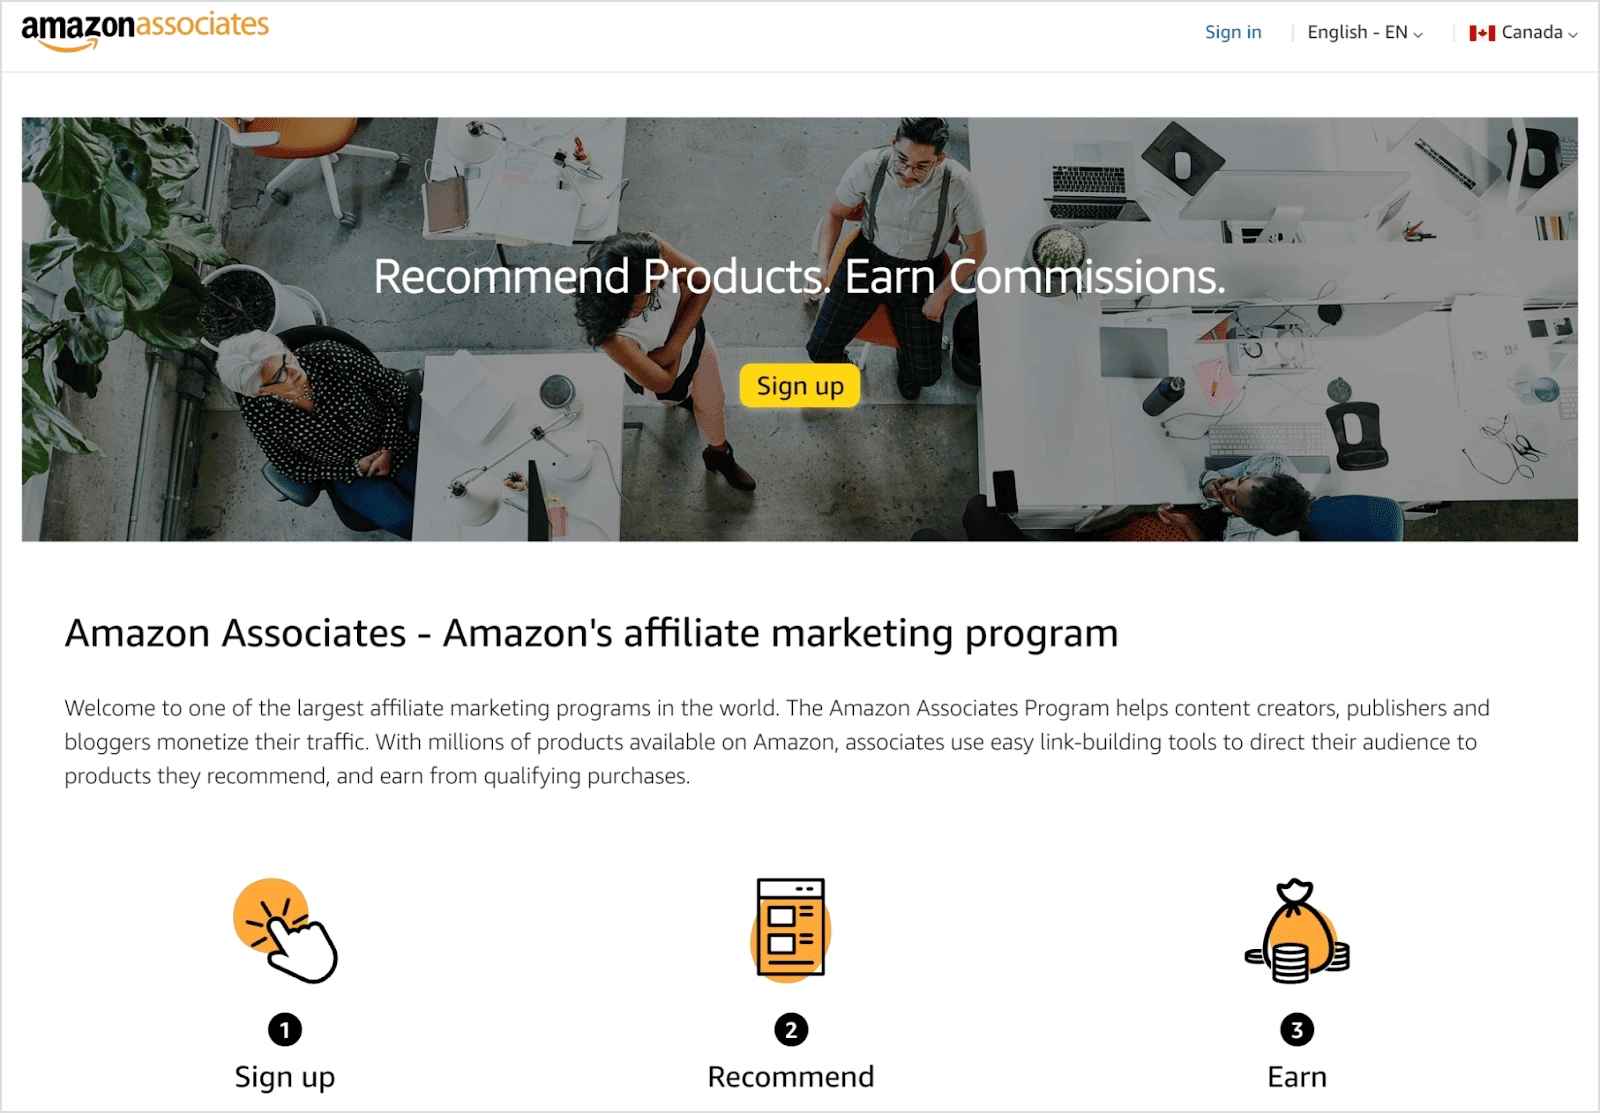
What is the Amazon Associates Program?
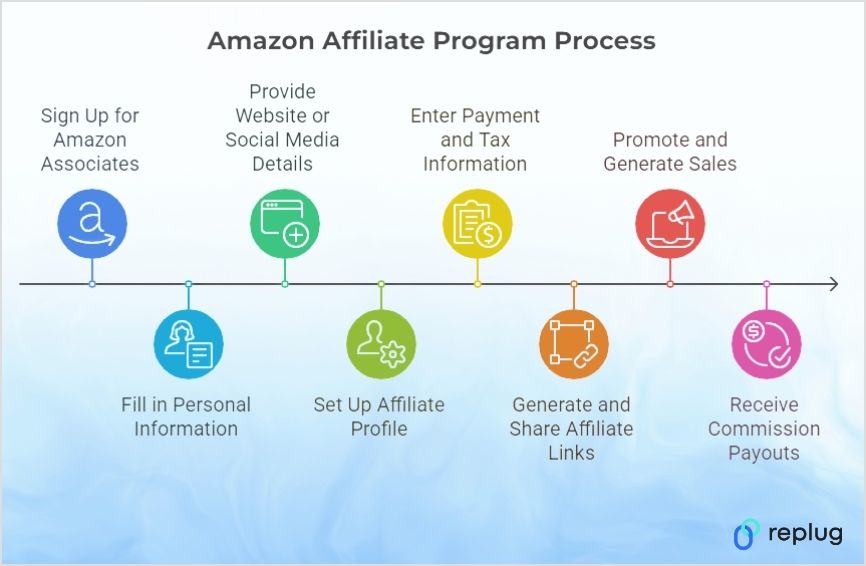
The Amazon Associates Program, similar to Replug’s affiliate program, is an affiliate marketing initiative that allows content creators, bloggers, publishers, and influencers to earn a commission by promoting Amazon products. When an affiliate shares an Amazon link and a visitor makes a purchase, the affiliate earns a percentage of the sale.
How does it work?
Sign up for the program.
Choose products to promote that align with your niche.
Share affiliate links on your blog, website, or social media.
Earn a commission when a user makes a purchase through your link.
Amazon’s commission rates range from 1% to 20%, depending on the product category. Additionally, affiliates earn commissions not just on the promoted product but on all purchases made within 24 hours of clicking their link.
Requirements for becoming an Amazon affiliate
To join the Amazon Associates Program, you need to meet specific eligibility criteria. Here are some requirements for becoming an Amazon affiliate:
General requirements
Requirement
Description
Website/blog
Must have at least 10 original and recently published posts.
Social media
Platforms like Facebook, Instagram, Twitter, YouTube, TikTok, and Twitch are eligible, provided you have at least 500 followers.
Failure to generate three qualifying sales in the first 180 days
How much can you earn as an Amazon affiliate?
Amazon affiliate earnings are highly variable, influenced by factors like audience size and engagement, niche selection, content quality, conversion rates, and Amazon’s commission structure. Beginners with smaller audiences and developing strategies typically earn modestly at first.
While top Amazon affiliates can earn substantial amounts, the range is broad. Influencer Marketing Hub reports an average annual income of $55,434 for Amazon affiliates. However, some studies suggest affiliate marketers may earn less than $20,000 annually. According to ZipRecruiter, the national average annual salary for an Amazon affiliate is $77,893, with top earners making over $126,500 per year.
Top performers, often with established online platforms like popular websites, influential blogs, and large, engaged audiences, can see monthly earnings ranging from thousands to hundreds of thousands of dollars. Pinpointing an exact starting income is difficult, but optimization is key to maximizing initial earnings.
Here’s a rough estimate of earnings:
Earning level
Monthly income range
Beginner
$50 – $500
Intermediate
$500 – $5,000
Advanced
$5,000 – $50,000+
How to become an Amazon affiliate: Step-by-step guide
Replug is a powerful link management tool that enhances affiliate marketing by offering multiple features designed to increase conversions and track performance. Here’s how:
1. Affiliate link cloaking and customization
Amazon prohibits traditional link cloaking, but with Replug, you can create custom, branded short links that look cleaner and more professional. These links increase trust and click-through rates.
2. Bio links for affiliates
Replug enables affiliates to create a single bio link containing multiple Amazon affiliate links. This feature is useful for social media platforms like Instagram and TikTok, where users can only place one clickable link in their bio.
Replug lets you generate dynamic QR codes linked to your affiliate URLs, making it easier for users to scan and visit product pages instantly. This is especially useful for physical marketing materials and events.
4. Advanced link tracking
With Replug, you can track real-time clicks and geotargeting statistics on your Amazon affiliate links. This data helps affiliates understand which products perform best and optimize their earnings by employing the best marketing strategies.
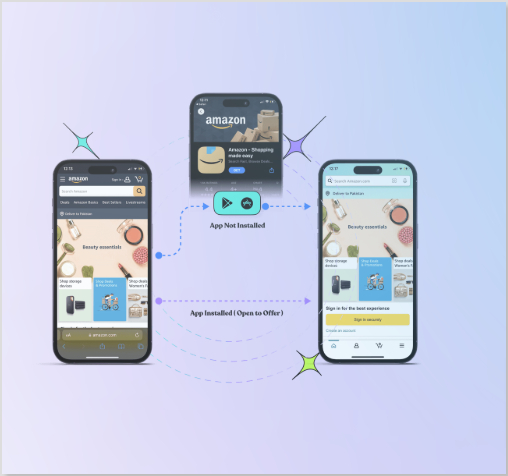
5. Deep linking capabilities
Deep linking ensures that when users click your affiliate links, they are taken directly to the product page within the Amazon app (if installed). This improves user experience and increases conversion rates.
Affiliates promoting Amazon product sales or limited-time offer can use Replug to set up link expiration for their affiliate links, preventing broken pages and seamlessly redirecting users to active deals.
8. Retargeting pixel integration
Replug lets affiliates add retargeting pixels to their affiliate links. If a user clicks but does not complete a purchase, they can be retargeted with ads, increasing the likelihood of conversions.
9. Bridge pages with custom CTAs
Replug enables affiliates to create bridge pages with eye-catching call-to-action (CTA) buttons, warming up potential buyers before directing them to Amazon.
Using Replug in conjunction with Amazon Associates enhances link performance, improves tracking accuracy, and maximizes affiliate revenue. If you’re serious and curious about how to become a pro Amazon affiliate marketer, integrating Replug into your strategy can provide better results.
A complete link management solution
for marketing professionals & agencies.
Try Replug for free
Advanced strategies to boost your Amazon affiliate income
Once you’ve joined the Amazon Associates Program, implementing advanced strategies can help you increase your earnings. If you’re wondering how to become an Amazon affiliate and make the most of the program, these strategies will help:
1. Utilize email marketing
You can use newsletters to drive traffic to blog posts containing affiliate links. This strategy helps build trust and long-term engagement with your audience while improving your chances of making sales as an Amazon affiliate marketer.
2. Create video reviews
YouTube is a powerful tool for affiliate marketing. High-quality, detailed video reviews often lead to better engagement and conversion rates than traditional blog posts. Many successful affiliates use video content to showcase products, making it a great approach for those learning how to become an Amazon affiliate seller.
3. Run paid ads
Consider running PPC (pay-per-click) campaigns on Google or Facebook to direct traffic to high-converting affiliate content. To boost your affiliate content’s reach, utilizing targeted ads can be a powerful strategy. Consider exploring a pay-per-click software to streamline and optimize your campaign management for maximum ROI. If you’re exploring how to become an affiliate with Amazon, paid ads can help you reach a wider audience and generate more commissions.
4. Build an affiliate funnel
Create a landing page that provides value (such as a free guide or checklist) in exchange for an email sign-up. Then, nurture leads through email marketing and direct them to your affiliate links over time.
5. Optimize for voice search
With the rise of smart assistants like Alexa and Google Home, optimizing content for voice search can help you attract additional organic traffic. Structuring content in a conversational, question-answer format improves its chances of appearing in voice search results. If you want to become an Amazon affiliate and make money, voice search is highly beneficial.
Aside from the Amazon Associates Program, there are other ways to generate income through the platform. If you’re looking into how to become an affiliate on Amazon but also want to explore additional revenue streams, consider these options:
Program
Description
Amazon FBA
Sell physical products through Fulfillment by Amazon.
Kindle Direct Publishing
Publish and sell ebooks on Amazon.
Amazon Merch on Demand
Sell custom-designed merchandise without inventory.
Amazon enforces strict affiliate rules to maintain credibility and protect its brand. New affiliates must make a minimum number of sales within the first 180 days to keep their accounts active. Additionally, Amazon does not allow link cloaking, requiring all associates to clearly disclose their affiliation with the platform.
Amazon also has content display restrictions, meaning affiliates cannot use product images or prices from Amazon directly. Violating these policies can result in account termination.
2. Choose high-performing products
To maximize affiliate earnings, focus on high-demand products that align with your niche. Check Amazon’s Best Sellers list in relevant categories and select products with positive reviews and high conversion potential.
3. Optimize your products with keywords
Search engine optimization (SEO) is crucial in driving traffic to your affiliate links. Conduct keyword research using tools like Helium 10’s Magnet to identify high-ranking keywords that potential buyers search for. Strategically integrate these keywords into your content for better visibility.
4. Create product-specific content
Engage your audience by writing detailed product reviews, listicles, and gift guides featuring Amazon affiliate links. Content types that perform well include:
Comparison articles (e.g., “Best Laptops for Remote Work”)
How-to guides (e.g., “How to Choose the Right Kitchen Blender”)
Seasonal recommendations (e.g., “Top Holiday Gift Ideas for Tech Lovers”)
Successful Amazon affiliates diversify their promotional efforts by sharing affiliate links across blogs, YouTube, TikTok, and Pinterest. You can easily drive traffic to blog posts or social media pages containing your links.
6. Use multiple tracking IDs
Amazon allows affiliates to create up to 100 tracking IDs, enabling better performance analysis across different channels. By tracking sales data, affiliates can refine their marketing strategies and focus on the most profitable platforms.
Pros and cons of the Amazon Affiliate Program
While Amazon’s affiliate program offers several benefits, it also comes with some challenges. Here’s a breakdown to help you decide if it’s the right choice for you:
Pros
Cons
Access to millions of products
Low commission rates on some categories
Trusted brand with high conversion rates
Short 24-hour cookie window
Easy integration with websites & blogs
Commissions revoked if products are returned
Works with multiple content platforms
Payouts can take up to 60 days
Conclusion
The Amazon Associates Program is an excellent way to monetize your content and generate passive income. By learning how to become an affiliate on Amazon, you can take advantage of one of the most trusted affiliate programs.
By leveraging tools like Replug, affiliates can boost their conversions, track user engagement, and maximize earnings. From custom short links to click tracking and retargeting, Replug offers powerful solutions for Amazon affiliates.
FAQs on how to become an Amazon affiliate
How old do you have to be to become an Amazon affiliate?
You must be at least 18 years old to join the Amazon Associates Program.
How long does it take to become an Amazon affiliate?
The sign-up process is quick, typically taking less than 10 minutes. However, getting approved and making your first three qualifying sales within 180 days will determine your long-term status in the program.
How can Replug help Amazon affiliates maximize conversions?
Replug allows affiliates to create branded short links, track clicks and conversions, and add retargeting pixels for remarketing. These features help optimize affiliate promotions, increasing overall earnings.
How many followers do you need to become an Amazon affiliate?
For social media accounts, Amazon requires at least 500 organic followers on eligible platforms like Instagram, YouTube, TikTok, and Facebook.
How to become an Amazon affiliate without a website?
You can promote Amazon products using social media platforms, YouTube, text, or email marketing. Having an active, engaged audience is key to success.
How to become an Amazon affiliate and make money?
To earn money, focus on selecting high-demand products, optimizing content for SEO, and leveraging multiple channels such as blogs, social media, and paid advertising to drive conversions.
Ever wondered how influencers, bloggers, and even everyday people turn their online presence into a steady income stream? Say hello to affiliate marketing.
Here’s how it works: You promote products you love, and every time someone makes a purchase through your unique link, you earn a commission. No need to create your own product or handle customer service—just share what excites you!
Affiliate marketing can be a game-changer whether you’re a blogger, YouTuber, or a newbie. To back this up, according to research, the average affiliate marketer earns around $8,038 per month, proving just how lucrative this side hustle can be!
Hence, we’ve broken down how to become an affiliate marketer into five simple steps, from choosing your niche to optimizing your links so you can start earning in no time.
By the end of this blog, you’ll have everything you need to kickstart your affiliate marketing journey. So, grab a cup of coffee, and let’s get to it!
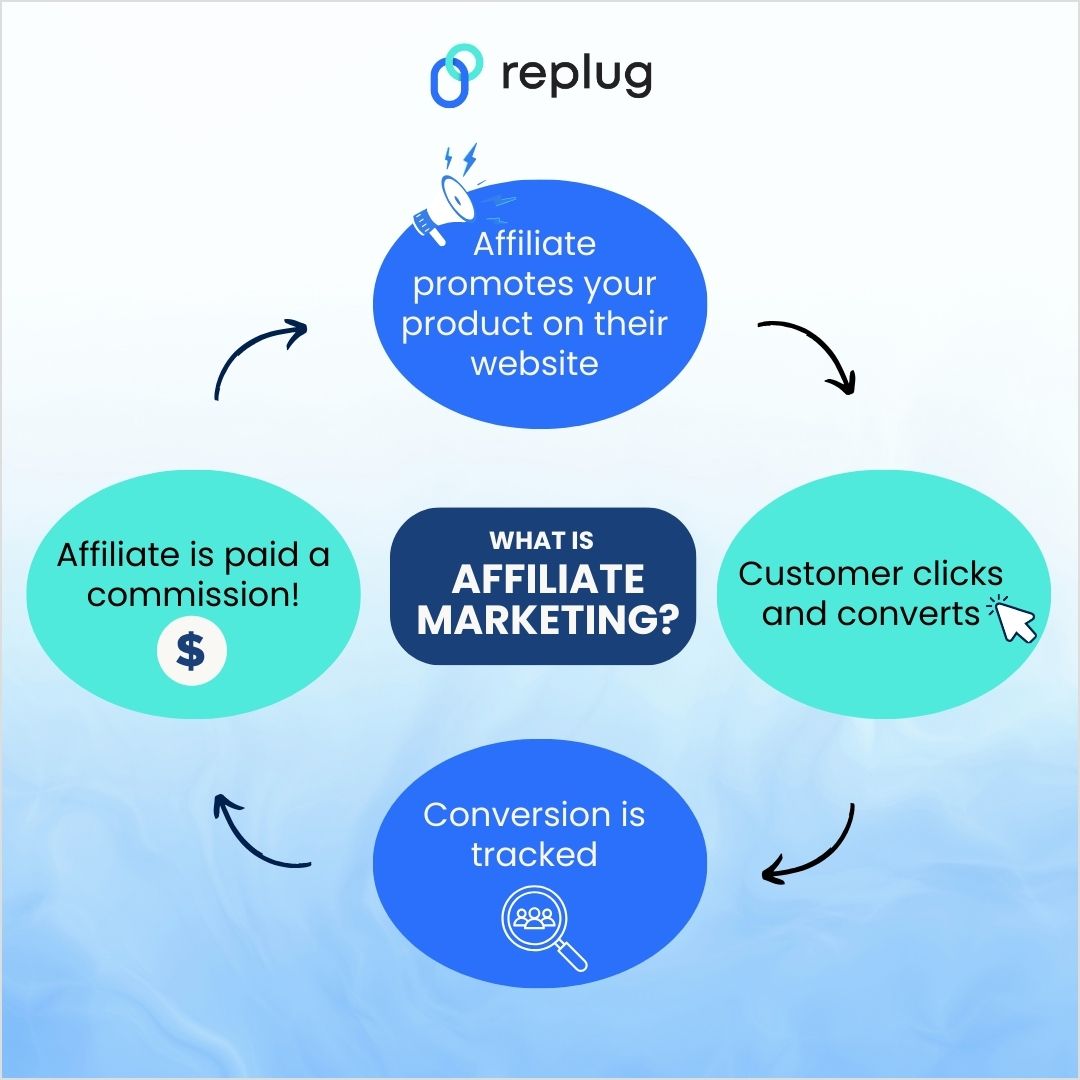
Affiliate marketing is a performance-based marketing model where you, as an affiliate, promote someone else’s products or services. In return, you earn a commission when people take specific actions (usually a sale or a lead) through your marketing efforts.
What is affiliate marketing?
It’s one of the most accessible and low-risk ways to start making money online because you don’t need to create products or manage inventory; you just need to focus on promotion.
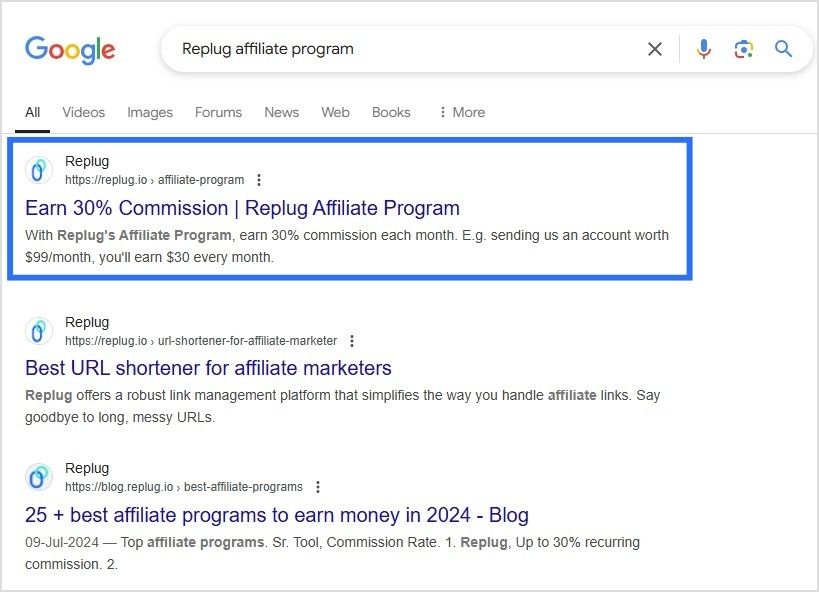
Process: Search for “[company name] affiliate program” to find their sign-up page. Example: Quick search for “Replug affiliate program” will direct you to their page, where you can easily apply.
Direct outreach
Process: Call the company’s customer service or marketing team and pitch your idea to promote their products for a commission. Example: Small businesses may be open to starting an affiliate program if they see the potential benefits.
Here’s a screenshot of what searching “Replug affiliate program” on Google search engine looks like:
5 steps to become an affiliate marketer
To succeed in affiliate marketing, it’s important to understand that it’s not just about sharing affiliate links. Building a solid foundation will set you up for long-term success. Here are five crucial steps to guide you in the right direction:
Step 1: Choose your niche and target audience
Choosing a niche is the first and most critical step in your affiliate marketing journey. Your niche defines what products you will promote and who your target audience is. A niche is a focused market, like tech gadgets, beauty, health, fitness, or travel. The more specific your niche, the more you can tailor your content to meet your audience’s needs.
For example, instead of just promoting general fitness products, you could focus on a specific sub-niche like home workout equipment for busy professionals or vegan supplements for athletes. A well-defined niche helps you stand out and build a dedicated audience that trusts your recommendations.
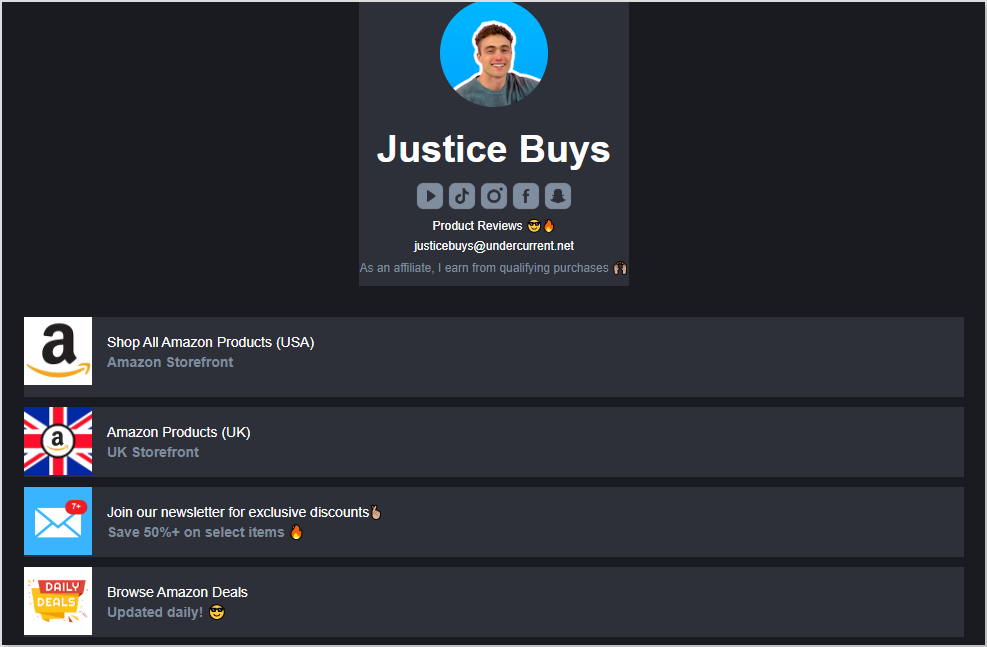
Here’s how Justice Buys, a leading Amazon content creator and affiliate marketer, earns a commission by promoting products to Amazon buyers:
How to choose the right niche:
Identify your passions or areas of interest.
Assess the demand and profitability of the niche (use tools like Google Trends).
Evaluate the competition—make sure there’s space for your voice.
Once you’ve picked your niche, it’s time to identify your target audience. Are they beginners or experienced? What are their pain points, and what solutions are they looking for?
Step 2: Analyze the competition
Understanding the competition helps you position yourself strategically. Look at other affiliate marketers in your niche. What are they doing well? What’s missing from their content? Are there areas where you can improve?
Check out popular blogs, social media accounts, and YouTube channels that cover your niche. What affiliate products are they promoting? What content formats are they using? This research helps you understand how you can differentiate yourself and bring something fresh to the table.
Choosing the right affiliate programs can make or break your success. You don’t want to promote products you don’t believe in, or that don’t resonate with your audience. Ideally, your affiliate products should align with your niche and audience’s needs.
Some key factors to consider when selecting affiliate programs:
Commission rate: How much will you earn per sale? Some affiliate programs offer a one-time payment, while others offer recurring commissions (which are great for long-term income).
Cookie duration: This refers to how long you’ll receive a commission after a customer clicks on your affiliate link. A longer cookie duration is preferable.
Product quality: Make sure the products you promote are high quality, as your reputation as a trusted marketer is on the line.
Popular affiliate programs include:
Amazon Associates (great for a wide range of products)
ShareASale (offers diverse merchants across multiple industries)
ClickBank (digital products with high commissions)
Mind-blowing fact (and stat): Around 75,659 companies are using the Amazon Associates affiliate program!
It’s that’s not your cue to become an affiliate marketer… why, just why?
Step 4: Build your marketing platform
Your marketing platform is the space where you’ll share your affiliate content. Whether it’s a blog, YouTube channel, podcast, or social media account, you need a platform to connect with your audience and deliver value. You don’t need to be everywhere; focus on the platforms your audience frequents most.
Ways to build your platform:
Start a blog: A blog gives you control over your content and audience. Create long-form posts, product reviews, tutorials, and guides. Use SEO to rank your content and attract organic traffic.
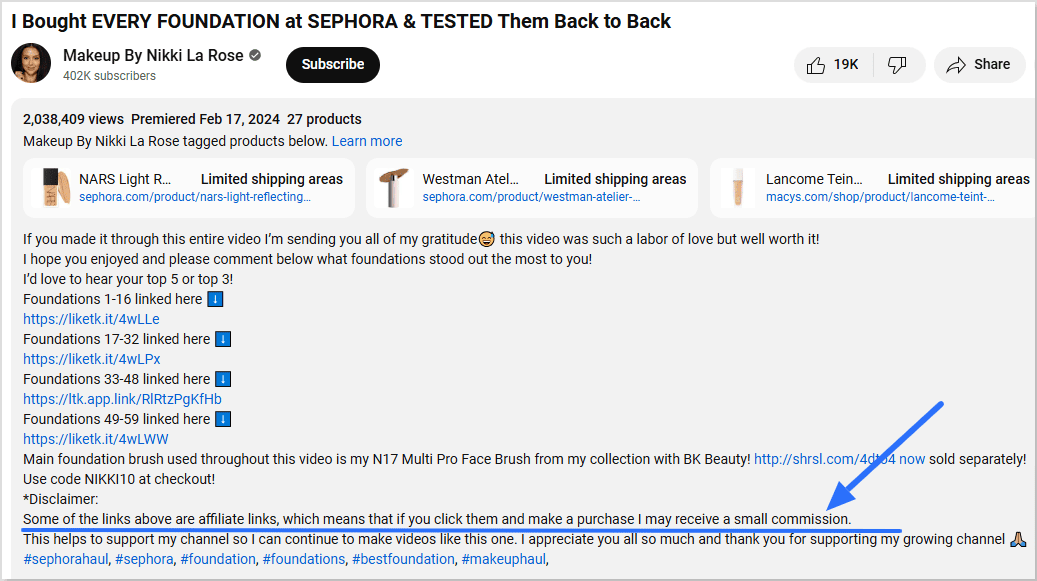
YouTube: Create video content with affiliate links in the description. Videos work great for product demonstrations, reviews, and tutorials.
Here’s an example of how Nikki La Rose, a famous beauty YouTuber influencer. She writes down multiple affiliate links to the products she uses in her YouTube videos.
Social Media: Instagram, Facebook, TikTok, and Pinterest are visual platforms where you can promote affiliate products using affiliate links in your bio or story swipe-ups.
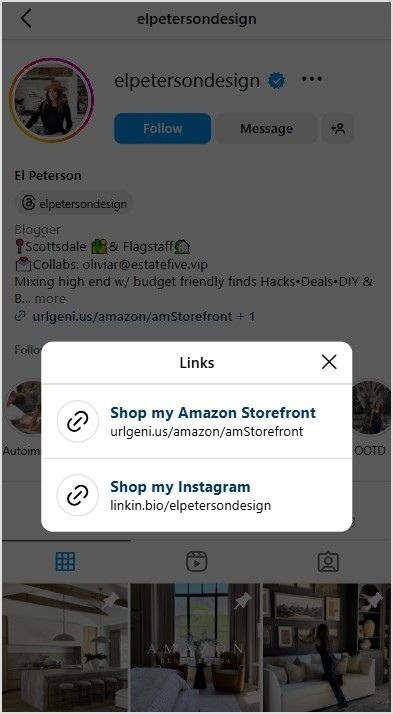
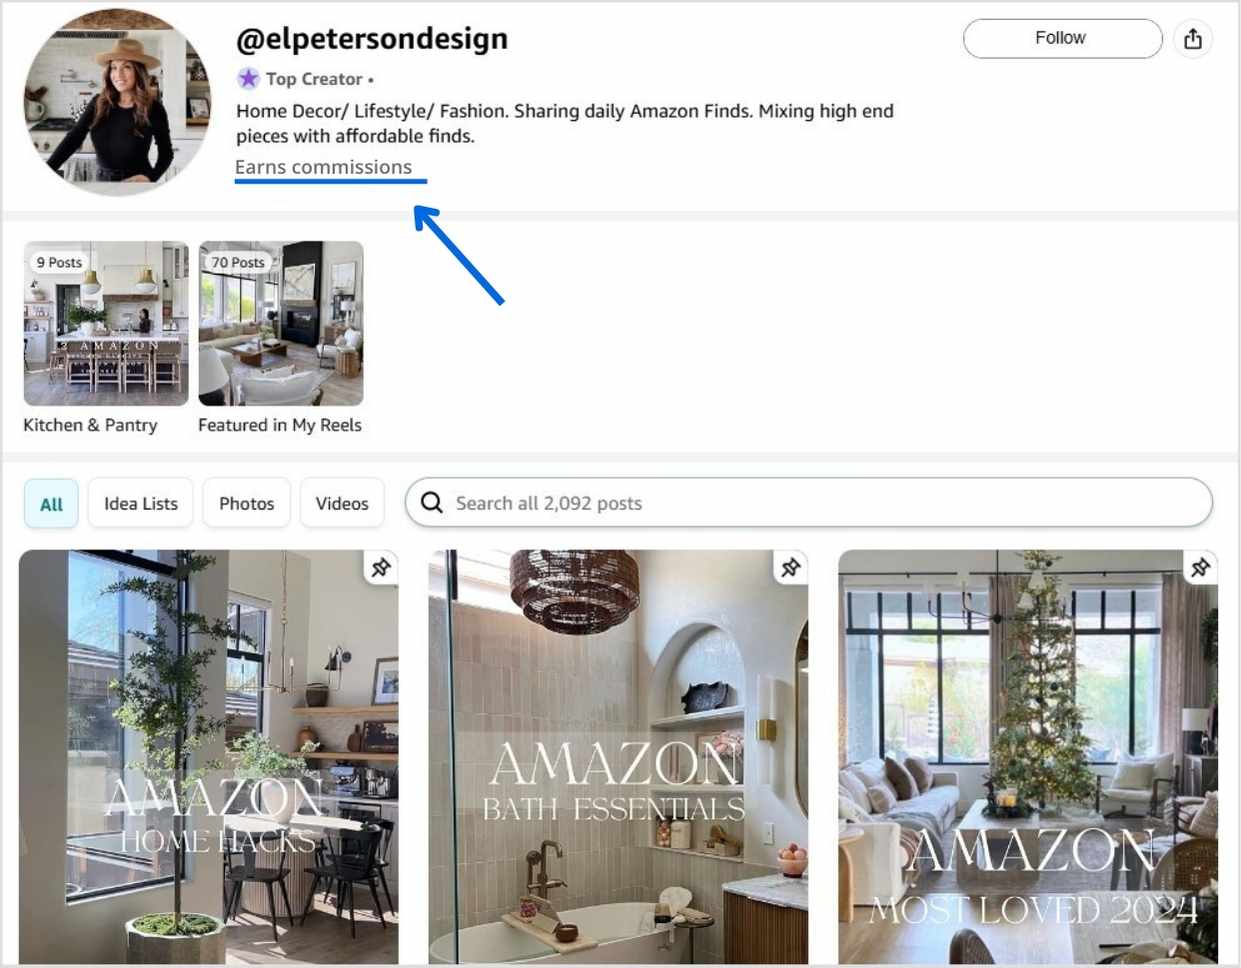
Check out how El Peterson, a popular content creator and affiliate marketer, links her Instagram bio with her Amazon Storefront.
Now comes the fun part—creating content! Affiliate marketing is all about providing value through content that informs, educates, and entertains. Whether you’re writing blog posts, creating videos, or sharing social media updates, always prioritize quality content that meets your audience’s needs.
For instance, let’s say you’re promoting fitness products. Instead of simply adding an affiliate link in a post saying “Buy this product,” create content that helps your audience solve a problem.
Content should always feel authentic and trustworthy. People are more likely to click on your affiliate links if they feel they can trust your recommendations.
How to become an affiliate marketer with Replug
Now that you know the basics of affiliate marketing, let’s talk about how you can streamline your process using Replug for shortening and managing your affiliate links.
Steps to get started with Replug:
Go to Replug’s website and click on “Affiliate marketing program” in the Resources dropdown.
Access the affiliate program page and click on “Become a Replug affiliate” button.
Register for an account or sign in if you already have an account.
Complete the application form
Add in all the necessary information and click “Update”.
Access your affiliate dashboard and add in the payout method.
QR codes: Quickly generate a custom QR code for your affiliate links. This way, your followers can quickly scan your code, and upon making a purchase, you earn a commission.
Cross-platform integration: Integrate with social media, email campaigns, and other platforms so your links perform better everywhere.
Branded links: Turn generic affiliate links into branded links that are more clickable and trustworthy.
Link retargeting: Retarget users who clicked on your affiliate links but didn’t convert, driving them back to your offers.
Boost ROI with branded URLs!
Enhance your marketing campaigns by creating shareable, trackable, and fully multi-purpose
customizable branded URLs.
Tracking and optimization are key to affiliate marketing success. Replug’s powerful analytics allow you to monitor every aspect of your links’ performance. You can see which pages, social media posts, or marketing strategies are driving the most traffic.
Here’s how you can track and optimize your affiliate links effectively:
A/B testing: Replug allows you to test different versions of your affiliate links to determine which one performs better.
Click tracking: See which links get the most clicks and optimize your content strategy to focus on high-converting links.
Optimize for SEO: Replug’s custom URL features also help improve your SEO by ensuring your affiliate links are clean, readable, and keyword-optimized.
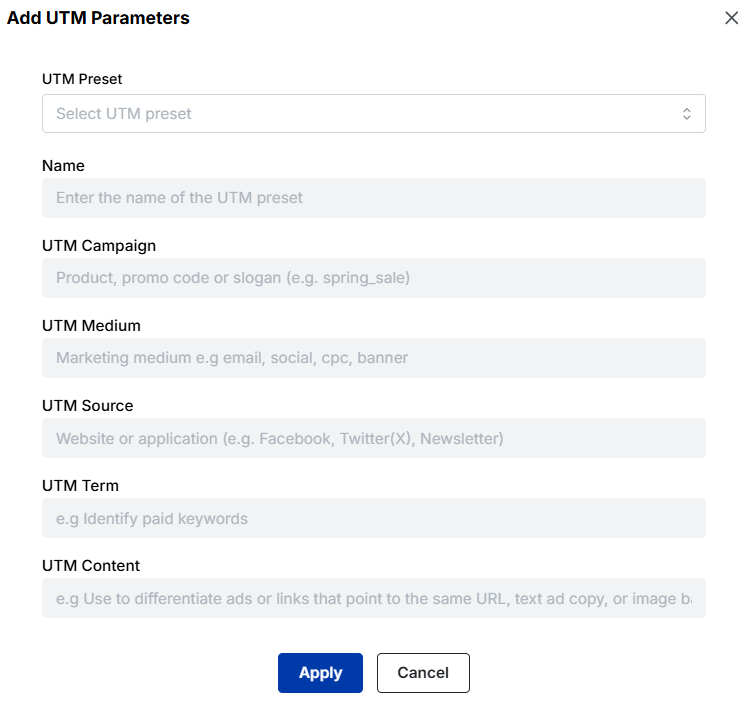
UTM builder: You can add UTM parameters to your affiliate links using Replug. This way, you can track the performance of your affiliate campaign depending on the UTM medium that you choose.
Conclusion
Affiliate marketing is a great way to earn passive income by promoting products you love and believe in. With the right approach, it can be a lucrative and sustainable business model. By following the steps in this guide, choosing the right affiliate programs, and optimizing your efforts using tools like Replug, you can maximize your affiliate marketing success.
A complete link management solution
for marketing professionals & agencies.
Try Replug for free
FAQs on how to become an affiliate marketer
How long does it take to make money with affiliate marketing?
It typically takes a few months to start seeing substantial income from affiliate marketing. It depends on factors such as your niche, marketing efforts, and audience engagement.
How do I find affiliate programs?
You can find affiliate programs through networks like Amazon Associates, CJ Affiliate, ShareASale, or directly on the websites of brands you admire.
How do I track the performance of my affiliate links?
Replug offers detailed analytics that help you track clicks, geographical data, and more. You can use this data to optimize your affiliate links and boost performance.
Amazon is the world’s largest online marketplace, and learning how to sell on Amazon can open up endless opportunities for entrepreneurs and established businesses alike. Whether you’re looking to start a side hustle, expand your existing business, or dive into e-commerce for the first time, Amazon provides a vast customer base and a streamlined selling process. However, with approximately 1.9 million sellers actively competing for attention, success requires strategy, research, and the right approach.
In this guide, we’ll break down the steps to help you start selling on Amazon, from setting up your account to marketing your products effectively.
Let’s get started!
The algorithm has changed
Imagine launching your Amazon store, excited to see sales rolling in, only to find your product buried on page seven of search results.
Ouch!
That’s because Amazon’s A10 algorithm doesn’t work like it used to. Gone are the days when you could simply throw money at PPC ads and expect to rank.
Previously, the A9 algorithm prioritized PPC sales, meaning you could run ads, generate sales, and climb the rankings quickly. A10 focuses more on relevance, customer satisfaction, and organic sales. Today, organic ranking, customer engagement, and external traffic play a much bigger role in your success.
What’s new?
Organic sales matter more: The algorithm favors products that sell well without paid ads.
External traffic is king: Amazon rewards sellers who bring traffic from Google, blogs, or social media.
PPC ads have less impact: You still need ads, but PPC sales don’t boost rankings like before.
Customer engagement counts: Good reviews, seller ratings, and response time affect ranking.
So, how do you win with A10? Let’s break it down.
Understanding Amazon seller accounts and costs
Before we begin, it’s wise to learn how Amazon structures its selling options. The platform offers two main selling plans: Individual and Professional. Both plans connect through Amazon Seller Central. Whether you aim to sell on Amazon for free or build a large-scale business, understanding these plans helps you pick the right path.
Individual vs. professional selling plans
Individual sellers
Pay a per-item fee of $0.99 whenever they sell a product.
Have no monthly subscription fee.
Rely on basic tools for selling on Amazon.
Often allows listing fewer than 40 items per month.
Professional sellers
Pay a monthly subscription fee of $39.99.
Don’t pay that extra $0.99 fee per item.
Can access advanced selling features, such as bulk listing tools and reports.
Sell in certain restricted categories that aren’t open to individual sellers.
Think about how many products you plan to list each month. If you expect higher sales, the Professional plan typically offers better value. However, the Individual plan is a solid choice if you’re selling fewer than 40 items per month.
Fees you should expect
One of the most common questions is: How much does it cost to sell on Amazon? Beyond your selling plan charges, here are additional fees to keep in mind when increasing sales on Amazon:
Referral fees: Amazon takes a percentage (often 8–15%) of each sale. This varies by product category.
Fulfillment fees: Using Amazon FBA requires payment for storage and shipping services.
Closing fees: These are charged on certain media categories (books, DVDs, and so on).
Setting up your seller account
Wondering how to become an Amazon seller and set up your account?
You’ll need the following:
A valid email address or Amazon customer account.
A credit card that Amazon can charge.
Government-issued ID for verification.
Tax details (depending on your country).
Phone number for verification.
Bank account to receive earnings.
Once you gather these items, you can register through Amazon Seller Central. Be sure to read and agree to Amazon’s terms of service.
After your account is live, you can start exploring how to sell products on Amazon, manage listings, and monitor performance. Let’s begin:
To list a product on Amazon, you have two options:
Existing products: If the product is already being sold on Amazon, it has an Amazon Standard Identification Number (ASIN). Your listing will be merged with the existing product page, showing all sellers offering that item.
New products (Private label): If you’re introducing a product that’s not yet on Amazon, like your exclusive line of eco-friendly water bottles, you’ll create a brand new listing.
Suppose you’re selling eco-friendly water bottles that you sourced from a supplier, and an existing listing is already on Amazon for the same product.
Start by copying the ASIN from the “product details” section of the current listing.
Log into Seller Central, click Catalog, and select Add Products. Paste the ASIN into the search bar to find the listing.
Choose the condition of your item (New, Used, etc.) from the dropdown and select Sell this product.
Set your price, select your fulfillment option (FBM or FBA), and follow the prompts.
You can create your SKU by clicking Save and Finish. The listing will be added to your Manage Inventory page in Seller Central.
Now, let’s look at adding a completely new product, for instance, “BrewNest Coffee Dripper”:
From Seller Central, click Add a product, then select I’m adding a product not sold on Amazon.
Select your product category and fill in all necessary details (title, price, description, photos, and fulfillment method).
Once everything is filled out, click Save and Finish. Your product will be submitted for approval.
After approval, Amazon will assign an ASIN and list it for sale. You can manage it through your Manage Inventory page.
When your product page goes live, customers can find it by searching Amazon. With the right marketing and a quality product, your orders should start coming in.
A well-defined plan makes all the difference when figuring out what to sell on Amazon. Whether you’re interested in private label items, retail arbitrage, or something else, assessing each model and performing thorough product research is highly recommended.
Various selling methods
Private label: You work with a supplier to manufacture goods under your own brand. This approach can yield notable margins but typically requires more upfront costs. Shops like Alibaba can help you find private-label products.
White labeling: You sell generic products with your own brand name or logo. No manufacturing or design experience is needed.
Wholesale: You buy existing branded items in bulk and resell them. It’s a stable method but can involve heavier competition.
Retail arbitrage: You look for discounted items in retail stores and resell them on Amazon at a markup. This model can have minimal startup costs but takes time to hunt for bargains. Places like BestBuy, Target, and Walmart are useful examples to start with.
Dropshipping: You connect buyers with a supplier who ships products directly. This can cut down on inventory management, though you might have less control over product quality.
Product research tactics
Effective product research answers the question, “Where to buy products to sell on Amazon in a profitable way?” Here are several strategies:
Check for Amazon’s Best Sellers list. Popular product categories may have fierce competition, so look for underserved niches to boost your brand awareness.
Study customer reviews and ratings. Gain insights into what aspects of the product customers appreciate or dislike. This feedback can help you improve your listings, address potential issues, and align your offerings with customer expectations.
Do keyword research. Use tools like Helium 10 or Jungle Scout to find high-volume, relevant keywords that potential customers are searching for. This will help improve your product’s visibility and increase sales.
Review Amazon’s product restrictions. Before selling, thoroughly go through Amazon’s product restrictions to ensure compliance. Some items, like fine art and surveillance equipment, are prohibited, while others require pre-approval.
Keep seasonality in mind. Consider how seasonality affects your cash flow. There might be a possibility that an item booms in the summer but slumps in the winter.
What makes a good product?
Wondering if your product is good enough to sell on Amazon? Here are some things to keep in mind if you want your product to sell like hotcakes:
Profit margins: After subtracting Amazon fees, shipping, and any production costs, does your item still turn a strong profit?
Moderate competition: Look for subcategories or specialized areas where you can differentiate your offering.
Manageable size: Heavier or larger goods can mean bigger shipping expenses.
Durability: Fragile items have a higher risk of returns and negative reviews.
Year-round demand: Some products sell steadily all year round, while others are tied to holiday seasons or trends.
When asking yourself, “How to sell my product on Amazon so it stands out?” focus on finding an item that balances demand, profitability, and strong branding opportunities.
Boost ROI with branded URLs!
Enhance your marketing campaigns by creating shareable, trackable, and fully multi-purpose
customizable branded URLs.
The best way to attract Amazon shoppers is through well-crafted product listings. You need to ensure that your product listing is clear and has engaging content so you don’t risk falling behind in Amazon search results.
Essential elements of a winning listing
Title: Include your main keyword—maybe “Bluetooth Headphones” or “Organic Dog Treats.” Keep titles concise (under 200 characters) and add main details (brand, model, color, size).
Images: Crisp, high-resolution photos from different angles can make or break a sale. Lifestyle images that show your product in use help buyers visualize how they’ll benefit.
Bullet points: Highlight key features or benefits in short statements. Use easy-to-read language and sprinkle in relevant keywords naturally, like “Amazon product reviews” or “Amazon bestsellers rank” when appropriate.
Product description: Give more in-depth information and address common buyer questions. Break text into paragraphs to make it inviting and easy to scan.
Think about what a shopper would type when looking for your product. Conducting keyword research can involve the following:
Using Amazon’s autocomplete option to see common search terms.
Reviewing top-performing competitor listings for keyword ideas.
Checking specialized keyword research platforms like Semrush or Ahrefs to pinpoint relevant words with strong search volume.
Place your most important keyword phrases in your listing title and bullet points. Spread secondary terms naturally throughout the product description.
Tips for ongoing optimization
Update visuals as you receive better photography or user-generated images.
Adjust bullet points based on frequently asked questions.
Test different versions of your title, bullet points, or images to see what increases your conversion rate.
Monitor comments and star ratings to see if product improvements or listing tweaks are needed.
Regularly refresh product visuals and optimize listings to maximize sales potential.
Storing, packing, and shipping goods might be the biggest challenge for new sellers. That’s where the debate begins: Fulfillment by Amazon (FBA) vs. Fulfillment by Merchant (FBM).
Amazon FBA (Fulfillment by Amazon):
Amazon handles storage, packing, and shipping.
Eligible for Prime shipping, increasing sales potential.
Amazon provides customer service & returns.
Higher fees for storage and fulfillment.
Amazon FBM (Fulfillment by Merchant):
You store and ship products yourself, reducing fees.
More control over inventory and order processing.
No Prime eligibility, meaning fewer conversions.
So, which method is right for you? It often depends on how quickly you expect to increase sales, your product’s size, and your margin. Some sellers even use both approaches to optimize costs, known as multi-channel fulfillment.y.
5. Marketing and promoting your products
With millions of items on Amazon, standing out takes strategy. Don’t skip marketing if you’re launching your first item or expanding a popular brand. Here are ways to market your Amazon products for higher sales:
Leverage external Traffic (Amazon loves this!)
Social media ads: Promote your products on Instagram, TikTok, and Facebook.
Google ads: Amazon rewards listings that receive traffic from Google.
Influencer marketing: Work with micro-influencers to create product buzz.
Promotions and deals
Here are some ways to drive an upswing in sales:
Lightning deals that appear on Amazon’s deals page.
Coupons that buyers can “clip” and see during checkout.
Prime-exclusive discounts reward Prime members with lower prices.
Run Amazon PPC campaigns (but smartly!)
Sponsored products:Appear in search results for targeted keywords.
Sponsored brands: Showcase multiple products under your brand.
Sponsored display: Retarget potential buyers.
Tip: PPC is still useful but should complement an organic ranking strategy rather than being the main driver of sales.
Track your campaigns regularly using campaign tracking. If a keyword isn’t converting, reduce the bid or add it to negative keywords.
Building brand awareness
Register your brand on Amazon Seller Central if you meet the trademark requirements. You’ll gain access to extra branding tools.
Building your brand image outside of Amazon can push more visitors to your listing and help you boost e-commerce sales. Here are some ways you can do it with Replug:
Link management Easily shorten long and cluttered Amazon links into clean, custom URLs. With Replug, you can generate link previews, add custom favicons, create password-protected short links for Amazon, A/B test multiple links, and set up link rotation.
Affiliate link cloaking Messy and intimidating Amazon affiliate links can turn potential buyers away. Replug allows affiliates to cloak long URLs, making them cleaner, safer, and more appealing for clicks.
Deep links Direct users to specific product pages within the Amazon app instead of a generic web page using Replug’s deep linking feature. This improves user experience and boosts conversion rates by reducing unnecessary redirects.
Bio links
Turn your single bio link into a high-converting landing page. Showcase multiple Amazon products, deals and discounts, new finds and launches, and more with Replug’s bio link feature. It’s perfect for influencers, content creators, and businesses looking to drive traffic from Instagram, TikTok, and other social platforms.
Retargeting Enhance your Amazon ad performance by embedding retargeting pixels into your short links. This enables you to cross-promote across different platforms, re-engage lost customers, and drive more traffic to your Amazon storefront.
White-label branding Create a customized white-label dashboard with Replug in just a few minutes and build a branded experience for your clients. With Replug’sthe white-label solution, you can add your own logos, colors, and domain, making it look like an extension of your brand rather than a third-party tool.
Advanced analytics Replug provides in-depth analytics that goes beyond Amazon’s default URL shortener. Gain insights into total clicks, unique clicks, referral sources, and geographic data. Plus, you can add UTM parameters to your links for precise tracking across various channels.
QR codes Easily generate QR codes for your Amazon links and share them across different marketing channels. Customers can simply scan the code to access your Amazon storefront, streamlining the shopping experience and increasing conversions.
A complete link management solution
for marketing professionals & agencies.
Try Replug for free
Conclusion
You’ve now seen the major steps for how to sell on Amazon for beginners, from setting up a Seller Central account to planning your product lineup and using thoughtful keywords. Selling on Amazon can feel like a real adventure, but a well-researched approach helps you stay on track.
Think of each sale as a stepping stone. Keep testing different product ideas, gather feedback from buyer reviews, and tweak your listings often. For off-Amazon marketing, remember to simplify your links and measure click performance with tools like Replug so you can make smart decisions about your campaigns.
Ready to take the next step? Launch a small batch of products, learn from the process, and keep evolving. With consistent effort and an eye on what customers value, you can build a successful Amazon seller account that grows in ways you never imagined.
FAQs on how to sell on Amazon
How much does it cost to start selling on Amazon?
Costs differ by the type of products you sell and how you fulfill orders. If you pick the Individual plan, you’ll pay $0.99 per sale instead of a flat monthly fee. You’ll also face referral fees (8–15%, depending on the category) and optional FBA fees.
Do I need a business license to sell on Amazon?
Some sellers start without an official license. Still, it’s wise to consult local rules, especially if you plan to scale fast. Certain regions or product categories may require tax registrations or formal business structures.
What are the best products to sell on Amazon?
Many new sellers look to categories like home and kitchen, electronics, or beauty. Others focus on niche items that solve specific problems. The best products often have good profit margins, consistent demand, and moderate competition.
Can I use Replug to create deep links for Amazon?
Yes! Deep linking allows users to open Amazon product pages directly in the Amazon app, improving conversions.
How long does it take to start making money on Amazon?
Some see their first sale within days, while others might wait weeks. It depends on your item’s appeal, strategy around Amazon PPC, and how you optimize listings.
Can I sell on Amazon without inventory?
Yes. Dropshipping and FBA are two ways to avoid storing items in your own space. With dropshipping, your supplier ships directly to the buyer. With FBA, Amazon stores and fulfills your inventory.
Have you ever wondered what sets certain web addresses apart from the rest? Why do some URLs feel tailor-made to cater to your interests and preferences?
The answer lies within the realm of Unique URLs. Unlike their conventional counterparts, these special links possess the ability to deliver customized experiences, guiding users to content that resonates with them on a deeper level.
Follow along as we uncover the secrets behind creating and leveraging Unique URLs and discover how they can elevate your online journey.
Get ready to unlock the potential of Unique URLs and enhance your digital impact.
What are unique URLs?
Unique URLs are special web addresses that are customized and tailored to individual users or specific purposes. They go beyond the standard URLs you see on the web and add a personal touch. These unique addresses can include elements like user identifiers, preferences, or customized parameters.
The purpose of unique URLs is to enhance user experiences and provide personalized content. They allow businesses to deliver targeted information, track user behavior, and measure the effectiveness of their marketing efforts. With unique URLs, website owners can create customized landing pages and provide a more personalized and engaging journey for their visitors.
When it comes to creating Unique URLs, Replug offers a comprehensive suite of features that empowers businesses to take control of their online presence and deliver personalized experiences. Let’s explore how Replug simplifies the process of creating Unique URLs and unleashes their potential for your digital strategy.
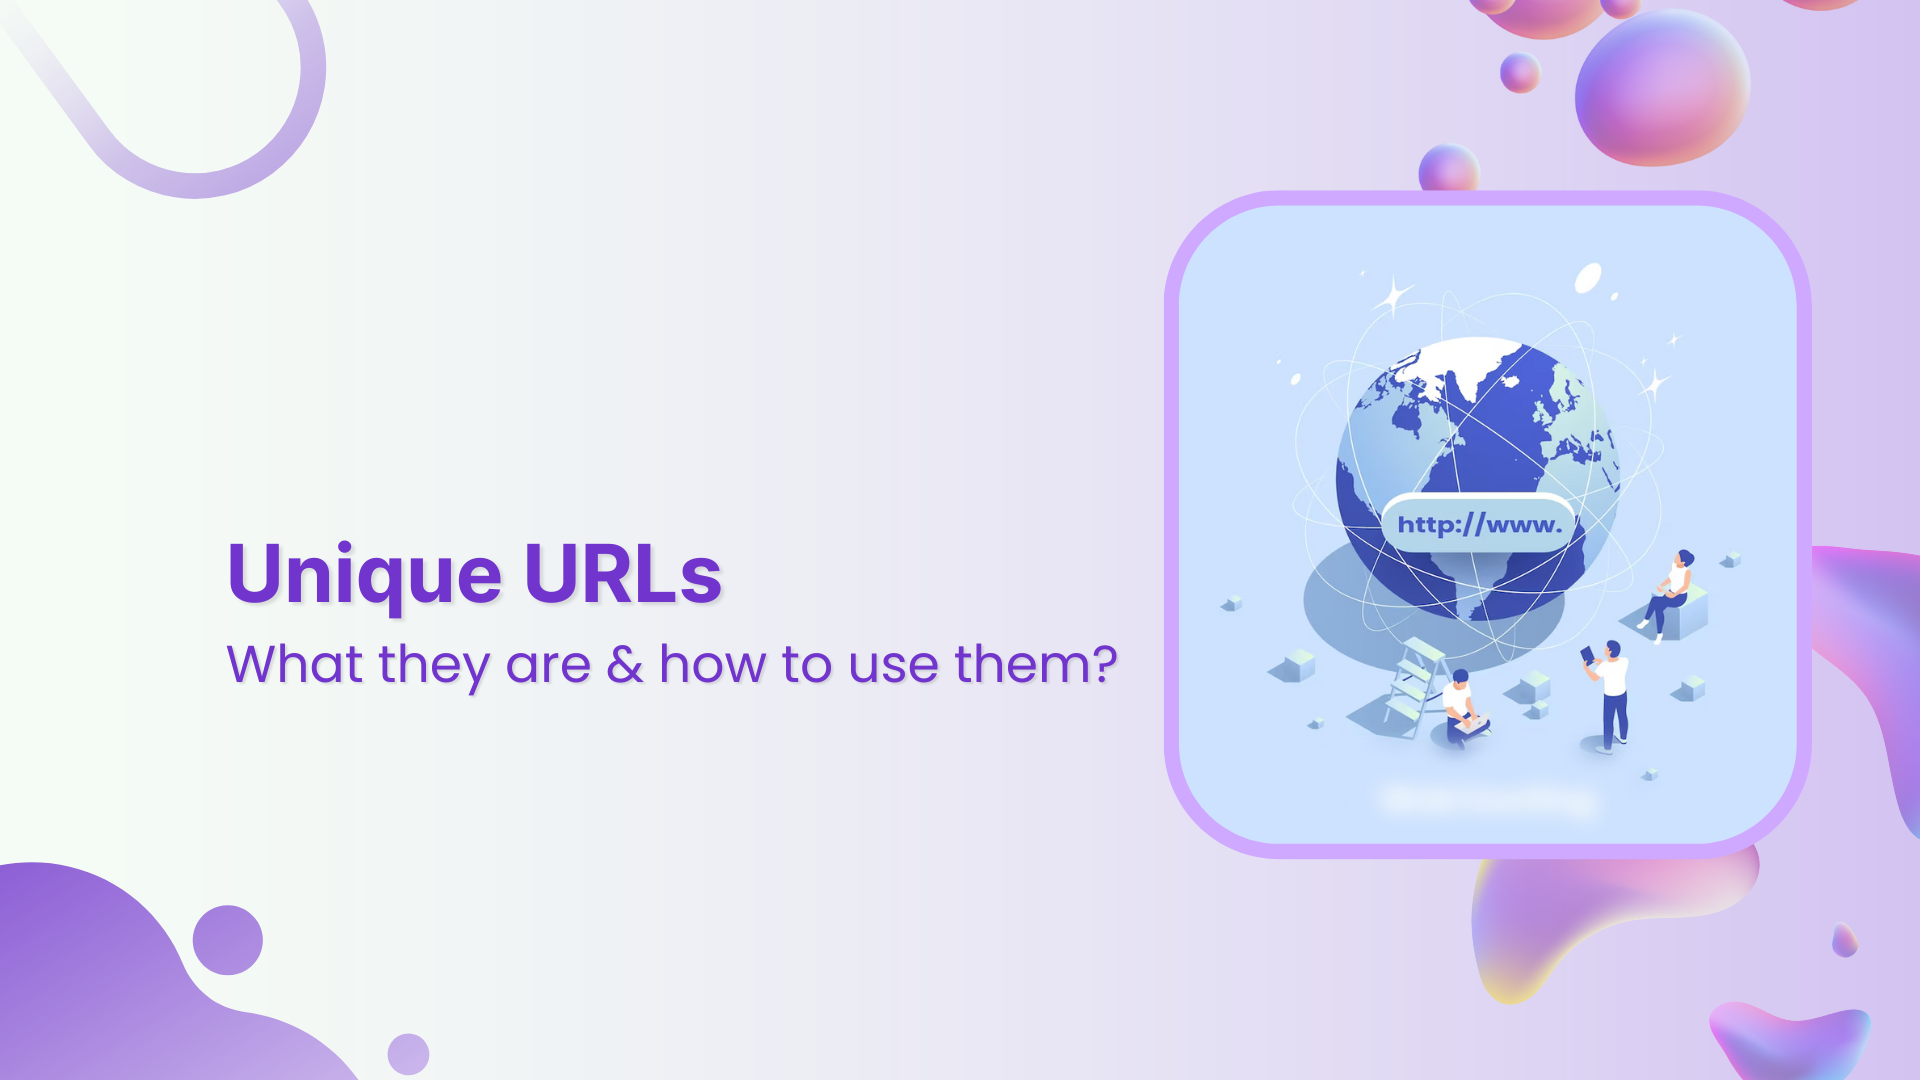
What does Replug do?
With Replug, you can add a call-to-action (CTA) to any link you share with your audience and drive traffic back to your site. You can also collect leads by adding your own branded CTA to any page on the web. Replug also provides analytics and insights, allowing you to track visits and conversions from the links you have shared.
Precisely, Replug is a link shortener and link-tracking platform that helps you build brand recognition and also allows you to add eye-catching and branded call-to-actions or retargeting pixels to any page on the web.
Additionally, Replug offers bio-links, so that you can drive more traffic to your landing pages through Instagram and Twitter.
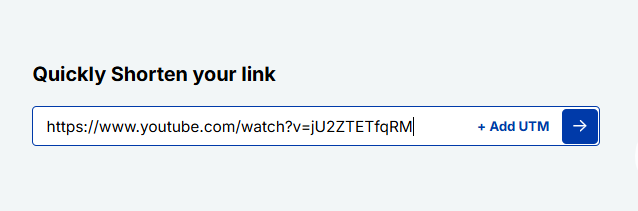
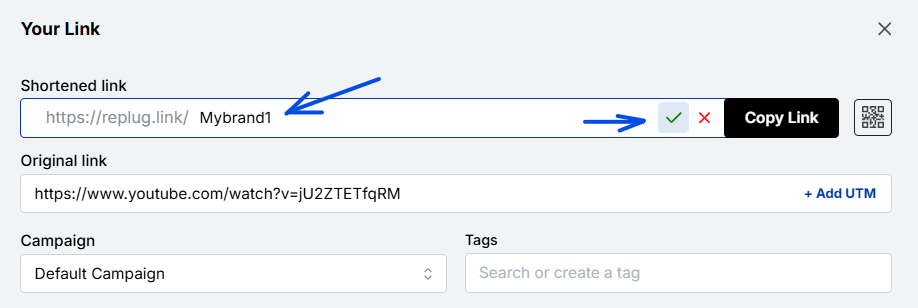
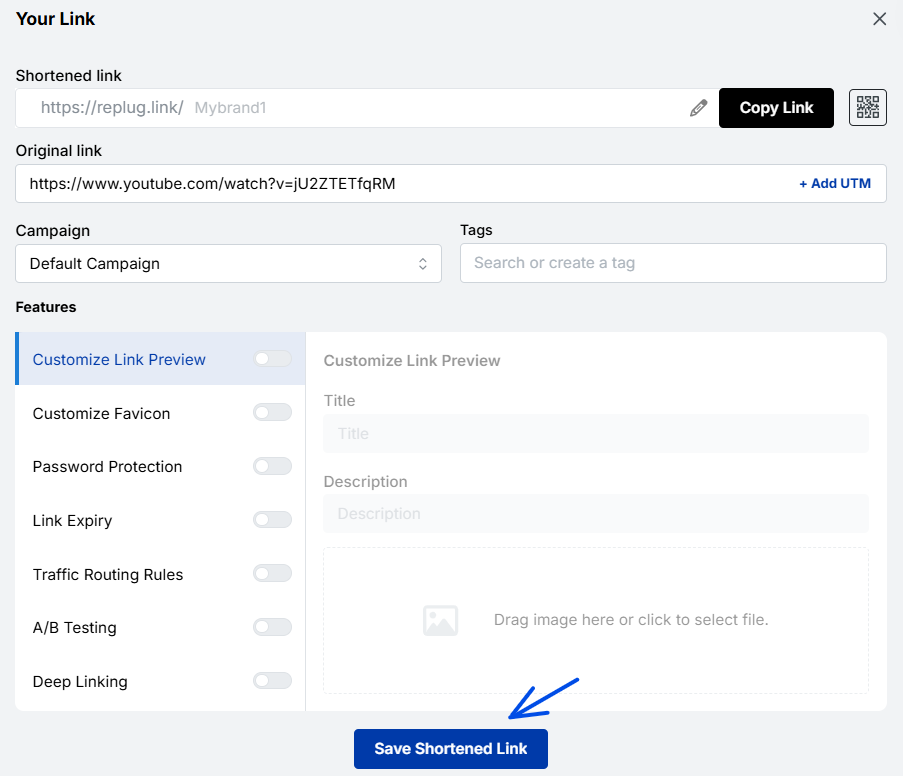
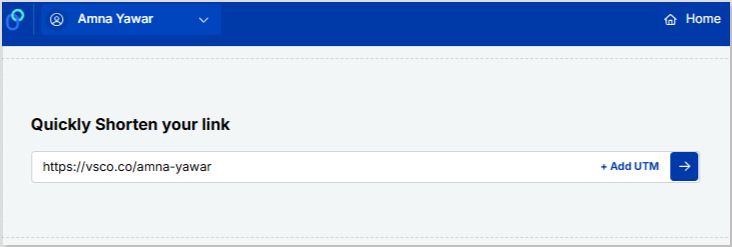
Step 2: On the main Home page, locate the “Quickly Shorten Your Link” bar at the top left corner. Paste the URL you want to shorten here.
Step 3: Press Enter. A dropdown menu will appear.
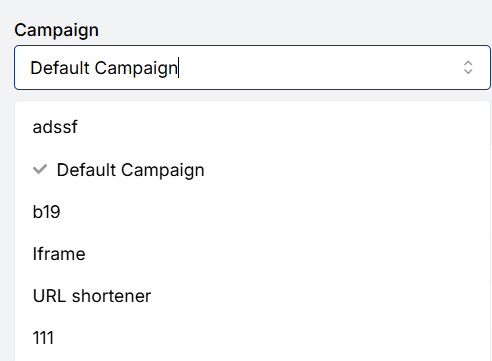
In this menu, you’ll spot the campaign bar. Go with the default campaign or choose your campaign from your existing campaigns.
Note: Creating a campaign is a matter of seconds. It can be the name of your project, allowing you to navigate it easily. For instance, if you’re creating a unique URL, your campaign can be titled “unique URL”.
Step 4: After that, customize your link to make it unique. Once done, click the check mark to save the customization.
Additional step:
You can also create a dynamic QR code for your link here.
Actionable link data: Replug’s analytics at your service
Replug not only provides powerful URL management capabilities but also offers robust analytics for each of your links. With Replug’s analytics feature, you can gain valuable insights into the performance and impact of your links, empowering you to make data-driven decisions and optimize your online strategies.
By utilizing Replug’s analytics, you can track important metrics such as the number of clicks, traffic sources, and geographic distribution of your audience. You can also dive deeper into user behavior by analyzing details like click times, devices used, and referring websites.
Additionally, Replug allows you to set up conversion tracking to measure the effectiveness of your campaigns and assess the return on your marketing efforts accurately.
A complete link management solution
for marketing professionals & agencies.
Try Replug for free
Make your links truly yours: Introducing Replug’s white-label feature
Replug’s White-Label solution empowers users to customize their Replug experience like never before. With the ability to add their own branding elements to URLs, emails, reports, logos, and favicons, users can create a seamless brand identity.
By rebranding Replug, users can make it appear as if they developed the product or service themselves without investing extensive time and resources in its creation. white-labeling becomes the go-to choice for companies looking to expand their offerings and reach new customers without the expense of building new products from scratch.
Unlocking the power of White-Labeling allows users to establish a consistent and credible brand presence. By incorporating their own branding elements into Replug, they can deliver a personalized experience that captivates their audience and builds trust.
With Replug’s White-Label solution, users can maximize their brand’s impact, extend their reach, and conquer new markets. It’s an amazing opportunity to effortlessly customize Replug and elevate their brand to new heights.
How to set up Replug’s white-label feature?
Navigate to Replug settings and click on the white-label option. You need to fill in the given field settings to set up your white-label url shortener. The given field settings are:
Once you have filled the required fields then switch to white-label. To switch just click your profile name or icon at the top right corner.
FAQs on unique URLs
What are the benefits of using unique URLs for tracking and analytics?
Using unique URLs for tracking and analytics offers numerous benefits, including understanding user behavior, measuring engagement, and optimizing your marketing campaigns for better results.
What role do unique URLs play in improving user experience?
Unique URLs improve user experience by ensuring visitors are directed to relevant content, reducing the risk of broken or outdated links, and allowing for more accurate tracking and analytics.
Can unique URLs be used for A/B testing and conversion rate optimization?
Yes, unique URLs can be used for A/B testing and conversion rate optimization. By creating different variations of a URL and measuring their performance, you can identify the most effective elements and optimize your campaigns accordingly.
What is Replug’s white label feature?
Replug’s white label feature allows users to customize Replug with their branding elements. It helps businesses create a consistent brand experience without developing new products.
Instagram and VSCO go hand in hand. While Instagram is all about sharing curated content, VSCO is where creators showcase their raw, aesthetic side. If you’re an avid VSCO user, it’s crucial to know how to put your VSCO link to your Instagram bio so that you can drive traffic to your profile and share your creative portfolio with your followers.
However, simply adding a VSCO link isn’t always enough. To make your bio more effective, using Replug to shorten and customize your link can enhance both its appearance and functionality. Plus, if you want to share multiple links, whether it’s for your VSCO, personal website, blog, or other social profiles, you can also use Replug’s bio link feature to organize them all in one place.
Ready to know how? Let’s get started!
How to add VSCO link to Instagram bio
Adding your VSCO link to your Instagram profile can easily lead your followers to your stunning VSCO portfolio without them having to hunt for it. After all, Instagram has a staggering 500 million daily users.
So, what’s more to think about? Let us guide you on how to add your VSCO link to your Instagram bio in a few easy steps:
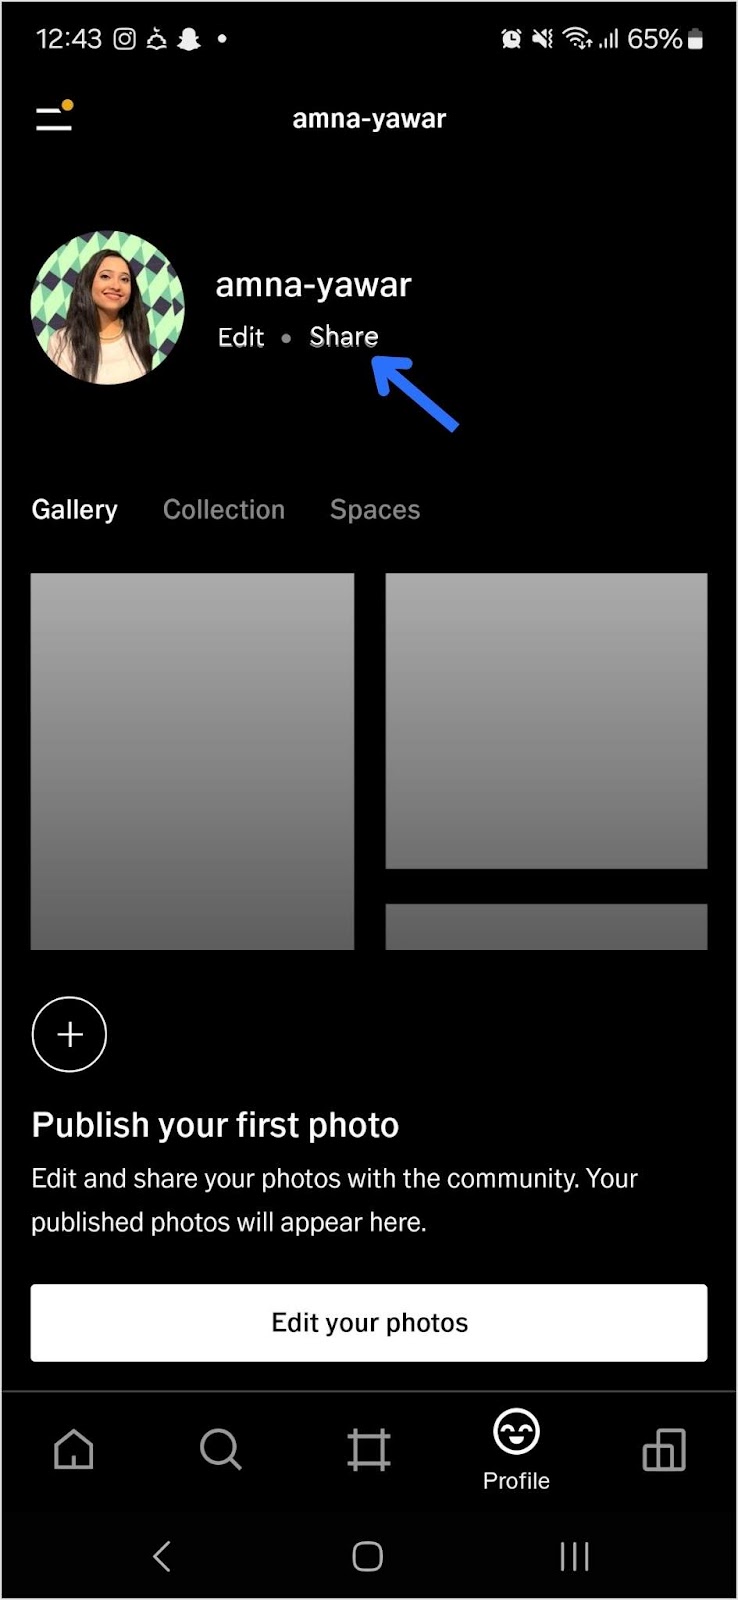
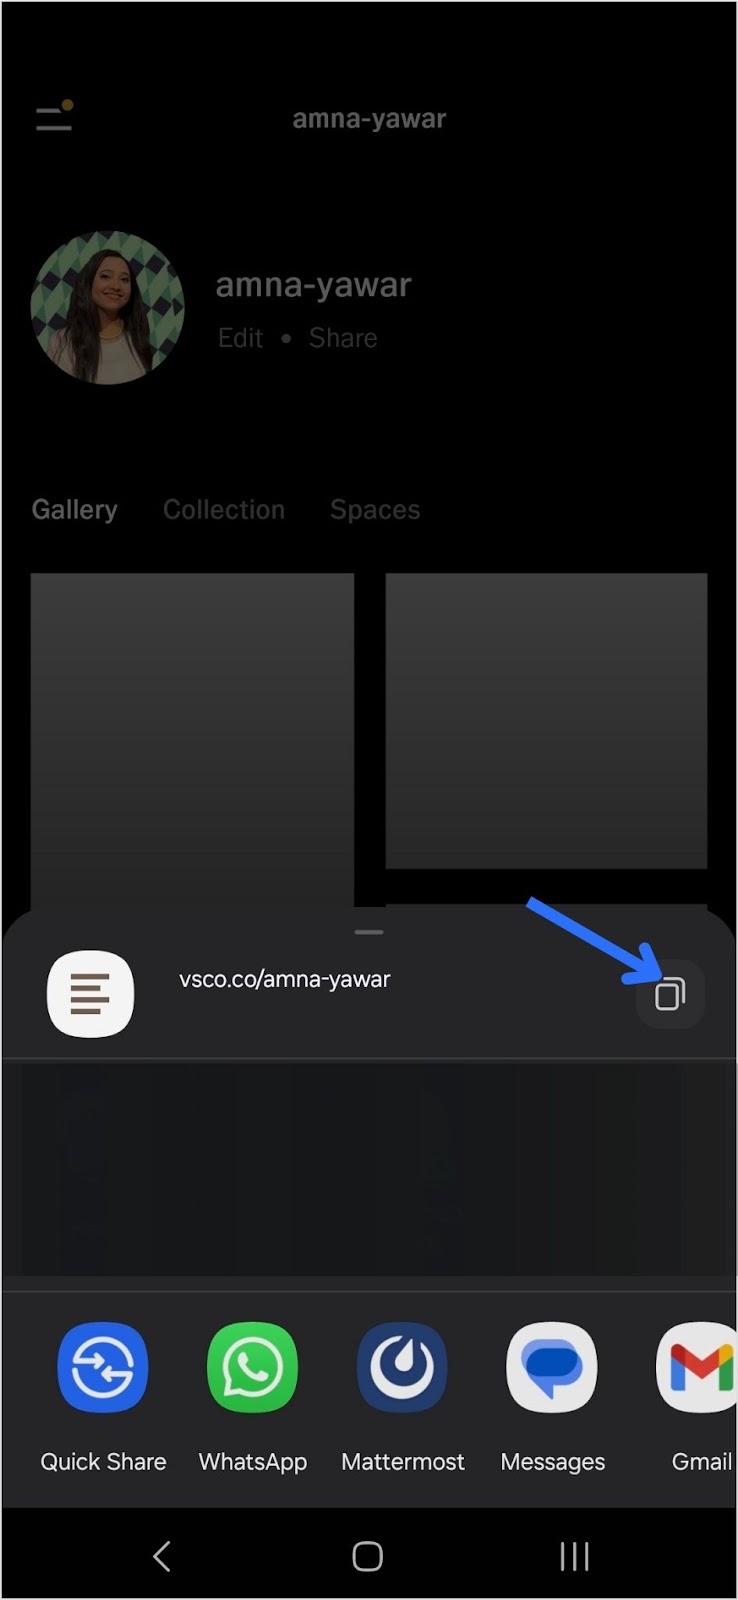
Step 1: Copy your VSCO profile link
Before you can shorten your VSCO link, you need to find it.
Open your VSCO app.
Navigate to your profile and tap “Share”:
Copy your VSCO link:
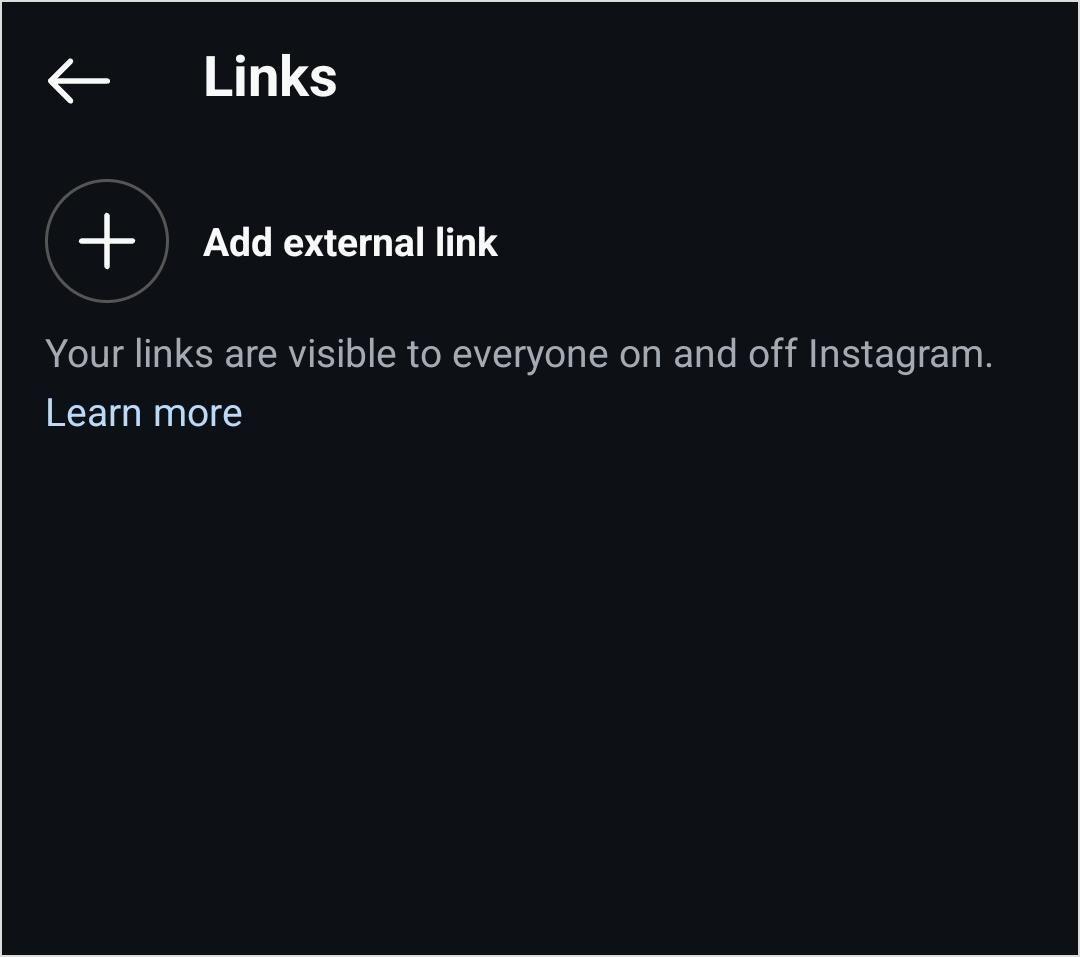
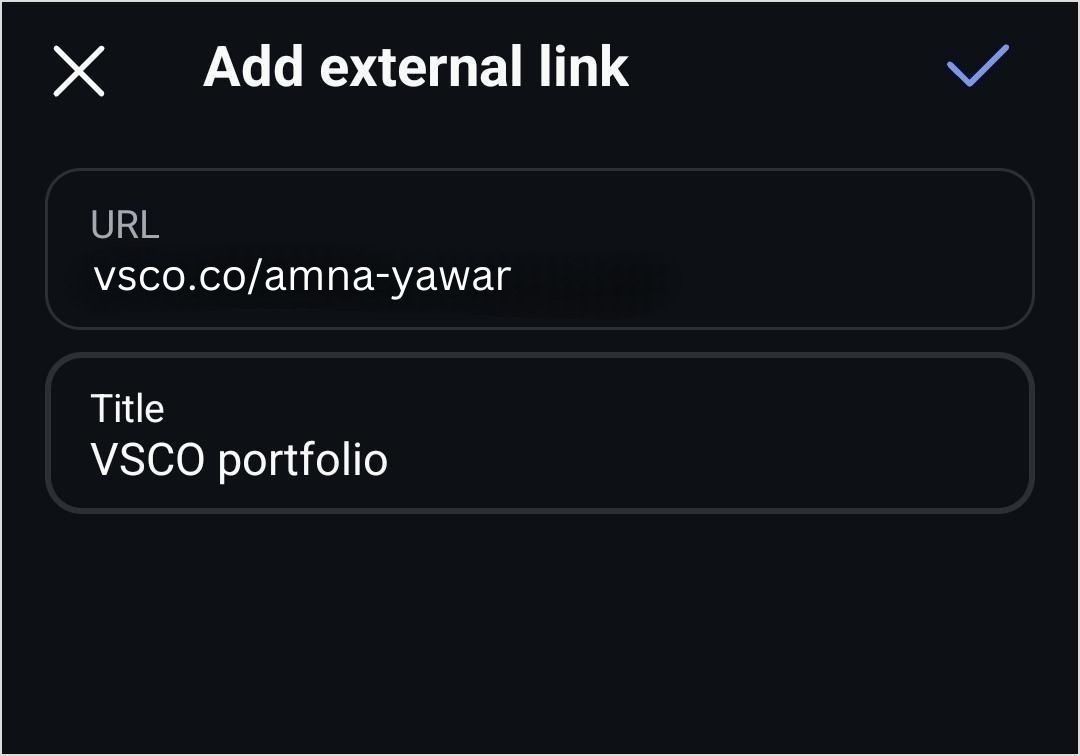
Step 2: Add your VSCO link to your Instagram bio
Now that you have your short VSCO link, follow these steps to add it to your Instagram bio:
Open Instagram and go to your profile.
Tap “Edit Profile.”
Find the “Add Link” field and click on “Add external link”
4. Add your VSCO link and click on the blue tick to save it.
Your followers will now be able to see your VSCO profile in your bio!
Shorten your VSCO link with Replug
Now, let’s make your link more presentable, branded, and optimized using Replug’s powerful link-shortening tool:
Sign in to your Replug account or create an account if you don’t already have one:
Paste your VSCO profile under “Quickly Shorten your link”
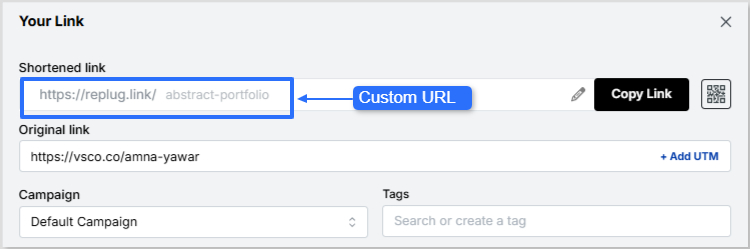
Customize the shortened link with a branded or neat alias:
Now it’s time to give your VSCO short link a glow-up! You can easily create a custom URL by simply optimizing the slug. This will let your audience know exactly where your short link will lead them.
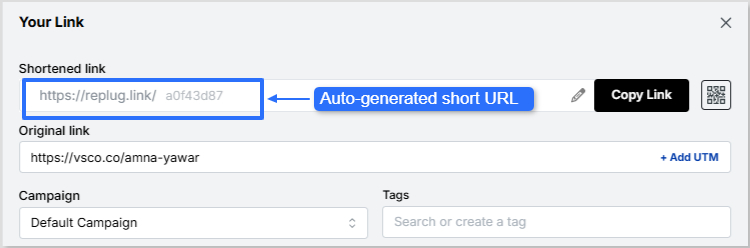
Auto-generated short URL:
Custom URL:
Maximize marketing ROI
by transforming ordinary URLs into branded short links that convert.
Try Replug for free
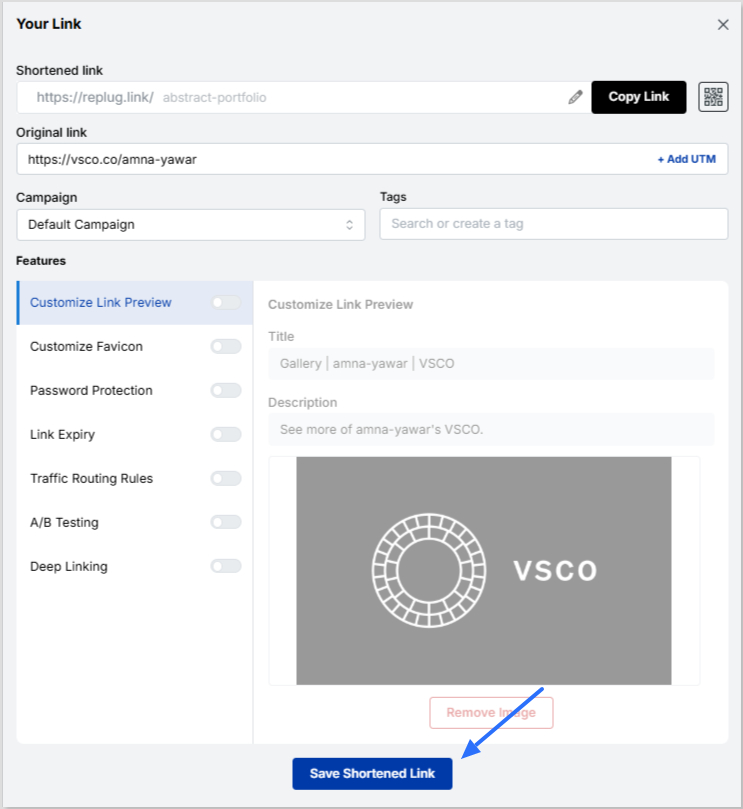
4. Save your custom URL. Now it’s ready to be shared!
Replug offers a bio link feature if you want to share more than just your VSCO link. This allows you to create a single, customizable landing page containing multiple links. Instead of being restricted to just your VSCO, you can include:
Your VSCO profile
Your Instagram, Twitter, TikTok, and other social links
1. Neat and professional links: Even if your VSCO link looks fine, using Replug ensures that your bio remains visually clean while giving you a customizable and trackable link.
2. Track link performance: Want to know how many people are clicking your VSCO link? Replug provides detailed analytics so you can track engagement and optimize your links for better performance.
4. Custom branding: Unlike generic link shorteners, Replug allows you to customize your shortened links and bio link page with brand colors, themes, and even a custom domain.
5. Better user experience: Instead of constantly changing your Instagram bio link, you can set up your Replug page once and update it anytime without modifying your Instagram profile.
A complete link management solution
for marketing professionals & agencies.
Try Replug for free
Final thoughts
Adding a VSCO link to your Instagram bio is great, but making it look neat and professional is even better. Replug helps you shorten your VSCO link for a cleaner appearance while also offering a bio link feature for those who want to share multiple links in one place. Whether you’re a photographer, influencer, or content creator, Replug makes your Instagram bio more effective and aesthetically pleasing.
Ready to clean up your Instagram bio? Sign up for Replug and start shortening your links today!
FAQs on how to put VSCO link in your Instagram bio
Can I make my VSCO link look more aesthetic in my Instagram bio?
Absolutely! Using Replug, you can create a clean, custom-branded short link that fits your aesthetic and keeps your bio clutter-free.
Will my Instagram followers know my VSCO link is legit?
A customized, branded short link reassures your audience that your VSCO profile is safe to click, unlike long, messy URLs that may look suspicious.
What if I want to share more than just my VSCO link?
No problem! Replug’s bio link feature lets you showcase multiple links, whether it’s your VSCO, website, TikTok, or latest projects—all in one place.
Can I see how many people are clicking my VSCO link?
Yes! With Replug’s analytics, you’ll get real-time insights on link clicks, helping you understand how well your bio is driving traffic.
Do I have to update my Instagram bio every time I change my VSCO link?
Not if you use Replug! Simply update your link inside Replug’s dashboard, and your Instagram bio link stays the same.
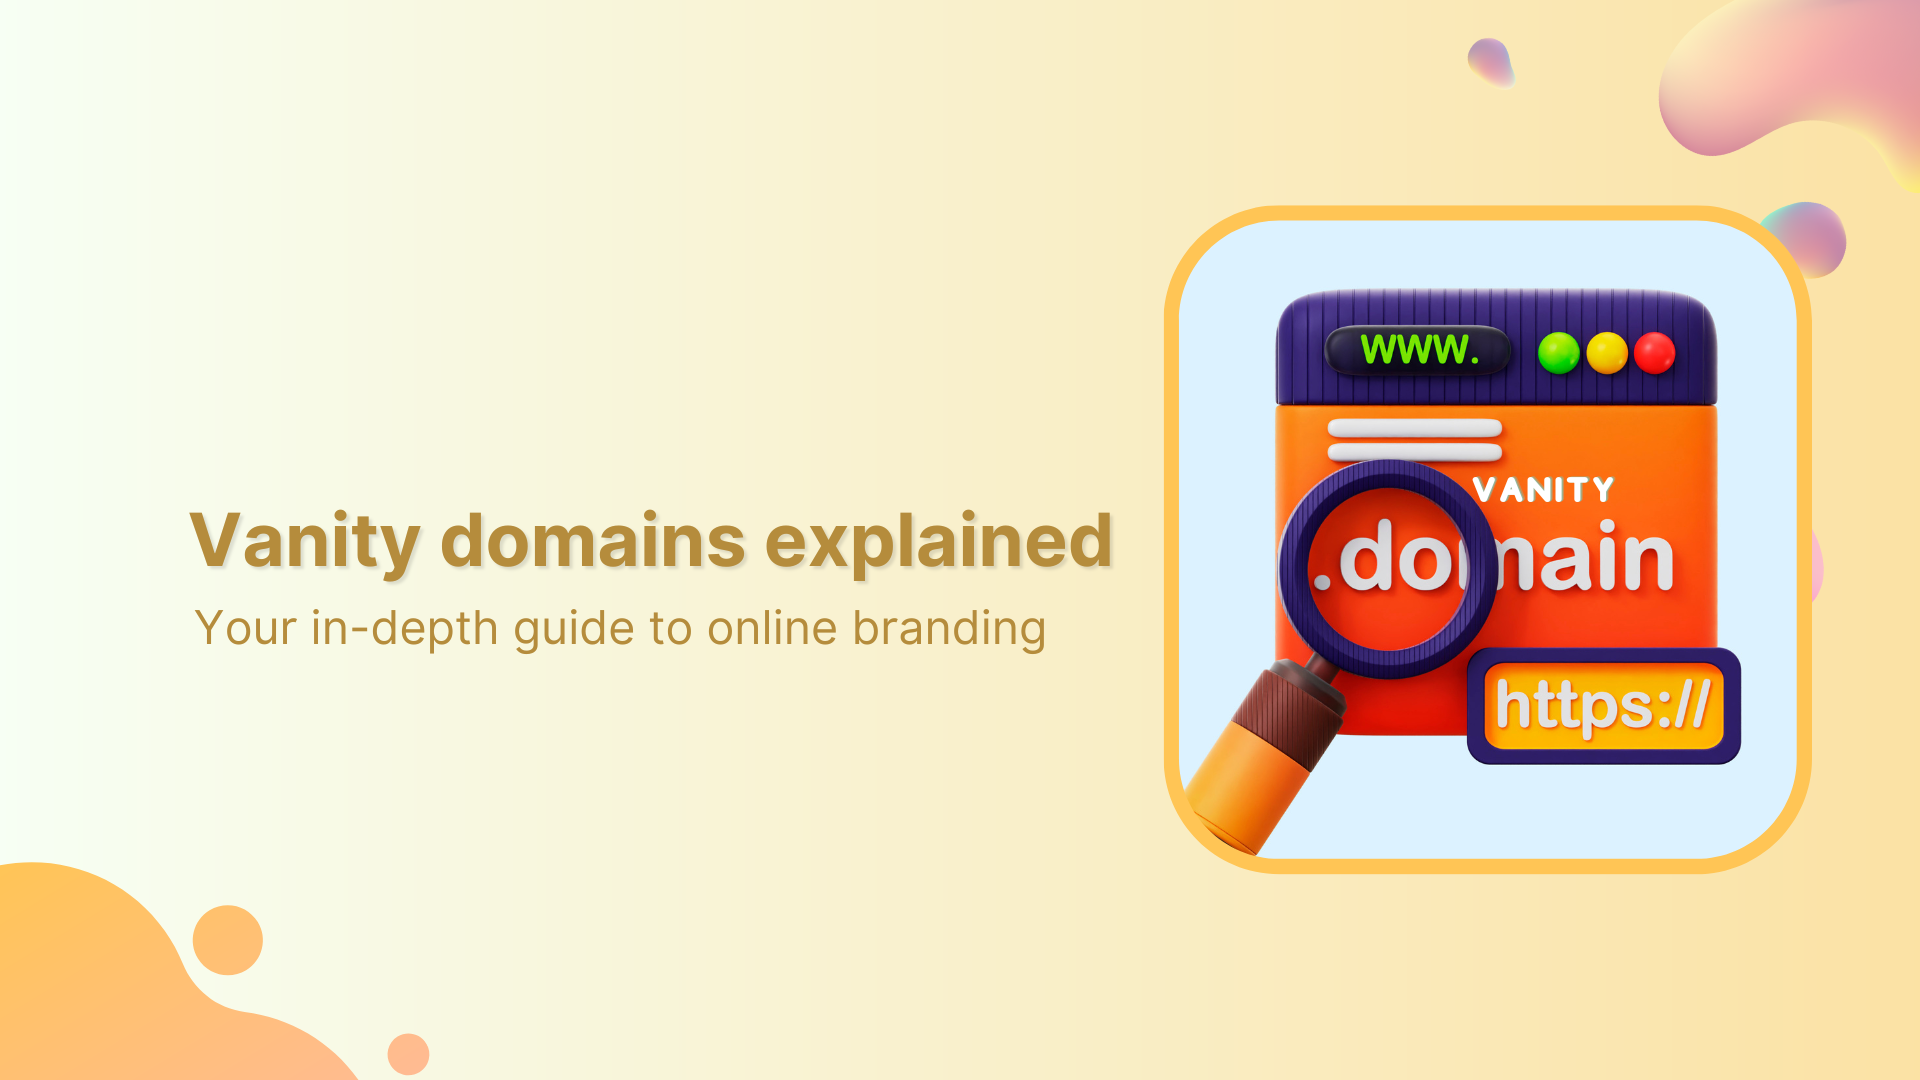
Marketing experts have embraced the power of vanity domains as transformative branding tools. These domains elevate simple links into potent instruments for building brand identity and driving website traffic.
In this comprehensive guide, we’ll explore the intricacies of using vanity domains to enhance your brand’s visibility and draw in visitors. We’ll also delve into the process of creating a vanity domain using a link management platform.
What is a vanity domain?
A vanity domain is a personalized and often shortened web address that is designed to reflect a brand, individual, or specific purpose. Unlike a standard domain name, which might consist of a generic combination of words and characters, a vanity domain is tailored to be more memorable, brand-focused, and aligned with a particular identity or message.
Vanity domains are often chosen to enhance brand recognition, create vanity URLs, and create a more engaging online presence.
For example, if a company named “ABC Widgets” wants to establish a strong online presence, it might opt for the vanity domain “ABCWidgets.com” instead of a more generic domain name. Similarly, an individual named John Smith might choose the vanity domain “JohnSmithDesigns.com” to showcase his portfolio as a graphic designer.
Vanity domain vs vanity URL: What’s the difference?
In the realm of online branding and link management, the terms “vanity domain” and “vanity URL” often surface. These terms are closely related but hold distinct meanings, serving different functions in the digital landscape. Let’s delve into the nuances of each concept to understand how they differ:
Vanity domain
A vanity domain refers specifically to the branded and personalized web address that serves as the main entry point to a website. This domain is carefully chosen to reflect a brand’s name, individual identity, or particular purpose. The primary goal of a vanity domain is to establish a memorable, recognizable, and often concise web address that aligns with the brand’s identity and message.
For instance, if a company named “ABC Innovations” wants a distinct online presence, they might select the vanity domain “ABCInnovations.com” as their main web address. This domain encompasses the entirety of their website and serves as the central location for their online activities.
Vanity URL
On the other hand, a vanity URL involves a combination of the branded domain name and a specific, often shortened, path or identifier that leads to a particular page or content within the website. Vanity URLs are strategically crafted to create user-friendly and easy-to-share links, particularly for marketing campaigns, social media sharing, and other scenarios where succinct links are preferable.
For example, if the company “ABC Innovations” is running a special summer promotion, they might use the vanity URL “ABCInnovations.com/SummerPromo” to lead users directly to the promotional page on their website. The inclusion of “/SummerPromo” specifies the exact destination within the website.
Key distinctions
Scope and purpose: Vanity domains encapsulate the entire website and serve as its main address, while vanity URLs target specific pages or content within the website.
Link components: A vanity domain consists solely of the branded domain name, whereas a vanity URL combines the branded domain name with a path or slug that directs users to a particular location.
Branding focus: Both concepts are used for branding, but vanity domains establish the overall brand identity and web presence, while vanity URLs provide branded and user-friendly links for targeted content.
A complete link management solution
for marketing professionals & agencies.
Try Replug for free
What is the difference between a vanity domain and your primary domain?
A vanity domain and a primary domain are related concepts but serve different purposes and have distinct characteristics. Let’s explore the differences between the two:
Primary domain
An original domain, also known as a standard domain or primary domain, is the standard web address that represents a website on the internet. It’s the unique address users type into their browsers to access a website.
Original domains are typically chosen based on the name of the business, brand, individual, or purpose of the website.
They are designed to provide a direct and clear representation of the website’s identity.
A primary domain encompasses the entire website and serves as its main entry point.
Examples of primary domains include “Google.com,” “Apple.com,” and “Amazon.com.“
Vanity domain
A vanity domain is a customized, branded web address that is often shorter and more memorable than an original domain.
It serves as an alternative or additional domain that redirects to the main website.
Vanity domains are chosen to enhance branding, improve link sharing, or create a more memorable online presence.
While vanity domains can redirect to the main website, they can also serve as standalone addresses with unique content or landing pages.
Examples of vanity domains include “YourBrand.link” or “JohnDoeDesigns.com.”
Key differences:
Purpose: An primary domain is the primary address of the website, representing the website’s identity and content. A vanity domain can be an alternative, shortened, or branded address used for specific purposes.
Branding and memorability: Vanity domains are often chosen for their branding and memorability, while original domains are selected based on brand identity and relevance.
Redirection: Vanity domains may redirect users to the main website or specific pages, whereas original domains are the main entry points to websites.
Length: Vanity domains are more concise than original domains.
Usage: Vanity domains are used strategically for marketing campaigns, specific content, or enhancing link sharing. Original domains are the primary addresses for websites.
How to choose an unforgettable vanity domain name?
Selecting a vanity domain name requires careful consideration to ensure it aligns with your brand identity and resonates with your audience. Much like choosing a brand name, the process involves creating a memorable and recognizable online presence.
Here’s a step-by-step guide to help you make an informed decision:
Catchy and memorable
Opt for a domain name that’s easy to remember and recall.
Choose words that are catchy and resonate with your brand’s personality.
Ease of pronunciation and spelling
Ensure your domain name is easy to pronounce and spell.
Avoid complex words or combinations that might confuse users.
Intuitive and clear
Your domain name should intuitively reflect your brand’s identity or the purpose of your website.
Make it clear to visitors what your website is about just from the domain name.
Avoid special symbols
Stick to letters and numbers in your domain name.
Avoid using hyphens or special characters that can complicate the name.
Capitalization for clarity
If your domain name consists of multiple words, consider capitalizing the first letter of each word.
This improves readability and makes the name easier to understand.
Brand value communication
Your domain name should communicate the value or essence of your brand.
Incorporate keywords or terms that resonate with your target audience.
Alignment with the brand name
Choose a domain name that’s closely aligned with your brand name.
If your brand name is short and distinctive, consider using it as your domain name.
Print advertising considerations
Think about how your domain name will appear in traditional print advertising.
Ensure it’s easy to remember and understand at a glance.
Vanity domain name extensions
Top-level domain (TLD) consideration
The TLD is the extension that appears after the dot in your domain name (e.g., .com, .net, .org).
Generic TLDs, like .com and .net, are widely used and recognized.
Custom TLDs for branding
Explore custom TLDs that align with your brand or industry.
Newer TLDs like .blog, .tech, and .store can offer unique branding opportunities.
Types of TLDs
Generic TLDs cover widely used extensions.
Sponsored TLDs are specific to organizations like governments or universities.
Country TLDs are related to specific countries.
Choosing TLDs
If your website isn’t affiliated with a specific country or organization, you’ll likely choose from generic TLDs.
Consider TLDs that best resonate with your brand identity and content.
Unconventional TLDs
Unconventional TLDs, such as “virg.in,” “nytim.is,” and “es.pn,” can add a creative touch to your domain.
Exploring new extensions
If your desired domain name isn’t available with traditional TLDs, explore new extensions or variations.
ICANN application
If needed, you can apply for a new TLD through the Internet Corporation for Assigned Names and Numbers (ICANN).
By following these steps, you can choose a vanity domain name that not only captures your brand essence but also enhances your online presence and user experience.
The process of setting up a vanity domain depends on your intentions and goals. Follow these steps to create a vanity domain using a link management platform:
How to create a vanity domain using Replug?
Step 1: Sign up for Replug
Visit Replug’s app and sign up for an account. You’ll need at least a basic Replug account to create a vanity domain.
Step 2: Log in to your Replug account:
After creating your account, log in to your Replug home page.
Step 3: Access custom domains
Click the drop-down icon next to your profile picture and select “Custom Domains” then click on the blue “Add Domain” button.
Step 4: Enter domain details:
In the next screen, where you need to enter your Domain URL, Custom 404 redirection, and Branded Domain.
Afterward, click on the Connect button as shown in the image below.
Domain URL: Your branded or custom domain is included here.
404 redirect URL: When a user visits your platform and lands on 404 pages.
Branded domain: Whenever the user visits the root address of your brand domains, they will be redirected toward the URL.
Note: Once you have added your domain to the platform, the next step is to point CNAME in your domain registrar’s DNS. If you would like to redirect your root domain, please try adding @ or www. Some of the registrars do not allow the @ option, for that, you will have to add www as a HOST value.
Replug offers real-time analytics that provides valuable insights into link performance, including click-through rates. Take advantage of these analytics to refine your approach and better target your audience. Additionally, Replug seamlessly integrates with various social media and digital marketing tools, enabling you to create and manage vanity links at scale.
Important note: Every link created through Replug comes with HTTPS encryption by default, ensuring the security of your content and the protection of user data.
By following these steps, you can effectively create and manage your vanity domain, enhancing your online branding efforts and maximizing your digital presence. Replug, in particular, offers a user-friendly platform to simplify the process and provide valuable insights into link performance.
Maximize marketing ROI
by transforming ordinary URLs into branded short links that convert.
Try Replug for free
FAQs on vanity domains
Why are vanity domains important for branding?
Vanity domains help enhance brand recognition, make web addresses more memorable, and improve the overall aesthetics of a brand’s online presence. They contribute to building a strong brand identity.
How do I choose the right vanity domain name?
When selecting a vanity domain, consider factors such as brand identity, memorability, ease of pronunciation, and relevance to your business. It should reflect your brand’s essence and be easy for users to remember.
Can a vanity domain improve my website’s search engine ranking?
While vanity domains themselves may not directly impact search engine ranking, they can contribute to a consistent and memorable brand identity, which indirectly can influence user engagement and recognition, potentially leading to improved SEO.
Can I use a vanity domain for social media links?
Yes, using a vanity domain for social media links can help create a cohesive and recognizable online presence. Shortened vanity URLs are particularly useful for sharing content on platforms with character limits.
Can I change my vanity domain once it’s set up?
Yes, it’s possible to change your vanity domain, but it may involve some technical steps and potentially impact your online branding. Consider the implications before making any changes.
Are there any security considerations when using a vanity domain?
Ensure that the domain registrar or link management platform you use provides proper security measures, including HTTPS encryption. This helps protect user data and maintains the integrity of your brand.
Do vanity domains work well for businesses of all sizes?
Yes, vanity domains can benefit businesses of all sizes. They provide an opportunity to create a memorable and distinct online identity, regardless of the scale of the business.
Can I use multiple vanity domains for different marketing campaigns?
Yes, using multiple vanity domains for different campaigns can be effective in tracking campaign performance and targeting specific audiences. Just ensure that the domains align with your brand’s overall messaging.
Curious about those square patterns you see on product packaging, restaurant menus, and even event tickets? These special grids, known as QR codes, provide a fast way to connect your smartphone with digital information. All it takes is a quick scan.
But have you ever wondered how to read them correctly?
Below, you’ll find a complete QR code scanning guide with tips, troubleshooting ideas, and safety recommendations. If you’re searching for steps to scan a QR code on any device, look no further!
How to scan a QR code on iPhone, iPad, or iPad Touch
Apple makes QR code scanning straightforward. Most Apple phones and tablets have a built-in scanner that works through the Camera app, so you likely won’t need extra tools.
Using the built-in camera app
Open the Camera app.
Point your camera at the QR code, making sure it’s inside the viewfinder.
Hold steady for a moment. A notification banner will pop up at the top of your screen.
Tap the banner to open the link or carry out the action.
If your phone’s camera is slow to respond, try adjusting the distance between your phone and the QR code. Good lighting can also speed up recognition.
Enabling QR code scanning:
In rare cases, the Camera app might not detect QR codes right away. You can activate the feature in the system settings:
Open the Settings app.
Scroll down and tap “Camera.”
Turn on “Scan QR Codes.”
Here’s a sample QR code we created using Replug so that you can see if scanning works for you:
Note: If your Apple device’s default camera doesn’t support QR scanning, you can easily download a dedicated QR scanner app from your app store. This might happen if you haven’t upgraded to a newer iOS model.
Using the Control Center QR code scanner
Some find it even easier to launch a scanner from the Control Center:
Go to Settings > Control Center.
Tap the green plus sign next to “Code Scanner.”
Open the Control Center by swiping from the top-right corner (on newer iOS devices) or bottom (on older iOS devices).
Tap the QR scanner icon and aim your camera at the code.
Scanning from photos or screenshots
Ever received a QR code in a text or image? You can scan that, too. Here’s how:
In the Photos app, pick the picture that has the QR code.
Touch and hold the code on your screen.
A pop-up appears with an option to open the link or carry out the relevant task.
Android devices come in many models, but they share similar ways to read QR codes. From Samsung phones to Pixel devices, you’ll usually have at least one built-in method.
Using the default camera app
Most newer Android phones handle QR codes directly:
Launch your camera app.
Aim at the QR code.
Wait for a prompt or banner with a link or action.
Tap it to open.
Keep your camera clean and well-focused. Poor focus can affect scanning speed.
Enabling QR code scanning in settings:
If nothing happens when you point your camera at a code, you might need to switch on scanning:
Open your Camera app.
Look for the gear icon or similar to open settings.
Find an option such as “Scan QR codes” and turn it on.
Using Google Lens
Source: Google Playstore
If the default camera fails to read QR codes, Google Lens usually works:
Open the Google app or say, “Hey Google, open Lens.”
Point the camera at the QR code.
Tap the on-screen code to see the information.
Using the quick settings drop-down
Here’s how to scan a QR code using Quick Settings drop-down on Android phones:
Swipe down your notification bar and tap on “Scan QR Code.”
The scanner will activate your camera. Just point it at any QR Code.
If you’ve saved a QR Code as an image, tap the image icon in the scanner app to access your gallery and scan it.
The QR Code data will instantly appear as a pop-up.
Samsung-specific methods
Samsung devices often include extra features via Bixby Vision or the Samsung Internet browser for QR code scanning:
With Bixby Vision:
Open the camera and tap the Bixby Vision icon.
Point at the QR code.
Tap the pop-up box to open the link.
With Samsung Internet:
Open the Samsung Internet browser.
Tap the QR code icon in the search bar.
Aim the camera at the QR code.
Alternative methods for older Android versions
Some older phones might not support built-in scanning:
A complete link management solution
for marketing professionals & agencies.
Try Replug for free
FAQs on how to scan a QR code
Do I need a special app to scan a QR code?
Most recent smartphones handle QR code scanning through their camera apps. For older devices, a scanner app from your app store can work fine.
Can I scan a QR code from a screenshot?
Yes. Open the screenshot in your Photos or Gallery app, then hold your finger on the code until an option appears to open the link.
Why isn’t my phone scanning QR codes?
Check if scanning is activated in your camera settings. Also, confirm your phone’s software is up to date. If it still won’t work, install a specialized scanning app.
Are QR codes safe to scan?
They are usually safe, but it’s best to be cautious. Look over the link if your phone displays it, and avoid codes that look suspicious or are from unknown sources.