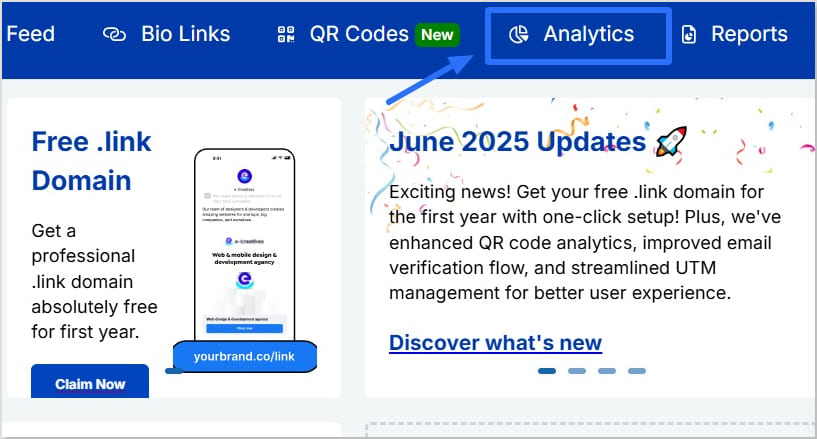
Selling products on Amazon sounds simple at first. But as your list grows with best selling products, affiliate offers, digital downloads, Kindle ebooks, and more, it can quickly feel overwhelming.
Most platforms only give you limited space to share these links. Updating them across bios, emails, and videos takes time, and your audience might miss your best offers.
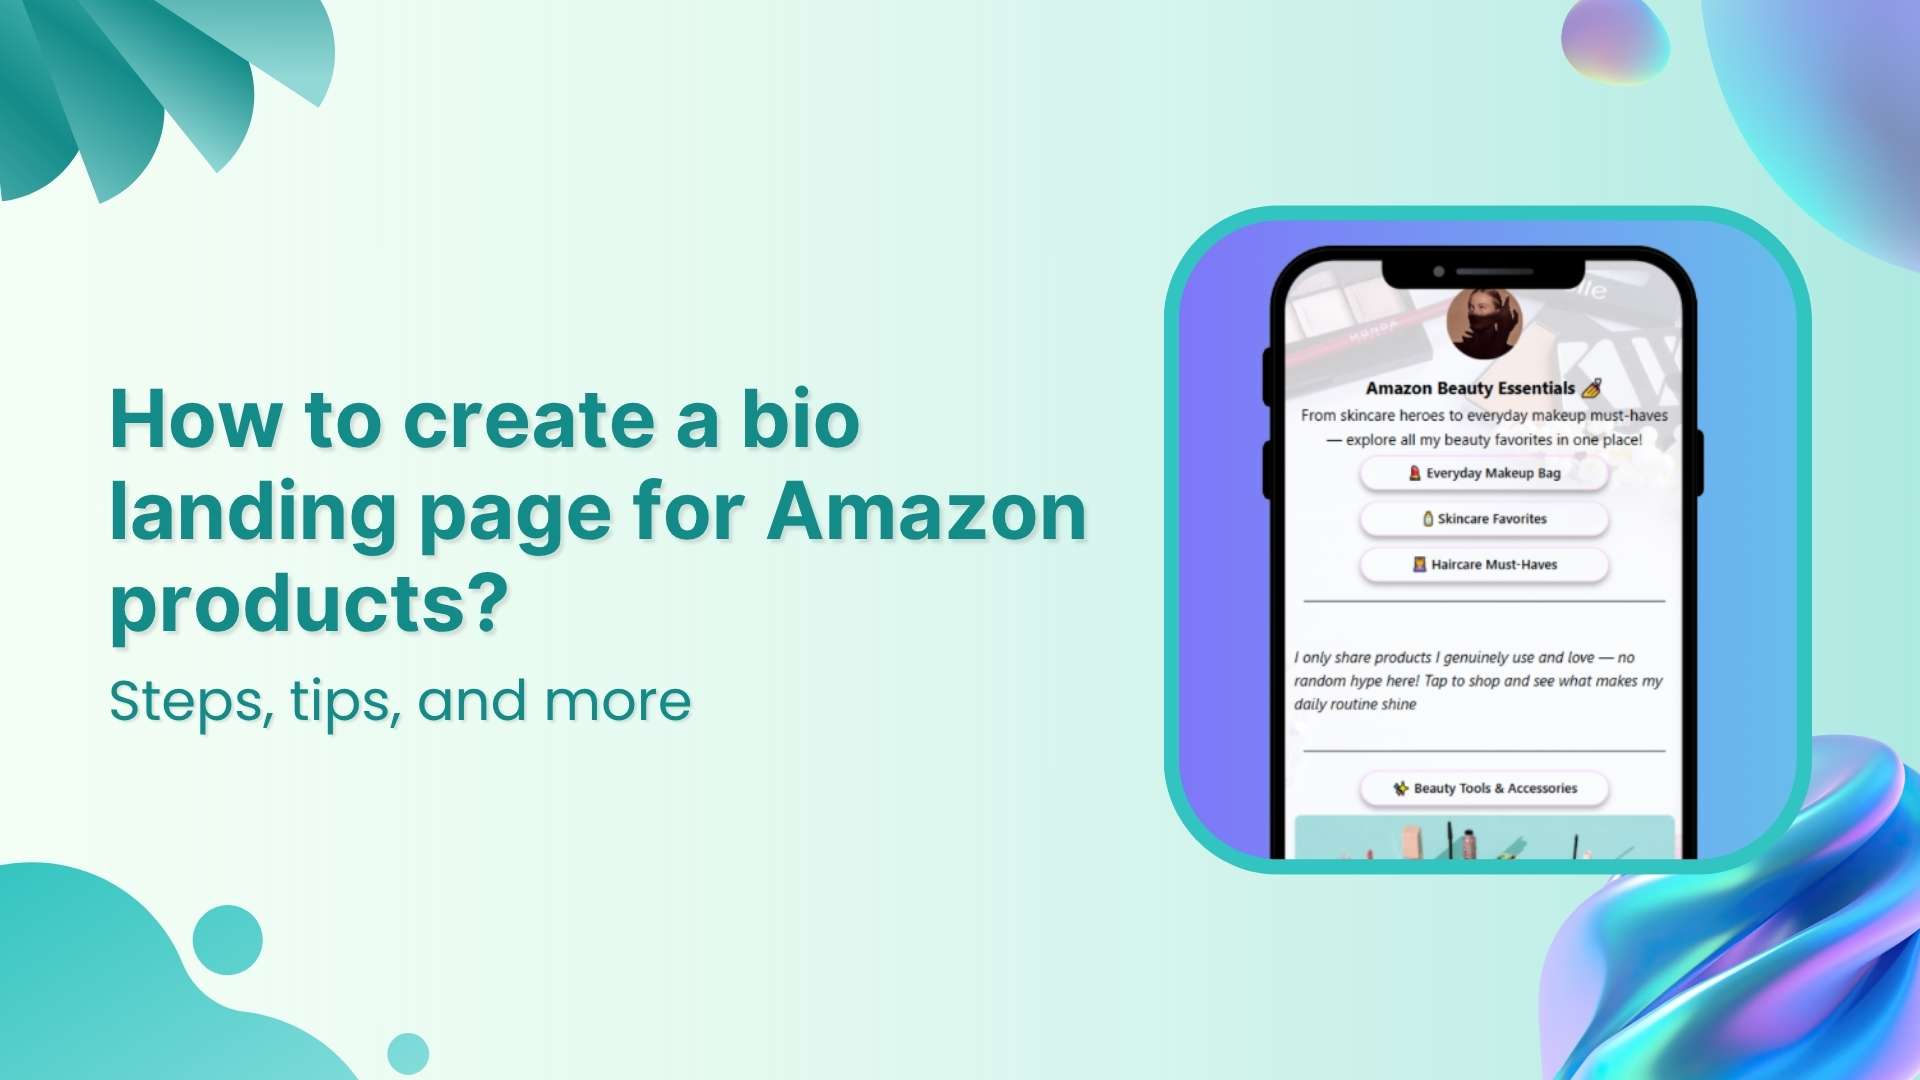
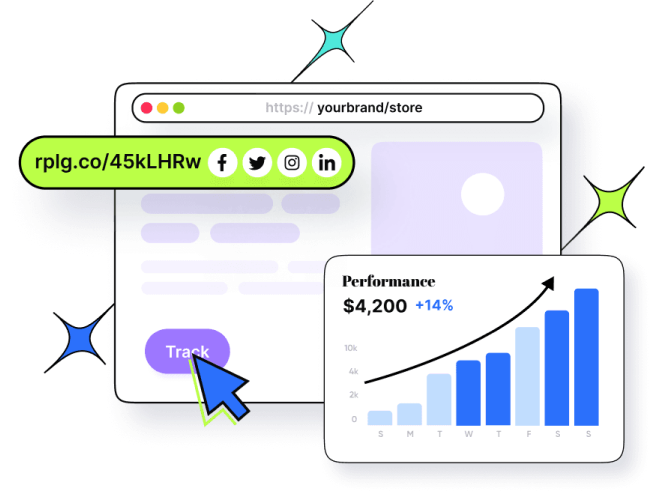
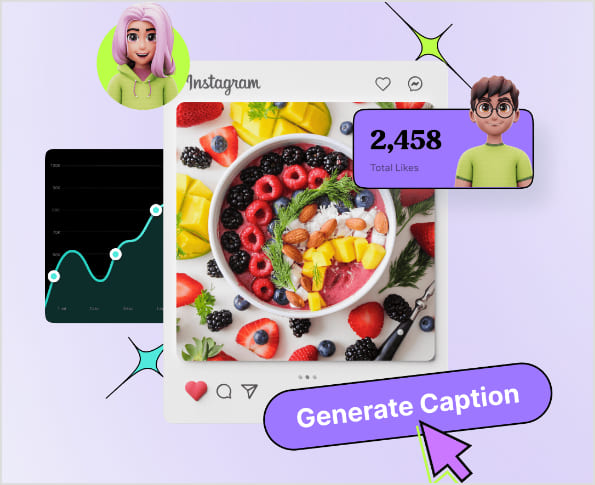
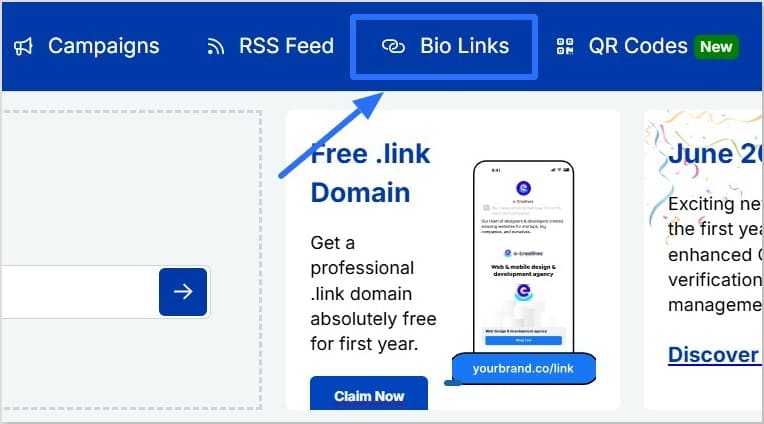
A landing page for Amazon products keeps everything in one place. With Replug, you can create a bio link page that holds all your links together. It’s easy to update anytime, so your followers always see your latest products and deals without extra effort.
In this guide, you’ll learn how to build that landing page step by step and keep your promotions fresh and organized.
Maximize marketing ROI
by transforming ordinary URLs into branded short links that convert.
Try Replug for free
Why create a bio landing page
When you’re sharing multiple offers, it doesn’t take long before you hit the limit:
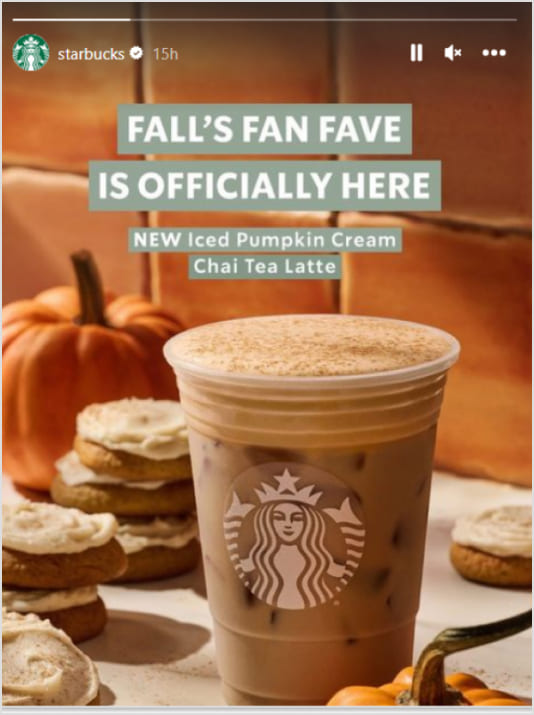
Promoting best selling products on Amazon alongside your latest blog or video
Updating all those links separately can be time‑consuming, and your audience might miss something great.
If you also sell digital products on Amazon or run affiliate marketing campaigns, flexibility matters even more. Plus, since Amazon requires sellers to notify purchasers of hazardous products and issue refunds, you might need to update or remove product links quickly to protect your audience and your reputation.
A single landing page for Amazon products fixes this. You update your product list in one place, and your bio link stays the same.
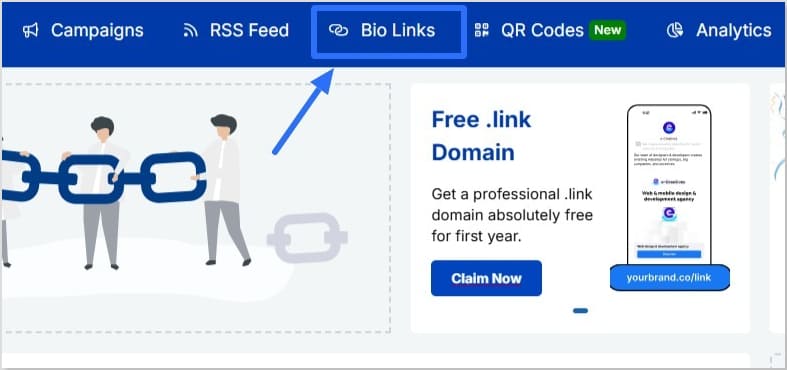
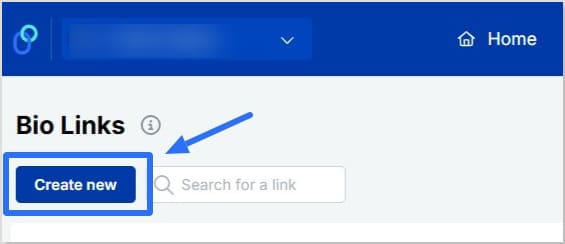
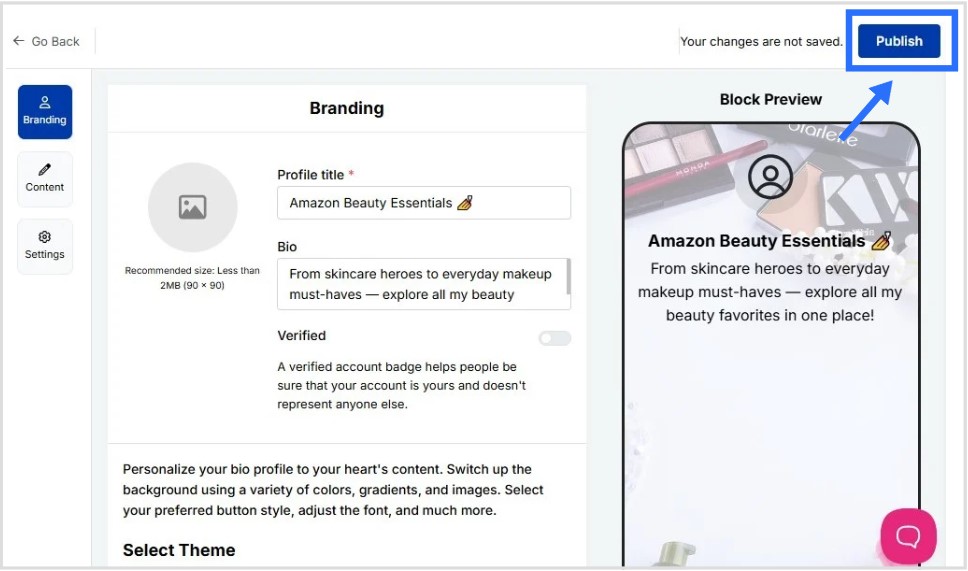
In the “Content” category, you’ll have the option to add your content blocks
Click on “Links” and paste links to your Amazon product pages, affiliate offers, or digital downloads
You can add more content block types if required; such as cards, socials, separator, etc
Keep updating as you go by clicking “Update” on the top right to save your progress
If you’re exploring how to make money on Amazon without selling physical products, affiliate marketing is your answer. You share Amazon links and earn a commission when someone buys.
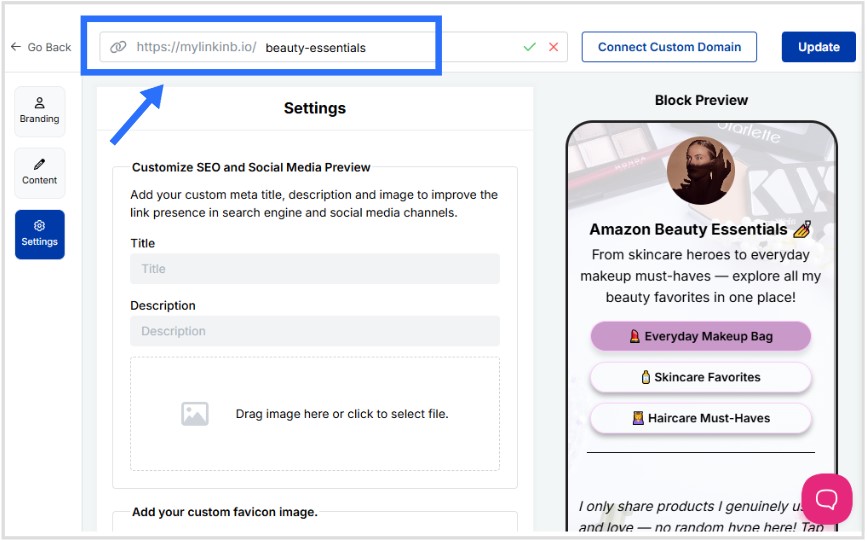
Step 4: Customize SEO and social media preview
Go to the “Settings” category
Add a custom meta title and description to improve how your landing page for Amazon products appears in search results
Upload a preview image that looks great when your page is shared on social media
Add retargeting pixels to track visitors and run targeted ads later (optional but highly recommended)
Step 5 (optional): Create a custom URL for your bio link
Personalize your landing page link to match your brand or product name
Create a custom URL by changing the slug of your bio landing page
This is how your final bio landing for Amazon products looks like:
Step 6: Share your landing page everywhere
Once your landing page for Amazon products is ready, share it across every channel where your audience hangs out. Add it to your Instagram and TikTok bio, YouTube description, Pinterest profile, email signature, blog sidebar, and even on printed materials with a QR code.
The more places you share your link, the more clicks and sales you can drive from people who discover you on different platforms.
Tips for your bio landing page for Amazon products
Creating a landing page is just one part of learning how to sell on Amazon effectively. To get even better results, try these extra tips that can help you drive more clicks and keep your page fresh:
Place your best selling products on Amazon at the top so they get more attention
Use direct titles like “Shop My Top Picks” instead of generic labels
Add UTM parameters to track which platform sends the most visitors
Highlight promotions and discounts on your Amazon products to catch attention
Add retargeting pixels so you can reach visitors again with targeted ads
Create a catchy call-to-action to encourage visitors to click and shop your Amazon products For example, try something like “See what I’m loving this month” or “Shop my current Amazon must-haves”
Keep your product list updated, especially if there are recalls or notice of hazardous products and issue refunds
A landing page for Amazon products isn’t just about adding more links, it’s about making your bio work smarter. Instead of juggling updates across multiple platforms, you control everything from one branded page.
Whether you’re promoting best selling products on Amazon, sharing digital downloads, or exploring how to make money on Amazon without selling physical items, this approach keeps your content organized and your audience engaged.
With tools like Replug, it’s simple to build, track, and update your landing page whenever you need, so your bio always stays up to date and your visitors always find your best offers.
FAQs on bio landing page for Amazon products
What is a landing page on Amazon?
A landing page on Amazon typically refers to a dedicated page that showcases a collection of your products or offers. In this guide, we’re talking about creating a landing page for Amazon products outside Amazon itself, like in Replug, so you can share multiple product links, affiliate offers, and digital content all in one branded link.
How to make an Amazon product page?
On Amazon, you create a product page by listing your product through Seller Central. You’ll add product details, images, pricing, and shipping information. If you want to promote several products together, a separate landing page (like the one you build in Replug) can help organize and share those links easily.
How to get traffic to your Amazon product?
Promote your landing page for Amazon products across social media, emails, blogs, and videos. Use engaging calls to action, share limited-time deals, and add UTM parameters to track which channels bring in the most clicks.
How to make up to $10,000 per month on Amazon without selling physical products?
Many affiliates are able to do this by joining the Amazon Associate Program. By sharing affiliate links to best selling products on Amazon, ebooks from Amazon’s Kindle Direct Publishing platform, or other digital content on your landing page, you can earn commissions on purchases without holding inventory.
Can I sell products directly through my landing page?
No. The landing page itself doesn’t process transactions. Instead, it links visitors to your product pages on Amazon, digital downloads, or affiliate offers where they complete their purchase.
What if an Amazon link breaks or a product is removed?
That’s one of the advantages of using Replug. You only need to update the broken or outdated link on your landing page, and it automatically updates everywhere you’ve shared your bio link.
In the beginning, QR code generators were mostly used for testing or simple features in games where the destination didn’t really matter. But today, a reliable random QR code generator is an asset for developers, marketers, agencies, and everyday users alike.
What is a random QR code?
A random QR code is a dynamic QR code that leads users to a different destination each time it’s scanned by rotating between multiple URLs.
Whether you’re testing QR code functionality, running A/B marketing experiments, or creating quick, scannable links for your projects, QR codes have the speed and flexibility to get it done effortlessly.
QR code usage has exploded in recent years. In 2025 alone, global scans reached 41.77 million, marking a 433% increase over the past four years. With this rapid growth, more businesses and creators are turning to smart tools like Replug to automate QR code generation.
Replug allows you to create branded short links, rotate multiple URLs, and generate trackable, customizable QR codes, all from one platform.
Maximize marketing ROI
by transforming ordinary URLs into branded short links that convert.
Try Replug for free
Step 1: Sign in to your Replug dashboard
Sign in to the Replug app. If you don’t have an account, sign up to get access to a 14-day free trial with full features.
Step 2: Create a short link campaign
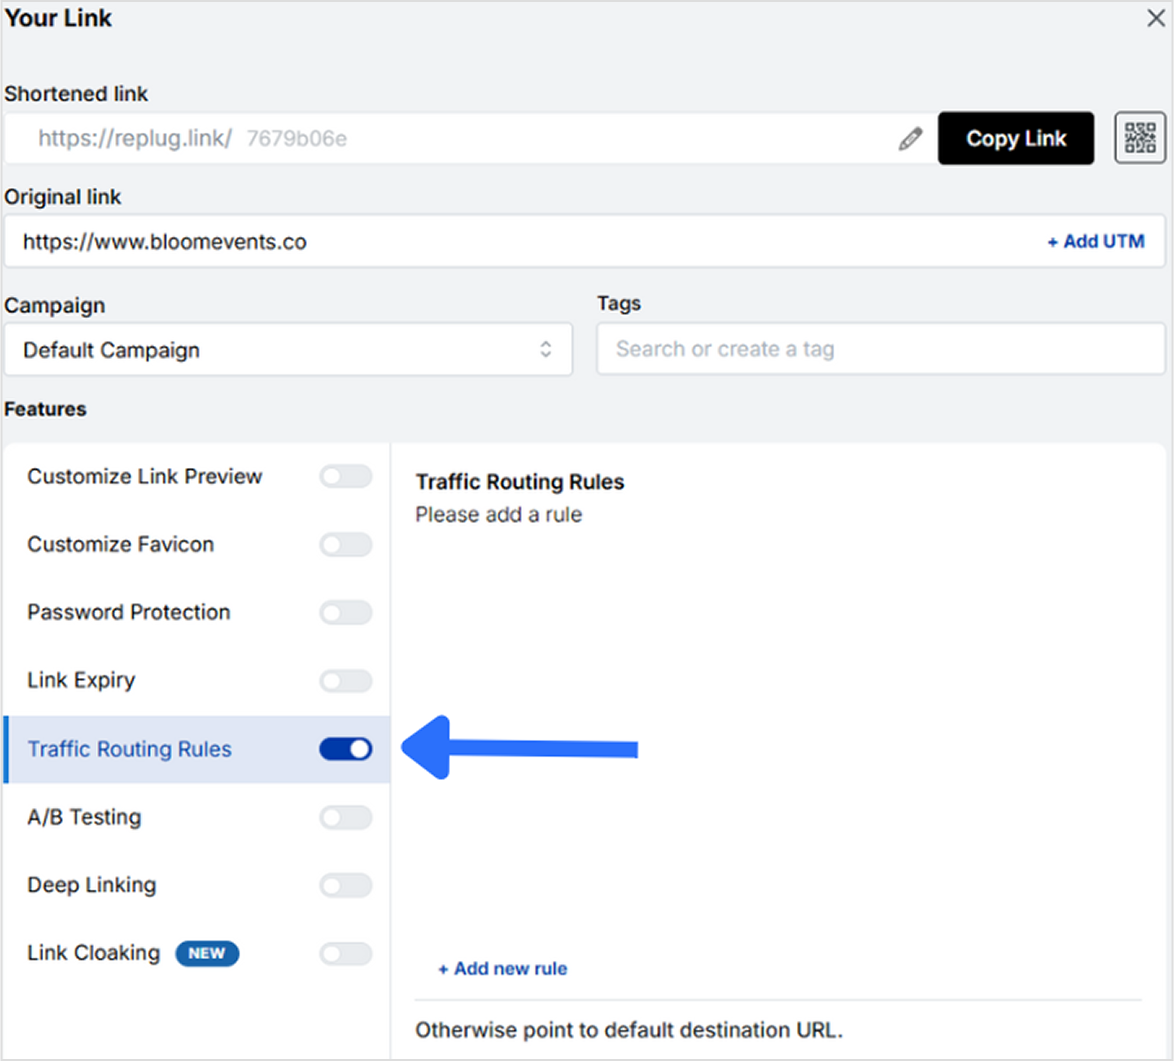
Once you’re on the main dashboard, paste your base URL into the “Quickly shorten your link” bar and hit Enter. Then, click on the “Traffic Routing” option to start setting up your rotating destinations.
Click on “+ Add New Rule” to open a new window.
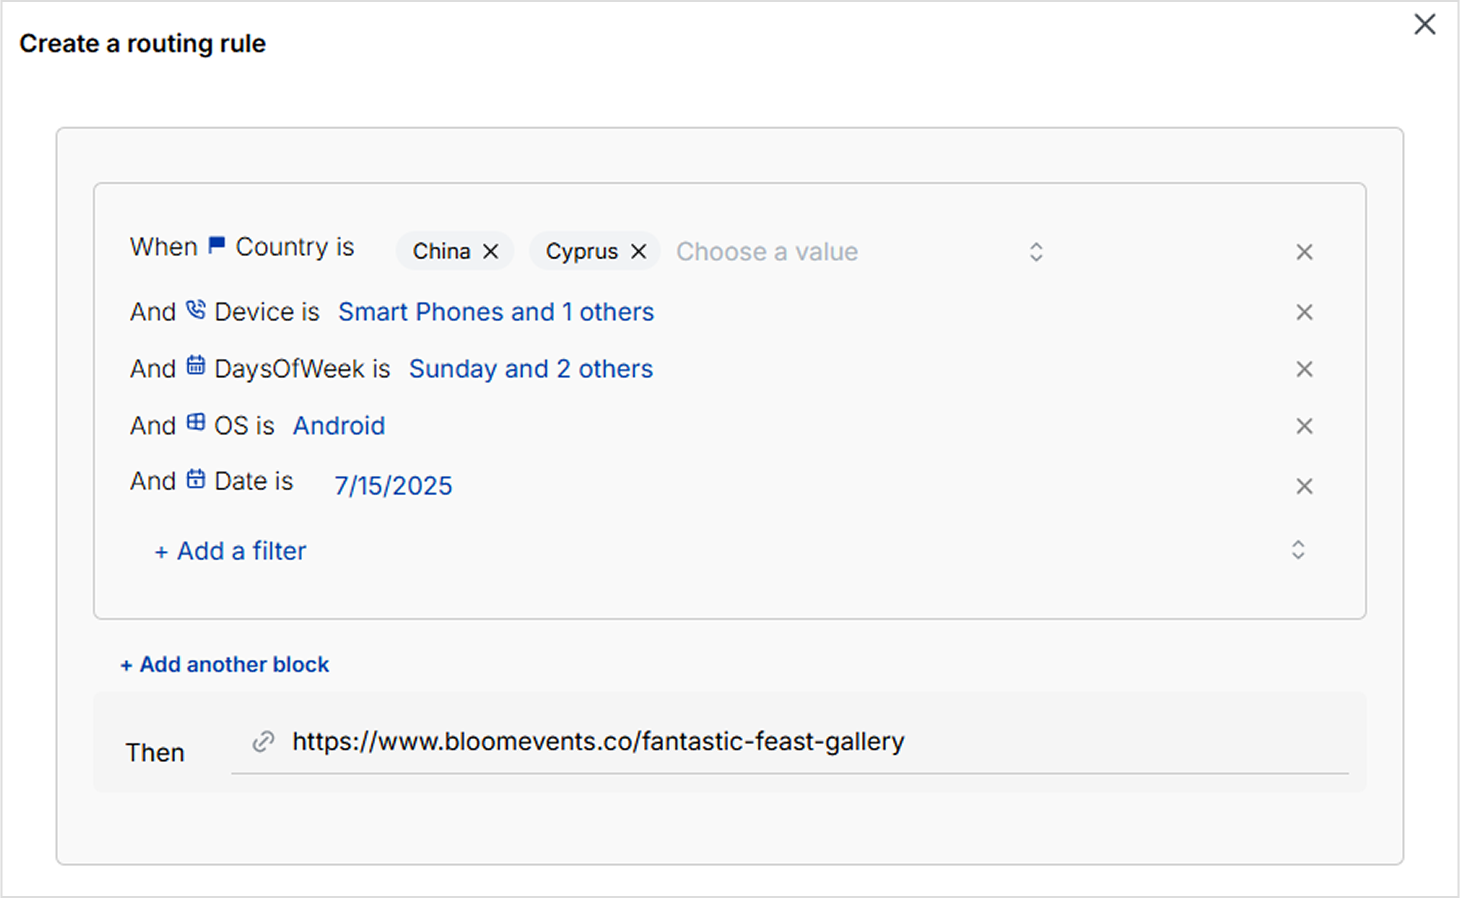
Step 3: Use Replug’s traffic routing feature
Here, you can define custom destination URLs based on filters like country, date range, device type, operating system, and more.
Replug allows you to add up to seven different destinations for a single short link.
Since it’s a dynamic QR code generator, you can update or change these destinations anytime, even after the QR code has been created.
Step 4: Generate a QR code for the short link
Once you’ve set up your random rotation link, head to the “QR code” tab in Replug. Click the small QR code icon next to your short link to generate your code.
They’re perfect for gamified experiences like “scan to win,” hidden discounts, or rotating messages.
They reduce costs and streamline workflows, especially for agencies managing multiple campaigns.
Tools like Replug offer detailed analytics, allowing you to track scans, devices, and user behavior in real time.
They work well in print media, one QR code on a flyer or package can serve fresh content over time.
They enhance the overall user experience by making interactions more dynamic, interactive, and memorable.
Final thoughts
Random QR codes have come a long way from basic functionality to becoming powerful tools for testing, marketing, and user engagement. With platforms like Replug, creating and managing these codes is not only simple but highly customizable and data-driven. Whether you’re looking to rotate links, run A/B tests, or craft interactive experiences, random QR codes offer the flexibility you need. And with Replug, you can do it all from one smart dashboard.
FAQs on random QR code
1. What is a random QR code?
A random QR code is a dynamic code that redirects users to different destinations with each scan. It can rotate between multiple URLs or display randomized content like discount codes, messages, or landing pages.
2. Can I control which links the QR code rotates between?
Yes. Replug’s traffic routing feature lets you manually set up to seven different destinations. Which can be shown based on rules like country, device type, etc.
3. Can I update the destination URLs after generating the QR code?
Absolutely. Since Replug generates dynamic QR codes, you can change, edit, or add new destinations anytime, without needing to reprint or redistribute the QR code.
4. Is the QR code trackable?
Yes. Every QR code generated in Replug is connected to a trackable short link. You can monitor scans, devices, locations, and other analytics from your dashboard in real time.
5. Can I add my brand’s logo or customize the QR design?
Definitely. Replug lets you fully customize your QR code’s style, color, frame, and logo. So it matches your branding and looks professional wherever it’s displayed.
6. Do I need a paid plan to use the traffic routing and QR code features?
Replug offers a 14-day free trial with full access to all features, including traffic routing and QR code customization. After the trial, these features are available on paid plans.
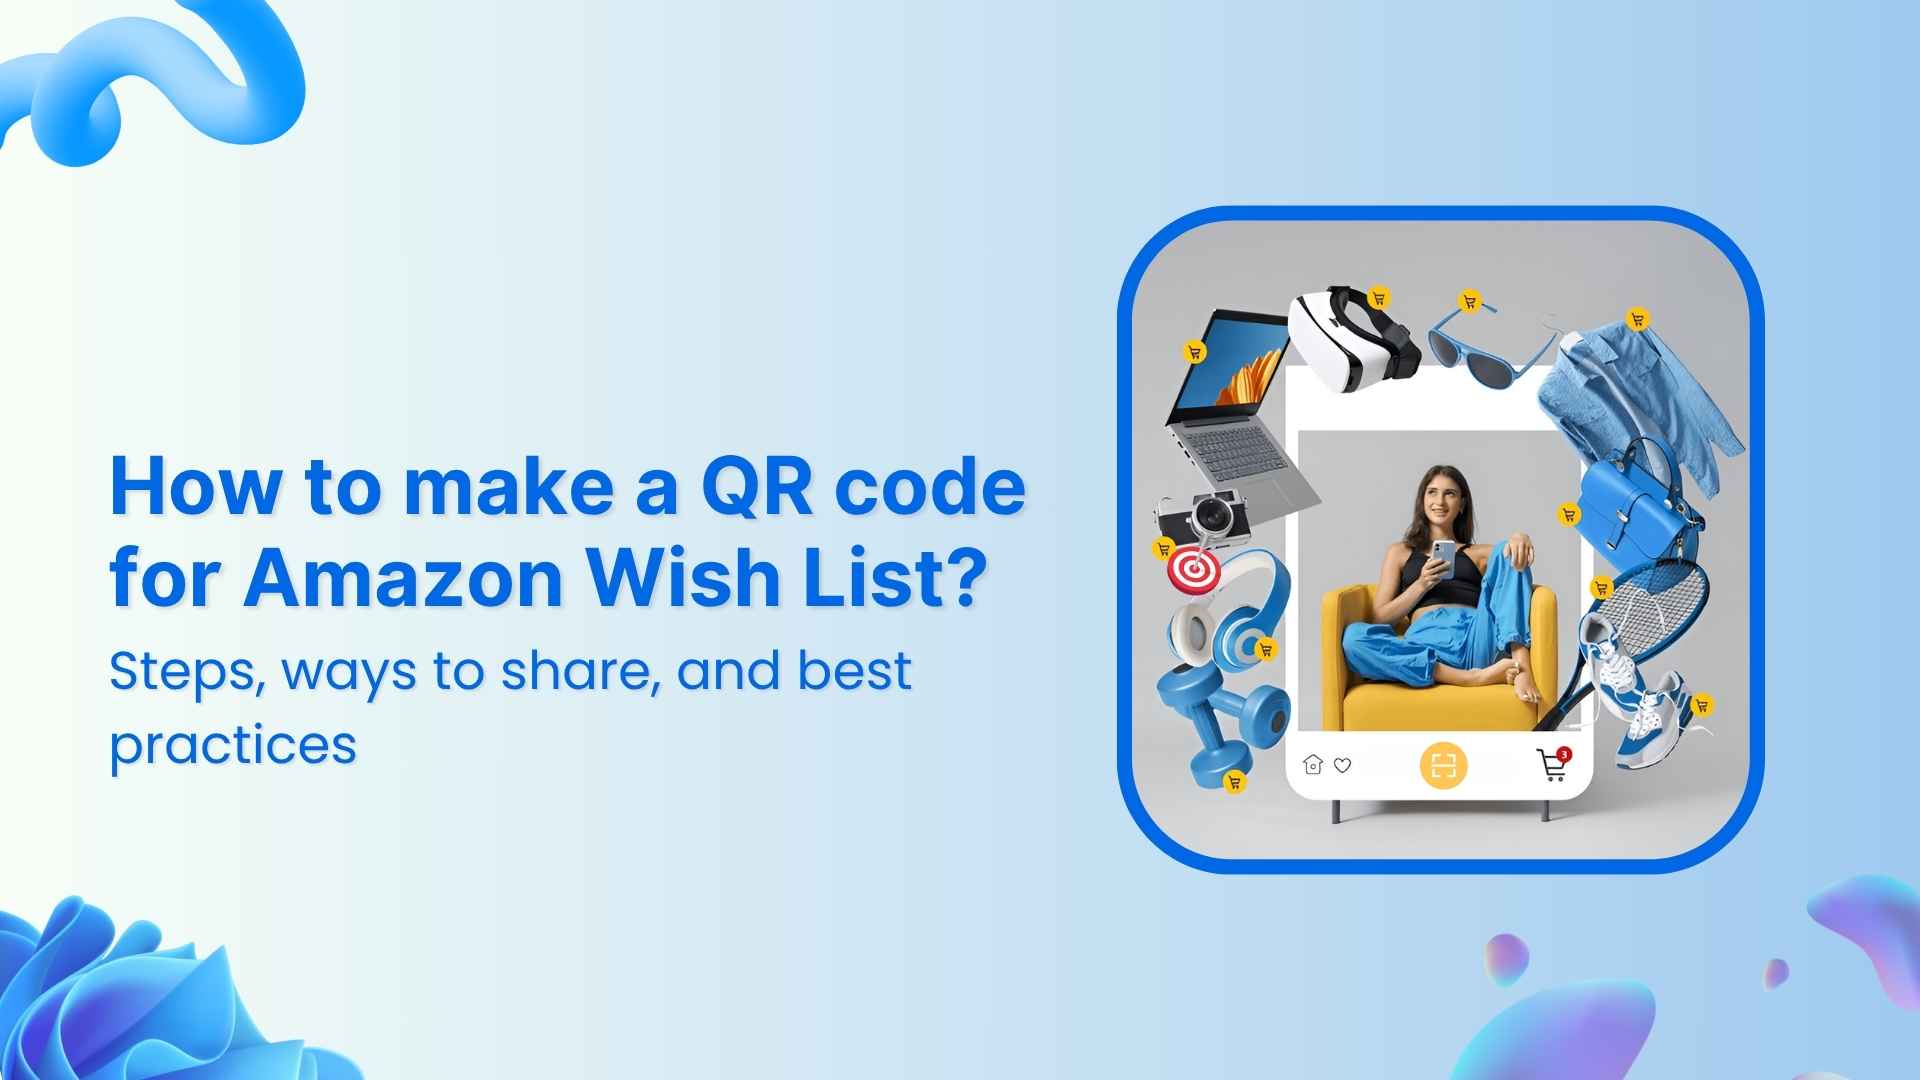
Amazon Wish Lists feel like mini mood boards for life’s special moments; from baby showers, to birthdays and weddings. Creating this Wish List is often the fun part; picking out things you love, imagining them in your life, and sharing that excitement with the people who care. But, sharing a messy Amazon Wish List URL into every invite or group chat? Not exactly pretty.
So, instead of sending long, clunky URLs, why not create a beautiful, scannable QR code your friends and family can use instantly? In this guide, you’ll discover how to make a QR code for Amazon Wish List with Replug so you can share your list easily, track its analytics, and keep it updated anytime. Let’s begin!
Maximize marketing ROI
by transforming ordinary URLs into branded short links that convert.
Try Replug for free
Why create an Amazon Wish List QR code
A Wish List isn’t just a list of things; it’s part of the excitement around big moments and small celebrations.
Creating a gift registry QR code means your guests, friends, or followers don’t have to copy-paste long URLs. Instead, they can scan and instantly see your Wish List from anywhere: wedding placards, baby shower invites, thank-you cards, or even an Instagram story. It’s the easiest way to make your Wish List feel modern, thoughtful, and completely your own.
With Replug, your QR code can be:
Dynamic, so you can change the destination URL of your Amazon Wish List anytime without needing to recreate or resend your QR code.
Branded, with your colors, logo, and style.
Trackable, so you know how many times it’s been scanned and from where.
Now, let’s move on to how you can make an Amazon Wish List QR code using Replug.
How to make a QR code for Amazon Wish List with Replug
Step 1: Find and copy your Amazon Wish List URL
First, you’ll need your Wish List link:
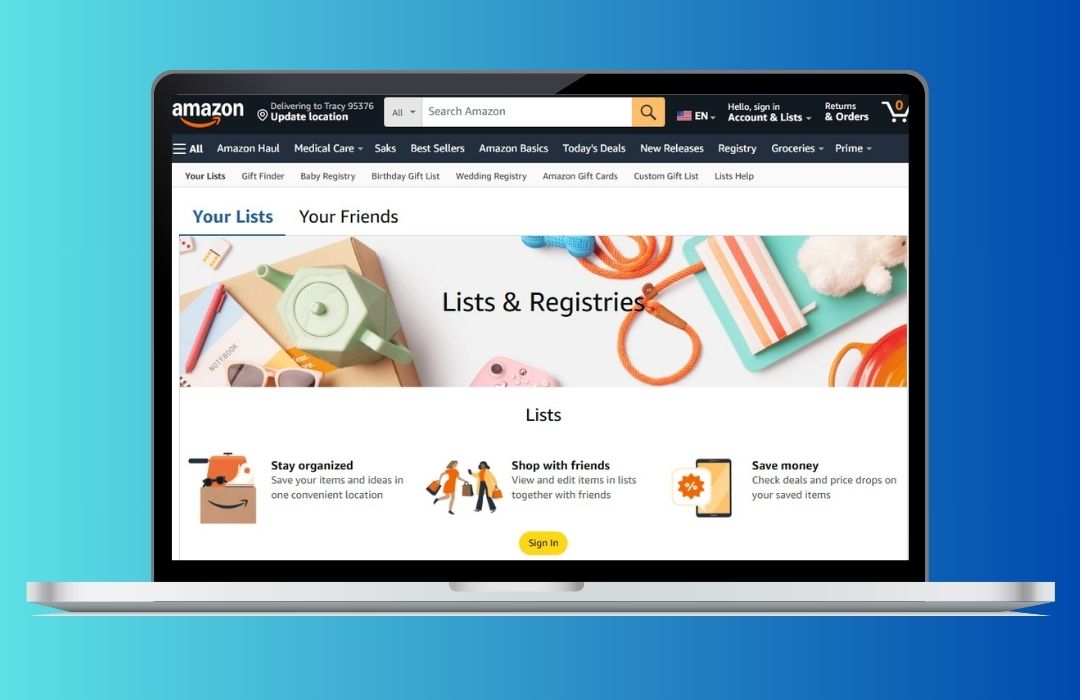
Log into Amazon and click ‘Accounts and Lists’ on the top right.
Pick ‘Wish List’ or ‘Your Lists’ to see what you’ve already created.
Choose permissions: View only (great for sharing) or Edit (if you want others to add items).
When you’re ready to share, simply click the “Invite” button at the top of your list. From there, you can copy the link directly or send it using the “Email” or “Text Message” options.
Tip: For smooth sharing, set your list to Public or Shared. Go to the three dots > Manage List to check this.
Step 2: Generate your Amazon Wish List QR code in Replug
Now for the fun part!
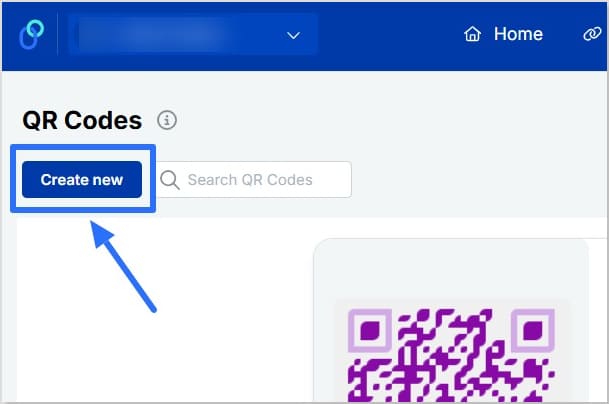
Sign in to the Replug app. If you don’t have an account, Sign up to get access to a 14-day free trial with full features
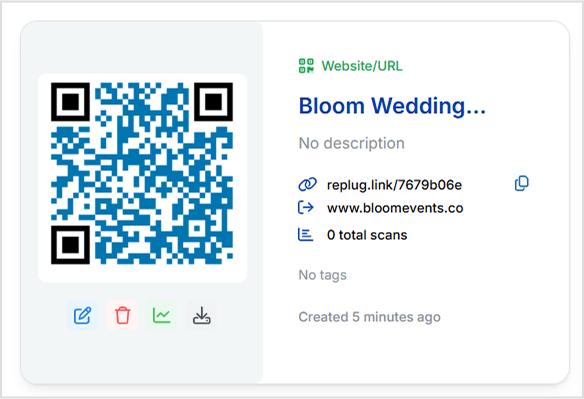
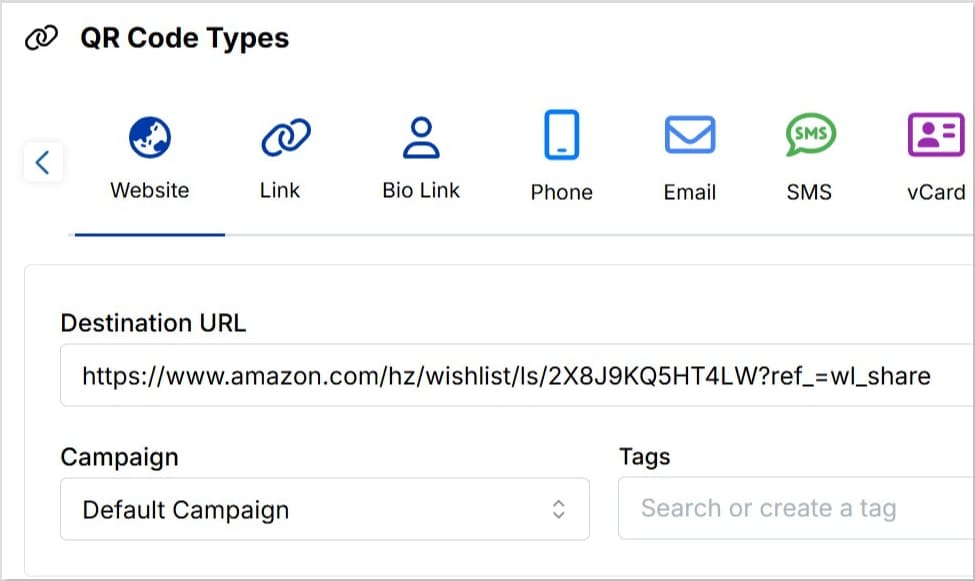
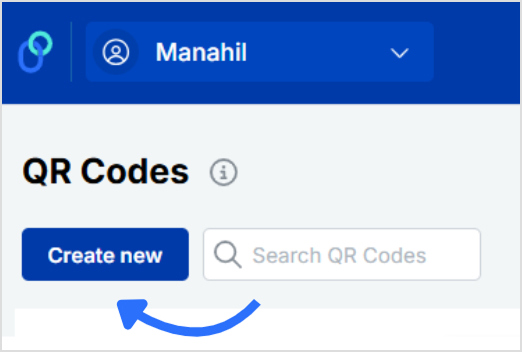
Click “QR Codes” on the left, then hit “Create new”
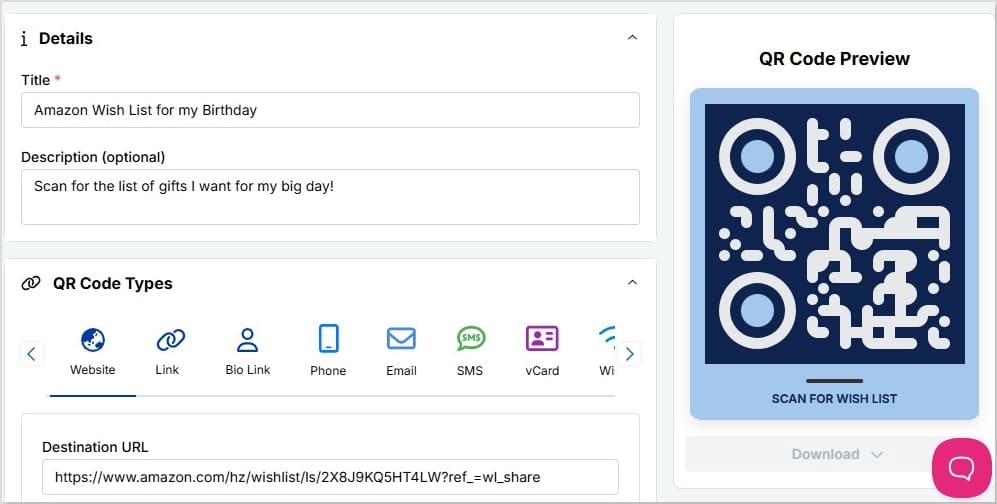
Add a title and description (optional) for your Amazon Wish List QR code
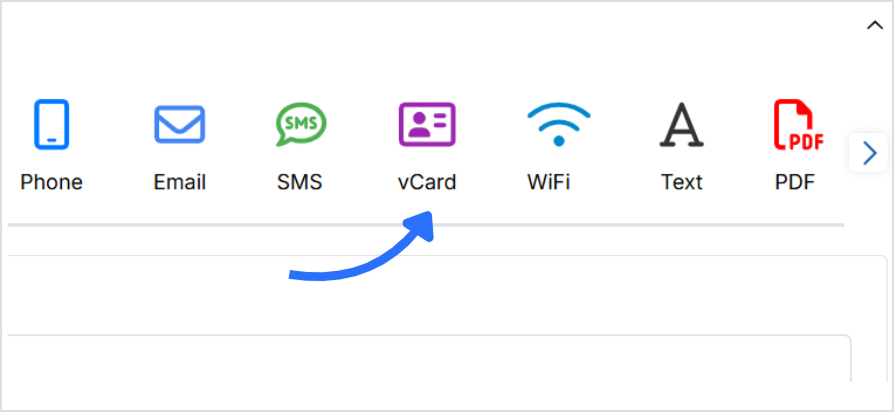
Choose “Website” as your QR code type and paste in your copied Amazon Wish List URL in the “Destination URL” bar
Connect it to a campaign if you want (optional)
In seconds, you’ve got the start of a Wish List QR code you can make uniquely yours.
Creative ways to share your Amazon Wish List QR code
Your QR code isn’t limited to invitations or cards. You can share it almost anywhere people already connect with you:
Print it on wedding invitations, baby shower cards, or birthday party stationery
Add it to thank-you cards, menus, seating charts, or event signage so guests can scan it right at the venue
Share it on Instagram stories, TikTok videos, or include it in your bio links so your Wish List is always one tap away
Include it in email newsletters, holiday e-cards, or digital announcements
Place it on packaging inserts if you sell products online. It can double as a gift registry or curated list
Try adding seasonal or event-specific Wish Lists with unique QR codes to keep things fresh
Tip: Adding a short caption like “Scan to view our Wish List” makes it clear what the code leads to, especially for guests who might not be used to scanning QR codes.
These small steps help your Wish List QR code feel personal, reliable, and easy for anyone to use, whether it be online or in print.
To wrap it up…
Your Amazon Wish List is about bringing people together to celebrate life’s moments, big and small. With Replug, you can easily learn how to make a QR code for Amazon Wish List, personalize it, keep it updated anytime, and see how people interact with it.
It’s a small step that makes sharing feel thoughtful, modern, and effortless.
FAQs for how to make a QR code for Amazon Wish List
Can I create a QR code for an Amazon Wish List?
Yes. Using a QR code generator like Replug, you can easily create a scannable code for your Amazon Wish List. Just copy your Wish List URL, paste it into the generator, and customize the design to match your style or event.
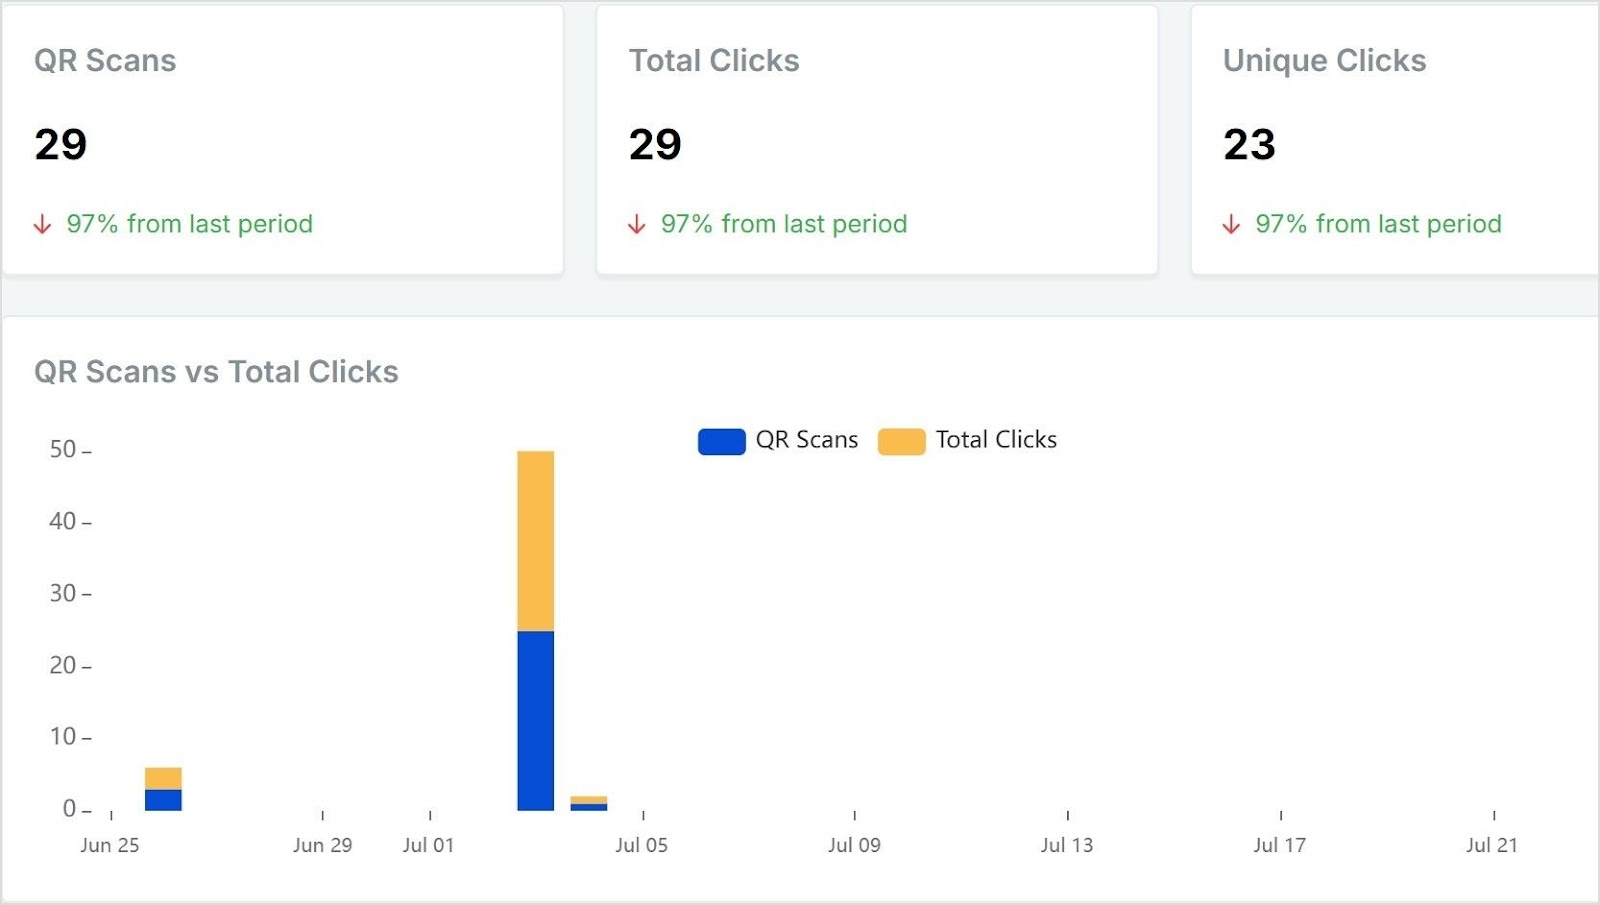
Can I track who scans my QR code?
You can’t see individual names, but with tools like Replug you can track total scans, unique scans, clicks, locations, devices, and referral sources. This helps you see which channels (like Instagram, email, or printed cards) bring the most engagement.
What if I add new items to my Wish list later?
As long as you keep the same Amazon Wish List URL, your QR code will still work. And if you create a new Wish List with a different URL, you can simply update the destination link if you’re using a dynamic QR code in Replug.
Where should I share my Wish list QR code?
You can print it on wedding or baby shower invitations, thank-you cards, event signage, menus, and packaging inserts. You can also share it digitally in Instagram stories, TikTok videos, bio links, email newsletters, or even as part of seasonal campaigns.
How do I create a link for my Amazon Wish List?
Go to Amazon, click “Accounts and Lists,” choose your Wish List, then select “Send List to Others.” Choose your sharing permissions, click “Copy Link,” and you’ll get a shareable Amazon Wish List URL.
How to find a Wish List on Amazon?
In Amazon’s menu, go to “Accounts and Lists,” then click “Your Lists” to see your own lists. To find someone else’s Wish List, go to “Find a List or Registry” and search by name or email if their list is set to public.
How to find someone else’s List?
In the “My Lists” section, you’ll find an option labeled “Find a List or Registry.” Just enter the person’s name to search. Or, you can ask your friends and family to share their list directly with you.
Artists and creators often need more than a simple link to share their work. That’s where a Spotify QR code comes in. It’s a quick, scannable way to connect audiences to playlists, albums, or podcasts.
In this step-by-step guide for Replug users, you’ll learn how to create, customize, and track a QR code that connects your audience directly to your Spotify content
Let’s tune in!
Maximize marketing ROI
by transforming ordinary URLs into branded short links that convert.
Try Replug for free
What is a Spotify QR code?
A Spotify QR code is a scannable code that links directly to any Spotify URL, such as a playlist, album, podcast, or song. Fans simply scan your code to access your content instantly, making it easier to share music anywhere, such as on posters, social media, websites, or even business cards.
Unlike Spotify’s built-in codes, Replug’s dynamic QR code for Spotify can be edited later and includes scan tracking, branding, and full customization options.
Why create a Spotify QR code with Replug?
Spotify has over 678 million users worldwide, and a QR code for Spotify bridges the gap between your online content and offline promotions. Replug makes it easy to create, customize, and manage your QR code with features like:
Don’t have one? Sign up to get a 14-day free trial with all our advanced features.
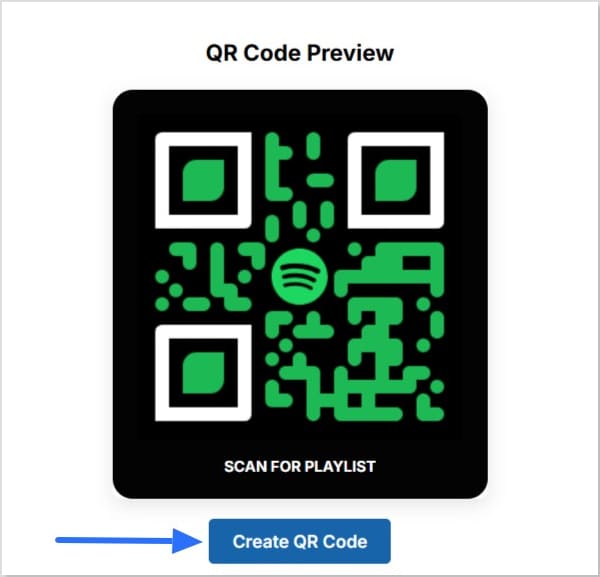
Step 3: Create a new QR code
Go to your Replug homepage.
Click on “QR Codes” from the navigation. From here, you’ll be led to your QR codes dashboard.
Once you’re in, click on the blue “Create new” button.
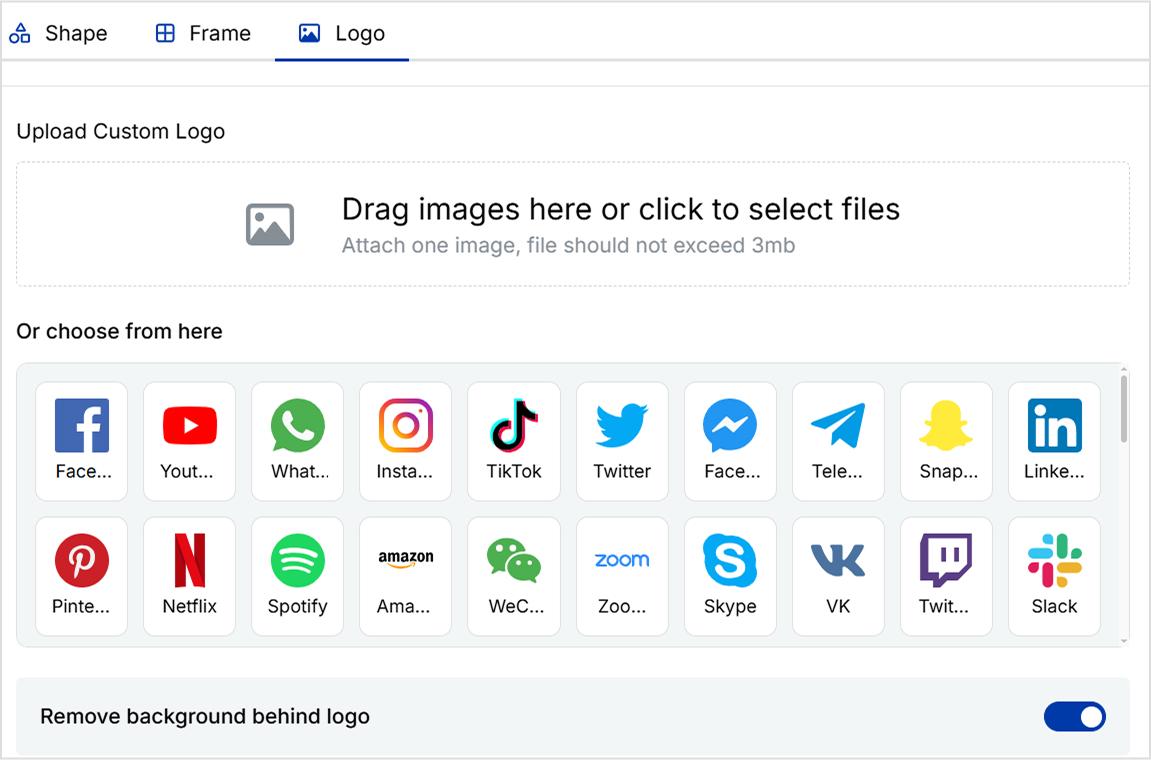
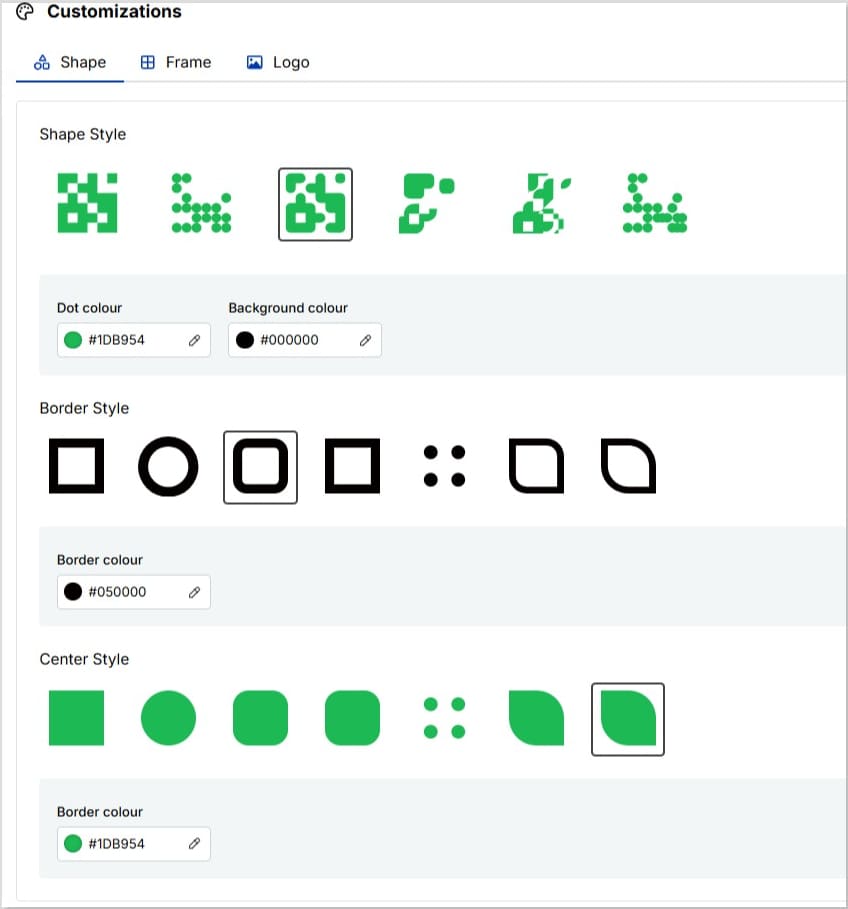
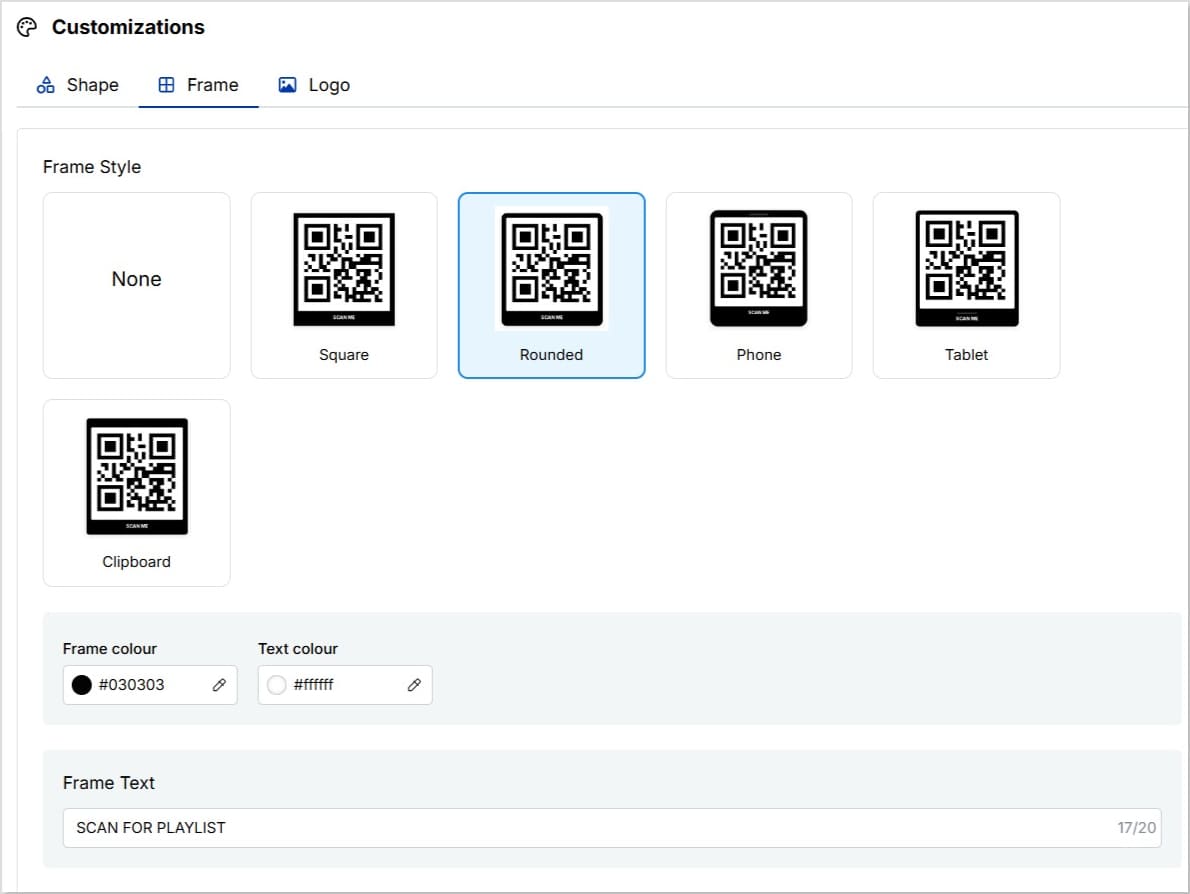
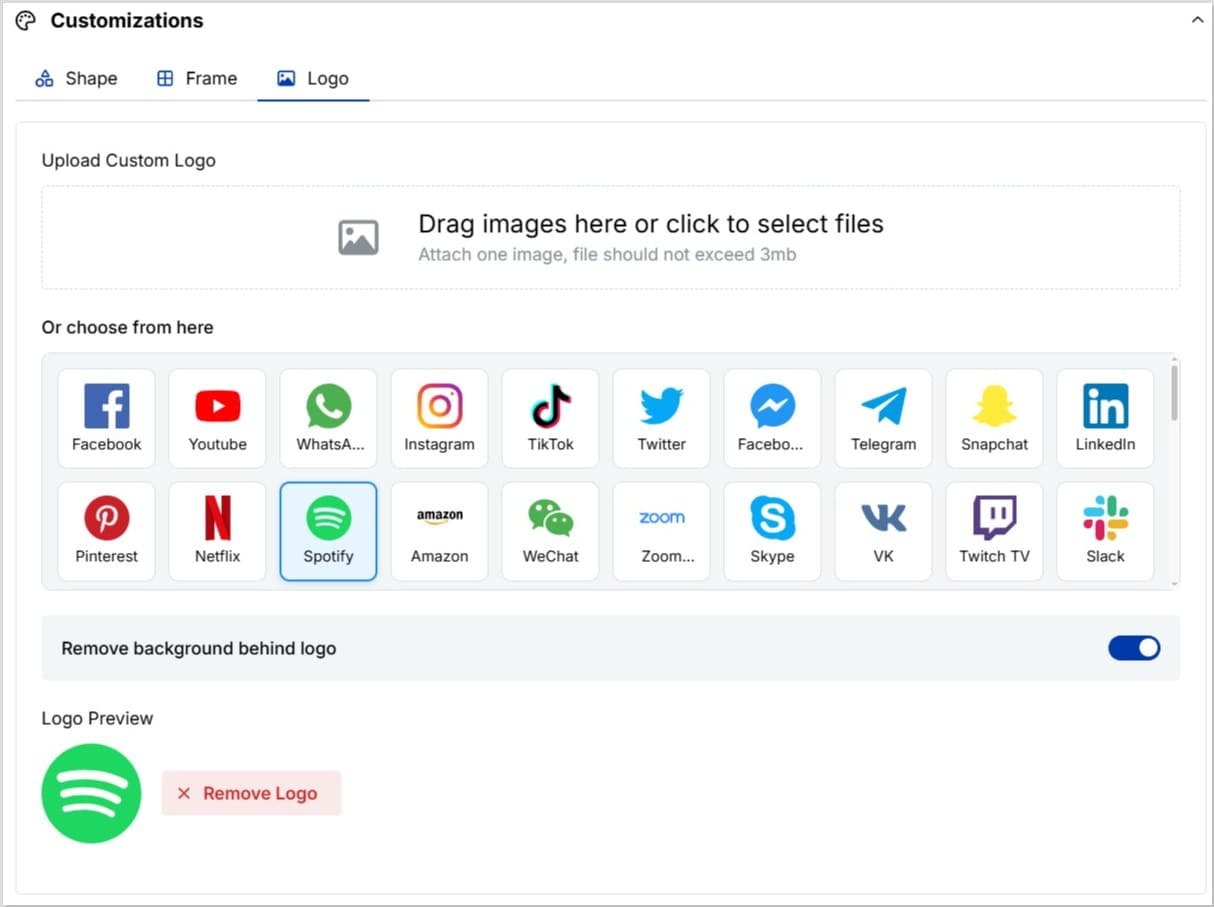
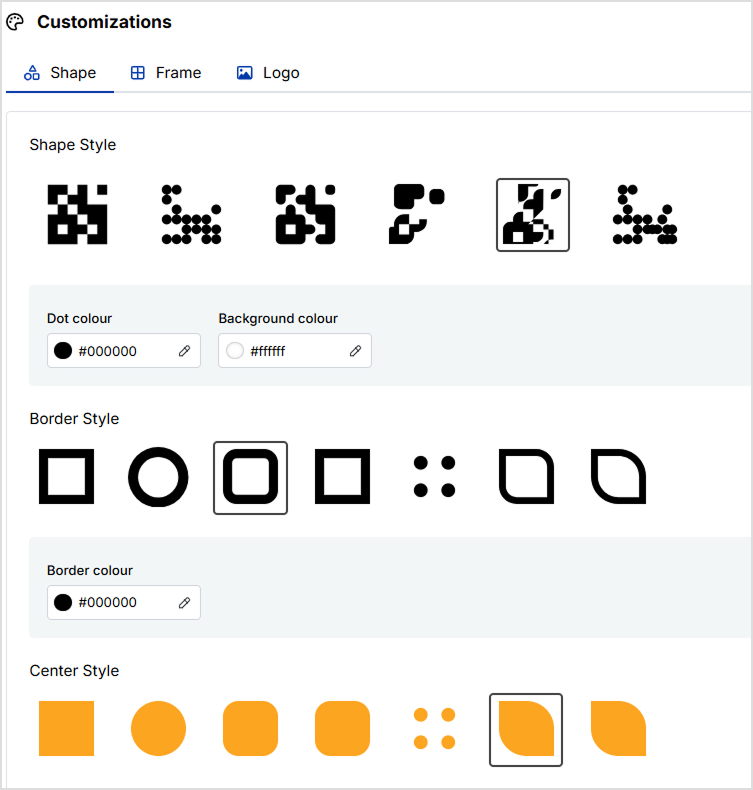
Step 4: Customize your QR code
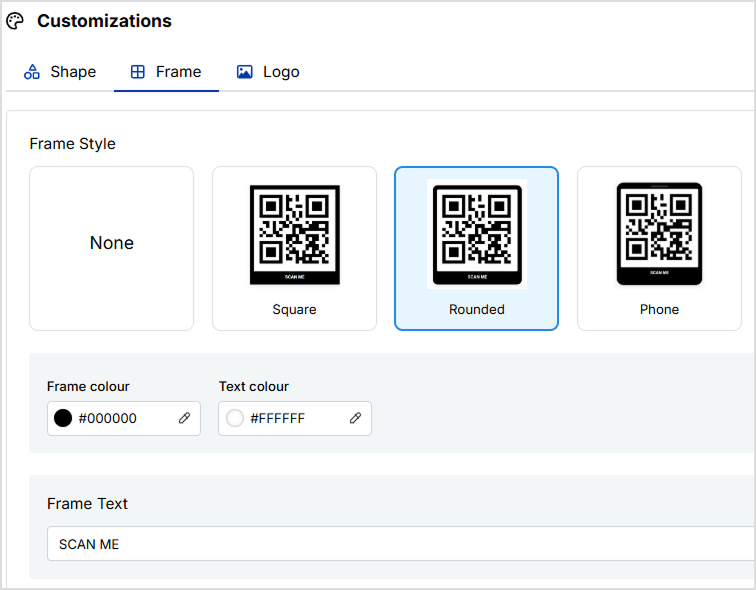
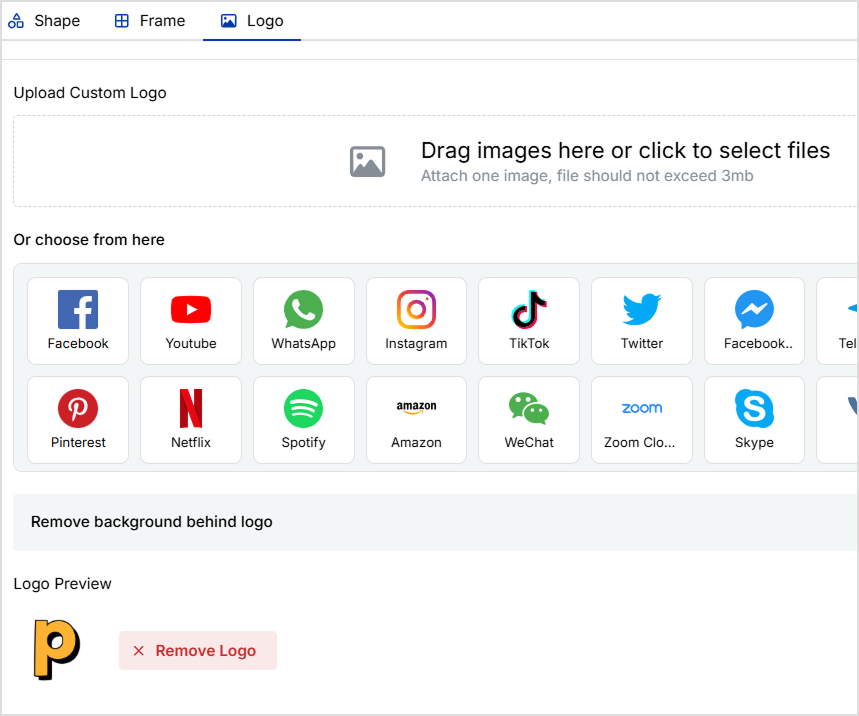
Replug gives you the option to customize the shape, frame and logo of your QR code. Here’s a quick snapshot of how many customization options you have:
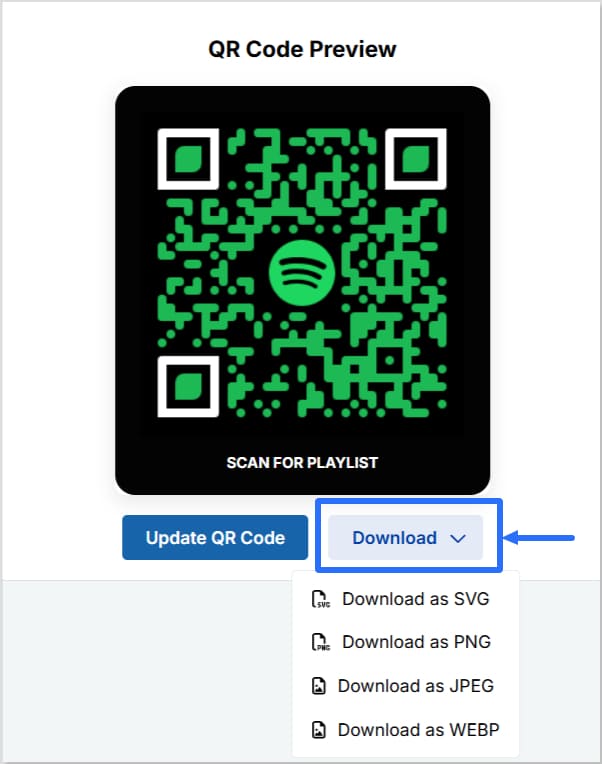
After creating your QR code, you’ll see the option to “Download”. Click on it to download your QR code for Spotify in either SVG, PNG, JPEG, or WEBP.
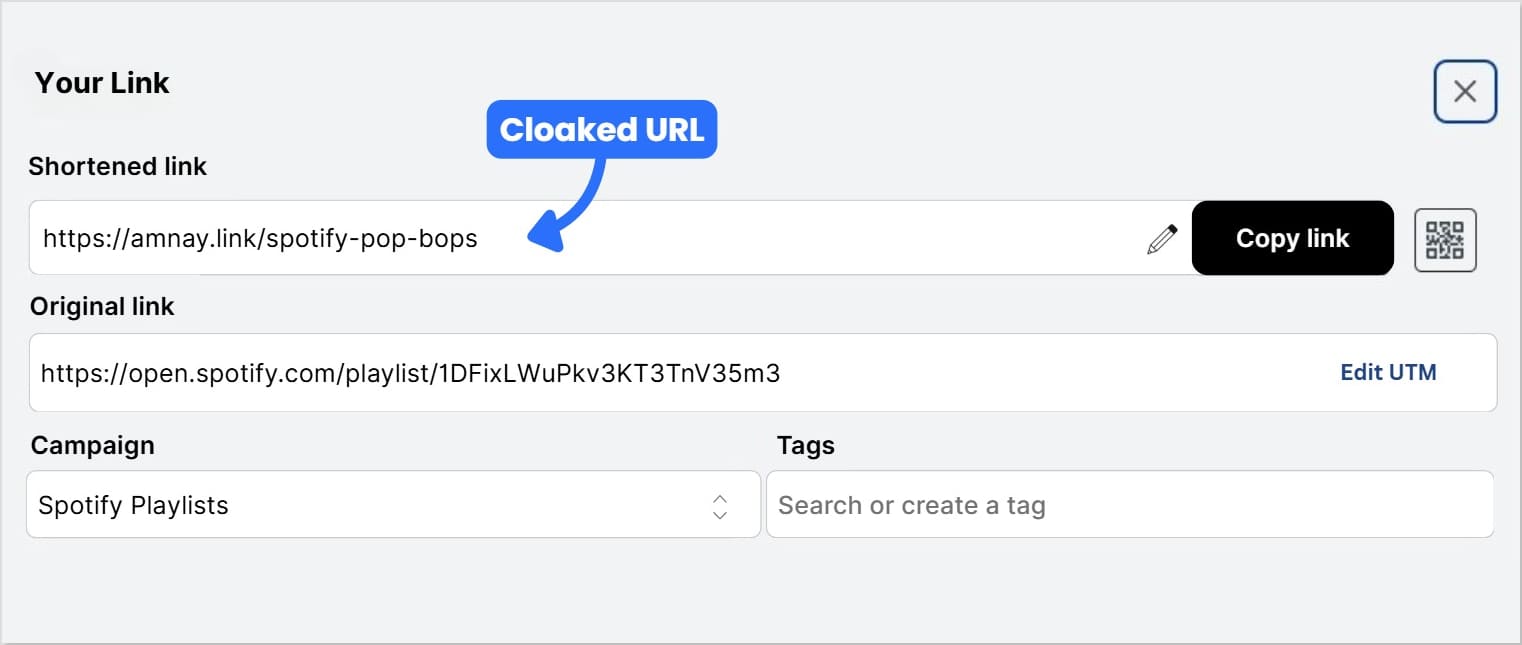
Step 6 (optional): Cloak your QR code
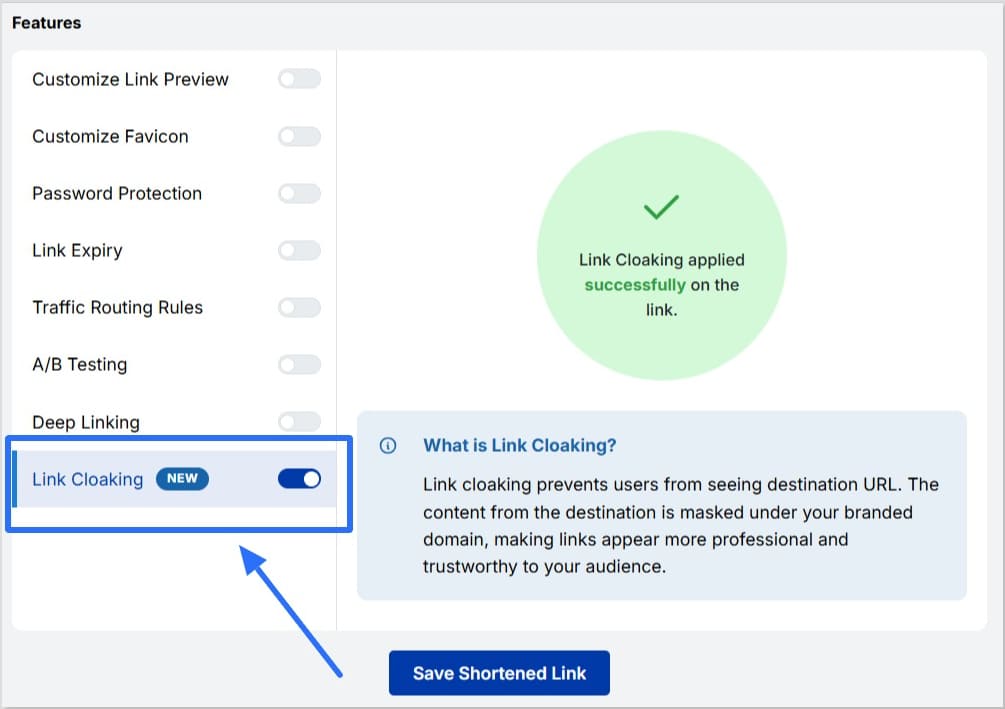
For cleaner, branded URLs, use Replug’s link cloaking feature. This hides the original Spotify URL behind your custom domain, making your QR code link look more professional and trustworthy.
First, go back to the Replug homepage and find the shortened link you just created in your list of recent links
From the three-dot menu under Action, click on Edit
Change the URL slug to something branded and memorable
Enable “Link Cloaking” to hide the original Spotify URL behind your custom URL
Save your shortened link. Now, each time someone scans your code, they’ll see your cloaked link in their browser
Track and optimize
Replug’s dynamic QR code isn’t just a design asset; it’s also a powerful link analytics tool:
Track scans in real time
See when and where your QR code was scanned
Identify devices and locations that bring the most traffic
Use these insights to refine your campaigns and enhance engagement; whether you’re using a Spotify playlist QR code, Spotify song QR code, or a QR code to promote your concert.
Benefits of using Replug
Here are the benefits that make Replug’s QR code generator the best choice for creators and marketers alike:
Share playlists, podcasts, albums, or even a single track effortlessly
Edit Spotify links anytime without reprinting your QR code
Customize your code to match any campaign: colors, logos, and call-to-action
Reach offline listeners at events, gigs, or retail stores
Measure ROI with detailed scan tracking and performance data
It’s an easy way to promote music with a QR code and use QR code marketing for musicians to grow your audience.
A complete link management solution
for marketing professionals & agencies.
Try Replug for free
Best practices
Use high-contrast colors to ensure your code scans quickly
Keep the printed size at least 3 × 3 cm for clarity
Add a clear call-to-action like “Scan to Listen!”
Track scans and adjust your marketing strategy over time
By following these tips, your code will not only look professional but also perform better, helping you connect with more listeners wherever they are.
Spotify QR codes wrapped
A Spotify QR code is more than just a shortcut; it’s a smart, scannable bridge connecting your audience directly to playlists, albums, podcasts, or songs. With Replug, creating a QR code for Spotify becomes an easy, flexible, and trackable process.
From designing a fully branded code to cloaking your link and measuring real-time scans, you’re equipped to take your music or podcast promotion further; online, offline, and everywhere in between.
What is the difference between “Spotify Codes” and a Spotify QR code?
Spotify Codes are a built‑in feature from Spotify that lets users share and discover content easily within the app. A Spotify QR Code (like the one you create in Replug) is a standard QR code that anyone can scan using any camera or QR scanner.
How to make a Spotify Code?
Inside the Spotify app, tap the three dots next to any song, playlist, album, or podcast. You’ll see a code displayed below the artwork. Friends can scan this code within the Spotify app to access the content directly.
Can you create a QR code for Spotify?
Yes. With tools like Replug, you can turn any Spotify link, whether it’s a playlist, album, podcast, or song, into a scannable QR code. These codes can be customized, tracked, and shared anywhere online or offline.
How do I create a QR code for a song?
Copy the Spotify link for the song you want to share. Then, use Replug’s QR code generator: paste the link, customize the design, and download your QR code. You can then use this code on posters, social media, business cards, and more.
How do I find my QR code for Spotify?
In the Spotify app, go to the content you want to share, tap the three dots, and the Spotify Code will appear under the cover image. If you’ve created a QR code with Replug, you can find it in your Replug dashboard under your recent links.
Can I track how many people scanned my Spotify QR code?
Yes, if you use Replug to create a dynamic QR code. You’ll get detailed analytics like total scan and unique scans from different locations, browsers, referrals, and device types. “Spotify Codes” not offer this tracking feature.
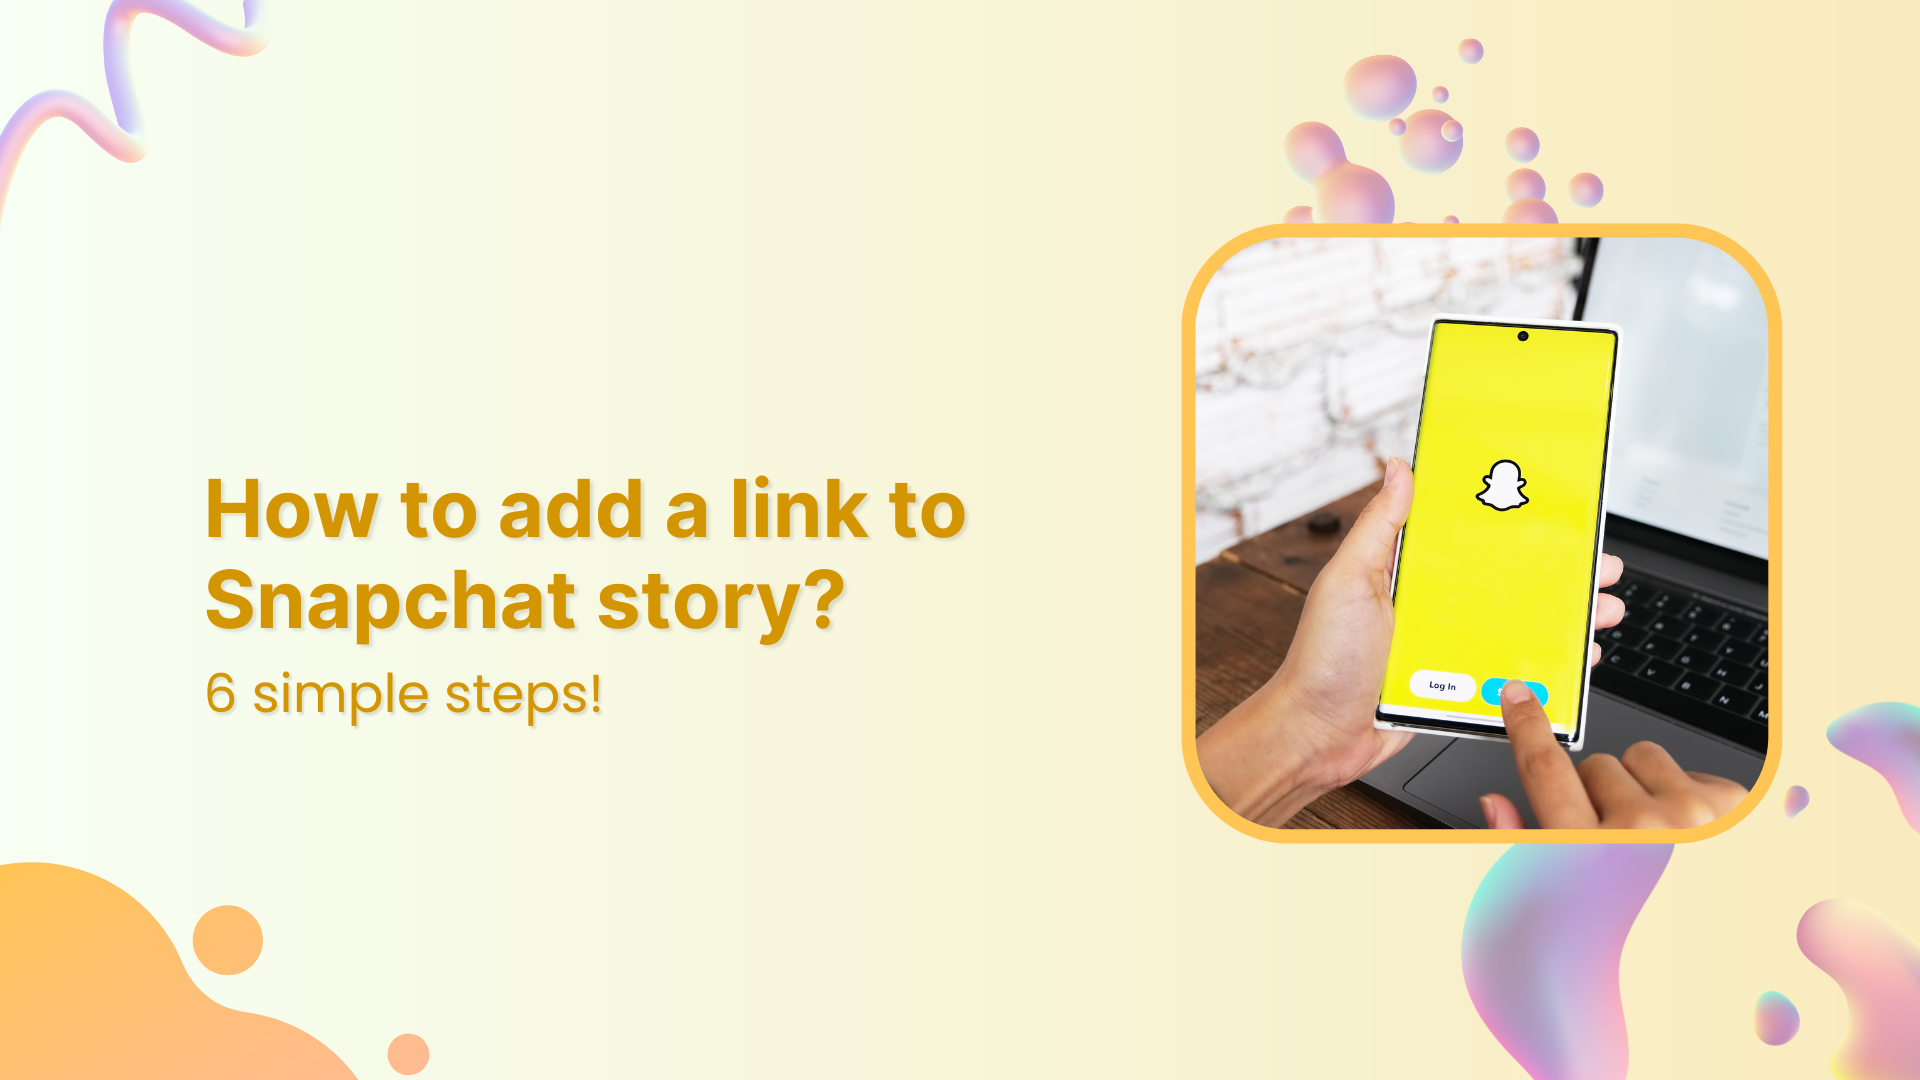
Snapchat isn’t just about sharing photos and videos anymore; you can now attach a link to a Snap and easily direct your friends and followers to external content. Thanks to the Snapchat linking feature, sharing a website, article, or even a funny meme right inside your snaps and stories has never been simpler.
In this guide, we’ll walk you through how to add a link to Snapchat story and snaps on both iOS and Android. By the end, you’ll know exactly how to attach a clickable link on Snapchat and let your friends swipe up on Snapchat to visit your shared content.
Follow along with the steps below to start sharing your favorite websites and content in no time!
Maximize marketing ROI
by transforming ordinary URLs into branded short links that convert.
Try Replug for free
How to add a link to Snapchat story: iOS and Android
Adding a link to your Snapchat snaps and stories is a great way to share a website on Snapchat and engage your followers.
Note: Screenshots are provided for the Android version, but iOS users should be able to follow along.
Here’s a step-by-step guide on how to do it:
Step 1: Open the Snapchat app on your iOS or Android device.
Step 2: Take a photo or film a video snap using the main camera tab or by uploading a photo/video from your device. Apply filters, stickers, emojis, text, or drawings to your snap as desired.
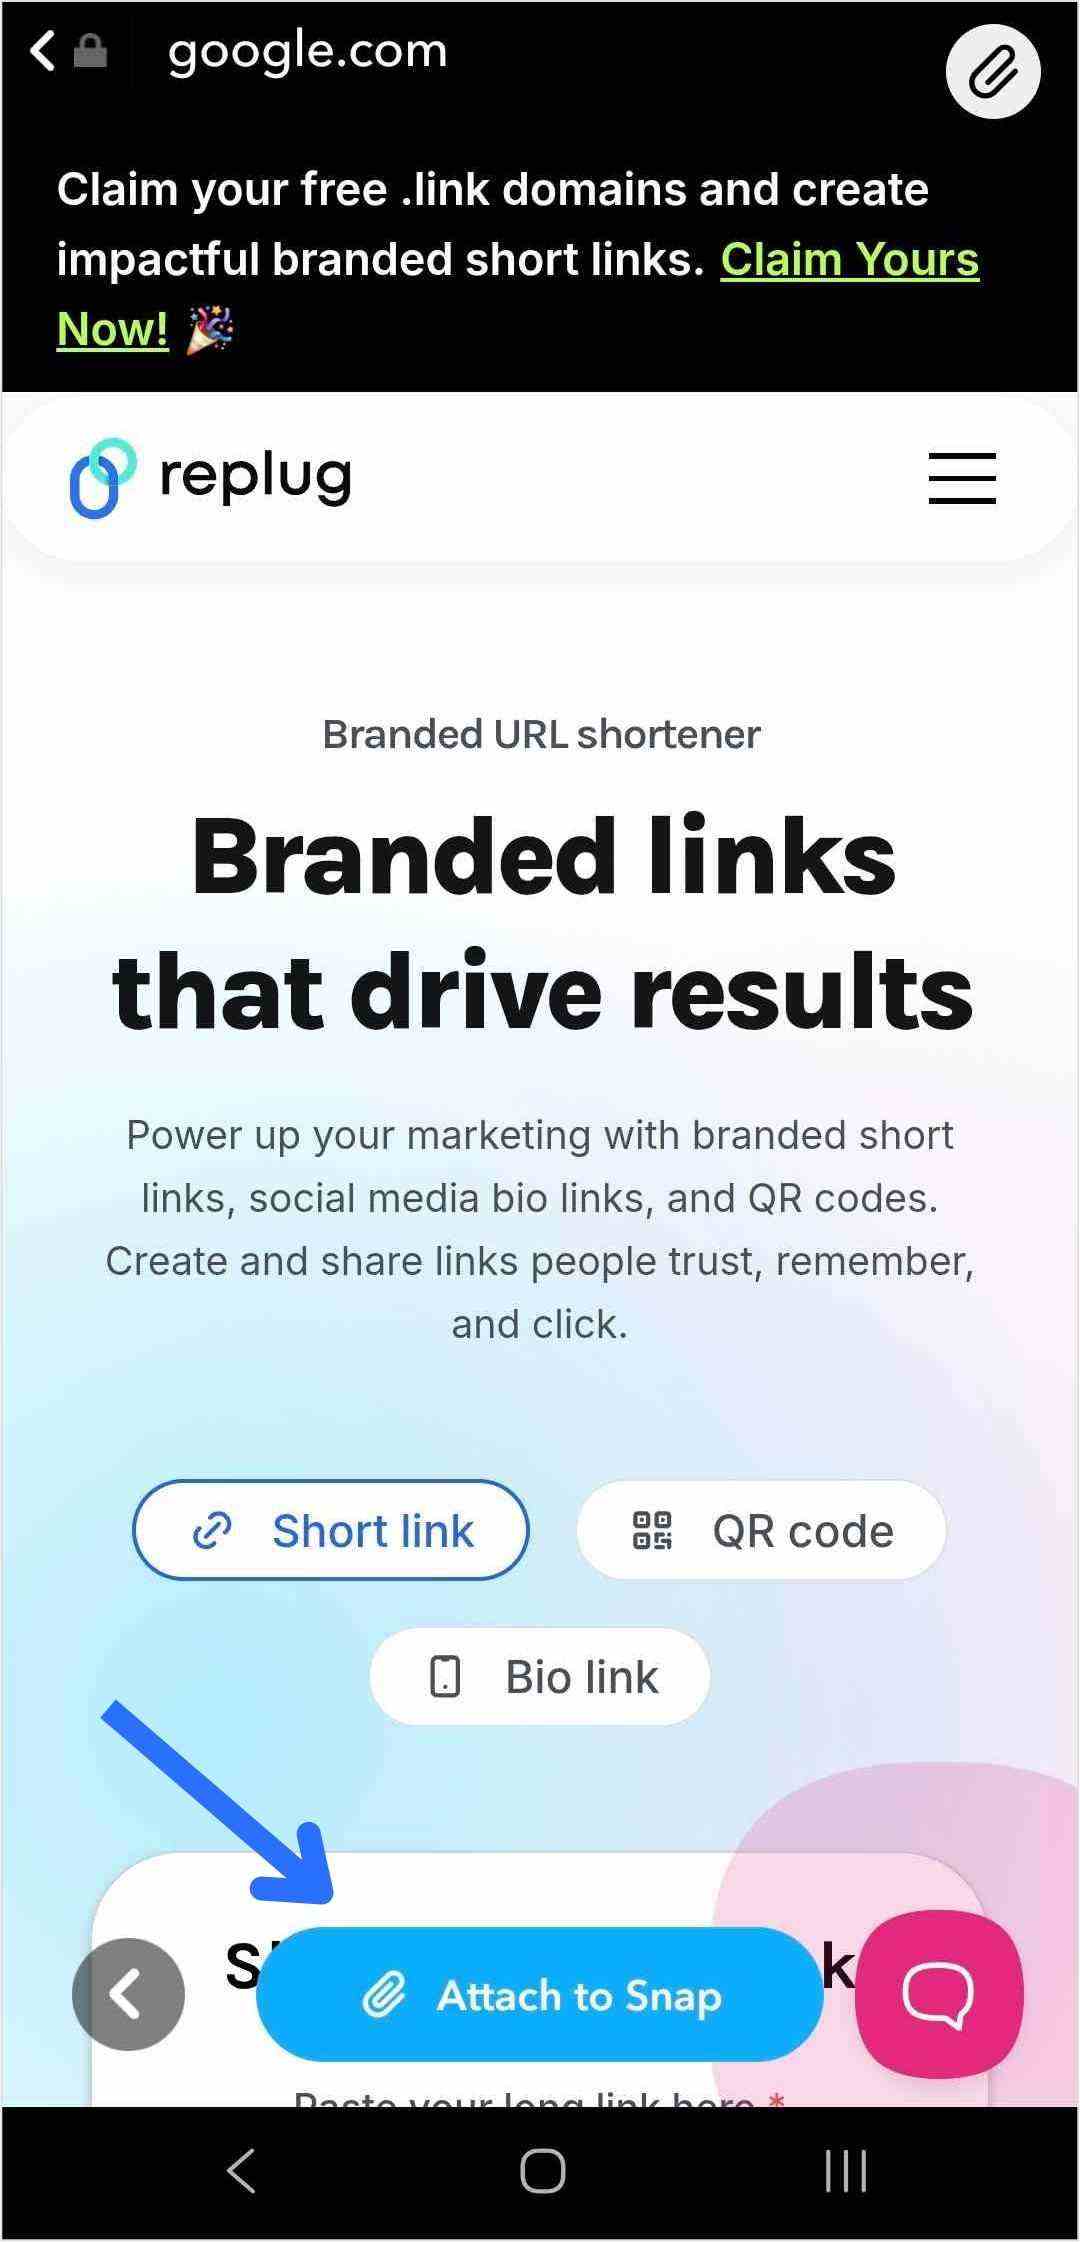
Step 3: Tap the Snapchat paperclip icon in the menu on the right to attach a link to Snap.
Tip: If the link is too long to type, copy it from your browser or another app before coming back to Snapchat.
Step no 4: Paste the link into the “Type a URL” field and tap “Attach to Snap.”
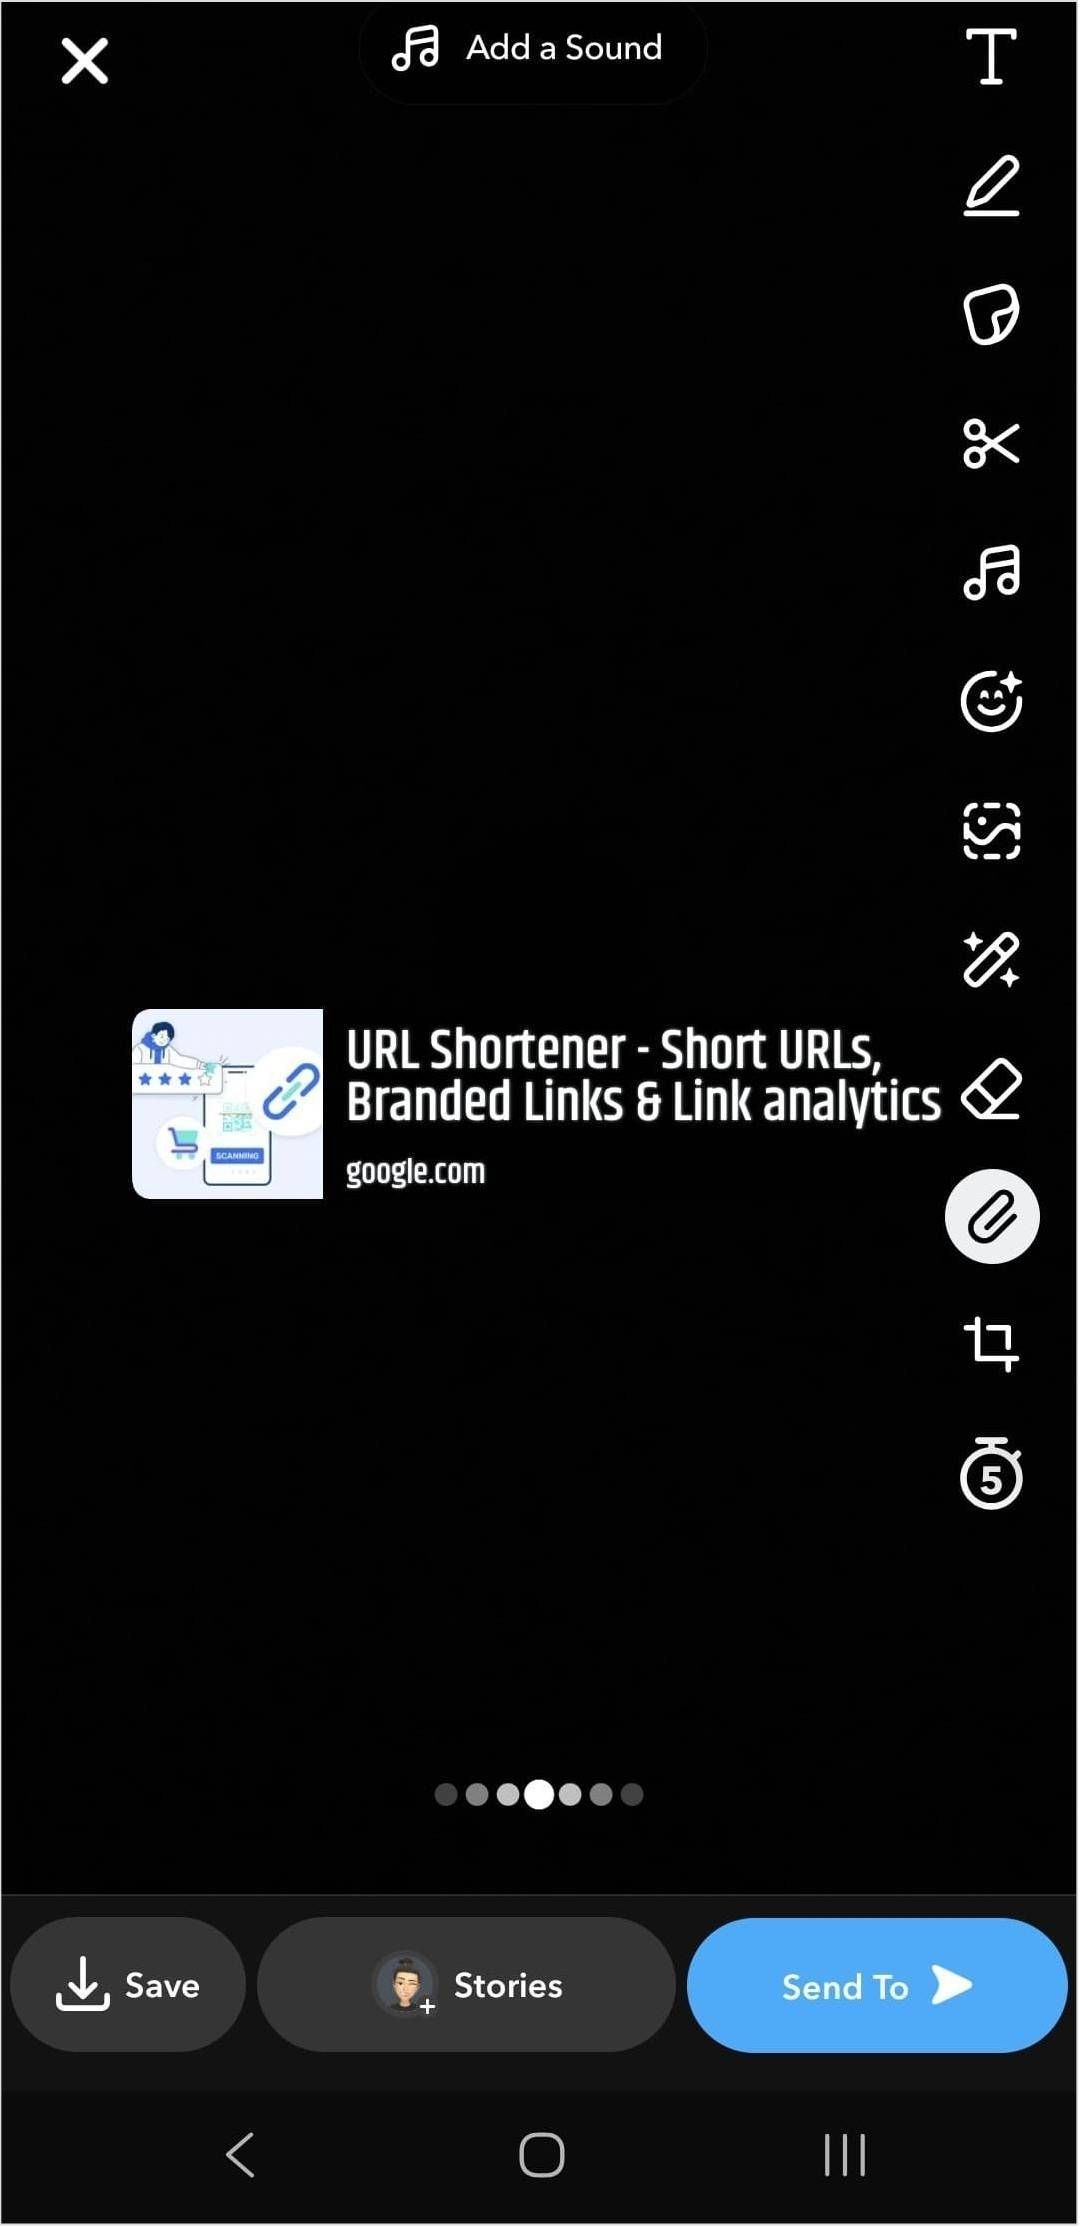
Tip: Attaching a link to your Snap is just the first step. To drive traffic and get people to swipe up, dress up your snap! Use music, effects, emojis, and text to make your story more appealing and clickable.
Step 6:Tap the blue arrow to send your snap to friends, or tap the story button to add a link to your Snapchat story.
That’s it! Now your viewers can swipe up on Snapchat to visit the link directly.
A complete link management solution
for marketing professionals & agencies.
Try Replug for free
How brands can leverage Snapchat links?
Snapchat has approximately 460 million daily active users, making it a valuable platform for brands to effectively reach their target audience. Using the Snapchat linking feature is a smart way for brands to maximize engagement and guide followers to key content. Features like Snapchat Planets also offer brands new ways to understand user interactions and strengthen their community.
Here’s how brands can make the most out of their Snapchat link:
Control and direct traffic
By adding a Snapchat link, brands gain control over where their followers go next after swiping up on a snap. Whether directing users to the homepage, a specific product page, or a demo page, brands can guide their audience’s journey within the app.
Gain insights with powerful analytics
Each swipe up on Snapchat gives valuable engagement data. Analyzing these interactions enables brands to better understand the audience’s behavior and preferences, allowing for more targeted marketing strategies.
Utilizing tools like Replug not only shortens links but also provides valuable insights into user engagement and the effectiveness of different types of content. By tracking click data and analyzing other metrics, brands can refine their marketing initiatives and optimize their Snapchat presence.
Using a link shortener
Using a link shortener like Replug can streamline the process of sharing links on Snapchat. Shortened links are cleaner and take up less space, making them more visually appealing and easier for users to engage with.
A complete link management solution
for marketing professionals & agencies.
Try Replug for free
Craft comprehensive social media strategies
Maximizing the use of Snapchat features, including links, is crucial for developing a robust social media strategy. Brands that harness the full potential of Snapchat links can initiate conversations, explore relevant topics, and expand their reach to a wider audiences.
FAQs on how to add a link to a Snapchat story
How do I attach a link to Snap?
Tap the paperclip icon on the preview screen
Add your link — paste a copied URL, type one manually, or search for it
Then tap “Attach to Snap”
Can I add multiple links to a single snap or story?
Currently, Snapchat only allows you to attach one link per snap or story. If you want to share multiple links, consider creating a series of snaps or stories.
Where is the paperclip icon on Snapchat?
It’s on the preview screen after you take a snap, in the vertical toolbar on the right side. Just tap the paperclip icon to attach a link to your snap.
Are there any restrictions on the type of content I can link to on Snapchat?
Snapchat’s community guidelines prohibit linking to certain types of content, such as illegal or explicit material. Ensure that the content you link to complies with Snapchat’s guidelines to avoid any issues.
Do users need to have the Snapchat app installed to view the linked content?
Yes, users need to have the Snapchat app installed on their devices to view linked content. When they swipe up on the link, it will open within Snapchat’s in-app browser.
Can I track engagement with the links I share on Snapchat?
While Snapchat does not provide built-in analytics for links shared on the platform, you can use link-shortening services like Replug to track clicks and engagement.
Do links expire on Snapchat?
Links attached to snaps or stories do not expire on Snapchat. However, you can remove a link anytime by editing the snap or story.
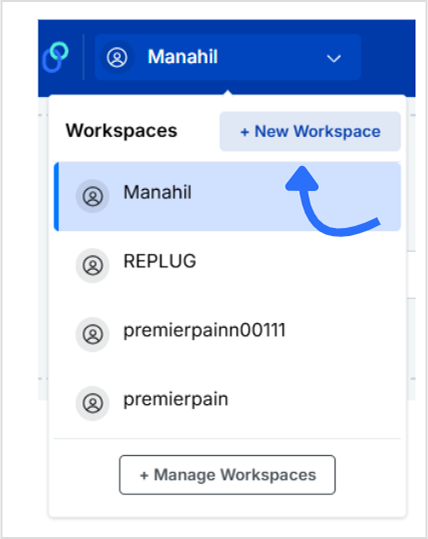
Today, we’re here with another guide, showing you how to create a workspace in Replug.
Replug’s workspace feature makes it super easy to keep everything organized. You can manage links, retargeting pixels, CTA campaigns, and team members, all in one place, without any mix-ups.
Each workspace acts like a separate space for a brand or project, so you stay focused and clutter-free. In this guide, we’ll show you how to create a workspace in just a few easy steps. Let’s get started!
A complete link management solution
for marketing professionals & agencies.
Try Replug for free
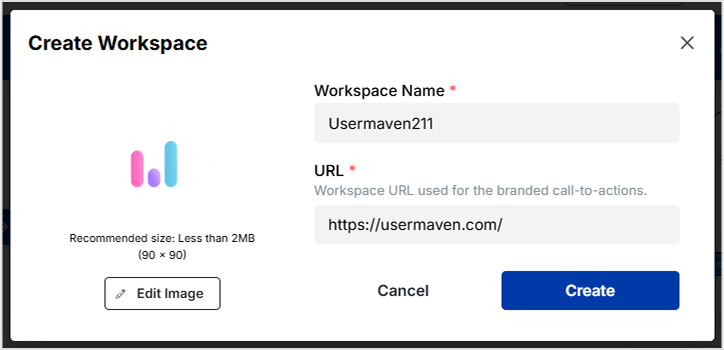
Invite team members (optional)
After creating your workspace, you can:
Add team members with different roles (admin, editor, viewer)
Grant access to only this specific workspace, great for clients or departments
Why use multiple workspaces?
Client separation: Avoid mixing links, campaigns, and analytics across different clients.
Team permissions: Assign specific access levels and keep internal processes secure.
Cleaner dashboard: Stay organized with clearly labeled, focused workspaces.
Scalability: Easily handle multiple projects, brands, or departments under one Replug account.
Final thoughts
Creating a workspace in Replug takes just a minute, but can massively improve how you manage your marketing tasks. Whether you’re running a solo project or handling multiple clients, workspaces keep things simple, secure, and scalable.
FAQs on Replug workspace
1. What is a workspace in Replug?
A workspace in Replug is a dedicated space where you can manage everything related to a specific project, brand, or client, including links, pixels, bio-links, campaigns, and team members, without mixing it with other workspaces.
2. Can I create multiple workspaces under one Replug account?
Yes! Replug allows you to create and manage multiple workspaces under a single account, making it ideal for agencies, marketing teams, or freelancers handling multiple clients or projects. Check the pricing page and choose teh required plan.
3. Do team members have access to all workspaces?
No. You can choose which team members have access to specific workspaces. This helps you maintain privacy and control while collaborating with clients, departments, or external partners.
4. Can I brand each workspace differently?
Absolutely. Each workspace can have its own name, logo, custom domain/subdomain, and campaign settings, so you can tailor the experience for each brand or client.
5. Will deleting a workspace remove all its data?
Yes. Deleting a workspace will permanently remove all its associated data, including links, campaigns, and analytics. Make sure to back up anything important before deleting.
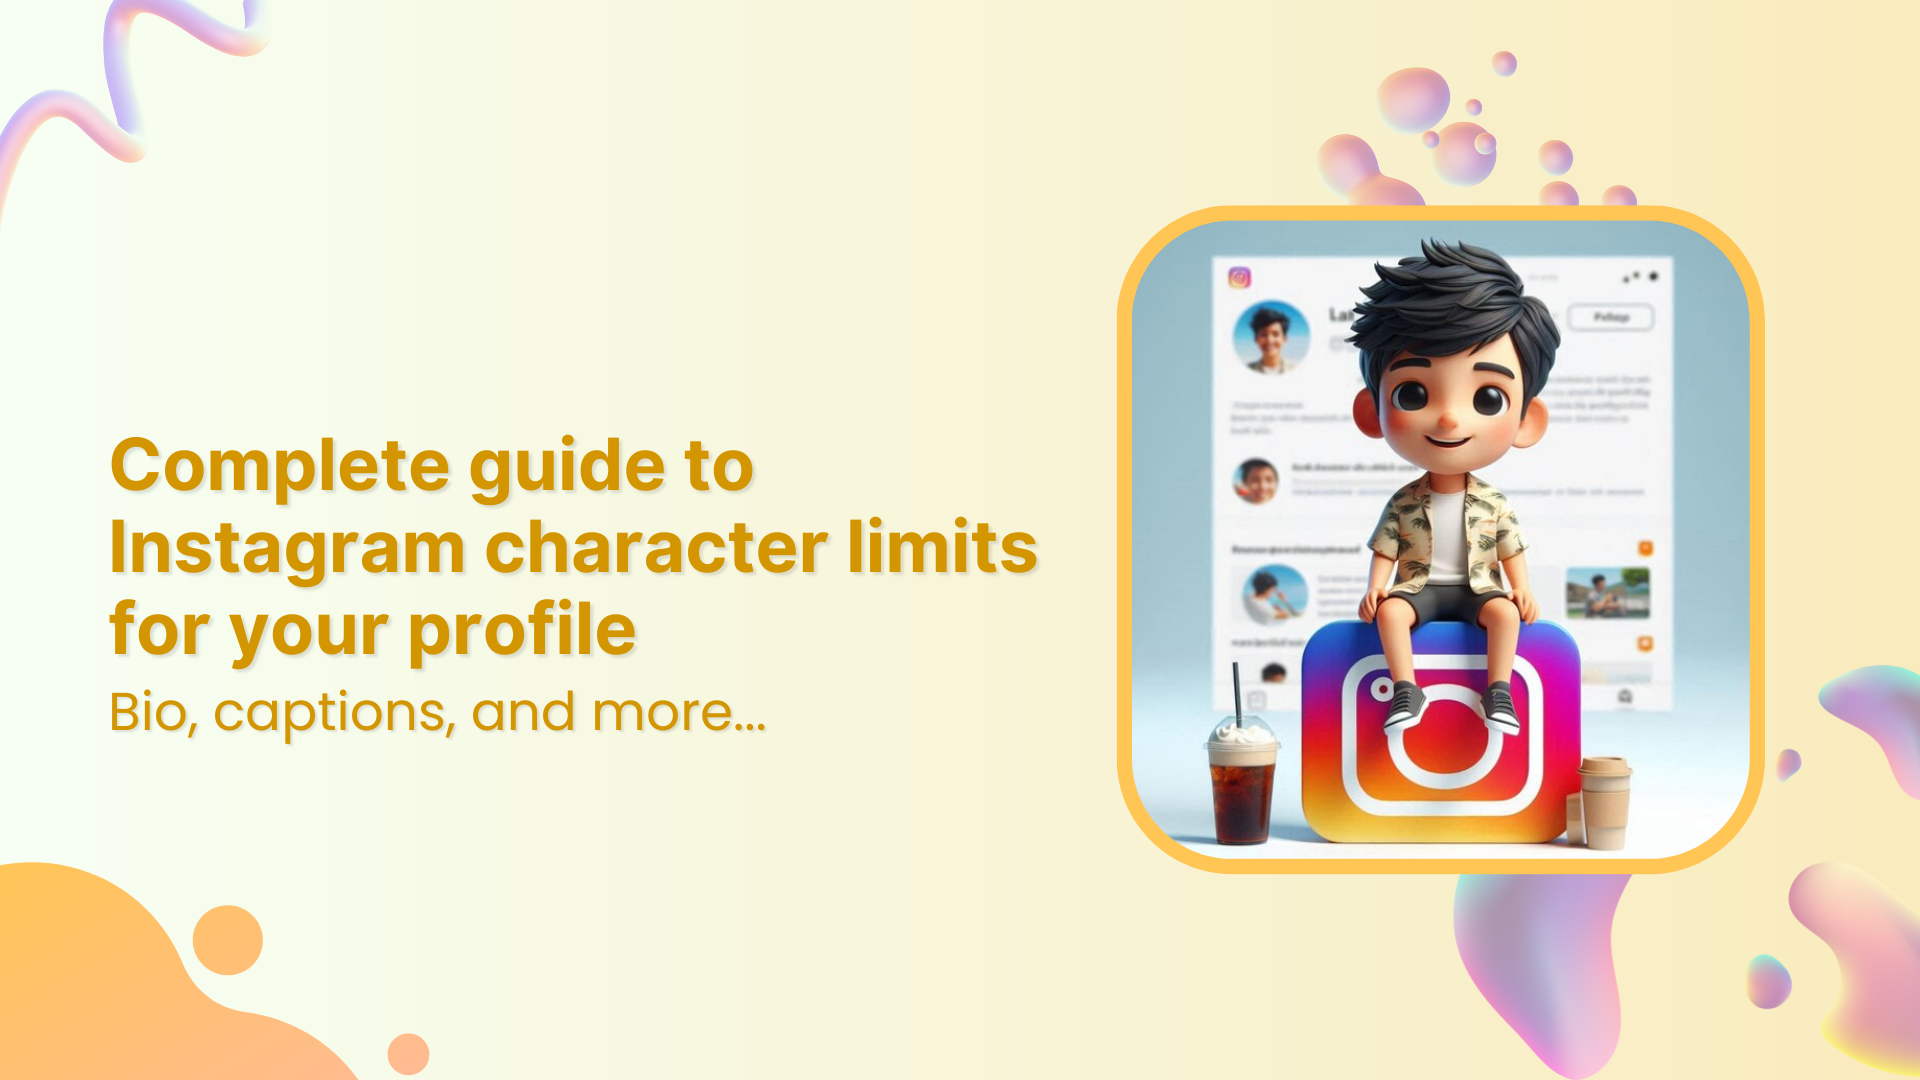
Do Instagram’s character limits have you feeling boxed in?
It’s time to break free!
While we can’t change the limits, we can help you utilize them like a pro. These characters are more than just words; they shape how we communicate and help us increase our Instagram followers and audience.
This guide breaks down the constraints for Instagram bios, captions, and other features, offering insights and tips to help you create standout content.
Go beyond generic link pages!
Create custom bio links that truly fit your brand
With Replug, you can create bio links that are unique, engaging, and built to convert.
Instagram character limits refer to the maximum number of characters you can use in different sections of the platform, such as bios, usernames, captions, and more.
Types of character limits on Instagram
Let’s break down the Instagram character limits for different sections.
1.Instagram character limit for bios
Your Instagram bio is your first introduction to potential followers, so making every character count is crucial. With a 150 Instagram bio character limit, you’ll need to be concise and compelling. This space is ideal for briefly introducing yourself, outlining your activities, and informing followers about what they can expect from your profile. Including emojis and hashtags can add personality and increase discoverability.
2.Instagram character limit for usernames
Your username is your unique identifier on Instagram, also known as your handle. It can be up to 30 characters long. When choosing a username, make sure it’s memorable, easy to spell, and reflective of your brand or personality. Avoid using special characters, as they can make it harder for people to find you.
3. Instagram character limit for hashtags
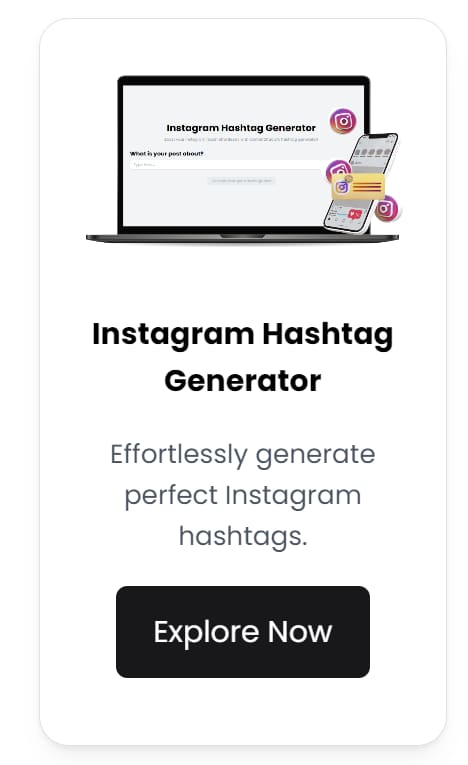
The limit for hashtags on Instagram is 30. However, just like captions, less is more; you don’t want to go overboard and look spammy. We recommend using 5 to 11 (sweet spot) relevant hashtags that describe your post.
4. Instagram character limit for captions
You’ve got 2,200 characters to work with in your captions, which is around 400 words. However, people’s attention spans are relatively short. So, please make sure to keep your captions concise and engaging.
Note: It’s important to note that only the first two lines of your caption are visible without clicking “more,” so make sure to hook your audience immediately.
5. Instagram character limit for comments
Instagram comments can be up to 2,200 characters long, and each comment can include up to 30 hashtags. To reduce spam, Instagram also limits users to around 180–200 comments per day, although highly active accounts might get a slightly higher daily limit.
6.Instagram character limit for ads
Primary Text: 125 characters
Headline: 40 characters
Description: 30 characters
Instagram ads have a specific character limit depending on the ad component. The primary text of your ad can be up to 125 characters, while the headline is limited to 40 characters and the description to 30 characters. These constraints require you to be remarkably succinct and impactful, ensuring that your message is clear and compelling within the limited space.
Want to know how different caption lengths impact engagement on Instagram? Here’s a quick guide to what works best; and when to keep it short, medium, or long.
Length
Best for
Why it works
Example
Short (under 150 characters)
Quick updates, punchy jokes, quotes
Perfect for shorter attention spans; less overwhelming
“New drop. Don’t miss out! 🔥”
Medium (150–500 characters)
Short brand stories, tips, tutorials, product teasers
Enough space to add context without losing attention
“Our new serum blends vitamin C & hyaluronic acid for glowing skin 🌿✨”
Invites comments and deeper engagement from users seeking detail
“Planning your first solo trip? 🧳 Here’s a complete checklist to get started.”
Tip: The Instagram algorithm favors posts with higher engagement (likes, comments, saves). Matching your caption length to your content type and audience preferences helps your posts feel authentic and can boost your visibility on followers’ feeds.
Factors that influence the ideal Instagram character count
The perfect Instagram character count depends on several factors, including your goals, audience, and industry. Let’s explore them with examples:
Purpose of your Instagram content
The main goal of your post shapes how many characters you should use.
Example: If you’re sharing a quick promo:
“🚨 24-hour flash sale! Tap now to shop your faves!” (under 70 characters).
Example: Sharing a story or educational tip? A longer caption works:
“Behind every cup of coffee is a story. Here’s how we ethically source our beans from small farms, ensuring quality and fair trade ☕🌱” (over 200 characters).
Posts that tell stories, explain how-tos, or build emotional connection usually need more characters, while promotional updates work best with shorter captions.
Who is your target audience?
Your followers’ preferences and scrolling habits can dictate caption length.
Example: A brand targeting professionals:
“5 leadership habits to inspire your team daily 📝 #LeadershipTips” (longer and informative).
Example: A fashion brand for Gen Z might say:
“New drop. Limited stock. 🔥” (short and punchy).
In short: Detailed, value-driven posts resonate with audiences who seek insights, while visuals and concise captions connect more effectively with younger audiences who tend to scroll quickly.
How you craft engaging content shapes your ideal Instagram caption length.
Example: Encouraging comments:
“Summer’s here! 🌞 What’s your go-to drink on hot days? Tell us below!” (longer, invites interaction).
Example: A simple vibe post:
“Weekend mood ✨” (short, keeps it casual).
Longer captions are great for storytelling and inviting conversation. Short captions work for memes, announcements, and quick updates.
Staying true to your brand voice
Your brand personality and tone matter too.
Example: A playful, casual brand:
“Oops… we spilled coffee ☕ But hey, meet your new favorite mug 😂”
Example: A luxury brand:
“Crafted. Timeless. Yours.”
A conversational tone leads to longer Instagram captions, while minimalist or formal brands keep it short and sleek.
Maximize marketing ROI
by transforming ordinary URLs into branded short links that convert.
Try Replug for free
Industry and competitor trends
Check what works in your niche. It helps you learn what your audience already responds to, so you can stay relevant without copying.
Example: Beauty brands often share mini tutorials or skincare routinesin about 200–300 characters, like:
“Apply our night serum before bed 🌙 Wake up glowing ✨ #SkincareTips”
Example: Food bloggers might use slightly longer captions (300–400 characters) to share recipes or behind-the-scenes cooking stories:
“Quick weekday dinner: lemon garlic pasta in under 20 minutes 🍋🍝 Save this for busy nights!”
Example: Meme pages keep it super short, often under 50 characters:
“Monday mood 😂” or “Who else? 🙋♀️”
Studying your competitors and industry leaders helps you see what post lengths get engagement. Then you can test similar strategies while keeping your unique brand voice.
The best way to discover your ideal Instagram character count? Test and learn over time.
Example: Post the same image twice:
Once with a long story caption explaining the moment or context.
Once with a short, catchy caption.
Then check your Instagram Insights to see which version got more likes, saves, comments, or shares.
Example: Try using short captions (under 100 characters) for quick promos, and longer captions (200–500 characters) for storytelling or educational posts. Track which style gets better engagement.
Example: Use different hashtags in each test post (but stay under the 30-hashtag limit) to see what combination boosts reach.
By experimenting and reviewing your analytics, you’ll find out what Instagram character lengths best suit your audience, content, and brand style; helping you stay both clear and engaging.
5 tips to make the most out of your Instagram characters
1. Don’t forget that link-in-bio
We recommend brands use a bio-link tool to create bio-landing pages. This approach allows brands to provide their audience with easy access to all important links and contact information in one place. Ultimately, bio links are an excellent opportunity to drive traffic and encourage conversions.
Your followers follow you for a reason. Make sure your content aligns with their interests. Share authentic, engaging posts that resonate with your audience. Whether it’s stunning visuals, informative captions, or entertaining reels, keep it relevant to your niche.
3. Find your voice and stick to it
Consistency is key to building a strong brand identity. Develop a unique voice that reflects your brand personality. Whether you’re funny, informative, or inspirational, let your personality shine through in every post.
4. Try adding a CTA
A call to action (CTA) tells your audience what you want them to do. Whether it’s liking, commenting, sharing, or visiting your website, a clear CTA can boost engagement. Use action-oriented words to encourage interaction.
Boost your conversion rates with irresistable CTAs with
Emojis can add personality and emotion to your posts. They can help emphasize your message, break up text, and make your captions more visually appealing. Just make sure they fit your brand and the overall tone of your post.
How to increase your Instagram character limits?
There are a few tips and tricks through which you can lengthen your Instagram character limits:
Use Instagram stories and highlights
Instagram stories:These 24-hour posts are perfect for sharing detailed information without worrying about any character limits on Instagram. You can break down complex topics into a series of short clips or images, making the content easy to digest. Utilize text overlays, stickers, and swipe-up links (if you have access) to direct followers to more in-depth content.
Highlights: Save your stories in highlights on your profile. This allows new and existing followers to access important information at any time. Organize Highlights by themes or topics to create an easily navigable content library.
Extend captions: If you run out of space in your main caption, use the comments section to continue your message. Start your caption with a compelling hook and then direct followers to the first comment for additional details. This can also foster engagement as users scroll through comments.
Community interaction: Use comments to answer FAQs, provide updates, or share stories. Engaging with your audience in the comments can build community and add depth to your posts.
Upgrade your Instagram text with the help of Replug free tools
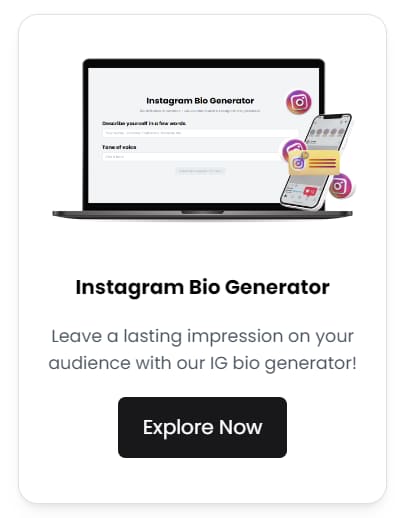
Need help with your Instagram captions or bio? Replug’s free AI tools can help. Create awesome content in seconds!
Crafting a compelling bio can be a challenge. Our AI Bio Generator takes the guesswork out of it. Simply input a few details about your brand or personality, and voila! You’ll have a range of engaging bio options to choose from.
Want to boost your Instagram engagement? A strong call to action (CTA) is essential. Our CTA Generator AI provides you with creative and effective CTAs tailored to your specific goals.
Running out of caption ideas? Our Caption Generator has you covered. Input your post topic or theme, and let the AI generate a variety of captivating captions to choose from.
Best app for Instagram character count?
There isn’t a dedicated app specifically for Instagram character count. However, several online word counter tools can effectively help you with this. These tools are typically web-based and can be easily accessed through your browser.
Here are a few reliable options:
Quillbot free word counter tool: Quillbot offers a free word counter tool that not only counts words but also characters, sentences, and paragraphs.
WordCounter.net: This tool is comprehensive and provides detailed statistics about your text, including character count, word count, and readability scores. It’s perfect for those who want more than just a character count.
Charcounter.com: This web-based tool gives a real-time count of characters and words as you type. It’s straightforward and efficient, making it ideal for quick checks.
Conclusion:
Mastering Instagram’s character limits is more than just counting words. It’s about using every character to tell your story, connect authentically, and drive engagement.
From keeping captions concise to maximizing the Instagram bio character limit and utilizing hashtags effectively, thoughtful writing helps your content stand out in busy feeds.
Use these best practices, keep testing what resonates with your audience, and watch your Instagram presence grow.
Go beyond generic link pages!
Create custom bio links that truly fit your brand
With Replug, you can create bio links that are unique, engaging, and built to convert.
The character limit on Instagram varies by section: your bio can have up to 150 characters, usernames up to 30 characters, and captions or comments can go up to 2,200 characters each. You can also add up to 30 hashtags per post. While these are the maximums, keeping your text clear and concise often makes your content more engaging.
How do I post more than 2200 characters on Instagram?
Instagram sets a strict 2,200-character limit for captions, so you can’t exceed it in a single post.
However, you can share longer content by: – Continuing your text in the first comment under your post. – Using Instagram Stories or carousels to spread your message across multiple slides. – Linking to a longer blog, article, or landing page in your bio or caption (using a short branded link).
How do I add more than 150 characters on my Instagram bio?
You can’t make your Instagram bio longer than 150 characters. However, you can share more by adding a link in your bio that leads to a micro landing page using Replug. On that page, you can include as much text, links, and details about yourself or your brand as you want.
How many hashtags should I use on Instagram?
There’s no strict limit, but using too many can look spammy. Aim for 5-10 relevant hashtags per post to improve discoverability without overwhelming your audience.
Can I change my Instagram username?
Yes, you can change your Instagram username. However, once you change it, it becomes available for others to use.
How can I make my Instagram bio stand out?
Use strong keywords, a clear call to action, and emojis to make your bio engaging. Keep it concise and informative.
You’ve got that one link in bio carrying your shop, your latest drop, or your best video, all in a single click. But do you really know what happens after someone taps it? Are people exploring your links, or dropping off after the first click?
That’s where link in bio analytics comes in. It shows which links get the most love, where your audience is coming from, and when they’re most active. And with tools like Replug, checking it all is as simple as open, tap, scroll.
Let’s break down how to use these insights to get real results.
Maximize marketing ROI
by transforming ordinary URLs into branded short links that convert.
Try Replug for free
What is the best way to track link in bio analytics?
The most effective way to track link in bio analytics is by combining detailed tracking with tools that help you act on what you learn.
Replug makes this simple. It shows how many clicks your link in bio is getting, where your audience is coming from, and when engagement peaks, all in real time. Beyond numbers, it helps you create branded short links that build trust and boost click-through rates.
By adding UTM parameters, you can track the performance of your link in bio, all within Replug’s dashboard. This way, you get a clear view of what’s working and can refine your strategy as you go. Together, these features turn your link in bio from a basic list of links into a powerful, data-driven marketing asset.
Let’s discuss the two easy ways to track your link in bio analytics using Replug.
How to track your link in bio analytics (two easy ways)
First things first: make sure you’re signed into your Replug account.
Haven’t signed up yet? You can start with a 14-day free trial and get full access to your link in bio analytics.
Now, here are two quick ways to see what’s really happening behind your link in bio:
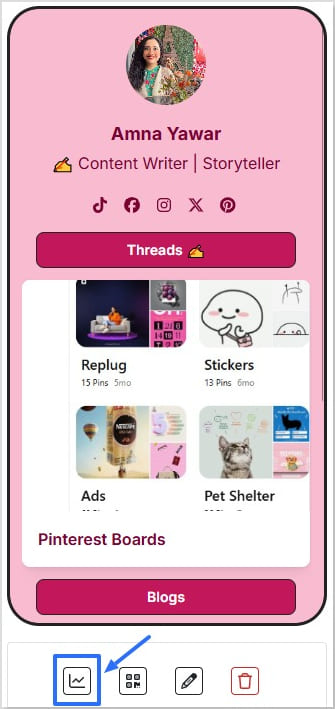
Method 1: Quick check from the bio links tab
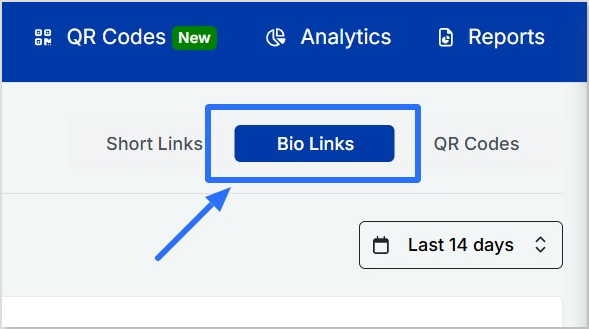
Go to “Bio Links” in your Replug dashboard.
Find the bio link you want to check.
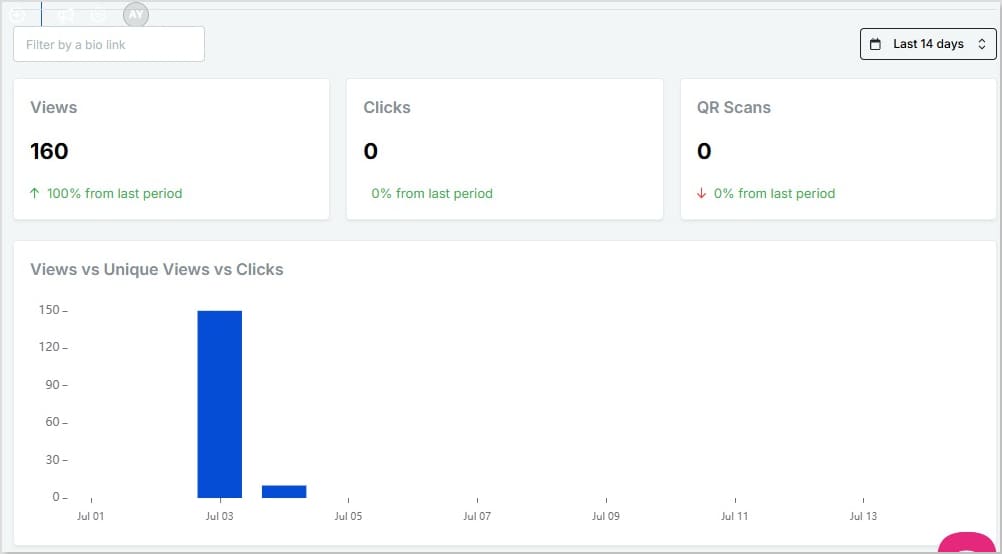
Click the small line chart icon right under it.
This opens up your analytics for that specific bio link, showing:
Views, unique views, clicks, and QR scans
A bar chart comparing views vs. unique views vs. clicks
Geotargeting filters so you can see data by referral source, location, browser, and operating system
Real-time stats and custom date ranges (check today, last month, or all time — no limits)
They’re little tags you add to the end of a URL so tools like Replug can track where each click came from.
For example:
Share the same link in a reel and a story
Add utm_medium=reel to one and utm_medium=story to the other
Now you’ll know which actually brings traffic, and which just looks good. Inside Replug, you can create and manage UTM-tagged links easily, so you can track smarter without extra hassle.
Another handy tip: Create a QR code for your bio link
Replug also lets you create a QR code for any of your bio links. So, if you share your link in bio offline on posters, packaging, slides, business cards, or anywhere else; you’re still not flying blind.
Data is great, but action is what makes it matter:
Move your best-performing links higher up
Swap out links that aren’t getting clicks
Post when your audience is most active
Test different headlines, emojis, or thumbnails to see what bumps up clicks
Focus promotion on platforms that actually send traffic
Conclusion
Your bio link shouldn’t just look pretty. It should work. Clicks, sign-ups, sales, traffic – whatever your real goal is.
And the good news? It’s simpler than you think.
With Replug’s link in bio analytics, you can see what’s working, what’s getting ignored, and where your audience is coming from, all in a few clicks.
Add UTM parameters to track which posts drive traffic, and use QR codes to bring in offline scans too. Then adjust: move your best links up, drop the ones that flop, and post when your audience is most active.
Your link in bio is more than a link. It’s your quiet traffic driver and digital storefront.
Now you know how to use link in bio analytics to make it deliver.
FAQs on link in bio analytics
What are links in bio?
A link in bio is the clickable URL on your Instagram, TikTok, or other profiles. Since most platforms allow only one, tools like Replug let you turn it into a mini landing page with multiple links to your shop, videos, or content.
What is a tracking link?
A tracking (or trackable) link has extra tags, like UTM codes, that show where your clicks come from and what drives traffic. Tools like Replug can create these automatically.
How to track link in bio analytics on Instagram?
In Replug’s analytics dashboard, you can see referral sources, so you’ll know how much traffic is coming from Instagram.
How to track link in bio analytics on TikTok?
In Replug’s analytics dashboard, you can check referral sources to see how many visitors came from TikTok.
Your business card shouldn’t just sit in someone’s wallet; it should make them act. In a world where everyone’s glued to their phones, no one wants to type out links. A QR code on your business card gives them instant access to your contact details, portfolio, or LinkedIn. Just a quick, and they have all your details.
With Replug’s business QR code generator, you can create a branded, trackable QR code for a business card that links directly to your vCard, website, resume, or any digital touchpoint. It’s modern, efficient, and adds a smart edge to your printed card.
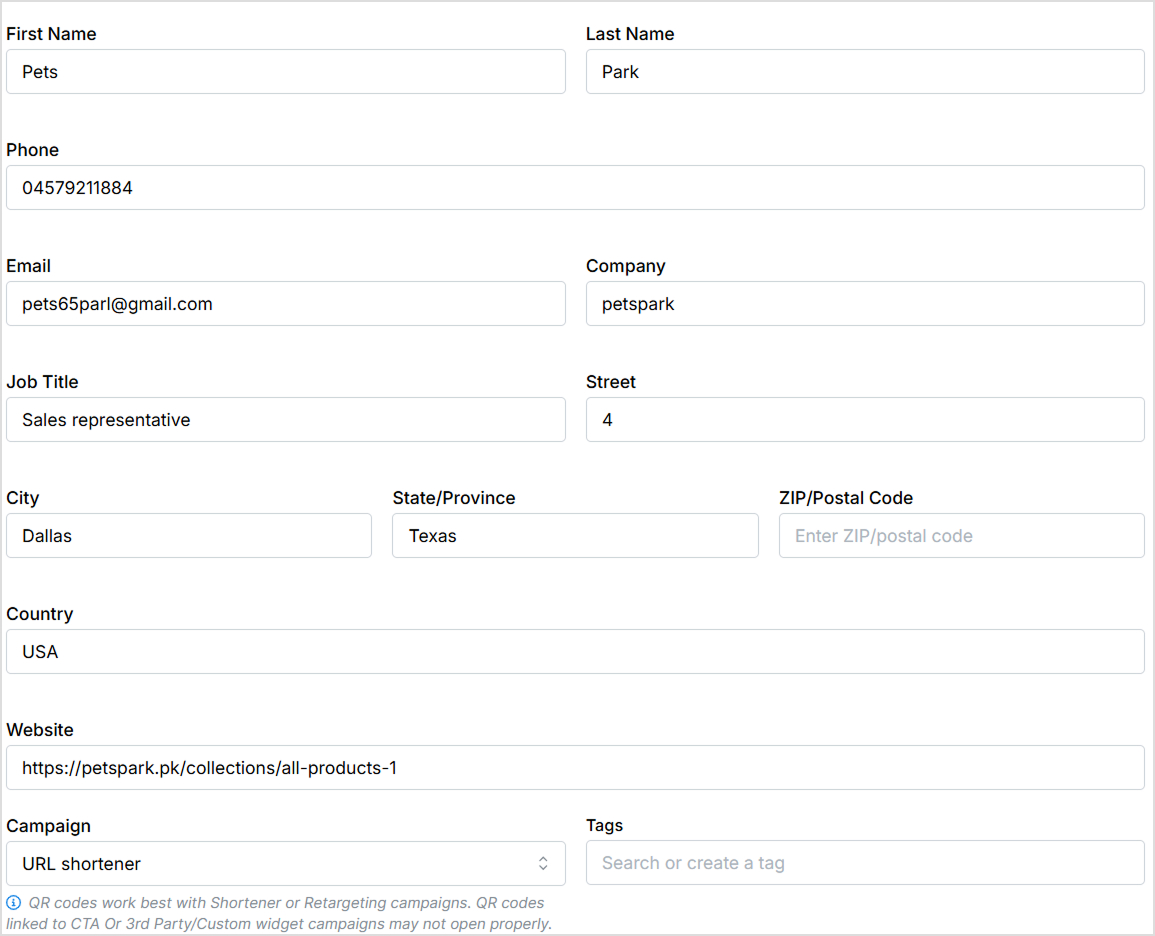
Step 3: Add your contact info for the QR code on the business card
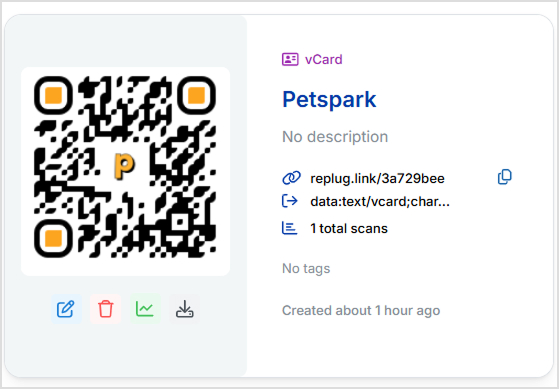
In the QR code type category, choose the vCard QR type, it’s the best format for creating a QR code for a business card that lets users save your details with one scan.
This allows people to save their contact details instantly with just one scan. Next, fill in your business card details:
Once your design is complete, click the “Create QR Code” located below your QR code preview. Now your QR code for business card can be downloaded in high-resolution formats like PNG, SVG, PDF, or WebP, ready to be added to your design and printed professionally.
PNG (for most uses)
SVG (for scalable designs)
PDF (for print-ready files)
WebP (for fast-loading on websites and mobile platforms)
Now you can add it to your business card layout and print with confidence.
Benefits of adding a QR code to your business card
Adding a QR code to your business card isn’t just trendy, it’s strategic. It blends traditional networking with digital convenience, making it easier for people to engage with you on the spot. Here’s why every professional should consider using QR advertising for business interactions:
1. Instant contact sharing
One scan saves your full contact details to the recipient’s phone, no manual typing required.
2. Drive traffic to your digital assets
Link your QR code to your website, portfolio, social media, calendar, or lead form to guide people where you want them.
3. Stand out professionally
A QR-enabled card shows you’re tech-savvy, modern, and intentional about how you present yourself.
4. Real-time tracking with Replug
Use Replug’s analytics to see how many people scan your card, where they’re scanning from, and on which device.
5. Edit anytime with dynamic QR codes
Need to update your job title or switch websites? Dynamic QR codes let you change the destination without reprinting.
6. Supports multiple file types
Download your QR in high-quality formats like PNG, SVG, PDF, or WebP, perfect for both print and digital use.
Boost ROI with branded URLs!
Enhance your marketing campaigns by creating shareable, trackable, and fully multi-purpose
customizable branded URLs.
Your business card is no longer just a printed rectangle; A QR code for a business card makes it easier for people to connect, remember, and engage with you instantly. You’re giving every contact the power to connect with you instantly, without typing or searching. Whether you’re a freelancer, entrepreneur, or corporate professional, this simple upgrade can dramatically boost your networking game.
With Replug, you don’t need a designer or a developer, just a few clicks and you’re done. Whether you’re attending conferences, networking events, or casual meetups, your QR-enhanced card ensures you’re remembered, saved, and contacted faster.
Ready to make your business card unforgettable? Create your QR code for business card with Replug today and step into a smarter, more connected way of networking.
FAQs on QR codes for business cards
1. What type of QR code should I use for my business card?
The best option is a vCard QR code, which allows people to save your contact details instantly. Replug supports this format, letting you include your name, email, phone number, website, and more.
2. Can I update my QR code’s destination after printing my business cards?
Yes, if you use Replug’s dynamic QR code feature. You can change the URL or content anytime without needing to reprint your business cards.
3. Where should I place the QR code on my business card?
Common placements include the bottom corners or the back side of the card. Just make sure the code has enough white space around it to remain scannable and clean.
4. What file format should I download for printing?
Replug offers several formats. For print, use PDF or SVG for the best quality. For web use, PNG and WebP work great; WebP is especially fast-loading for mobile and online platforms.
5. Will people actually scan my QR code on a business card?
Definitely! A well-placed, branded QR code on a business card with a clear CTA is highly effective in modern networking.
If you’re still running ads that drop people straight onto an affiliate product page, we need to have a talk.
It’s like texting someone and saying, “Hey nice to meet you! Wanna buy this $300 course?”
No context. Minimal warming up. Zero chance it’ll go well.
Because here’s the deal: When you’re an affiliate, you don’t control the product page. You can’t tweak the copy, add testimonials, or even change a single headline. All you can do is hope that random visitors magically feel convinced enough to buy.
And let’s not forget: Platforms like Facebook and Google hate it. They’ll shut your ads down if your landing page is just a sales pitch or direct affiliate link.
So, what do smart affiliate marketers do?
They build something in between: a bridge page, also known as a pre-sell page, warm-up page, or primer page.
In this guide, you’ll learn:
What exactly a bridge page is (without the jargon)
Why it works so ridiculously well
Different ways to set it up
Real-life examples
And finally, how you can create a bridge page easily (even if you hate design or coding), with Replug.
Let’s break it down.
What is a bridge page?
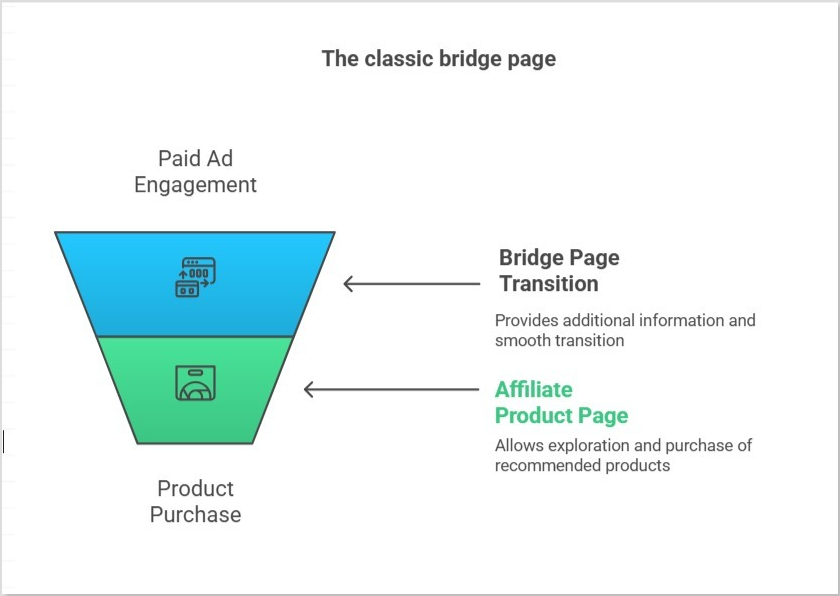
At its simplest, a bridge page is an intermediate landing page between your ad (or traffic source) and the final affiliate offer.
But, it’s more than that.
It’s your chance to:
Tell a story
Build trust
Address objections
Qualify your leads
And most importantly, prime visitors to buy
That’s why people also call them:
Pre-sell pages (because you’re selling the click, not the product… yet)
Warm-up pages (because you’re taking cold traffic and making them toasty)
Primer pages (focusing on mental “priming”)
Transition pages (guiding traffic smoothly to the offer)
Affiliate landing pages (if it feels more natural in your niche)
Whether you’re an Amazon affiliate trying to boost your commissions or promoting high-ticket digital offers, the goal is the same: create an intentional step that makes people care before they see the price.
Why bridge pages work: the psychology behind them
Bridge pages (and the broader bridge funnel strategy) tap into a powerful psychological principle: priming.
When you show someone a persuasive copy, engaging content, or even a quick quiz before asking them to buy, you do more than just inform them; you change their mental state.
Instead of landing cold on a product page and wondering:
“Do I really need this?”
They arrive already thinking:
“Wow! This actually fixes a problem I have.”
That’s the beauty of a bridge page: You’re not selling right away. You’re setting the stage so the sale becomes the next logical step.
Why bridge pages work: a quick example
Let’s say you’re running an affiliate ad for a high-ticket coffee machine. If someone clicks and lands straight on Amazon or the brand’s sales page, what happens?
They see a price tag, specs, and maybe some reviews; but no context. No storytelling. No reason why this coffee machine should matter to them.
Result? They bounce.
A bridge page fixes this.
It adds a warm-up step in between:
Your ad
A bridge page you control (with persuasive copy, testimonials, benefits)
The affiliate offer page
Instead of asking cold traffic to buy right away, you guide them, answer objections, and prime them to click “buy.”
That’s the “bridge”: You move people from just being curious to actually wanting the product.
Now let’s move to the fun part: b?
How to create a bridge page for affiliate marketing?
There are plenty of ways to create a bridge page; from hiring a designer to wrestling with WordPress plugins. But if you want a faster, cleaner, and ad-friendly solution, Replug makes the whole process refreshingly simple.
With Replug, you can design a branded, persuasive bridge page without any coding. Add your story, images, and call-to-action, cloak your affiliate links so they look professional, and track everything from clicks to conversions, all in one place.
In the next section, we’ll walk you through the steps on how to create a bridge page in Replug, whether you want a classic bridge, or even a squeeze page to grow your email list. Let’s dive in!
How to create a bridge page in Replug (step by step)
Step 1: Sign in or create an account
Start by signing up for Replug. If you don’t have an account, sign up and you’ll get a free 14-day trial to explore all the features without any risk.
Once you’re in, you’ll have everything you need to build, brand, and track your bridge page.
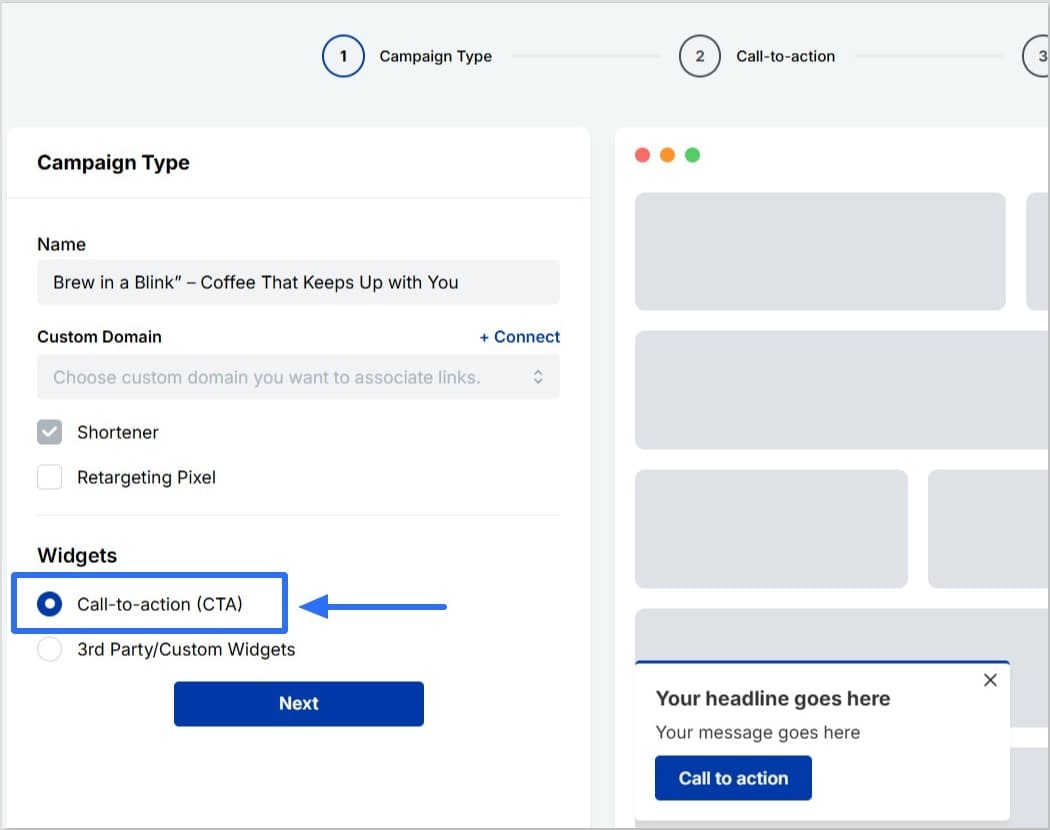
Step 2: Create your campaign
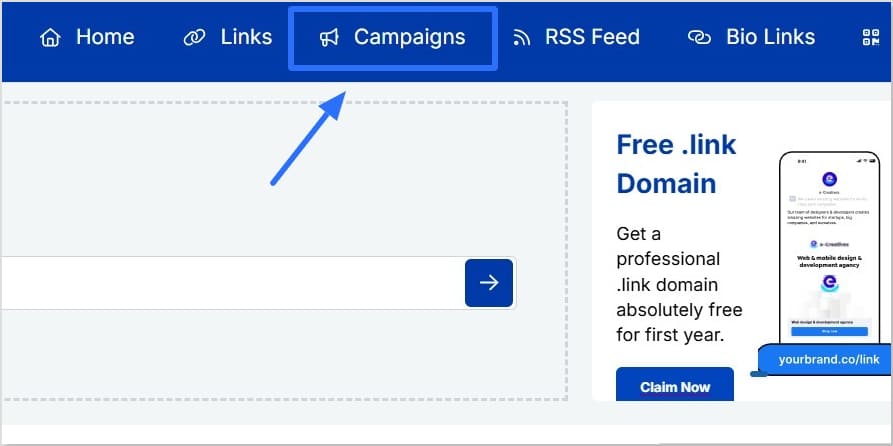
Inside your Replug dashboard, head to Campaigns → Create New
When prompted, choose the “Call to Action” campaign type.
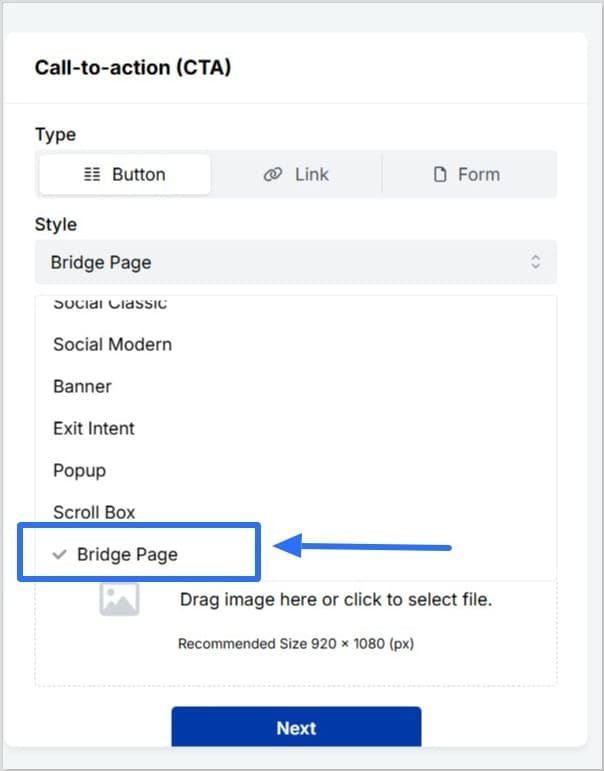
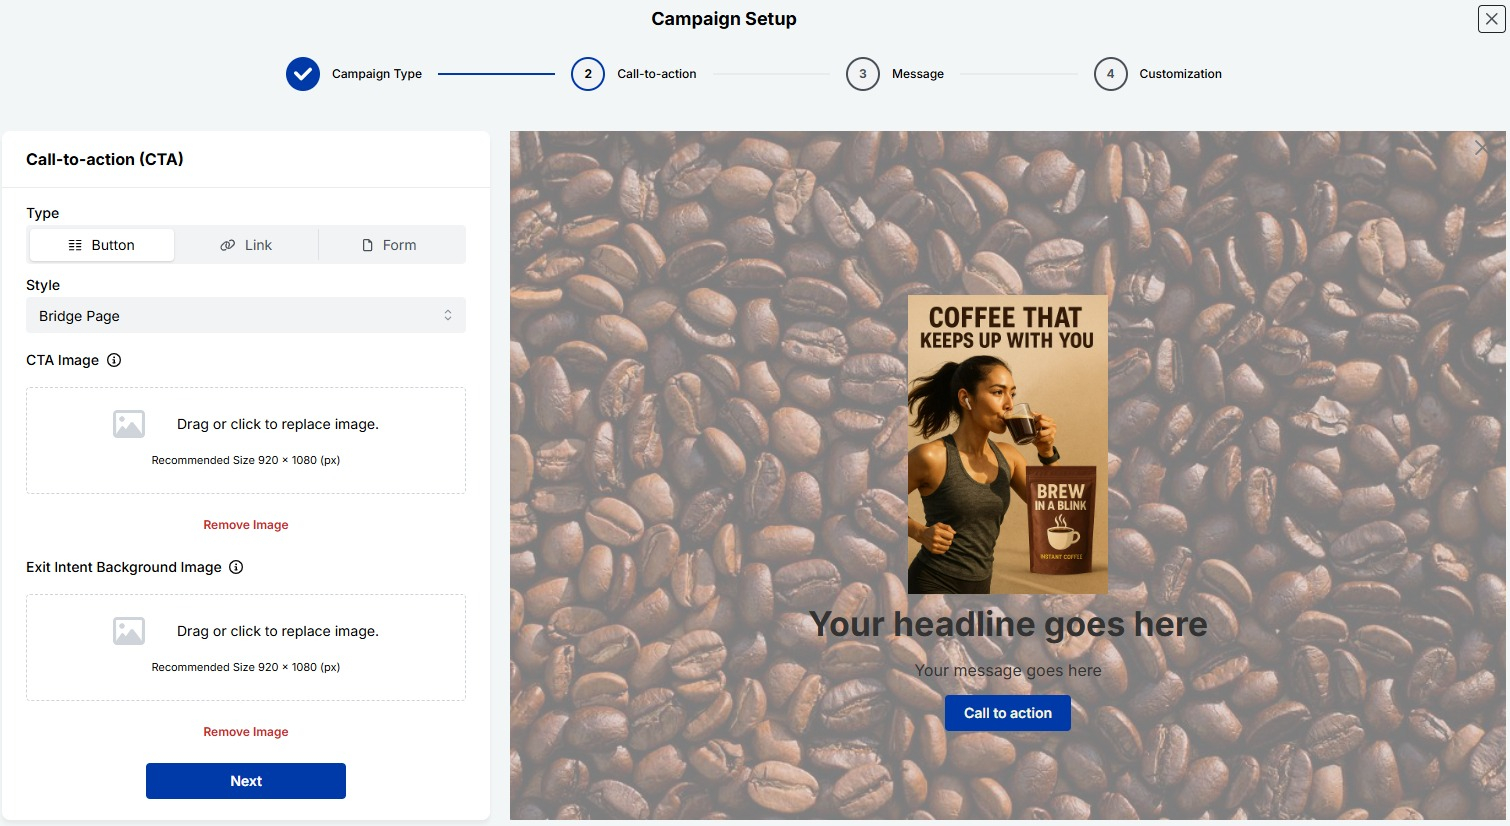
Select “Bridge Page” as the style from the dropdown. This will let you design a bridge page (or pre-sell page) that does more than just redirect. You can choose from CTA button, link, or form as your preferred CTA type. It’s your call!
Add your CTA Image and Exit Intent Background Image.
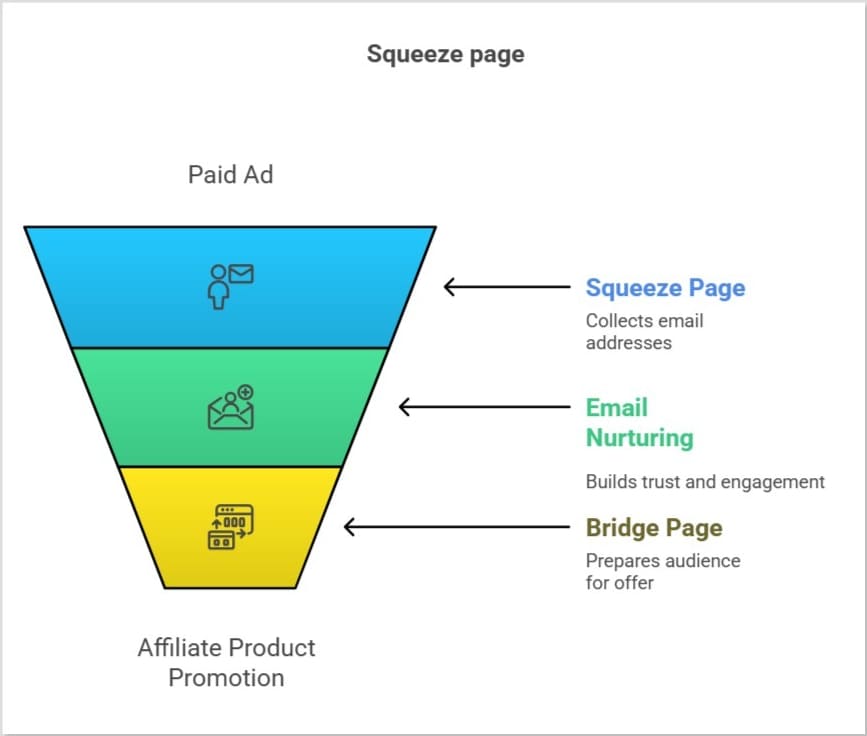
Tip: If you want to create a squeeze page, you’ll simply choose “Form” as your call-to-action type. This lets you capture emails right on your bridge page and build your list while warming up leads.
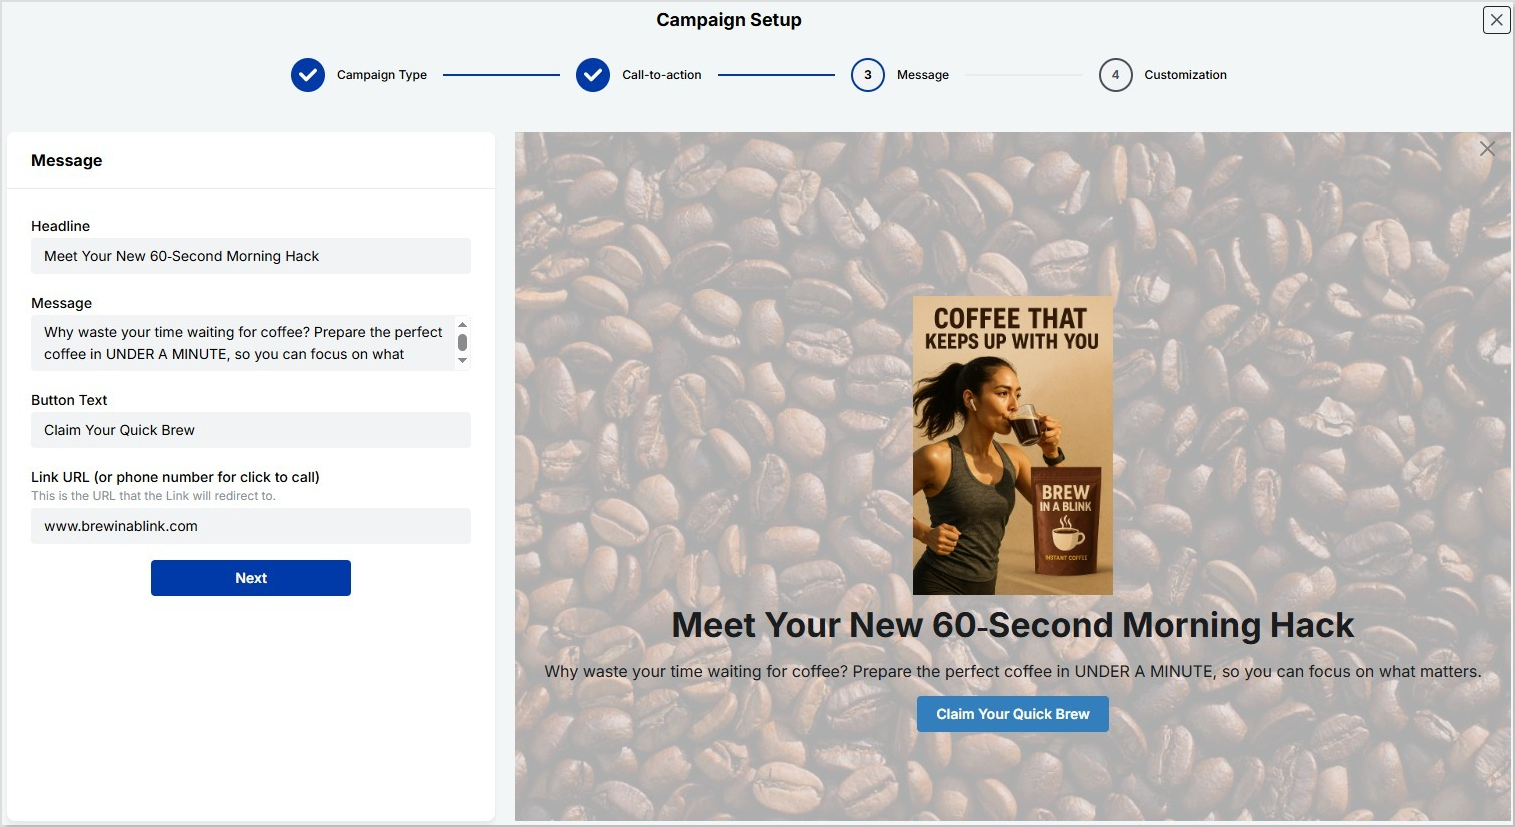
Finally, add the affiliatelink URL for the affiliate product you’re promoting, or your phone number if you’re using a click-to-call option
Remember: you’re not pitching the product directly; you’re helping people see why the product matters to them.
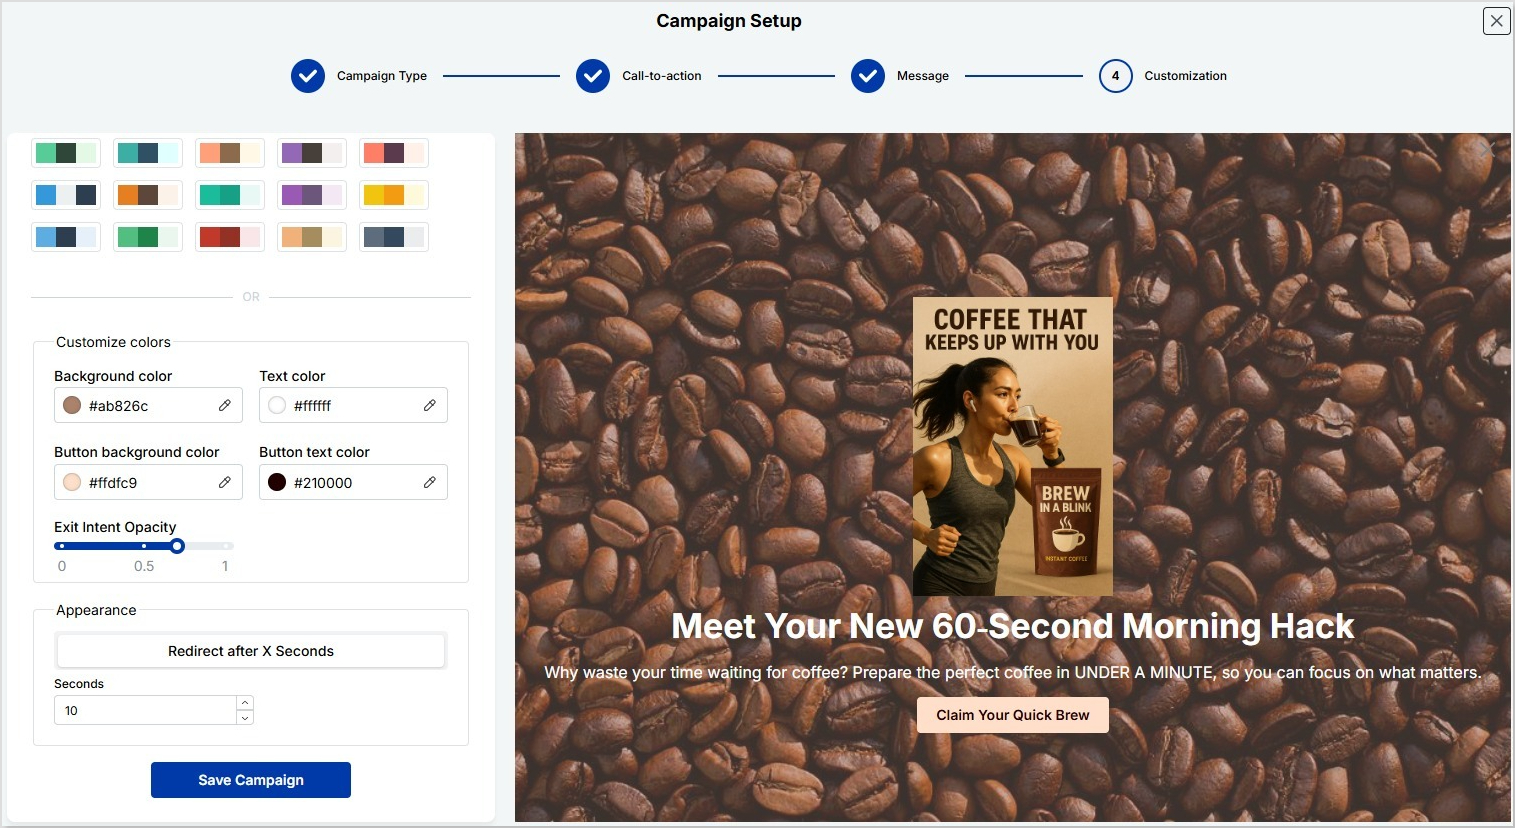
Step 4: Customize your bridge page
Make your page stand out by matching it to your brand or product vibe. Here’s what you can adjust:
Color palette: Choose from preset themes or set your own colors:
Background color
Text color
Button background color
Button text color
Redirection time: Decide how long visitors stay on your bridge page before being redirected to the affiliate offer. Example: set it to 10 seconds for a smooth experience
Exit intent opacity: Control how your bridge page appears if someone tries to leave early
This small customization step helps your page look professional and keeps it consistent with your branding.
If you’ve built affiliate bridge pages the “old school” way, you know how time-consuming it can be. But with Replug, it’s completely different. You can launch, track, and optimize your bridge pages in minutes; without coding, plugins, or tech headaches.
Why Replug makes it so easy
Old way
With Replug
Hire a designer and build pages in WordPress
Use ready-made templates to launch bridge pages quickly
Example: Collect emails with a lead magnet (e.g., “Free guide: 5 mistakes to avoid when buying X”) → build trust → send them to bridge page → offer page.
Keep it mobile-friendly (most clicks come from phones)
Use one clear CTA
Test different headlines & images
Add urgency or scarcity only when it’s real
Stop losing sales and start building bridges
If you’re still sending cold ad traffic directly to an affiliate product page, you’re leaving money (and trust) on the table.
A bridge page changes everything: it gives visitors context, tells your story, answers objections, and makes buying feel natural. Instead of hoping your ad clicks magically convert, you guide them to that “yes.”
And if you’ve been wondering how to create bridge page content You get ready-made templates, branded short links, retargeting pixels, A/B testing, and detailed analytics; all without touching a single line of code.
Build smarter funnels, keep your ads compliant, and see what difference a bridge can make for your affiliate campaigns.
FAQs on how to build a bridge page for affiliate marketing
What is an example of a bridge page?
A classic example: you run an ad for a high-ticket coffee machine. Instead of sending traffic straight to Amazon, you send them to your bridge page first. This page has a short story, benefits, maybe a video review, and a CTA like “See price on Amazon.” It warms them up before they see the offer.
What is a bridging page?
It’s the same thing as a bridge page: an intermediate page that sits between your ad (or traffic source) and the affiliate product page.
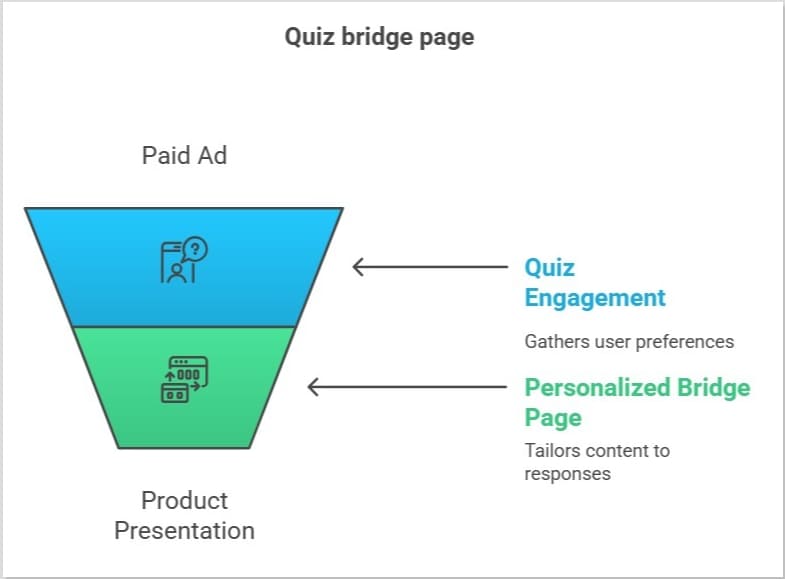
What is an example of bridging?
Think of a quiz funnel: “Which running shoe fits your style?” After the quiz, people see a personalized bridge page recommending one product, instead of dropping them directly on a store page.
Can I build a bridge page in Replug?
Yes! Replug makes it super simple. You can create branded bridge pages, add retargeting pixels, cloak affiliate links, A/B test different versions, and track everything; all without coding. Plus, you can rotate links, share anywhere, and keep your ads compliant.
What’s the difference between a bridge page and a landing page?
A landing page is any standalone page designed for a single goal (sign-up, download, sale, etc.). A bridge page is a specific type of landing page used mainly in affiliate marketing to “bridge” the gap between your ad and the final offer, warming up visitors so they’re more likely to convert.