Author: Hassaan Khan

  • What is a Dynamic QR Code: Benefits, Use Cases, & More

    What is a Dynamic QR Code: Benefits, Use Cases, & More

    QR codes come with more tricks than a magician’s hat. ???? A Dynamic QR code is all about redefining how you connect with information.

    Usually, a QR code is printed on the packages or product boxes to access the product details specifications, or other information regarding the product.

    However, the dynamic QR code is something most of you haven’t heard of before. You’ll be amazed at how these codes are changing the game for businesses, educators, and more.

    So let’s dive deep into it and learn more about this specific type of QR code.

    What is a dynamic QR code?

    A dynamic QR code is flexible and adaptable codes can be edited, replaced, and updated after their creation. enabling real-time information updates and tracking of user interactions.

    The core purpose of a QR code is to direct visitors to a specific website page or information linked to it. These codes are not your standard QR codes; they transform, adapt, and offer unparalleled tracking and customization.

    How does dynamic QR code work?

    Dynamic QR codes are made using specific software or online tools. Users input the content they want the QR code to show, like a website link or text. The QR code generator then produces a QR code that links to a server or database where the content is kept. You can change the content even after making the QR code.

    Dynamic QR codes are responsible for showcasing the QR code analytics for tracking purposes. It also provides an option to edit or alter the destination URL or link information to the QR code. Therefore, the users don’t have to generate new QR codes in case of a change in the information, such as website URL, email address, or phone number.

    Moreover, a dynamic QR code also integrates with several third-party tools and softwares to analyze the digital marketing campaign performance. So that’s why it’s important for brands and entrepreneurs to embrace the effectiveness of the dynamic QR codes.

    The key steps in how dynamic QR codes work are:

    1. Creation: A dynamic QR code is generated using a QR code generator or software. During this process, a URL (web address) pointing to the server or database is typically included in the QR code.
    2. User Scanning: When a user scans the dynamic QR code using a smartphone or QR code reader, the app decodes the code and sends a request to the included URL.
    3. Server Interaction: The server receives the request and dynamically generates the relevant content. This could be a webpage, text, image, or any other data.
    4. Content Display: The server then sends the content back to the user’s device, which displays the updated information.
    5. Tracking (Optional): Dynamic QR code systems often include tracking capabilities, allowing the QR code owner to collect data on how often the code is scanned.

    Static QR code vs. dynamic QR code

    Most businesses have been using static QR codes for a while without fashioning the innovation in the process. Therefore, it’s vital to discuss the core differences between a static and dynamic QR code to bring clarity to the readers’ minds.

    Let’s do a side-by-side comparison of static and dynamic QR codes to give you perspective on capitalizing on this fantastic marketing and engagement
    opportunity:

    Static QR CodesDynamic QR Codes
    PermanentEditable
    Non-TrackableTackable
    No Retargeting CapabilityRetargeting Capability
    Long Clunky URLShort URL
    Takes Time To ScanQuick Scanning

    Static QR Code

    • Static QR codes are permanent and cannot be edited, which is the key difference between both types of QR codes
    • The data linked to a static QR code remains unchanged indefinitely no matter what QR software is used to create the code
    • One of the factors of static QR codes is that they can’t be tracked regardless of the QR code generator
    • A huge perk of creating a static QR code is that it’s free to use and the users don’t need a subscription to create a QR code
    • Static QR codes are compatible with both Android and iOS devices

    Related: QR Code Sharing with Bio Link

    Dynamic QR Code

    • The biggest perk of the dynamic QR codes is that they are editable and trackable, making them ideal for businesses to alter the stored information going forward
    • Dynamic QR codes flawlessly redirect users to various types of information, such as website pages, videos, podcasts, and other information sources
    • Users can easily store rich media content like videos, images, audio, or custom webpages using dynamic QR codes
    • Dynamic QR codes are easy to alter anytime a user wants to update the information
    • Analytics help marketers analyze the performance of their content or product. The performance of the dynamic QR codes can be tracked to analyze the campaign outcome
    • A dynamic QR code campaign can provide access to detailed reports, showcasing information about the total number of scans, scan locations, scan times, and the scanning device
    • Dynamic QR code allows users to integrate the QR code with third-party tools, such as Google Analytics, Zapier, and other SAAS products
    Replug Branded Short Links CTA
    Replug Logo
    A complete link management solution
    for marketing professionals & agencies.
    Try Replug for free

    Examples of QR codes

    QR codes are a rapidly growing trend without a doubt. Businesses of all sizes are adopting QR codes for marketing and engagement purposes.

    Let’s shed some light on the diverse use cases of QR codes to understand the acceptability of this innovation:

    i. Netflix: Household verification

    Netflix QR code Example

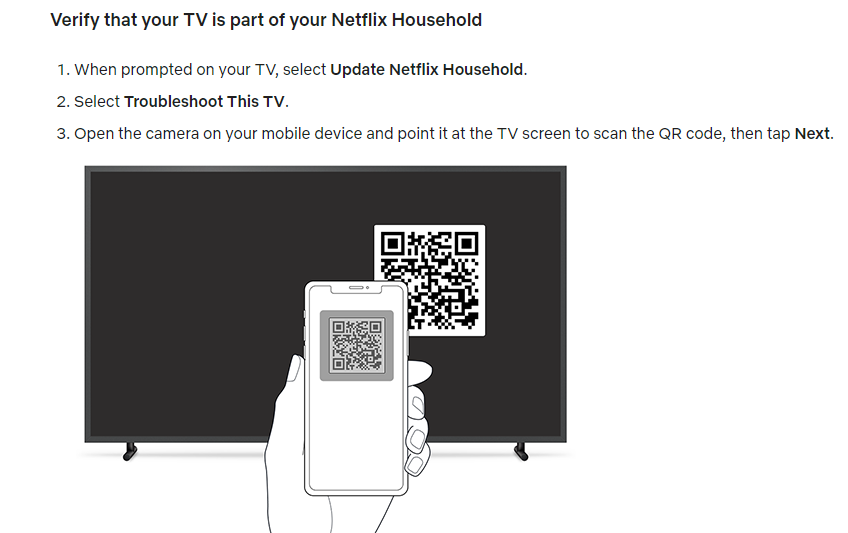
    Netflix is a popular OTT streaming service that has millions of users globally. The streaming platform recently implemented a household user verification system through QR codes.

    Netflix asks the users to verify their identity to ensure that the subscription is in the same household when the user logs in on a different device or through a different internet connection.

    The users are required to scan the QR code using their smartphone’s camera and then they’re redirected to the Netflix app once it’s verified.

    Key takeaways:

    • Streamlined sign-up process, reducing friction for new users.
    • Enhanced user engagement and personalized recommendations for existing users.
    • An intuitive and convenient way to access the app’s features using a smartphone’s camera.

    ii. AliExpress triggers app installations through the dynamic QR codes

    AliExpress is a well-known Chinese e-commerce platform with customers across the globe.

    This e-commerce giant has been using the QR code to direct the audience toward their respective mobile app store.

    The iPhone users are redirected to the App Store, whereas the Android users are redirected toward the Google Play Store.

    So it’s yet another use case of QR code that’s worth noticing. Brands could elicit this strategy and use the QR code to increase their mobile app downloads for more sales and engagement.

    Key takeaways:

    • Dynamic QR codes offer a streamlined and efficient way for e-commerce platforms.
    • Brands could elicit this strategy and use the QR code to increase their mobile app downloads for more sales and engagement.

    Related: How to Link a QR Code to a Website: A Quick Guide

    Use cases & uses of QR codes

    Restaurant menu use case of qr code

    Now that we have seen some popular examples of dynamic qr codes. But the story does not end there, as there are a number of ways you can use QR codes.

    Let’s have a look at the use cases below where dynamic QR codes can be valuable.

    i. Marketing Campaigns:

    A company runs a marketing campaign with dynamic QR codes on promotional materials. Using it, they can monitor how many times the QR code is scanned, where and when scans occur, and the conversion rate to gauge the campaign’s success.

    ii. Contactless Payments:

    Dynamic QR codes are employed for contactless payments, where customers can scan the code to make payments at stores, restaurants, or for online purchases.

    iii. Retail price updates:

    Retailers can update the pricing information on their products by utilizing dynamic QR codes on price tags. This is especially useful during sales or when price changes are frequent.

    iv. Inventory tracking in a warehouse:

    Warehouse staff can update the QR code to indicate changes in the contents of a shelf or aisle. This allows for accurate and up-to-date inventory tracking without the need for manual record-keeping.

    v. Product recalls:

    If a product recall is necessary, the company can update the QR code to provide consumers with recall instructions, replacement options, or safety information. This ensures that consumers have access to the most current and critical information.

    vi. Restaurant menus:

    Restaurants use dynamic QR codes on printed menus to provide customers with access to digital menus. These menus can be updated in real-time to reflect daily specials, pricing changes, or new dishes.

    vii. Emergency contact information:

    In case of an emergency, first responders can scan the QR code to access the person’s medical history and emergency contacts. The individual can update this information as needed, ensuring accurate data is available during critical situations.

    The above cases are just to name a few. These codes can be further utilized in various services departments like travel, real-estate, event management etc. These codes essential in making life easier through real-time updates and convenient processes.

    When it comes to QR codes, the benefits are greater than we think. Let’s dive in further to learn about the key benefits.

    Benefits of using a dynamic QR code

    Dynamic QR codes have relatively broader capabilities as compared to static QR codes. No wonder top brands, marketing agencies, and social media influencers prefer dynamic QR codes for marketing and user engagement.

    Let’s take a look at some of the benefits of using a dynamic QR code:

    i. Easily editable

    The first and foremost benefit of a dynamic QR code is that it can be edited going forward. The information attached to a dynamic QR code can be altered if needed. On the contrary, the static QR codes can’t be edited once created. The QR code is editable, which makes the dynamic QR code a clear choice for most brands and companies. It’s one of the differentiators between dynamic and static QR codes.

    ii. Track performance

    Static QR codes aren’t trackable, whereas dynamic QR codes can be tracked. Performance tracking makes dynamic QR codes more effective from the data and analytical standpoint. Brands and e-commerce websites use dynamic QR codes so that they can track their products’ reach, engagement, and sales.

    iii. Fast processing

    Dynamic QR codes are quicker when it comes to processing. The static QR codes are generally free to create. However, dynamic QR codes are available on premium plans. Therefore, it’s crystal clear that dynamic QR codes would be faster than static ones.

    iv. Third-party integrations

    Third-party tools integration takes any tool or service to the next level. When it comes to dynamic QR code generators, they seamlessly integrate with other tools for marketing and management. Marketers and brands may want to connect their QR codes with analytics tools to keep track of their QR codes’ performance.

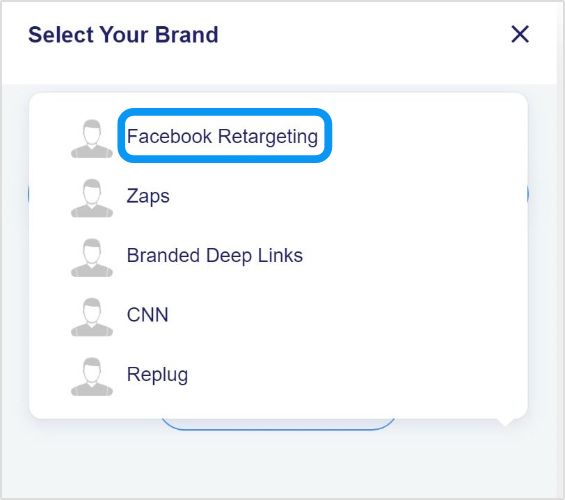
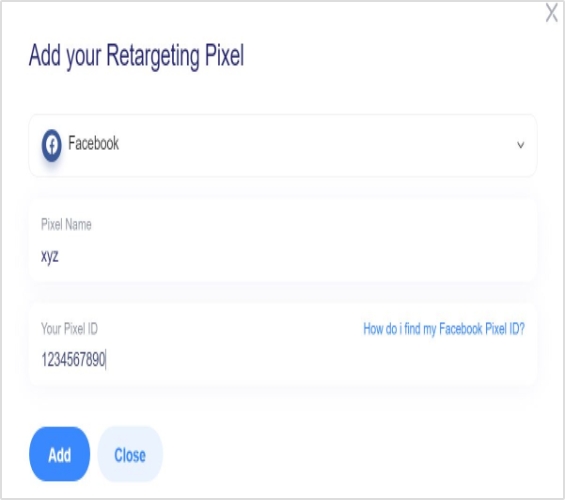
    v. Retargeting capability

    One of the benefits of dynamic QR codes is that they can be used for retargeting the audience through ad networks such as Facebook ads and Google ads. The marketers can launch a retargeting campaign targeting the visitors who scanned the dynamic QR code and increase the likelihood of a conversion.

    Add a dynamic QR code to your website using Replug

    Replug-Link-Management-solution

    Adding a dynamic QR code to your website, landing page, or app would be a game-changer in engaging prospective customers or new visitors from a standpoint.

    Since the QR code makes it easier for the visitors to access the stored information, the visitors would be able to access the URL or other information swiftly.

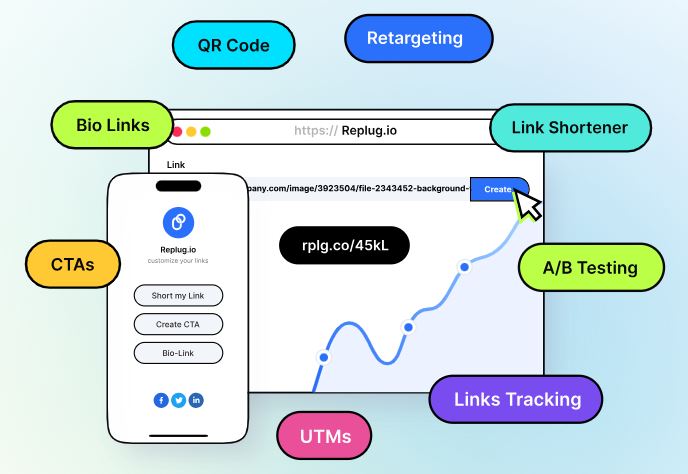
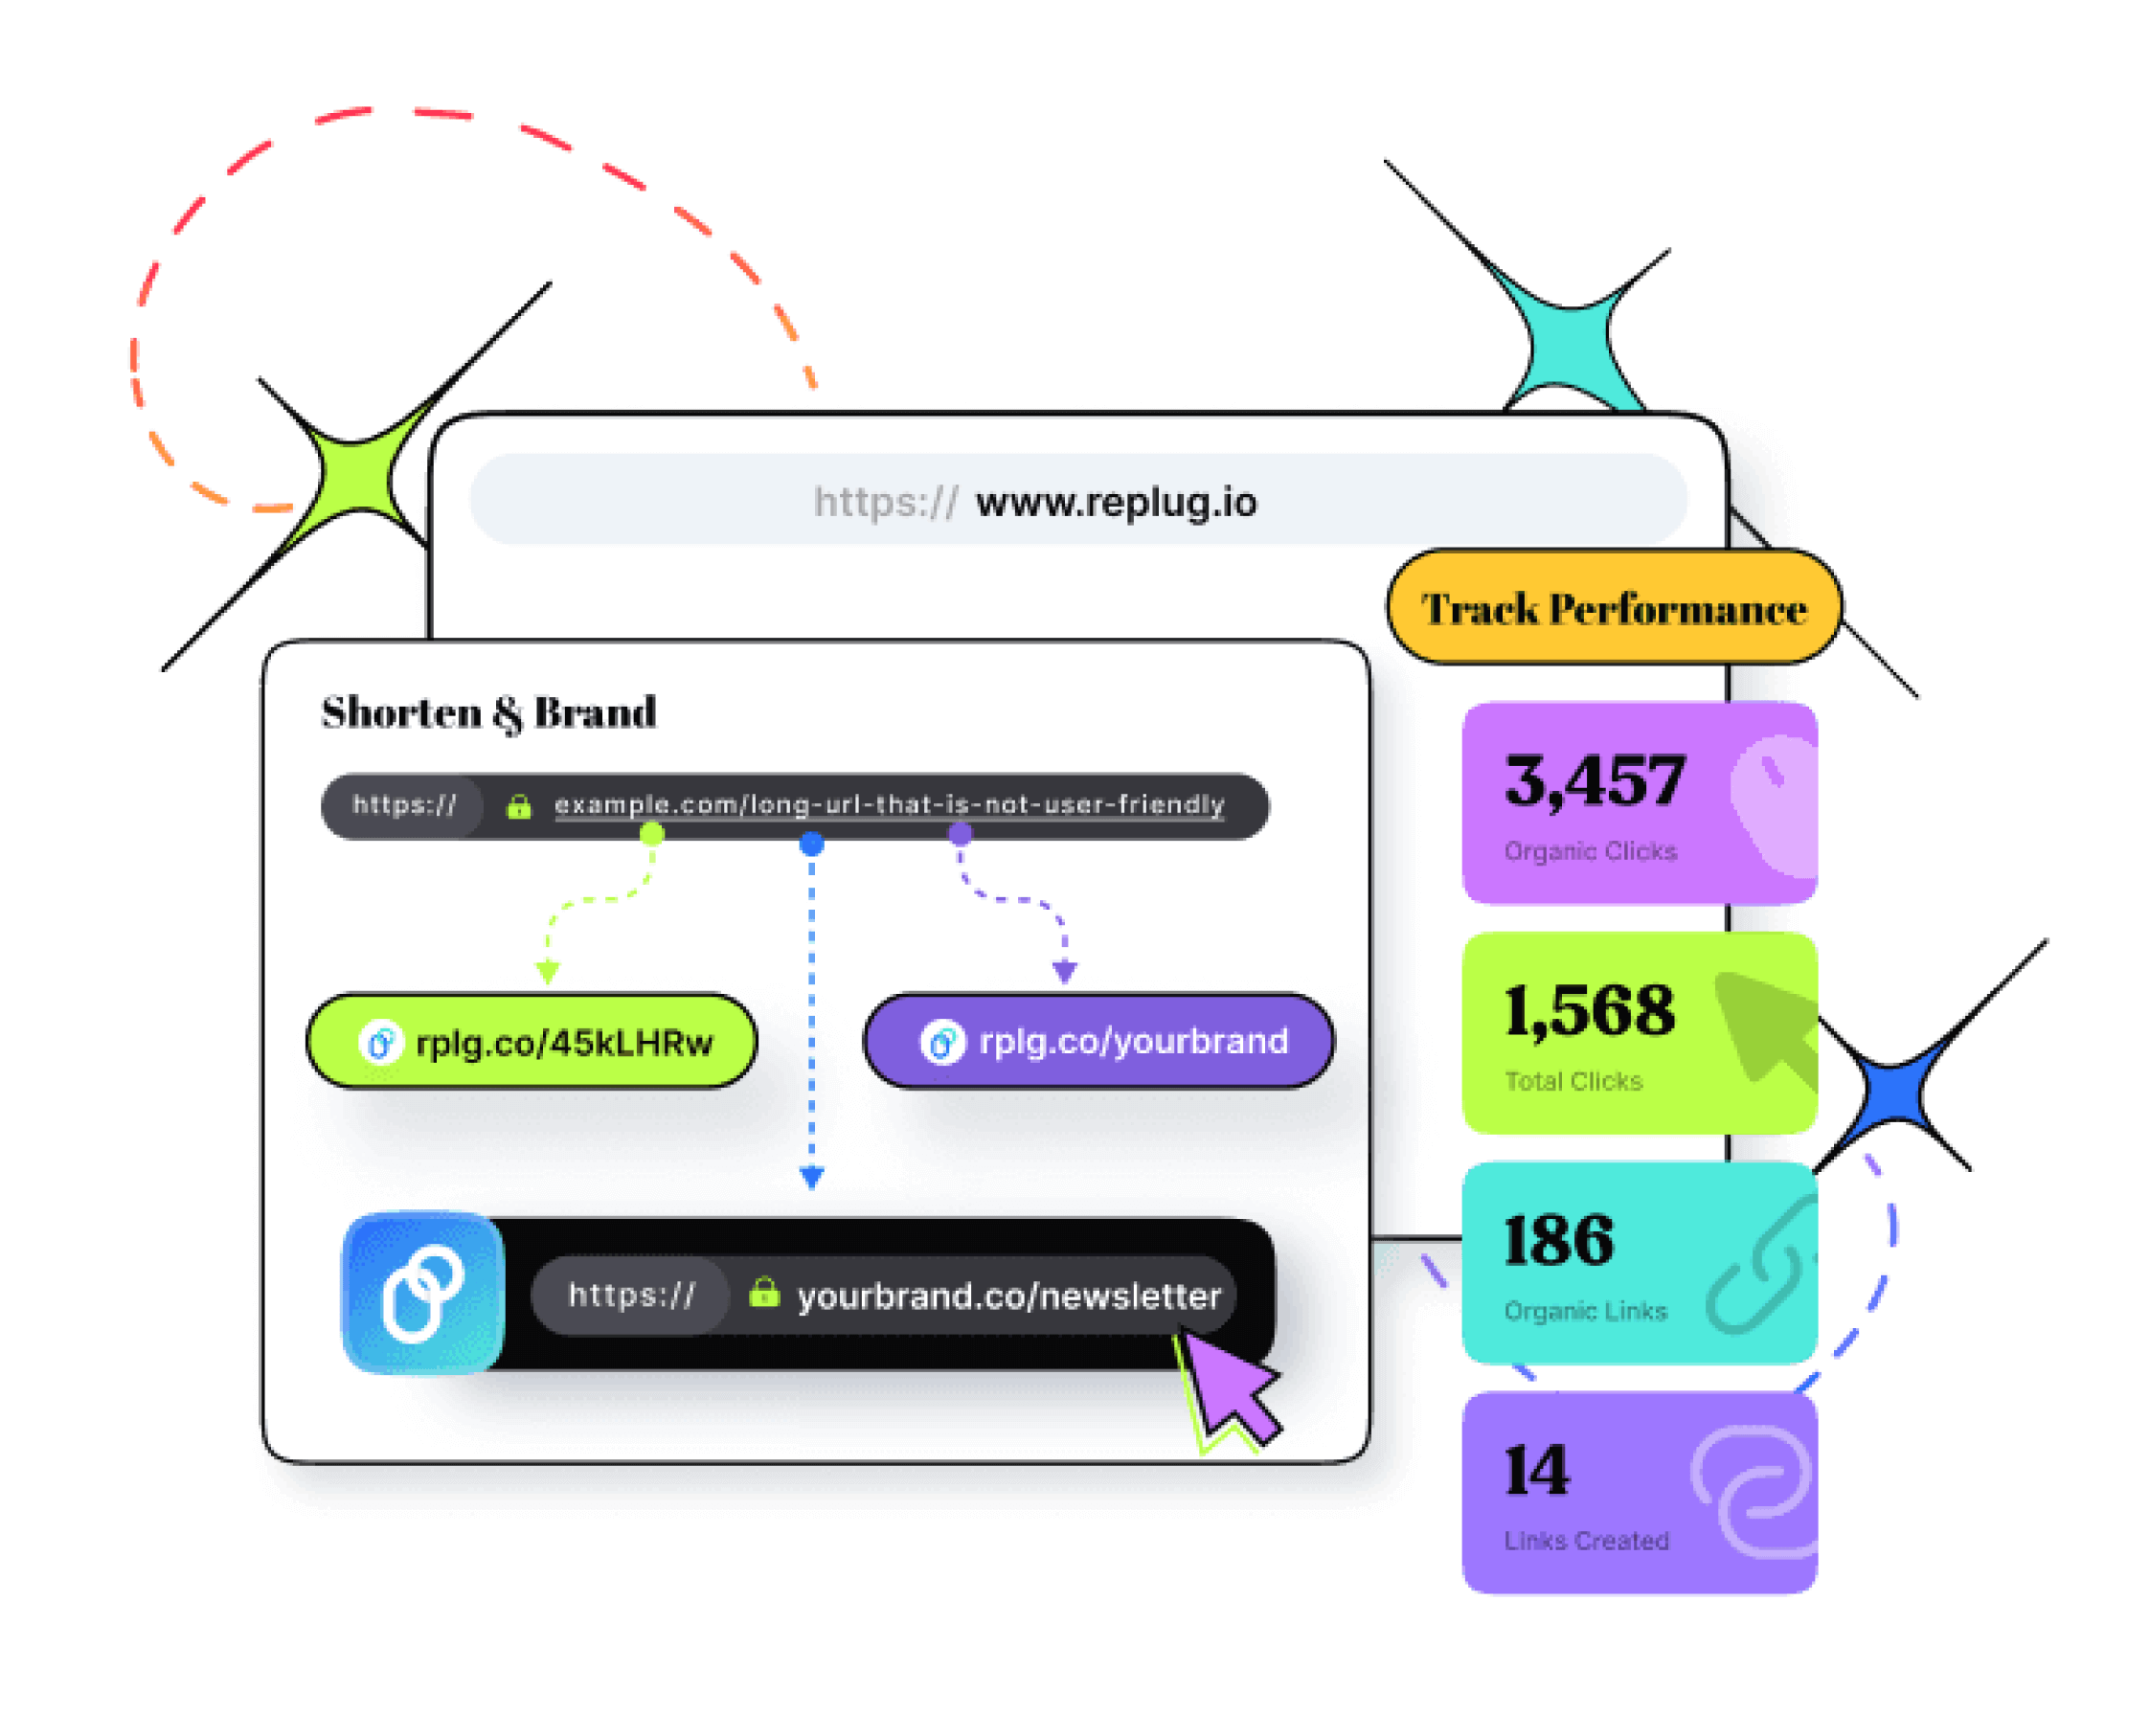
    Replug is one of the best URL shortening and link management tools. One of the features of Replug is QR code generation for the shortened URLs.

    Here’s how you can add a dynamic QR code to your website link using Replug:

    Step 1: Log in to your Replug account

    Replug-log-in

    Start by logging in to your Replug account using your credentials.

    Create a free account if you haven’t tried it yet. Replug has a 14-day free trial.

    Step 2: Generate a short link

    quick-replug-link

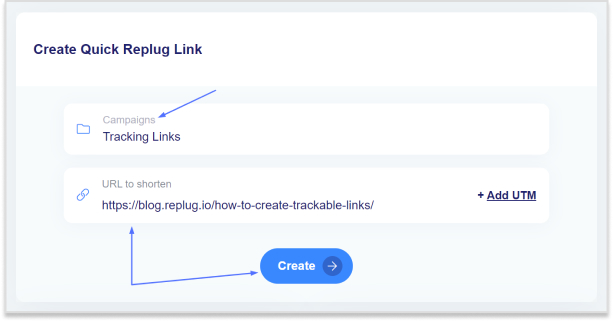
    After logging in, the next thing you should do is to generate a short link that you want to associate with a QR code. This can be a link to your website, content, or any other online resource. Replug will automatically generate a QR code for it. You don’t need to do anything specific to initiate this process.

    Replug Branded Short Links CTA
    Replug Logo
    Maximize marketing ROI
    by transforming ordinary URLs into
    branded short links that convert.
    Try Replug for free

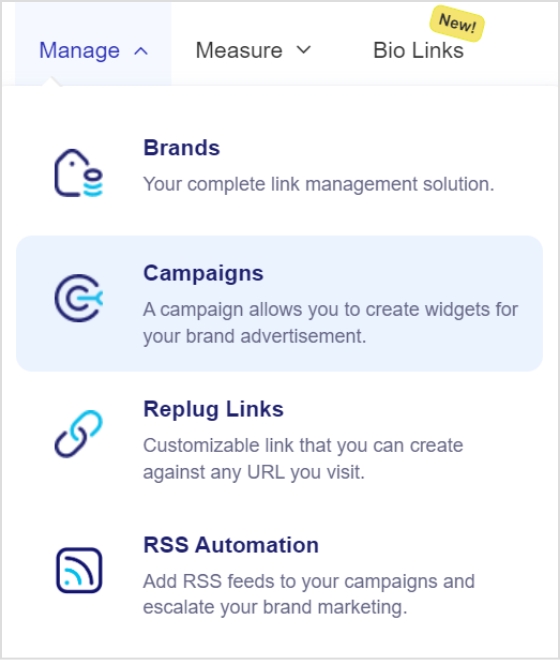
    Step 3: Access the “Manage” section

    manage and replug links

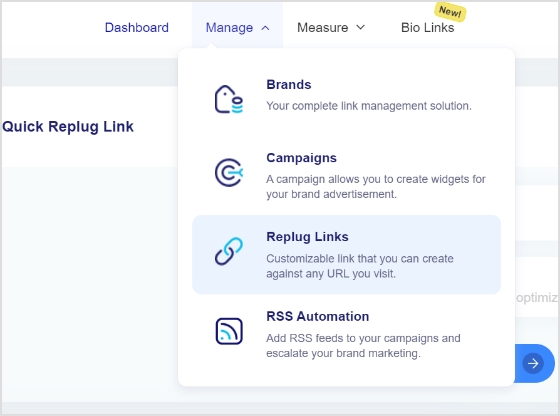
    Once a short link is created, navigate to the “Manage” section within your Replug account. Then select “Replug Links” to proceed further to get your QR code.

    Step 4: Locate the link

    download-qr-code

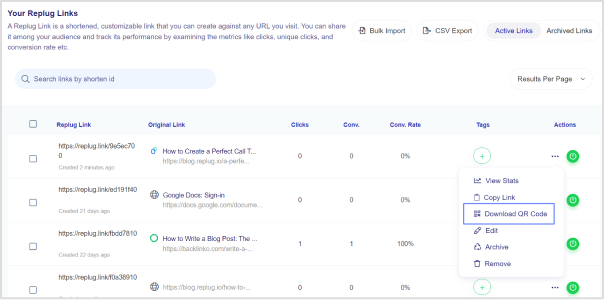
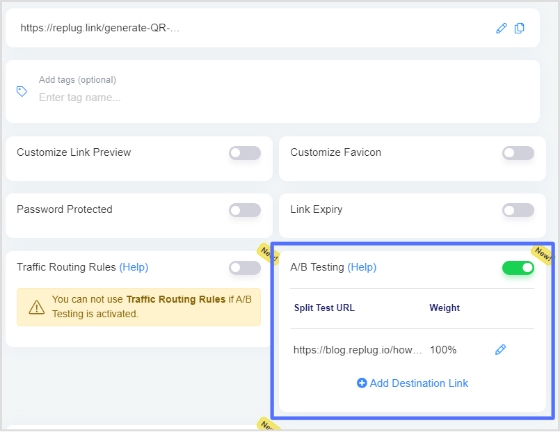
    Now locate the specific link you want to download the QR code for to proceed. To get the QR code for the short link you generated, open the settings of the short link by clicking the three-dot icon of that link.

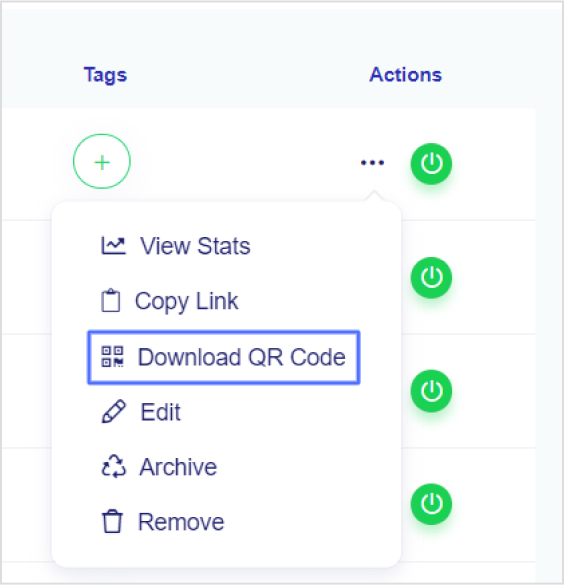
    Step 5: Download the QR code

    Upon clicking on the three-dot icon, a menu would appear. Click on the option that says “download QR code.” It will prompt Replug to generate and download the QR code image associated with your chosen short link.

    download-QR-code

    Once you’ve clicked on “download QR code,” the image of the QR code will be saved to your device. That will be your dynamic QR code for that specific link.

    That’s it!

    FAQs about QR codes

    Let’s take a look at some of the commonly asked questions about QR codes:

    Do dynamic QR codes expire?

    The dynamic QR codes can expire depending on the rules set while creating them. The brand that creates the QR code gets to decide the expiration date of the QR code.

    Can I change the URL on a dynamic QR code?

    Absolutely. You can change the URL on a dynamic QR code. All you need is to go to the QR code tool, locate the respective link, and edit the QR code setting to make the required changes.

    Can I reuse an old QR code?

    A dynamic QR code could be reused if it’s changed, meaning the information has been altered or updated for reuse. However, the static QR code can’t be changed or reused once created.

    Which QR codes never expire?

    Static QR codes never expire. Similarly, these QR codes can’t be edited or changed once created. You may have to create a new one if you need to make some changes to the stored information.

    What is a unique QR code?

    Every QR code is unique. The QR pattern makes them different from one another. The reason why it’s necessary for a QR code to be unique is to ensure that it stores and accesses the appropriate information.

    You may also like:

  • What are Dark Posts on Social Media?

    What are Dark Posts on Social Media?

    Have you ever heard of the dark posts in your social media management journey?

    Most of you haven’t heard about it until recently. Even though dark posts have been around for over a decade, it’s a concept still new to most of us.

    Well, if you have been paying attention to social media marketing, then it’s worth going deeper into this and figuring out how to use dark parks on social media going forward.

    So let’s cut to the chase.

    Origin of dark posts

    The concept of dark posts was introduced by Facebook in 2012. It was later adopted by all major social media platforms, such as Twitter, LinkedIn, Pinterest, and YouTube.

    The dark posts are targeted ads that are tailored toward a specific segment of the audience and these posts don’t appear on the timeline for everyone.

    Moreover, the posts don’t have the sponsored post or promoted post attribution, which makes this type of post quite unique.

    Advertisers and digital marketers publish dark posts across all major social media platforms mostly to A/B test the performance between dark posts and regular ads.

    Example of a dark post

    You already know that a dark post doesn’t appear on the page’s feed. Instead, it appears on the timeline to a select group of users.

    The purpose of a dark post across all social media platforms is to target the specific audience who hasn’t followed the brand just yet.

    So after understanding the concept behind this type of social media post, it wasn’t difficult to spot a dark post.

    Here’s an example of a dark post on Facebook:

    Quick-books-Example-dark-posts-

    It seems like Intuit QuickBooks is using dark posts on Facebook to reach out to the targeted audience that has probably heard about them before but hasn’t engaged with them properly.

    It was a Facebook ad that appeared on the home feed. In fact, you won’t find that very post anywhere on their Facebook page.

    Why use Facebook dark posts?

    Some of you might be wondering why we need to use Facebook dark posts. Well, there is a reason why a social media platform provides users with a feature – Facebook’s dark posts feature is no different.

    There are a handful of reasons why you should be at least testing out this Facebook ad strategy.

    Let’s take a look at some of them:

    1. Precise targeting

    Precise targeting is the mark of a perfect social media ad campaign. Facebook dark posts offer unparalleled precision in audience targeting, which makes them special.

    Unlike regular Facebook page posts that are visible to most followers, dark posts hit the bullseye as they aren’t intended to reach everyone. Instead, they’re tailored to reach a specific group of audiences based on the given demographics, interests, and behaviors.

    2. Avoid timeline clutter

    Big brands and organizations run multiple Facebook ad campaigns. Since showcasing multiple ads to the same audience could be overwhelming for the audience, dark posts come to the rescue as they don’t clutter your brand’s timeline.

    Moreover, dark posts remain invisible to your followers as they’re targeting the prospective audience. This way brands avoid timeline clutter by opting for Facebook dark posts.

    3. Split test Facebook ads

    Dark posts make split testing easier than ever. Advertisers can create multiple variations of the same ad and test them on different target audiences without overwhelming their followers.

    The advertisers would learn which combination of the ad copy, ad design, and target audience works best. As a result, it would immensely refine the brand’s social media advertising strategy.

    4. Optimized Ad spend

    Ad spending could go out of control if you don’t know what you’re doing, especially when you’re running ads with a tight budget. One of the reasons why dark posts work is that they appear only to the intended audience.

    Moreover, advertisers can optimize the ad spend by improving the targeting, behaviors, and interests of the prospective audience.

    5. Tailored engagement

    Every marketer dreams of getting a ton of engagement on both social media ads and organic posts. Dark posts are a great way to get traction by crafting relevant and thought-provoking ads for a specific audience.

    It massively increases the relevance of your ads, making them more impactful to get the desired results.

    6. Unobtrusive advertising

    Dark posts make it easier for brands and experts to target a select group of audiences without bombarding the same offer to the broad audience base. This subtlety can make a lot of difference in the outcome of the Facebook ad campaign.

    How does dark posting work?

    Dark-posts-ads

    Dark posting on social media platforms is not rocket science. Users can dark post on almost all major social media platforms like Facebook, Twitter, LinkedIn, and TikTok.

    The way it works is quite simple. Dark posting is an advertising strategy that allows advertisers to publish ads targeting a certain segment without shoving the offer down the throats of existing followers.

    Dark posts are also known as “unpublished posts” on Facebook. The reason is that such posts are used as ads only. However, Facebook provides users with an option to publish the dark post later on the page like a regular Facebook page post.

    To ensure the proper publishing of a dark post, make sure you opt for the “only use this post for an ad” option while creating your Facebook ad.

    We’ll dig deep into the benefits of dark posting on social media platforms later in the article. Just make sure that you have understood the fundamental idea of how dark posting works.

    How to identify a dark post social media ad?

    Digital marketers and online advertisers may spot a dark post from miles away. It’s essentially an ad just like any sponsored post or boosted post, but it isn’t necessarily intended for the existing customers.

    Moreover, experts identify a dark post by looking at the offering as well as visiting the brand’s page to see whether or not the post exists on the timeline.

    Here’s an example:

    Dark-Post-Example

    IDP Education is an education and visa consultancy service that helps students with studying abroad, admissions, and visa services.

    They published a dark post on their Facebook page which wasn’t available on the Facebook page’s feed. So that’s how it was easily stood out.

    Here are four ways to quickly identify a dark post on social media :

    1. They don’t show up on your page’s timeline

    One of the ways to identify a dark post is that it doesn’t show up on the page’s timeline. One can spot a dark post by looking through the brand’s page that whether or not the same ad is posted as a normal post. Usually, a sponsored or boosted post can be seen on the page’s timeline, but it’s not the case with dark posts.

    2. They don’t appear on your followers’ feed

    Just like they don’t show up on the page’s timeline, these posts don’t appear on the followers’ feeds. This is the difference between a regular ad and a dark post. A normal ad might be appearing to the current followers depending on the audience targeting, interests, and behaviors. However, the dark posts won’t do that.

    3. These posts are only displayed to the targeted audience

    Since dark posts don’t appear to the existing followers, these posts are used to target a specific segment of the crowd that hasn’t been following you on social media. Each brand has a buyer persona when trying to reach out to new audiences, and that’s where dark posts come in handy.

    4. They are mostly discount or coupon offers

    Brands, agencies, and companies use dark posts to get traction using discount offers, coupon codes, and other enticing offers. The purpose is to engage the new faces and bring them into the marketing loop. So dark posts could be used to reach new audiences by offering discounts and coupon codes.

    Facebook dark post ads benefits

    Facebook Dark Post Ads

    We’ve discussed how these types of social media ads work and how to spot these ads across different social media platforms. Let’s shed some light on the benefits that they provide to the advertisers:

    1. Easier to target a specific audience

    Dark posts are paid posts that don’t target your existing audience on social. In fact, these posts target the new users who haven’t followed you or your business page just yet. These posts help brands and entrepreneurs put their products and services in front of new audiences.

    2. No bombardment of sponsored posts on the feed

    Since dark posts don’t show up on the feeds of the existing followers, these types of posts don’t clutter followers’ home feeds with sponsored posts. Nobody wants to see the sponsored posts from the brands or experts they’re already following.

    3. Test out new ad strategies without disturbing the existing followers

    Dark posts provide a segue into testing out different ad strategies without making a mess. One of the fears of online advertisers is that they don’t want to disturb the existing customers or followers in any way.

    For instance, offering the same product to customers who have already bought the same product would be a bad move.

    4. Experiment with new content trends

    Experimenting is the key to winning on social media. Don’t shy away from testing out different types of content formats, styles, patterns, and tactics.

    Social media trends change over time, so it’s necessary to keep up with the new trends and capitalize on them when they’re in the trend. Dark posts could be a fantastic way to test out new content trends to see how people react to them.

    5. No appearance on the timeline

    One of the benefits of dark posts is that they don’t appear on the timeline of the advertiser’s page, which means the followers don’t have to see every offer the business is creating for new or unpaid customers.

    The dark posts only appear to the audience it is intended to reach out to on the social media platform.

    How to create dark posts on Facebook?

    Dark posts are paid ads, but they don’t show up to the existing customers. If you’re curious about how to start experimenting with dark posts on Facebook, then allow me to share my two cents on the process.

    Let’s head over to the few simple steps to understand how to create this type of Facebook post:

    Step 1: Navigate to Ads manager

    To create a dark post on Facebook, go to the Facebook Ads Manager, which serves as the central hub for managing your Facebook ads campaigns.

    Now click on the drop-down menu located at the top left corner and choose the “Page Posts” option under the “Create & Manage” section.

    Once you find this option, move on to the next step and carry on the rest of the process.

    Step 2: Create the dark post

    Find the “Create Unpublished Page Post” option at the top and click on it to initiate the creation of a new dark post.

    Provide your ad details, ensuring that it reaches the right audience. Moreover, when specifying how to utilize the post, opt for “Only use this post for an ad.” Doing so ensures that the post remains hidden from public eyes and would only reach a select group of the audience.

    Step 3: Select target audiences

    Target audience is one of the fundamentals of any type of digital ad. Advertisers can utilize preexisting segmented ad sets if they’ve created ads previously. However, if you’re new to this, you’ll need to establish audience segments while creating a new ad.

    Advertisers have the option to specify their audience’s demographics such as age, gender, location, language, behaviors, and interests to make the ad campaign more authentic and helpful.

    Step 4: Check & balance on the dark post performance

    It’s vital to keep a check-and-balance on the dark posts’ performance. Don’t hesitate to A/B test
    different ad types, formats, and styles to see which works better for your brand.

    You can conduct a split test on your dark post and based on the results optimize your post accordingly. Moreover, you can modify your audience parameters as needed.

    How to analyze the Facebook dark posts?

    To analyze the Facebook dark posts, you would have to look at different numbers, graphs, and data. However, it’s not as tricky as it may sound like. Anyone with a little bit of Facebook ads experience can analyze the dark posts’ performance.

    Here’s how to do it:

    1. Compare the performance with regular ads

    Start with comparing the Facebook dark posts’ performance with regular ads or sponsored posts. These regular Facebook ads would appear on the page’s timeline. Plus, they might be showing up to some of the current followers as well.

    The idea is to run both types of Facebook ad campaigns and see if there is a difference in the outcome of the regular ads and dark posts. This will give you an idea of how well or badly your dark posts were performing.

    2. Split-test different dark posts

    Once you’re done comparing dark posts with regular Facebook ads, try split-testing the dark posts with one another. It means you’ll be running multiple dark posts on the same subject and see how they perform.

    You can further analyze the winner’s dark post to see what was the differentiator that put the winner’s dark post ahead of others. Harness the power of A/B split testing by comparing different dark posts and trying to find the reasons behind this.

    3. Check the ROI of the dark posts

    ROI is a popular metric used in digital marketing to analyze the effectiveness of any marketing tactics or strategy. One of the ways to analyze Facebook’s dark posts is to see the return on the investment.

    These are essentially paid posts on social media platforms, so there is no harm in analyzing the ROI of one type of paid post to another type of paid post.

    4. Keep an eye on the niche preference

    Some dark posts may outperform other dark posts from a performance standpoint. Sure, there might be technical differences, which might make the comparison irrelevant. However, there will be some cases where this won’t be an issue.

    Keeping an eye on the niche preference means in some niches dark posts or advertising on social media in general would perform better than the others.

    It’s necessary to figure out whether or not the dark posts make sense in this niche. Otherwise, you might end up wasting your time and money.

    FAQs about dark posts

    Are dark posts paid?

    Yes, the dark posts are paid posts. However, they are slightly different from the regular paid posts from the targeting standpoint.

    Why is it called dark post?

    Dark posts are dark posts or unpublished posts because they don’t appear to the current followers. Instead, they only show up to the new audiences.

    What is the difference between a dark post and an organic post?

    The main difference between a dark post and an organic post is that the dark post reaches the audience through paid advertising. Whereas the organic post reaches the audience naturally through content popularity or recommendation.

    You may also like:

    What is “Dark Traffic” & How Should You Deal with It?
    Conversion Pixels 101: Optimize Your Conversion Strategy
    Retargeting Ad Examples That Convert & Drive Growth
    How LinkedIn Retargeting Ads Work?

  • A Definitive Guide to URL Filtering

    A Definitive Guide to URL Filtering

    Have you ever tried to access a website at school or library but it wasn’t accessible there? The reason is that there might be a URL filter in place to block the entire website or specific pages.

    Most universities, organizations, and libraries URL certain URLs that are inappropriate or illegal to access and may result in harming the integrity of the institution.

    Often companies and banks don’t allow employees to access social media platforms on their internet connections to ensure discipline and focus during work hours.

    If you’re not sure what it is and how it works, then let’s crack it open.

    What is URL filtering?

    URL filtering is a cybersecurity technique that blocks specific websites’ access to users based on predetermined criteria. A URL filter is mostly applied on the local network level at a workplace, but it could also be set on a state or country level.

    The idea of implementing URL filtering is to improve network security or restrict the end users from accessing certain websites by limiting the URLs or web content that users can access.

    Once a URL filter is in place, the blocked websites or apps aren’t accessible to the end users unless the filter is removed from the network.

    Related: Password protected links

    What does a URL filter do?

    The way a URL filter works is that it begins with checking the website URLs to ensure that this URL isn’t one of the blocked websites. If the URL matches with the forbidden site URL, the URL filter immediately responds and halts the accessibility.

    As a result, a URL filtering system implements an administrator-defined URL restriction policy to prohibit website users from accessing specific URLs.

    URL filter works as a gatekeeper for internet access, assisting enterprises and organizations in enforcing internet usage policies and preventing users from potential malware or hacking threats.

    Use cases of URL filtering

    To understand URL filtering better, it’s best to study the use cases of this website usage-controlling technique. Here are three of the many use cases of URL filtering:

    i. Blocking explicit websites

    Some countries have a strict policy against pirated content and pornography websites. They ban all such websites for obvious reasons. The mechanism behind banning these websites is URL filtering. The governing authorities set a URL filter that blocks out the designated websites.

    ii. Banning social media platforms

    TikTok-Ban-India

    Another common use case of URL filtering is the banning of social media platforms. Such a ban could be due to a conflicting policy or not abiding by the local laws. India banned TikTok in 2020 along with other Chinese apps amid political tensions with China. Pakistan also banned YouTube several times due to the blasphemous content on the platform.

    iii. Restricting the messaging apps usage

    One of the use cases of URL filtering is to restrict the use of a specific service. For instance, you can’t make voice calls on WhatsApp in UAE and Saudi Arabia. These Middle Eastern countries have banned the use of VoIP services, such as Skype, WhatsApp, and Viber. The users go for alternative apps, such as Botim or Comera.

    Example: TikTok got banned in several colleges in the US

    NBCNews published an article in January 2023 sharing the news of the TikTok ban in several colleges in the US after the vertical videos app was banned on state-owned devices and networks. It wasn’t the first time TikTok got banned or came into the headlines for unpleasant reasons.
    URL filtering comes in handy when a telecom authority or government decides to halt the use of an application or accessibility to a website. The above-mentioned examples are fine examples of exercising the power of blocking an online platform.

    How does URL filtering work?

    URL Filtering- Restrict Access

    URL filtering is a security measure that controls web access within a network. Its sole purpose is to block specific URLs based on the given criteria.

    When a user tries to access a blocked URL, they are redirected to a “blocked” page. Hence, they come to know that this website or URL isn’t accessible from their territory or IP address.

    Keep in mind that URL filtering can target individual URLs or entire websites, allowing efficient control over the type of content accessible.

    Sometimes, websites or apps block out the users due to suspicious activity from the user end. As a result, they block the account or IP address so that the accessibility is cut off for further investigation.

    It’s vital to understand that URL filtering works at the protocol level, such as HTTP, FTP, and SMTP. It monitors accessibility requests using these protocols, blocking them if they target a prohibited URL and redirecting users to a block page.

    The Internet and telecom governing bodies usually control, monitor, and analyze web accessibility. Therefore, these institutions have the power to implement URL filtering. As a result, a single URL or a number of website URLs can be blocked out, including those related to VoIP services.

    Related: What Does HTTP 302 Code Means?

    URL filtering process

    Here are the steps involved in the URL filter setup:

    i. Set filter configuration:

    The first and foremost step is the configuration of the URL filtering system which takes place at the main body that controls the internet. It usually is the telecom and communication department of the government. Once a URL filtering system is developed and installed, the authority can put any URL (and its sub-directories) on the block list.

    ii. URL database creation:

    The next up in the process is to create a database of blocked websites to put the restricted or banned websites on it. Once the URL is added to the list and the direction has been forwarded to the telecom, mobile, and internet operators across the country, the website becomes inaccessible to the public.

    iii. URL requests monitoring:

    Once this URL filtering system starts to function properly, the system tracks every URL request that is being created by internet users. It keeps an eye on the URL requests so that it can create an appropriate response if the blocked URL is requested on the network.

    iv. Trigger the response:

    The URL filter closely monitors the web traffic on the network and triggers the response if a blocked website is requested from the user end. The way it works is that if the requested URL is matched with the URL on the blocked URLs list, it immediately raises a red flag. Eventually, the user won’t be able to access the URL and see the error in the browser instead.

    URL filtering best practices

    While the steps to implement URL filtering are essential to the process, some of the best practices would come in handy too.

    Here are a few URL filtering best practices:

    i. Define a set of rules for URL filtering:

    One of the prerequisites for URL filtering is to define the rules for the process. It would eventually help design the whole process from software development to strategy implementation on the ground. So set the rules for the URL filtration setup.

    ii. Build a secured URL filtering system:

    When the rules are made, the next up is the implementation through building a powerful URL filtration system. URL filtering software is designed to detect, block, and report suspicious activity, such as accessing a banned website. This system gets authorization from the telecommunication ministry when it’s a nationwide system or from the network server room when it’s implemented at an organization.

    iii. Keep the URL filter database updated:

    One of the best practices of a successful URL filtering system is to keep its database updated. The list of blocked websites and apps must be updated on the list. When the ban is lifted from a website or app, the users may not be able to access the website or app unless the URL is unblocked or removed from the database.

    iv. Train a select group of employees to manage the system:

    It’s best to train a small team of operators who can understand and manage the whole URL filtering system. The reason is that the alternative team member should be able to manage the URL filtering in case of an emergency. It’s not viable to have a one-man show when it comes to network security or URL filtering.

    Related: Track links through filters

    URL filtering benefits

    Link management is crucial to your digital marketing campaign. URL accessibility, website security, and content theft are pretty serious matters for businesses, especially those who heavily rely on online marketing.

    Installing a URL filtering system has its perks. Let’s take a look at some of the benefits of URL filtering:

    i. Access deniability for specific sites

    One of the key benefits of URL filtering is that it allows companies and organizations to implement restrictions or blockage for specific websites. Companies usually block accessibility to social media, illegal content, and porn websites at workplaces.

    ii. Malware protection

    Some phishing websites could transfer viruses and malware to your computer and phone devices. It’s necessary to identify them through anti-virus softwares on the computers and put them on the blocked website list so that no one can access them on the organizational network.

    iii. Company policy enforcement

    A huge benefit of implementing URL filtering is to enforce the company’s policy toward certain URLs. As mentioned above, these blocked websites could be illegal content sites, porn sites, gambling sites, or other type of sites. The implementation of a URL filter concretes the zero-tolerance policy toward unprofessional and unproductive behaviors at work.

    iv. Bandwidth control

    One of the reasons why companies would want to apply a URL filter on their computer network is to control the internet bandwidth. Since the network administrator could locate the computers on the network and track their activities to some extent, they would know what the employees are spending their time on. URL filtering could help bandwidth control without a doubt.

    v. Increase employees’ productivity

    When a URL filter is installed and employees are unable to access certain apps or websites, such as social media websites, it significantly improves their productivity. The reason is that their attention doesn’t divert to social media apps.

    Vi. Security and compliance with NIST standards

    Aside from improving productivity and protecting against malware, another major benefit of URL filtering is enhancing organizational security protocols. For businesses that handle sensitive data, adhering to cybersecurity guidelines is paramount. One key framework is compliance with NIST standards, which provide a robust set of practices for maintaining secure networks, effectively reducing vulnerabilities. Implementing URL filters can help align your security controls with NIST requirements by actively managing online threats, thereby supporting overall compliance efforts in complex IT environments.

    Best URL filter tools

    Let’s quickly mention some of the best URL filters on the market:

    i. McAfee Web Gateway

    McAfee Web Gateway is a powerful URL filtering solution offered by McAfee. The purpose of this tool is to assist companies and organizations in protecting their networks from phishing threats and malware attacks by providing a shield through monitoring the web traffic.

    ii. WebTitan

    WebTitan is an excellent DNS security tool that protects data and devices from cybersecurity threats and hacking attempts. Moreover, it has an advanced DNS filtering system to control, manage, and analyze network users’ activities for security purposes.

    iii. DNSFilter

    DNSFilter is yet another DNS threat protection and content filtering solution system to implement at an organization for tightening up the web and network security. Once deployed, these security measures protect users from phishing softwares, malware threats, and hacking attempts

    iv. Cisco Umbrella

    Cisco Umbrella is a state-of-the-art filtering software for cybersecurity that helps protect networks by detecting fishy activities. It blocks threatening files from malicious websites when browsing. This software technology offers multiple security tools, such as DNS security, data threat intelligence, secure web gateway, firewall protection, and more.

    v. Secure Web Gateway

    Secure Web Gateway is a cloud-based web filtering software for organizations and large businesses. This security technology is suitable for enterprise-level clients. This URL filtering system is effective, powerful, and scalable for everyone who signs up for a trial account.

    What features to look out for in a URL filtering solution?

    Before you hop on a URL filter to try it out for your organizational network, it’s necessary to know what features to look out for in a URL filtering solution.

    Here are some of the must-have features in a URL filtering solution:

    i. URL & content filtering:

    An effective URL and content filtering system is a must-have feature in a tool like this. Make sure that it allows organizations to block or restrict access to specific websites and content pages, enhancing computers’ security from malicious activities.

    ii. Blocked URL database:

    One of the key features is to have an automatically updated database management of blocked websites. Whenever a new website URL is blocked by the URL filtering system, the database should automatically updated.

    iii. Malware detection:

    It’s a network security feature that scans web traffic for malicious softwares, code injections, and phishing activities. As a result, it prohibits the end users from accessing infected websites, apps, and online tools. It’s safe to say that it significantly reduces the risk of malware and virus attacks on the network.

    iv. Bandwidth controlling:

    Bandwidth check and balance is essential for network administrators to keep the network in proper shape. Some students or employees use an internet connection at work to download large files that go unnoticed. A URL filtering system must be able to keep an eye on the web surfing. When a specific website is being surfed more than usual, the software must alert the administrators.

    v. Users’ authentication:

    One of the features that could be worth implementing is the users’ authentication. Whenever a new user logs in to the office or organization’s network, the person must go through an authentication phase to prove the identity. It will enhance the network security by ensuring only authorized users can access the data or information.

    vi. Analytics & reporting:

    The system should be able to provide detailed insights into internet consumption, most visited websites, software or app usage patterns. It will allow companies and organizations to monitor user activity, mitigate security threats, and prepare reports for network and internet compliance.

    Related: Your Guide To URL Blacklist

    Limitations of URL filtering

    Here are some limitations of URL filtering:

    i. Bypass URL filters

    URL filtering does work in most cases. However, one of the limitations of URL filtering is that there are some tricks to bypass URL filtering, such as VPNs, proxy sites, and DNS change-ups. The only catch is that the end-user has to be an expert at this.

    ii. Privacy issues

    Since URL filtering at an organization allows administrators to restrict and block websites and apps, it also allows admins to keep a close eye on the users’ activities. The admins can access the logs of the network computers to see what users are up to. As a result, URL altering could raise privacy concerns for the users.

    iii. Obfuscation tactics

    It’s possible that hackers and malicious actors are using obfuscation strategies to hide their agenda underneath the content of the website. One of the examples of such activities is that when you install free software on your computer, it secretly installs a couple more without notifying you.

    iv. Labor intensive

    One of the drawbacks of URL filtering is that it’s labor intensive. In most cases, the quality control team at the server has to manually add hundreds of links to block the URLs. Similarly, they may have to go through dozens of URLs when removing a URL from the blocked URLs list.

    v. Constant monitoring

    Undoubtedly, URL filtering could be a daunting task if the system is not automated. In the majority of cases, there has to be constant monitoring to make sure that the URL filter is up and running. Any error or system failure could unblock the blocked URLs, which could raise serious questions about your work.

    vi. Detection mistakes

    When URL filtration has an automatic URL detection and banning system, chances are, the system may end up blocking some URLs by mistake. Sometimes, such filters are keyword-based, which end up detecting and blocking some similar websites based on the look-alike brand names.
    So these were some of the limitations of the URL filtering system.

    FAQS about URL filtering

    Let’s take a look at some of the burning questions in this URL filtering space:

    Should you enable URL filter?

    It depends on the need to implement a URL filtering strategy. Companies with large teams usually implement URL filtering to increase employees’ productivity, work ethic, and output quality.

    URL filtering vs. DNS filtering?

    The difference between URL filtering and DNS filtering is that URL filtering blocks website pages, while DNS filtering blocks domains. DNS filtering ensures that the entire domain, sub-directories, and all associated pages are blocked based on the IP address. While the URL filter also blocks the main URL, allows some parts of the website accessible, in some cases. It’s safe to say that URL filtering is a bit more flexible than DNS filtering.

    Is URL filtering the same as web filtering?

    Web filtering is a cybersecurity element that restricts certain websites and URLs from being accessed on the network. URL filtering is a common web filtering type used by organizations to restrict employees from accessing specific websites or apps.

    You May Also Like:

  • Abandoned Cart Email Examples & Tips That Actually Convert

    Abandoned Cart Email Examples & Tips That Actually Convert

    Have you ever heard the phrase “leaving money on the table”?

    Well, cart abandonment is somewhat similar – the customers leave the website without completing the transaction.

    Cart Abandonment Meme

    Bummer. Right?

    Most e-commerce brands struggle with minimizing cart abandonment so that they can squeeze more money from their website traffic.

    However, it doesn’t happen unless they have a bullet-proof strategy in place.

    To fix the problem, one needs to come up with an excellent shopping cart abandonment email template that tempts the reader to get back to the website and complete the purchase process.

    You’re about to learn:

    • What is a cart abandonment email?
    • Why do marketers send out cart abandonment emails?
    • Why buyers abandon shopping carts in the first place?
    • The best cart abandonment email templates to get inspiration from
    • How to approach a prospect who has abandoned the cart

    But first things first, you must know what the heck is cart abandonment email.

    What is an abandoned cart email?

    The abandoned cart email is the one that you receive in your inbox when you add a product to your shopping cart on an e-commerce website, but leave the site without completing the transaction.

    The purpose of sending an abandoned cart email is to re-engage the customers who left the website without placing the order.

    In some cases, e-commerce brands successfully convert those customers who left the website without buying by sending them the best-abandoned cart emails.

    I’ve seen some SAAS companies send out a discount offer to website visitors who abandon the shopping cart on their website.

    There could be several reasons why customers might abandon a shopping cart, for instance:

    • Got distracted and left the website
    • Found the product on a competitor’s website
    • Changed their mind about buying it

    The reason why it’s important to understand abandoned carts and reach out to those customers is that a customer with a buying intent would add a product to the shopping cart.

    Such customers are way more valuable than those lurkers who click through your offers from social media ads but never end up buying anything.

    So the next time you leave Target or Amazon’s website after adding a product to your shopping cart and receive an email reminder about that product, don’t be surprised.

    Do abandoned cart emails work?

    Most of the time, they do work unless you mess it up in the email newsletter formatting or send it out too late. No wonder it’s a widely adopted sales strategy. It looks like a lot of brands recover lost sales through abandoned cart emails.

    Statistics by Moosend are clear proof that abandoned cart emails actually convert.

    • Cart abandonment emails exhibit impressive engagement statistics. They achieve open rates of over 40%, occasionally even reaching a remarkable 45%.
    • Furthermore, half of these abandonment emails are not just opened but also clicked on, with 21% of the opened emails resulting in click-throughs.
    • The most compelling fact is that 50% of the users who click through these emails go on to complete their purchase. In essence, half of the recipients who engage with the email content ultimately make a purchase, underlining the effectiveness of these campaigns in converting potential customers into buyers.

    What do you write in an abandoned cart email?

    There is a not rocket science. You have to quickly explain to the customers where they left off when shopping on your website. Showcase the product they added to the cart, and place a CTA button that takes them straight to the shopping

    10 abandoned cart email examples to learn from

    Let’s take a look at some of the best-abandoned cart email templates that work for businesses:

    1. Fiverr

    Fiverr is quick to send out an email to buyers who search for a specific gig but never end up placing an order on the platform.

    The freelancing platform finds a bunch of relevant gigs and emails to the buyer. Here’s what I got when I searched for dog-related gigs while doing some research on the platform:

    Fiverr Cart Abandonment Email

    2. Daraz

    Daraz is a popular e-commerce website in Pakistan. It was acquired by Alibaba in 2018. Here’s how Daraz sends out emails if you abandoned carts on their platforms.

    Here’s what I found:

    Daraz Cart Abandonment Email

    3. Kayak Media

    Kayak Media is a software company that makes small software.

    I once wanted to test out one of their softwares, but somehow, I didn’t go through the purchase process.

    Then I received this cart abandonment email which sounds about right:

    Kayak Media's Cart Abandonment Email

    4. NetPeak Software

    Netpeak is yet another software company that immediately sends out cart abandonment emails if you don’t complete the purchase process. Here’s an example:

    NetPeak Cart Abandoned Email Example

    5. Away

    Away is an e-commerce website that sells travel and fashion accessories. I stumbled upon their abandoned cart email template while researching this topic. Here’s what their abandoned cart email looks like:

    Away- Cart- Abandoned Email Practice

    You May Also Like : Retargeting Ad Examples That Drive Growth

    6. Ugmonk

    Ugmonk is a desk accessories e-commerce store that sells aesthetically pleasing and classy office and desk accessories. They send out abandoned cart emails in style as well:

    Ugmonk's Cart Abandonment Email

    You May Also Like: 8 Best Retargeting Platforms

    7. Peel

    Peel is a well-known brand in the phone case space. They sell all sorts of iPhone and Android phone cases. They also send out cart abandonment emails if you don’t complete the purchase and leave their website. Here’s how they send out a reminder via email:

    Peel- Cart- Abandoned Email Practice

    8. Bearsville Soap Company

    Bearsville Soap Company has an interesting approach to sending out abandoned cart emails. They have a brief email copy with a CTA that says, “Return to your cart.”

    Bearsville Cart Abandonment Email Example

    9. ThredUp

    ThredUp comes with a straightforward message in their abandoned cart. They have several things added to their abandoned cart email, for instance, discounted prices, coupon codes, and the CTA.

    Thred-Up Abandonment Email Template

    10. Vans

    Vans is a footwear brand that sells sneakers for kids, women, and men. They adopted a unique yet interesting approach in their abandoned cart email. They quickly remind the customers who abandoned the cart that they’re still holding the shopping cart for them.

    Plus, they go on to mention the products that the customer might also like, which is quite an ambitious approach.

    Vans Abandonment Email Exmaple

    These were some of the examples of abandoned cart newsletters which were using unique and diverse email newsletter templates to attract, re-engage, and convert abandoned visitors. Sure, marketers could take away a lot from these newsletter examples.

    Replug Branded Short Links CTA
    Replug Logo
    A complete link management solution
    for marketing professionals & agencies.
    Try Replug for free

    Abandoned Cart Email Best Practices

    Email-Best-Practices

    Wondering how do I email someone who’s abandoned a cart?

    If you’re curious about emailing customers who have abandoned the shopping cart and are not sure what to do or say, then this section might come in handy.

    Compliance with the best practices will give you better results in turning cart abandoners to customers.

    Without any further ado, let’s get right into it:

    1. Set up the email automation

    Email automation is the process of setting up an email sequence that sends out a series of emails to customers depending on the situation.

    When a customer signs up on an e-commerce website, usually the first email that comes through is an account verification email. Similarly, when a purchase is made by the user, a confirmation email goes out to the customer.

    So most e-commerce platforms seamlessly integrate with email marketing softwares and allow merchants to send out abandoned cart emails.

    To get started with sending abandoned cart emails, simply set up an email sequence in your e-commerce platform or email marketing software to get going.

    You May Also Like: 18 Ways To Turnaround eCommerce Sales

    2. Opt for an email newsletter template

    An email newsletter template is an email theme that a sender uses to compose and design the email message.

    Keep in mind that most e-commerce businesses go for a fancy email newsletter template when setting up an abandonment cart email.

    While an attractive email newsletter template could attract the customers to take action, it could also create a hurdle in engaging the customers.

    The reason is that sometimes the email services block out the email template and notify the email receiver to unblock the template if they want to.

    This could impact the clickability of the email and divert the attention of the customer to somewhere else. Similarly, a text-only email doesn’t appeal to the customers to take any section.

    Therefore, it’s necessary to find a middle ground where you use an email newsletter template that increases the click-through rate of your email.

    3. Write a compelling email subject and body

    The email subject line and the in-body message are essential parts of the email. No matter how good your offer is, it won’t work out unless you don’t get the email subject line and body right.

    The subject line of your cart abandonment email is the gateway to engagement. This can be achieved through various techniques, such as humor, creating a sense of urgency, or utilizing personalized language.

    Writing a compelling email subject and body would significantly help you succeed in generating sales from abandoned carts. Whereas, the body of the email message would convince readers to take action or ignore it altogether.

    There has always been a debate about the length of the email newsletters. Some believe that it has to be short, sweet, and brief as a well-crafted subject line entices recipients to open the email and explore its contents further. Whereas, a lot of marketers prefer to send out in-depth email newsletters.

    Moreover, a catchy and attractive email subject line would massively impact your abandoned cart email open rate.

    4. The first email reminder:

    The first email should ideally be dispatched within an hour or two of cart abandonment. At this point, the shopper’s interest is at its peak, making them more likely to return and complete the purchase.

    Subsequent reminder emails can be strategically spaced out over a few days or a week to gently encourage the customer to take action without bombarding them with messages.

    5. Test out the email sequence

    It’s vital to do testing before you move on to the next thing. Don’t shy away from sending out a few test email sequences to yourself to be 100% sure about this.

    If you don’t test your abandoned cart email sequence, you’ll never know what customers receive when they abandon the cart.

    6. Follow-up sequences:

    Achieving the right balance in terms of email frequency and timing is crucial. While follow-up emails are effective, sending too many in quick succession can irritate recipients. Experiment with different timing strategies to identify what resonates best with your audience without inundating them with reminders.

    A series of follow-up emails can be a powerful strategy if the initial reminder email doesn’t lead to a conversion. These subsequent emails can build upon the previous messages, progressively strengthening the offer or message. By providing additional incentives or addressing specific objections, you increase the likelihood of convincing hesitant shoppers to complete their purchase.

    You May Also Like: Email Marketing: The Best Time Send Emails

    7. Clear & compelling content:

    The content of your cart abandonment email should be clear, concise, and compelling. It should remind the shopper about the items they left behind, emphasizing the unique benefits of those products. Explain why completing the purchase is an excellent decision, using persuasive language and complementing your message with high-quality images of the products. The aim is to reignite the shopper’s interest and urgency to buy.

    8. Personalization:

    Personalization adds a human touch to your emails. It involves addressing the recipient by their first name and referencing the specific items left in their cart. This level of personalization can significantly increase engagement because it demonstrates that you’re paying attention to their preferences and needs.

    You May Also Like: Top 22 Personal Branding Tools To Upscale Your Marketing

    9. Urgency and scarcity:

    Urgency and scarcity tactics can create a sense of FOMO (fear of missing out). You can implement these tactics by mentioning limited stock quantities or including countdown timers for discounts or promotions. These elements encourage recipients to take prompt action, fearing they may miss out on a great deal.

    10. Call-to-Action (CTA):

    CTA message and link

    The Call-to-Action (CTA) is the key element that prompts recipients to take action. It should be clear, visually striking, and placed prominently within the email. The CTA button should guide the recipient directly back to their abandoned cart or the checkout page. Use action-oriented language in the CTA, such as “Complete Your Purchase” or “Get Started Now,” to motivate immediate action.

    Boost ROI with branded URLs - Replug dashboard showing performance metrics and branded URL creation
    Replug Logo
    Boost your conversion rates with irresistable CTAs with

    for your marketing campaigns.

    Check

    Higher clicks

    Check

    More leads

    Check

    Better ROI

    Generate free CTAs

    11. Incentives:

    Incentives are powerful tools to entice shoppers to return and complete their purchase. Common incentives include limited-time discounts, free shipping, or complimentary gifts. To maximize the effectiveness of incentives, ensure they are directly relevant to the items left in the abandoned cart. Additionally, clearly communicate the urgency of these incentives to drive immediate action.

    12. Mobile responsiveness:

    Given the prevalence of mobile shopping, it’s imperative that your cart abandonment emails are mobile-responsive. Mobile-responsive design ensures that your emails display correctly and are easy to navigate on smartphones and tablets. To ensure compatibility, thoroughly test your emails on various devices and email clients to guarantee a seamless experience for all recipients.

    13. Segmentation:

    Segmentation is a strategic approach to dividing your email list into distinct groups based on customer behavior, purchase history, and the value of the abandoned cart. Once segmented, you can tailor your email messaging to suit the unique preferences and needs of each group. This level of personalization can significantly enhance engagement and conversion rates.

    14. Social proof:

    Social proof is a psychological phenomenon that influences behavior. In your cart abandonment emails, you can leverage social proof by showcasing positive reviews, testimonials, or product ratings from satisfied customers. By highlighting the experiences of others, you build trust and demonstrate the popularity and quality of your products, making recipients more inclined to complete their purchase.

    15. Privacy and trust:

    In an age of heightened concern for data security and privacy, assuring customers of their information’s safety is paramount. In your cart abandonment emails, display trust symbols, security badges, and contact information prominently to instill confidence. By addressing these concerns, you build trust and reduce potential barriers to completing the purchase.

    16. A/B Testing:

    enable AB testing

    A/B testing, also known as split testing, is a method of experimentation where you compare two versions of an element within your emails to determine which performs better. This can involve testing different subject lines, email content, CTA buttons, or incentives. A/B testing is an ongoing process that allows you to fine-tune your emails and optimize their performance based on data-driven insights.

    You May Also Like: How to Do A/B Testing the Easy Way

    17. Customer support:

    Providing accessible customer support options in your cart abandonment emails demonstrates your commitment to customer satisfaction. Include easy-to-find contact information or a chat option for recipients who may have questions or need assistance. A responsive and helpful customer support system can contribute to higher satisfaction levels and increased conversions.

    18. Opt-out option:

    Including an opt-out or unsubscribe option is both a best practice and a legal requirement to comply with email regulations. This feature allows recipients to stop receiving emails if they no longer wish to be contacted. Respecting recipients’ preferences is not only ethical but also important for maintaining a positive brand reputation.

    19. Analytics and monitoring:

    url-tracking- analytics

    Leveraging analytics tools is essential for tracking the performance of your cart abandonment email campaign. Key metrics to monitor include open rates, click-through rates, conversion rates, and the revenue generated from the campaign. By closely analyzing these metrics, you gain valuable insights into the effectiveness of your strategy and can make informed adjustments.

    FAQs About Abandoned Cart Emails

    Let’s shed some light on the frequently asked questions about abandoned carts:

    How many abandoned cart emails should I send?

    There is no right or wrong way of doing this, especially when it comes to the number of emails one should send out when a customer abandons the shopping cart. Most brands send out one email to remind customers to complete the transaction. However, some brands send up to three abandoned cart emails.

    How to keep unwanted emails away?

    There are several settings available in the user account settings area on almost every e-commerce platform. Users must go through the settings and alter the settings for notifications, promotional offers, and emails. That’s the perfect way to keep unwanted emails away from your inbox.

    Is it legal to send abandoned cart emails?

    An abandoned cart email is just another email newsletter that you send to your customers. Make sure you have mentioned in the email or communication section of the terms and conditions of your e-commerce website that the customers may receive promotional or abandoned cart emails from the brand.

    What is the best time delay for an abandoned cart email?

    It depends on multiple factors, such as time zone, genre, demographics, etc. For instance, if a customer is shopping at 3 a.m. and abandons the cart, you might not want to send out that abandoned cart email at 4 a.m. because he might have gone to bed.

    Therefore, you can always test out different time delays so that you can decide what works best for you. Give it at least 10 to 12 hours before you send out the first email.

    Other Interesting Reads

    How to Create an Email Marketing Strategy to Grow Your Business

    Getting Started with Meta Pixel: The Key to Successful Retargeting

  • Conversion pixels 101: Optimize your conversion strategy

    Conversion pixels 101: Optimize your conversion strategy

    Have you ever noticed a “thank you” page pops up as soon as you complete an online purchase?Sometimes, e-commerce stores recommend products based on your previous purchases or showcase relevant products buyers purchase along with those products.

    You might wonder how this happens. Well, the secret behind all this is something called conversion pixels.

    I’ll explain the conversion pixels in a jiffy, but let’s discuss the pixels first.

    What’s a pixel?

    Pixel is a code inserted into a website, mobile app, or email. The purpose behind adding a pixel to a website or any other online real estate is to track a user’s activity.

    The pixel observes the user behavior and reports back to the main source. Thus, it opens up a floodgate of opportunities for digital marketers, online businesses, and e-commerce stores to reach out to the same audience through retargeting.

    What is retargeting?

    Retargeting is an advertising strategy that allows brands and entrepreneurs to remarket the products or services to the audience that has visited their websites or used their apps. All this becomes possible due to the pixel.

    Almost all major social media platforms provide pixels for advertisers. It helps marketers track website visitors and better understand how they interact with the products and content.

    What’s a conversion pixel?

    A conversion pixel is a piece of code placed on e-commerce websites and apps to track the conversions that occur on the websites, sales pages, and emails.

    A conversion pixel is crucial to tracking conversions on websites and apps as it reports to the advertiser when a conversion event occurs. Usually, advertisers use conversion pixels to track the sales performances of their marketing campaigns.

    Its code is embedded in the “payment successful” or “thank you for the purchase” pages on an e-commerce website.

    When the conversion happens, the conversion pixel triggers a signal and the event gets recorded for the advertiser’s record.

    If you ever run a Facebook ad campaign for generating sales on your website, the Facebook Pixel is used to track the sales.

    Note that a sale isn’t the only conversion metric used by advertisers. In some cases, a successfully generated lead or a downloaded file through an ad is also considered a conversion.

    Why use a conversion pixel?

    While the primary goal of using a conversion pixel is to keep track of the ad campaign’s performance, there’s more to the story.

    Advertisers must know that conversion pixel is imperative to understand the performance of ad units, call-to-actions, and landing pages. Moreover, it doesn’t end here.

    Here are four key reasons why to use a conversion pixel:

    i. Measure conversion rate

    The key benefit of injecting a conversion pixel on your website or landing page is to keep track of your conversion rate, especially after the conversion optimization tactics have been applied. Low or zero conversion is indicative of wrong tactics.

    ii. A/B testing Ad strategies

    When a conversion pixel is embedded into the website code, it’s pretty clear that the conversions are being closely analyzed. Therefore, it allows advertisers to test out different ad designs, ad copies, and color schemes to see what works the best.

    iii. Analyze conversion cost

    One of the most underrated metrics is the conversion cost. Some digital marketers pay attention to analyzing the conversion cost, especially if they’re running different marketing campaigns, such as social media advertising and influencer marketing campaigns. It helps them understand which one is outperforming the other one.

    iv. Optimize campaigns

    When the data of an ad campaign comes up — usually at the end of the campaign — it’s the time to reflect on the situation. Moreover, marketers could optimize campaigns based on the previous ad campaign’s data. This data analysis wouldn’t have been possible without placing the conversion pixel on the site or landing page to track performance.

    Use cases for using a conversion pixel

    Since conversion pixel provides valuable insights into visitor engagement, it assists brands make data-driven marketing decisions, optimize their digital marketing campaign, and skyrocket the conversion rate.

    Here are different areas where marketers can use conversion pixels:

    i. Email marketing

    Most email marketing softwares have a built-in feature to track the open rate of emails so that users could keep track of their email campaigns’ performances. However, a conversion pixel is also linked with an email campaign to inform the merchant or brand about the action being taken.
    For instance, users often get confirmation emails when they sign up for a service, it triggers the confirmation signal that a conversion event has occurred.

    iii. Online advertising

    Running online ad campaigns without any check-and-balance might be a huge mistake. It’s essential to track the performance of an ad campaign. One of the easiest campaign measurement techniques is to place a conversion pixel in the website or landing code.

    When advertisers utilize conversion pixels, it assists them track, record, and analyze the output of the ad campaign. As a result, it helps them make informed decisions based on the ROI.

    iii. Affiliate marketing

    An affiliate marketing campaign would fall flat if there is no conversion tracking available or the conversion pixel isn’t working properly.

    The way affiliate marketing works is that an affiliate promotes a product of a merchant and when a web visitor makes a purchase through the affiliate partner’s link, the affiliate earns a commission.

    However, the merchant uses the affiliate tracking software to keep track of the affiliate conversions so that the affiliate partners could be paid for their referrals.

    iv. E-commerce sales

    The most common use case of the conversion pixel is in the e-commerce industry. It assists e-commerce businesses track e-commerce sales.

    All they need to do is to place a conversion pixel on their “thank you” or “order confirmation” page to trigger the successful sale signal.

    It significantly helps users measure the sales numbers from online ads or any other marketing campaign. More importantly, it’ll give insight into which of the online campaigns or ad platforms are driving the most sales.

    v. Track mobile app installations

    Startups and mobile app developers can use conversion pixels to track app installs and downloads. Remember to add the conversion pixel to the app download completion page to track the data.

    Once it starts working properly, the user can analyze which ad campaigns or marketing channel is driving the most traction.

    vi. Lead generation

    Lead generation is a process of gathering user details, such as name, phone, and email through a lead magnet or sign-up form.

    Businesses and organizations can track the performance of their event registrations landing pages, whether they’re hosting a webinar or a physical event.

    Most brands and entrepreneurs use opt-in bribes to generate leads whether it’s access to an email course or a downloadable content.

    The conversion pixel comes in handy in lead generation. Without placing a conversion pixel, it won’t be possible to track the conversion of a specific campaign or platform.

    For example, if you run a Quora ads campaign, you place Quore Pixel on your website to measure the campaign’s effectiveness.

    All they need to do is to paste a conversion pixel, and it will track the performance and effectiveness of the copy, landing page layout design, and ad campaign.

    Best conversion tracking tools

    Here are some of the best conversion tracking tools to check out:

    ⦁ Replug

    replug-1

    Replug is an all-in-one link management tool that provides a complete toolkit for URL management. The key features include a URL shortener, branded URLs, UTM codes, URL tracking, deep links, retargeting, and more. This tool plays a vital role in setting up a retargeting campaign for brands and advertisers using pixel tracking.

    ⦁ Optimizely

    optimizely-logo

    Optimizely is yet another powerful URL-tracking tool for digital marketers and brands. It assists web developers and digital marketers in analyzing and optimizing landing pages and website content pages. This tool empowers brands and digital marketing agencies to implement visual editing, page optimization, and advanced targeting.

    ⦁ Google Analytics

    google-analytics4

    Google Analytics is the widely popular website and app analytics tool from the house of the internet tech giant Google. It’s used to collect website visitors’ data, conversion reporting, site traffic sources, bounce rate, page views, and much more.

    ⦁ Woopra

    woopra-logo

    Woopra is a well-known player in the website conversion optimization genre. It’s a powerful tool that helps users track, analyze, and improve the customer journey. It offers powerful features to empower brands with effective, real-time customer analytics.

    How to set up conversion tracking pixel for your website?

    Conversion pixels are a must-have tool for measuring the effectiveness of your online advertising efforts and digital marketing campaign.

    Let’s shed some light on how to set up a conversion pixel for your website:

    1. Create a Conversion Pixel

    Most first-timers haven’t had a chance to generate their conversion pixel. So the first step while setting up the conversion pixels is to generate the pixel itself. To do this, marketers need to go to their advertising platforms, such as we have taken Facebook Ads Manager in this case.

    facebook-ads-manager

    If it’s not created before, then select the option to create a new conversion pixel in the conversion tracking area. The process is pretty much the same across all social media ad platforms.

    2. Choose a name for the pixel

    name-your-pixel

    All you need to do is to choose a name for the pixel and select the type of conversion you want to measure, such as a purchase or lead generation.

    3. Generate the pixel code for your website

    copy the pixel code

    Once the conversion pixel is generated, grab it for installation on your web or app property. You don’t need to be a website developer to insert this piece of code into your website or application.

    4. Add the pixel code to your website

    Install your conversion pixel on your website or app by adding it to the source code. If you’re using WordPress, it’s better to use a link insertion plugin.

    -put-Meta-Pixel-code-on-website-header-

    In some cases, you might have to manually inject the code into the website source. Make sure the code is in the right place on your page, such as the header or footer. Once it’s done, go ahead and connect it with your site.

    So this entails adding a short piece of code to the page or website section where conversions are to be tracked. Once the code is added, save the changes and move on to the next step.

    Pixel-helper

    Now you can test traffic using Pixel Helper extension.

    Setup Facebook conversion API

    • Click on the “Events Manager” tab in the Business Manager menu.
    • Click on “Data Sources” in the left-hand menu.
    • Select or create the event you want to configure for the Conversion API.

    Now you have two options

    • If using Partner Integration, choose the partner and follow the provided instructions.
    • If using Manual, you’ll need to manually implement the API calls.

    Just follow the prescribed steps and you will be done setting up your conversion API. If you still have any confusion, check the detail here..

    Conversion tracking using GA4

    Two steps for tracking conversions on Google Analytics4.

    1. Create an event for the confirmation page
    2. Mark the event as a conversion

    Step 1: Create an event for the confirmation page

    Access admin section and choose property:

    Admin-GA4

    Begin by accessing the admin section of your analytics tool or platform. Within this section, locate and select your preferred property. For this guide, let’s focus on the “events” property. Navigate to the property options where you can manage and set up events.

    Create a new event:

    Inside the “events” property settings, you’ll find the option to create a new event. Click on this option to initiate the event creation process. This is where you’ll define the specific event you want to track and analyze.

    Enter custom event name:

    Create-event-GA4

    As part of event creation, you’ll need to provide a unique name for the event. For instance, let’s use the example of tracking a lead generation event. In the “Custom event name” field, input a descriptive name such as “generate_lead.” This name should clearly represent the nature of the event you’re setting up.

    Set matching conditions:

    Matching conditions help define when the event should be triggered and recorded. In the “Matching conditions” section, you’ll configure these conditions for accurate tracking. Start by entering the first matching condition. For instance, if you want to track an event when a page is viewed, input “event_name equals page_view.”

    Add first condition:

    After entering the initial matching condition, click on the “Add condition” button. This step confirms the first condition you’ve specified. It’s essential for ensuring the event is only triggered when the specified conditions are met.

    Enter second matching condition:

    Now, proceed to input the second matching condition. This further refines when the event should be recorded. For the lead generation example, if you want to track a form submission on a specific page, enter “page_location equals https://www.example.com/contact-us-submitted.”

    Finalize Event Setup:

    After providing both matching conditions, review the details you’ve entered. Make sure the event name and conditions accurately represent the event you’re tracking. This step is crucial for proper data interpretation and analysis.

    In the Parameter configuration section, click Add modification twice. Because you are using a recommended event, you need to define each of the required parameters. Otherwise, Google Analytics will treat the event as a custom event.

    Step 2: Mark the event as a conversion

    To set up a new conversion event in Google Analytics, start by clicking on the “Admin” option from the main menu. This will take you to the administrative section where you can manage various settings for your account.

    Ensure that you’re working within the correct Google Analytics account and property. You’ll want to make sure you’re making changes to the right data. In the “Property” column, find and click on the “Conversions” option. This is where you can manage your conversion tracking settings.

    Once you’re in the “Conversions” section, you’ll see an option to create a new conversion event. Click on “New conversion event” to initiate the event creation process. This is where you’ll define the specifics of the event you want to track.

    Give your new event a descriptive name. For instance, let’s say you’re setting up an event to track lead generation. Enter the name “generate_lead” in the provided field. This name should clearly represent the action or interaction you’re interested in tracking.

    Here’s a detailed video of tracking conversion goals in GA4.

    That’s it from our side now get started with your conversion tracking process.

    FAQs about Conversion Tracking Pixels

    Let’s answer some of the frequently asked questions about conversion tracking:

    What triggers a conversion pixel?

    Any pre-defined action or event that matches the conversion criteria triggers the conversion pixel and ensures that the action or event gets recorded. The conversion pixel is a short piece of code that plays a crucial role in recording a specific event or action.

    How do you set conversion pixels?

    To set a conversion pixel, create and grab the conversion pixel from the desired social media advertising platform like Facebook ads or Quora ads, and then put it on the website property, such as a landing page or website to start tracking an action or event.

    What is pixel-perfect conversion?

    Pixel-perfect conversion refers to the process of understanding design principles and front-end development techniques for translating a design into a digital format with absolute precision. The goal is to ensure that the digital version replicates the original design with accuracy and avoids discrepancies in the output.

  • URL Masking: What Does It Mean for Marketers

    URL Masking: What Does It Mean for Marketers

    Digital marketers, SEOs, and affiliate bloggers play around with links all the time. Sometimes, these experts use short URLs, masked URLs, or redirect URLs. Different link management strategies are used to achieve desired results.

    If you’re into affiliate marketing, you must have come across link cloaking. It’s also known as URL masking.

    If you’re curious about URL masking or why it’s important to understand or who should be using this link management technique, then stick around.

    What Does it Mean to Mask a URL?

    URL masking is a process of altering the appearance of the URL without changing the destination URL. When a URL is masked, it may appear different on the outside, but it takes the visitor to the pre-defined destination.

    URL redirection has an important role in the URL masking process. The redirection helps website owners and bloggers to allow URL masking to work. I’ll shed some light on the URL redirects in a second.

    There are several other use cases of URL masking that you’ll witness going forward.

    One of the reasons why marketers and SEOs mask URLs is to beautify the look of the URLs, especially if they want to promote content on social media or email newsletters.

    Most bloggers and affiliate marketers cloak affiliate links to hide the hideous affiliate links and mask them with their short, beautiful links to increase CTR and engagement.

    What are URL Redirects?

    Types-of-url-redirects

    URL redirects are traffic forwarding parameters to direct the visitors and bots toward the destination URL. The purpose of setting up redirects is to push the visitors or bots in the right direction.

    Sometimes, a company rebrands itself into a new name and pushes the website traffic toward the new domain. This is where the URL redirection comes in handy.

    Often a landing page or website section is under construction, so a temporary URL redirection is set to direct the traffic to a different destination.

    Moreover, a permanent redirect is also used to tell the search engine bots that a page or website has moved to a new URL.

    URL redirection is extremely helpful in blogging, affiliate marketing, and SEO. Therefore, it’s vital to understand how it works and the difference between different types of redirects.

    When to Mask a URL?

    Now you know how URL masking works and why it’s important. So let’s discuss when to apply URL masking.

    Here are different scenarios where URL masking would be helpful:

    • Inserting affiliate links: Most affiliate experts mask URLs when they have to promote affiliate products on their blogs. They use a URL masker so that their affiliate links look more natural and non-spammy.
    • Dealing with long URLs: We’ve established the fact that long and clunky URLs don’t appeal to website visitors due to their spammy and sketchy appearance. Therefore, marketers and bloggers mask such URLs when they have to deal with long product URLs or affiliate offer links.
    • Hiding free web hosting URLs: A lot of beginners prefer free web hosting and free sub-domains for launching their websites or blogs. However, most of them try to hide those free sub-domains through link shortening or URL masking. For instance, blogger.com and wordpress.com provide free sub-domain and web hosting for setting up free blogs.
    • Increasing tracking parameters: Whenever a brand wants to keep track of its links’ performance, they have to add certain tracking parameters to the URLs in question. Therefore, it’s necessary for them to insert additional tracking parameters using a URL tracker to make it happen.

    These were some of the situations where users might want to consider masking the URLs so that they could benefit from this link management strategy.

    Advantages of URL Masking

    Here are some perks of using a URL masking tool:

    i. Security

    A lot of companies try to hide their sensitive information or deny the accessibility to sensitive files to maintain security. Data theft, malware transfers, and code injections are a few of the challenges websites, blogs, and e-commerce sites have to be aware of to survive.

    So this is why it’s important to understand and implement URL masking when or where it’s inevitable. You can also apply data masking in Salesforce to manage customer data, especially during sandbox testing or internal reviews, where exposing real records could pose risks.

    Related: A Complete Guide to Protecting Your URLs

    ii. Links appear user-friendly and trustworthy

    They say the first impression is the last impression. You might not want website visitors to feel overwhelmed when looking at your links. URL masking may help improve your links’ appearance to some degree.

    Social media influencers, bloggers, and affiliate marketers strive to position themselves as genuine, authentic, and real.

    However, when they come across awkward, untrustworthy links to publish on their sites or social media, they fashion something to make those links look better.

    URL masking helps marketers and brands create short, user-friendly links that don’t look sketchy at all. And that’s a huge advantage of link cloaking.

    As a result, most influencers and creators with massive followers base use short links to promote the products or sell their own products.

    iii. Hide unnecessarily long destination URL

    One of the benefits of using any URL masker is to hide long destination URLs. These long URLs might not necessarily be affiliate links or e-commerce product links. Sometimes, website pages or blog posts have relatively longer URLs that don’t look very nice.

    Have you ever come across a social post that has a long URL as a call-to-action?

    I’m sure we have all seen something like that on social media or SMS. The point is that nobody would ever click on such a link.

    Brands, marketers, and affiliate bloggers need short and trackable URLs. The reason is that these experts know that readers despise long links in the article or social media posts etc.

    URL masking provides these professional marketers and bloggers with a shield to get away with this.

    This way, brands, websites, and bloggers can get more engagement and clickability on their websites. Here’s an example of Coca Cola’s URL branding example.

    Coca-Cola-branded-links-Strategy

    iv. Adds the ability to track link performance

    It’s impossible to grow an online business or blog without a proper website tracking and reporting system. One of the benefits of URL masking is that it allows users to track the clickability of the shortened links. Thus, it helps in determining the conversion rate of a website or blog.

    Website tracking assists website owners to analyze content performance, user engagement, and conversion rate. Links are added to the content or social posts so that readers click them while going through the content.

    It’ll be a shame if clicks are happening, but there is no click tracking in place to analyze the links’ performance.

    It’s safe to say that link performance tracking is crucial to establishing a successful link management strategy whether you’re managing social media channels or running an email marketing campaign.

    URL masking does help marketers and affiliate bloggers to track link performance across different platforms.

    v. Improves click-through rate on affiliate links

    An affiliate marketing campaign has numerous aspects that make conversion happen. The affiliate offers on a blog don’t convert just because they have been added.

    In fact, the conversion happens because readers need the solution or they trust the author or the recommendation makes sense.

    URL masking does have a huge impact on the click-through rate of any brand or website. You must have known by now that readers find it hard to click on an untrustworthy link.

    While some readers chicken out when they aren’t sure about the link they’re supposed to click, others leave it to decide later.

    I have personally been using link-cloaking tools to hide the affiliate offers on my blogs because I don’t to showcase my unpretty links.

    On the flip side, adding short URLs to your blogging system dramatically improves the click-through rate on your website.

    vi. Branding

    Branding

    Branding isn’t just about the name, logo, and colors – it’s a wholesome package that shapes how a brand is perceived by the audience. Links are an essential part of the branding composition. Pay close attention to your links from the branding perspective. No wonder a lot of brands use short custom domains for URL shortening.

    URL masking & URL branding is quite common in digital marketing and affiliate marketing areas. Publishers, bloggers, and affiliate marketers try to mask affiliate or lengthy URLs to make the user experience as smooth as possible.

    Perhaps, long and bulky URLs scare readers off. Therefore, it’s necessary to make your links look beautiful and catchy with your branded keywords.

    Replug Branded Short Links CTA
    Replug Logo
    A complete link management solution
    for marketing professionals & agencies.
    Try Replug for free

    How Do I Create a Masked URL?

    You don’t have to be a website developer need to create a masked URL. In fact, it’s not that difficult, considering you have access to the right tools for the job.

    Speaking of the tools, I’ll be sharing how you can do URL masking using a URL shortener. Let me tell you a little bit about this URL shortener.

    It is an all-in-one URL shortening tool that provides digital marketers, affiliate bloggers, and social media experts with a bunch of link management tools.

    The key features of Replug include social media bio links, branded short links, URLs shortener, retargeting visitors, mobile deep links, QR marketing, UTM parameters, and more.

    Create a masked URL using Replug URL Shortener:

    Note: Skip to step 3 as integrating a custom domain is not mandatory to create a customized URL slug. Unless you want to use your brand name in your domain with your slug, then follow the given steps.

    Step #1: Register your short domain

    First things first, register a short domain that is suitable for your brand. A lot of companies and experts pick the short version of their brand name to register for setting up their short domain.

    For instance, youtube.com has youtu.be, Amazon has amzn.to, and Replug has rplg.co. So these are a few examples of short domain names that companies have registered for different purposes.

    To register your short domain, go to your favorite domain registrar services like Namecheap or Godaddy and look out for a perfect, short domain name.

    Once you’ve registered the domain name, move on to step number two.

    Step #2: Integrate your custom domain with Replug

    After registering the short domain name, there are some integrations that need to be done before you could start using your branded short URL.

    This integration is a two-step process to make it work. Start with adding the DNS records for your custom domain to configure it with Replug.

    To do this, log in to your domain registrar account and look out for the DNS settings. You’ll see an option like “Add New Record” or “Add Record,” depending on the domain registrar you’re using.

    The idea is to add a CNAME record in your domain setting to configure it with your Replug account.

    So click on the “Add New Record” option to include a new record. Provide the following details:

    Record typeHostnamePoint to (Address)
    CNAME@ or www*short domain*

    Most domain registrars allow adding a CNAME record. However, if your domain registrar doesn’t allow it, you can use the A -Address option instead.

    Record typeHostnamePoint to (Address)
    A@ or www*Domain IP address*

    Once you’re done on the domain registrar front, head over to the Replug account.

    Now it’s time to add a custom domain to your Replug account.

    Log in to your Replug account and open the drop-down settings menu from the top right corner.

    Go to the Custom Domains section to proceed.

    Click on the Add Domain option to add a custom domain.

    Connect your custom domain by providing the branded URL (that you want to use), custom 404 redirection page URL, and main root URL.

    Once the details have been added, press the Connect button to go ahead.

    Step #3: Add a new brand to your Replug account

    After you’ve successfully configured the short domain with your Replug account, the next up is to add a new brand to your Replug account.

    To do so, log in to your Replug account.

    Go to Manage from the top menu bar, and click on the Brands option from the drop-down menu.

    Now you need to add a new brand. Click the “New Brand” button to proceed.

    A pop-up menu would appear.

    Enter the brand name and website URL of your brand and press save.

    That’s it.

    Step #4: Create a new campaign

    Once you’ve added the brand, now it’s time to create a new campaign for this brand.

    Replug campaign

    Access the campaign section through the top menu. Go to Manage from the top menu bar and click on the Campaigns option from the drop-down menu.

    new campaign

    Now press the New Campaign button from the top.

    Now you’d have to select the right brand for this campaign.

    Shortener-campaign

    Select the brand you just created for this campaign.

    The next section would be about the campaign type selection.

    This is where you have to select the appropriate custom, short domain for the campaign.

    Name your campaign and opt for the right short domain you just added.

    Save the campaign and you’re good to go.

    Step #5: Shorten the URL with your branded URL

    Once everything goes smoothly, you’ll be able to create disguised short links.

    Head over to the dashboard to start shortening the URLs using your short, branded domain.

    FAQs About URL Masking

    Here are some burning questions about URL masking:

    Is there a way to mask a URL?

    Sure, there is more than one way to mask a URL. The most common method for bloggers and affiliate marketers to mask links is by using plugins.

    Moreover, you could also use link cloaking to mask a URL. It essentially changes the appearance of the URL to make it look decent, but the destination URL remains the same. It requires URL redirection to direct the visitors to the destination page.

    What is the difference between URL masking and redirecting?

    The URL redirection pushes the visitors to a different page or a new website with clear directions for search engine bots to follow. However, URL masking is more of a URL-hiding strategy to avoid unnecessary suspicion on the user’s end.

    What is the difference between URI and URL?

    The URI is an abbreviation for Uniform Resource Identifier. It’s a series of characters employed to specify and differentiate a logical or physical resource, commonly associated with the internet, from other resources.

    Whereas, a URL is short for Uniform Resource Locator. It’s a distinctive identifier employed to pinpoint the location of a resource on the Internet. It’s also known as a web address.

  • A complete guide to building a brand marketing strategy

    A complete guide to building a brand marketing strategy

    Brand marketing and online branding have become critical elements for conquering the digital landscape.

    Designing a strategic marketing road map has become necessary to understand the fundamental idea of branding.

    Multiple brands have successfully demonstrated effective brand building and brand marketing strategies.

    apple-branding

    Apple stands out with its sleek design, innovative products, and consistent messaging that evokes sophistication and forward-thinking.

    Coke_branding

    Coca-Cola’s timeless branding focuses on fostering emotional connections and spreading happiness through their refreshing beverages.

    Let’s elaborate on the basic concepts and then we’ll move forward to the details.

    What is a brand?

     Brand Marketing Concept

    A brand is a business or company that sells a product or service and has positioned itself into a well-reputed business in the niche or market segment.

    Plus, the brand identity and positioning in the users’ minds play a vital role in the establishment of any brand.

    Brand Attributes

    Brand attributes are the traits that reassure the brand values by implementing the core values of the brand.

    Here are the most common brand attributes that shape brands’ perceptions:

    • Relevancy: Brand relevancy means how relevant a brand’s approach is toward prospective customers. The target audience is key to getting noticed by the market segment.
    • Consistency: Stick with your publishing or marketing regime, especially if it’s working out for you because consistency takes you ahead of your competition.
    • Credibility: Credibility revolves around how a brand is perceived by people. Brands put a lot of effort into building brand reputation because being in the audience’s good books is essential for repeat clients.
    • Positioning: Brand positioning is an attribute that showcases how a brand shapes its image in the customers’ and prospects’ minds.

    Types of Brand Attributes

    Brand attributes can be divided into two types:

    i. Hard brand attributes: These are the properties involving visual appearance and tangible qualities. It includes logos, brand names, slogans, sign boards, mascots, etc.

    ii. Soft brand attributes: These are the characteristic values of a brand in the customers’ minds. It includes uniqueness, trustworthiness, innovation, convenience, etc.

    What is branding and why is it important?

    What is branding?

    Branding is a marketing buzzword widely used in the sales, marketing, and public relations departments.

    Branding is a strategy to build a company’s identity and carve out an image in the end-users’ minds.

    The purpose of branding is to create awareness and spread the word about the brand.

    For instance, Nike is an American brand known for manufacturing athletic shoes, apparel, and sports equipment. Plus, they sponsor sports celebs and sporting events across the globe.

    The reason we all recognize the “Nike” logo is that they have spent billions of dollars over the years on building their brand’s identity.

    Branding encapsulates everything from creating the identity of a brand to shaping the perception through several tactics, such as:

    • Choosing a brand name
    • Creating a logo
    • Making the branded stationery
    • Designing the official merchandise
    • Putting up the sign boards
    • Printing the pamphlets

    Benefits of branding

    Here are some key benefits of branding to remember:

    • Builds trustworthiness: Branding is crucial to building trust between a brand and the consumer base. A brand’s logo, name, slogan, and colors help develop recognition among the masses.
    • Establishes brand positioning: Brand positioning is the image of a brand in the customers’ minds. Often brands’ are known for their high-quality products or low prices and such perks help shape their position in the end-users’ minds.
    • Infuses brand loyalty: Branding sparks brand association that pulls the loyal customers and fan base toward their favorite brands. Brands understand the psychology of brand loyalty so they use branding to leverage that brand association in their marketing campaigns.
    • Helps customer acquisition: Branding works as a channel to communicate, attract, and engage both existing and potential customers. Companies use all sorts of channels to promote their branding, for instance, giveaways, charity events, sponsorship, etc.
    • Inspires purchase decisions: Since branding is all about creating awareness about a brand with direct and indirect brand promotion, it excites potential buyers and loyal fans to make a decision who are on the fence.

    What is brand marketing?

    Brand marketing is a process of establishing a connection between a brand and its users.

    Brand marketing focuses on highlighting the effectiveness of a brand and how the entirety of the brand is important to the customers’ survival in the market.

    Brand marketing doesn’t emphasize selling the product or service directly. Instead, it paves the way for building and growing a strong relationship with the end users.

    Most brands opt for the traditional route and use digital marketing mediums like ads, email, and social media for product marketing. As a result, their goal gets tied with the transactional part of the communication.

    pepsi branded link

    Pepsi’s brand marketing strategy revolves around capturing the spirit of youth and pop culture. Pepsi’s online brand marketing efforts are a testament to their ability to connect with consumers in the digital sphere.

    Pepsi employs branded URLs strategy to reinforce brand recognition and simplify online experiences. By using customized short links featuring their brand name, Pepsi ensures consistent branding across digital channels

    What’s the difference between branding and marketing, and which comes first?

    The main difference between branding and marketing is that branding brings recognition, identity, and positioning. Whereas, marketing gets brand attention, eyeballs, and engagement.

    The branding vs. marketing debate isn’t worth it because both are essential from publicity and sales standpoints.

    However, if you’re wondering which one comes first, it’s pretty clear that branding comes first.

    For instance, if you launch an SEO agency, you’d start with a brand name, logo, domain, and website instead of hopping on Facebook to run Facebook ads.

    What are the types of brand marketing?

    There are several types of brand marketing, the below-mentioned three are the popular types of brand marketing:

    i. Corporate brand marketing: It revolves around companies’ strategies to develop their reputation and build a connection with the audience through different means. These corporations often communicate their brand values through a mission statement, promotional offers, and press releases.

    ii. Personal brand marketing: Personal brands are individuals who have managed to hone in on certain areas and dominate a small segment of the market. Social media influencers cash in on their personal brands. They use content distribution by leveraging social media platforms and amassing an audience which wants to listen to them.

    iii. Product brand marketing: Product brand marketing is a process of branding a specific product by pouring all energies into it. In product brand marketing, brands often pick their best-performing product and try to put it on a pedestal to win the attention of the end users.

    4 things to keep in mind when developing a brand marketing strategy

    A branding marketing strategy doesn’t build on a whim – it always takes some time to put together a strong brand marketing plan.

    Here are a few key elements to consider when developing a brand marketing strategy:

    1. Brand marketing is a long-term strategy. Don’t rush it. Otherwise, you might end up frustrated within a few weeks. It’s about building a brand’s identity based on the available resources, relationships, and communications.
    2. It takes time to reap the fruit. It’s not a short-term marketing strategy like an ads campaign that shows results at the end of the week, month or quarter.
    3. It is ongoing and can take many forms. It doesn’t only revolve around choosing a brand name, opting for a nice logo, and designing the brand’s stationery. In fact, brand marketing encompasses everything you do to establish your brand’s identity through collaborations, partnerships, sponsorship, giveaways, etc.
    4. The overarching goal of brand marketing is to grow the business, whether it’s done through building relationships with new prospects, attending seminars or industry meetups, or launching a content marketing plan to attract, engage, and convert the audience.
    5. An effective brand marketing strategy involves understanding different market attributes, including brand positioning, which is a critical aspect that helps shape how a brand is recognized. In Cincinnati, diverse techniques are blended to leverage brand presence and reach an amplified audience base. This modern approach includes collaboration with a leading Cincinnati marketing agency that inspires local and international brands by marrying traditional concepts with contemporary technology and creative executions.

    How to build a strong brand marketing strategy?

    Brands with strong business positioning in their industry often are the ones that build a branding strategy and follow it. Remember, it’s not a get-rich-quick scheme; branding is a real deal.

    Here are 9 tips that can help you can build a strong brand marketing strategy:

    1. Identify your brand marketing goals and vision

    The first and foremost thing to do when building a strong brand marketing strategy is to identify the brand’s marketing goals. Every brand sets eyes on certain targets to achieve.

    In order to build a powerful brand marketing strategy, start by envisioning the future. It doesn’t matter whether it’s gaining a significant market share or entering into a monopolistic market. Collaborating with a specialized marketing agency can provide valuable insights and expertise in reaching your branding goals.

    Once the brand marketing goals have been set, it gets easier for the team to execute marketing and branding plans.

    2. Develop your brand identity

    The brand identity means what this brand stands for or is known for. These brands try to develop their brand identity to attract potential customers and social media audiences.

    Interesting read: 8 Best Retargeting Platforms To Retarget Your Potential Audience

    3. Raise brand awareness

    Brand Awareness - replug

    When brands educate the audience about their belief system, they basically share what they believe in to spread brand awareness. Almost every brand tries to position itself as culturally diverse, with no tolerance for racism, and gender equality.

    4. Build brand loyalty

    To create a strong brand marketing structure, it’s vital to have brand loyalty on the customers’ part. Brands pay close attention to the ideas that help them earn brand loyalty from customers.

    Once these things sort out, building a brand identity seems like a piece of cake.

    5. Research target market

    Understanding the target market and the challenges that might arise is crucial to establishing a solid brand marketing strategy.

    Researching the target market means analyzing the market segment you’re about to enter to help bring clarity to the process.

    Brands often turn a blind eye to the competition, which is a big mistake. There may have been a couple of reasons: the first is that they overrate themselves right at the beginning of the journey and the second is that they think competitors won’t notice them, so they don’t consider their competitors a threat just yet. Understanding your target market also helps shape your content, SEO, and advertising strategies to match customer expectations. For businesses looking to scale without building an in-house team, partnering with the best white label SEO service can streamline audience targeting and ensure consistent, high-quality search visibility.

    There are two factors to consider when considering research on the target market for building a brand marketing plan:

    • Narrow in on the target audience: Zooming in on the right segment of the audience would take you closer to the target audience. This is exactly what every brand dreams of when entering the market.
    • Know your competition: Every brand that excels on social media or in SEO is always aware of its competition. They closely follow their content strategy, social media content distribution, SEO tactics, and more. To make this process more efficient, many teams automate data collection using proxy scraper tools, which help track competitor site activity and gather structured insights at scale.

    The target market research would take you ahead of many competitors who don’t care much about understanding the competition or haven’t had a chance to learn more on this topic.

    6. Determine your brand marketing tactics

    One of the important steps when building a brand marketing strategy is to determine what route to take to get to the destination. The decisions such as color schemes, blog content style, social media content strategies, and other strategies fall into this category.

    Clarifying the brand marketing tactics would provide the team with a roadmap to follow and help develop a system to save time in the future.

    However, there are always some inside secrets that only team members know and these secrets aren’t supposed to get out. The reason is that competitors spy on you the way you keep an eye on them.

    The keys to remember when determining the brand marketing tactics are:

    • Develop brand marketing collateral: Branding marketing requires a set of tools and resources. Developing an arsenal whether it’s a PDF outline or a list of online tool subscriptions – this would come in handy for the team.
    • Outline a messaging strategy: The message-driven content always does better than vague and pointless content. Make sure that the content is sending out a clear, concise message to the chosen audience.
    • Define messaging and positioning: It’s necessary to communicate to see that everyone is on the same page. The team must be crystal clear about the brand position. Don’t shy away from explaining the brand message to the team to ensure that every individual team member knows about it.

    7. Rollout a timeline

    Rolling out a timeline means allocating a time window to a specific project or campaign. Brands always set a timeline whether they’re hiring a new freelancer or opting for a new URL shortener.

    It’s best to set a timeline for a campaign to analyze its performance and effectiveness at the end. Brands usually choose monthly, quarterly, biannual, and annual timelines for their campaigns.

    When you’re building a brand marketing strategy, don’t hesitate to choose a time frame for the strategy. The reason why it matters is that it helps brands measure the performance of the campaign afterward.

    8. Create a consistent brand image

    One of the goals of establishing a strong brand marketing strategy is to come up with a consistent brand image. A brand image means building a positive brand reputation among customers.

    brand reputation risks

    Burger King UK faced backlash for tweeting ‘Women belong in the kitchen’ on International Women’s Day. The tweet was criticized for its insensitive and derogatory language, which undermined the significance of the day and perpetuated harmful stereotypes about women. Many people expressed their disappointment and called out the fast-food chain for the inappropriate message. Burger King later issued an apology and acknowledged the need to deliver a more respectful and inclusive message.

    This example shows why it is crucial for companies to recognize the importance of fostering an inclusive and supportive environment both online and offline. Small gestures, like providing personalized office items such as custom paperweights, can also contribute to creating a more welcoming and cohesive workspace.

    brand user experience

    The brand position or image doesn’t establish overnight; it takes forever to establish a brand in the eyes of the audience. It requires continuous effort and a dedicated plan to pull this off.

    Brands that successfully establish their reputation and goodwill try to continue that momentum and live up to the customers’ expectations. No wonder they build this brand position and image over the course of several years.

    Therefore, it’s vital to make efforts to create a consistent brand image through actions, offerings, customer support, high-quality products/services, and pricing to build and maintain a strong brand reputation.

    9. Measure the success of your brand

    social media meme

    No one wants their successful strategies to go unnoticed because otherwise they wouldn’t realize what worked for them and might as well try something new.

    Therefore, the success measurement of the brand marketing campaign is crucial to the whole process.

    In order to get disciplined about measuring the success of the branding strategies, keep the following tactics in mind:

    • Create brand guidelines: Don’t sleep on setting the ground rules for everyone to follow. It could be anything from choosing the best time to post on TikTok to using a specific font for social media image copies.
    • Make sure your product delivers on your promise: The product or service has to be top-notch to fulfill the promise. Otherwise, your marketing tactics would fall flat.

    The question you might ask is how someone could measure the success of their brand marketing strategy.

    Well, there are several indicators that might give you an idea of how well or badly your brand marketing campaign has performed over the course of the campaign, such as:

    • The number of email inquiries received
    • The number of social media followers increased
    • The percentage of social media engagement increased
    • The percentage of website bounce rate decreased
    • The change in the digital marketing ROI

    These indicators may vary from brand to brand. I won’t be surprised if some brand would go further down the rabbit hole and analyze numerous other factors to measure the success of their branding campaign.

    Interesting read:15 Proven Facebook SEO Techniques To Increase Brand Visibility

    How to use social media to market your brand successfully?

    social media meme

    Social media has become an important part of the marketing arsenal. No individual or brand could think of marketing a brand without using social media.

    The reason why social media is inevitable in marketing is because it has the attention of the masses. Now social media platforms have over 1 billion monthly active users.

    So, you might wonder how you can use social media to market your brand without breaking the bank. Well, I have a handful of tips that would help you cash in on the social media real estate:

    • Create a community of like-minded people: Don’t shy away from starting something from scratch. Build a community of true fans or like-minded people using a Facebook group discord channel or any other similar tool.
    • Put out compelling, helpful content: Publishing high-quality, effective, and useful content is your ticket to engagement, attention, and eyeballs. Social media ads won’t cut it for most people, so use content marketing as a great alternative to advertising.
    • Build a strong relationship with the audience: Building a healthy, strong relationship with your audience means you care what they want to know or learn. Provide them with efficient customer support and help them out by going out of the way – it will make a difference in the long term.
    • Show up consistently on social media platforms: One of the best strategies to market a brand on social media is to consistently show up on social media platforms. You could always use a social media scheduling tool like ContentStudio to schedule your posts for the future.
    • Use promotional strategies to spice things up: Most brands only focus on once-a-year discounts. However, if you’re a B2C company, then use giveaways, discounts, and promotional offers throughout the year to strengthen the relationship with the audience. Don’t shy away from giving away free brand merch or arranging meet-ups with customers or fans.

    FAQs

    Let’s answer some of the burning questions about brand marketing:

    i. What is the marketing of a brand?

    Marketing a brand means putting the brand in front of the prospective audience and establishing an image of the brand.

    ii. What are the four branding strategies?

    Here are four of the essential branding strategies to follow”

    1) Start with finding your brand’s mission.

    2) Identify the target market to enter.

    3) Build your brand’s image.

    4) Measure the outcome of the branding campaign.

    iii. What are the benefits of using a marketing strategy for a brand?

    • Provides clear direction
    • Targets the audience
    • Increases brand awareness
    • Establishes brand recognition
    • Defines a unique brand identity
    • Engages and fosters customer loyalty
    • Maximizes ROI
    • Drives business growth

    iv. Which is better: marketing or advertising for brands?

    There is no right or wrong answer for this one. It depends on the industry, company’s type, growth hacks being followed, and tactics that have worked – most brands tend to use both and put more energy into whatever works for them.

    v. When is brand marketing most successful?

    Brand marketing is most successful when it effectively communicates a compelling brand story, resonates with the target audience, and drives positive brand perception, loyalty, and engagement.

    vi. What should be included in a good marketing plan for my brand?

    The common tactics for establishing a solid marketing plan must include clarity of the brand’s offering, effective communication, and a powerful analytical mechanism to measure the outcome.

    You may also like:

    Unique URLs: What They Are and How to Use Them?

    Tips and Tricks From Some of the Best Personal Brands Around

  • Getting Started with Meta Pixel: The Key to Successful Retargeting

    Getting Started with Meta Pixel: The Key to Successful Retargeting

    What is a Meta Pixel?

    Meta Pixel, previously known as Facebook Pixel, is a small piece of code that can be added to the back-end of a website, mobile app, or partner application to track user’s footprints, making it easier for advertisers to retarget them on Facebook.
    Moreover, the Meta Pixel assists brands, organizations, entrepreneurs, and marketers with Facebook pages in determining and enhancing their return on investment from the largest social network in the world.

    While e-commerce has never been this popular, social media platforms are adapting to the latest technologies and advancements.
    Since Facebook is the number one social media platform with over one billion monthly active users, digital marketers and online advertisers need to tighten their grip on every aspect of Facebook ads.
    In a world full of AI tools and chatbots, it’s crucial to figure out the basic online marketing techniques that could give you a slight edge over the competition.
    Let’s dive deep into Meta Pixel and understand more about it.

    Why is the Meta Pixel called “Pixel”?

    Since Meta Pixel is a powerful analytical tool that tracks website visitors‘ activities. The way it works is that it uses a short code that leaves a cookie on each website visitor and helps advertisers track them via Facebook ads.
    Pixel is the industry-standard name for retargeting code that sits on the advertiser’s website or app and provides them with insights into consumer behaviors, actions, and choices.
    Meta Pixel helps identify Facebook advertisers and how users are interacting with the content or products on their website.
    Installing a pixel, whether you’re running Quora ads or Facebook ads, is vital to remarketing the previous website’s visitors and understanding the audience’s behavior toward your ad.

    What are the benefits of installing the Meta Pixel?

    Digital marketing gurus and online advertising experts rave about retargeting and often consider it one of the most important aspects of e-commerce sales growth.
    Installing the Meta Pixel in your website or app can provide various benefits that can help improve your Facebook advertising efforts – no question about it.
    So let me shed some light on the capabilities and benefits of installing or using the Meta Pixel:

    Essential for Facebook remarketing:

    Retargeting or remarketing is the core reason why meta-pixel is a thing now. With the help of the Meta Pixel, you can track the behavior of users who have visited your website or app, and target them with specific ads to encourage them to return to your site or complete a desired action.

    Track and improve conversions:

    Advertisers can track user behavior on their websites or apps and analyze the effectiveness of their advertising campaigns. The data can help them identify areas where they need to improve their campaigns and optimize their ads to increase conversions.

    Helps build custom audiences:

    Marketers and advertisers could create custom audiences based on the actions users take on their website or app. This can help them create targeted ads for specific groups of users and improve the relevance of their advertising campaigns.

    Assists in building lookalike audiences:

    By analyzing the behavior of users who have interacted with your website or app, the Meta Pixel can help advertisers identify similar audiences that are likely to be interested in their products or services. It can easily expand the reach of the advertising campaigns and help target new potential customers.

    Measures the results of your ad campaigns:

    The Meta Pixel provides advertisers with detailed data about the performance of your advertising campaigns. They can track the number of clicks, conversions, and other metrics that help them understand the effectiveness of their ads.

    Enables advertisers to show ads to the right audience:

    It gets easier to track user behavior with such a facility. Therefore, the advertisers could create targeted ads that are shown to the right people at the right time. It can significantly improve the relevance of their advertising campaigns and increase the chances of users taking action.

    How does the Meta Pixel work?

    meta-pixel

    The Meta Pixel works by inserting a one-time code into your website or app source so that it could track the users and allows you to remarket them using Facebook retargeting ad campaigns.
    To use the Meta pixel effectively, you must first install it on the website or app – wherever you’re trying to capture the audience footprints for Facebook retargeting.
    The retargeting pixel goes into the header section of the website or the source code of your app and helps you monitor, analyze, and track the audience visiting the pages/sections with the code on it.
    For example, an author is selling an ebook through a website and has already set up a landing page, a checkout page, and a thank you page for the campaign. The Meta Pixel would be installed on all three pages to record the buyer’s journey.
    In most content management systems (CMS), the header and footer are common on all pages. Therefore, adding any piece of code into the header or footer section means it’s been added to all pages eventually.

    What does Meta Pixel collect?

    Facebook-ads

    The Meta Pixel is a powerful tool that enables advertisers to collect valuable data that can be used to improve the effectiveness of your Facebook ad campaigns.
    The data collection using Meta Pixel begins by installing the Meta Pixel on the back end of your website or app. Once it’s added, you can monitor and track conversions on the website/app.
    This valuable data can be used to optimize your ad campaigns, ensuring that they are delivering the best possible results.
    The reason why advertisers collect data is because of its ability to facilitate remarketing to people who have already taken some kind of action on your website.
    By tracking the actions of visitors, such as adding items to a cart or completing a purchase, the Meta pixel can help facilitate the delivery of targeted ads to those individuals.
    Furthermore, one of the benefits of using the Meta pixel is that it allows you to build targeted audiences for future ads. As visitors interact with your website, their actions are recorded and analyzed by the Meta pixel.
    This empowers you (or the advertiser) to create audience segments based on specific behaviors or interests, which can then be used to target future ads. This process is called retargeting or remarketing.
    So the Meta Pixel collects valuable information about the website visitors so that the advertiser could design or create a relevant ad campaign to target the right audience.

    What are Meta Pixel Events?

    Meta has provided several “Events” for conversion optimization. If you’re new to Facebook advertising jargon, then let me make it easier for you.
    Events are defined as any type of action that takes place on your website after the visitor lands on the website as a result of the ad.
    There are several “Standard events” which are predefined by Meta and advertisers could use them to log user activities, conversion analysis, and build an audience.
    Besides the “Standard events,” there are “Object properties” that are also predefined by Meta and can be included with “Standard events” based on compatibility. For more clarification on Meta Pixel or to access the event codes, check out this page.

    How to setup Meta Pixel?


    Setting up the Meta Pixel is not a complex process unless you haven’t done any Facebook ad campaigns before or you never edited even a simple HTML code.
    I’ll try to break down the process into brief sections so that it gets easier for an average Joe to digest, comprehend, and implement it.
    Before I head over to the next part, just remember that Meta Pixel is a code that works as a cookie and helps advertisers target the website audience on Facebook.
    Since you have already learned about the Meta Pixel by now, it’s important to know how you can create it. It’s not a complex process so no need to panic.
    Here are the steps involved in creating a meta pixel:

    Step 1: Access the ads manager

    Ads Manager is a platform provided by Facebook that allows you to manage and create advertisements for your business.

    To create a meta pixel, you need to first access the Ads Manager by logging in to your Facebook account and clicking on the “Ads Manager” button in the top left corner of the screen.

    Step 2: Go to the events manager

    Once you are in the Ads Manager, you need to navigate to the Events Manager section. This can be done by clicking on the “Events Manager” button in the left-hand menu.

    Step 3 Connect a data source:

    Connect-Data-Source

    After accessing the Events Manager, you need to connect a data source. A data source can be any platform that you use to collect data related to your websites or apps, such as Google Analytics or Shopify.
    By connecting a data source, you can collect information about user behavior on your website or app and use it to create targeted ads.

    Step 4: Choose the data source

    Choose-data-source

    Lastly, you need to choose the data source that you want to use for creating your meta pixel. This can be done by clicking on the “Connect Data Sources” button in the Events Manager. In most cases, the data source is the website, so you’ll need to provide the URL of your website.
    You may also like: How to rename a link using Replug?

    Step 5: Select connection methods

    Select-connection-method

    You can either connect through the Conversion API method or Facebook Pixel method. For the said case we have selected the Facebook Pixel method.

    Step 6: Connect website activity using Facebook Pixel

    Connect-Website-Activity-using-Facebook-Pixel

    Once you have chosen the data source and followed the on-screen instructions to complete the process of creating a meta pixel, you’ll be able to generate your meta pixel for installation on your website or landing page.

    How to install the Meta Pixel on your website?

    Connect-website-Activity-using-pixel

    There are two basic ways of installing the meta pixel on your website.

    i. Insert Meta Pixel code manually

    The simple yet basic method of inserting the meta pixel code into your website is by accessing the source code of the website and putting the code into it. It’s usually done by editing the HTML or PHP file using a code editor and pasting the code into it.
    Make sure to add it to the pages that need the most or else you won’t be able to track the conversion. If your website is built with PHP, you might have a header.php file, just insert the code into it and it’ll be available/accessible on every page of the website.
    Below are the steps to follow to install the Meta Pixel code manually.

    1.Naviagte to the Events Manager in your FB Business Suite and click the Data Sources.

    2. Select the Meta Pixel you want to setup, and click Continue Pixel setup.

    3. Select Meta Pixel and click Connect.

    Connect-website-Activity-using-pixel

    4. Select Install code manually

    5. Copy the pixel base code.

    copy the pixel code
    -put-Meta-Pixel-code-on-website-header-


    6. Paste the pixel code at the bottom of the header section above the closing header tag in your CMS or web platform.
    Note: Ensure to toggle on Automatic Advanced Matching 

    ii. Add Meta Pixel code via Partner Integration

    The second method is more convenient than the previous one. It will work only if you’re using a CMS like WordPress, Drupal, or Shopify. All you need is to edit the source file and insert the meta pixel into your website’s code.
    Most people use WordPress for building their websites, blogs, and landing pages. So you could use any code insertion WordPress plugin for that matter. All you have to do is to install such a plugin and paste the code into it. The plugin would do the rest of the process of code placement on the website.
    Here are some of the popular code insertion plugins:
    ⦁ WPCode
    ⦁ Woody code snippets
    ⦁ Header Footer Code Manager
    Below video by digital marketer Jacob Lee explains the steps to add Meta Pixel code via WordPress partner integration.

    Here’s a video by Metics Media explaining the steps to add Meta Pixel code via the Shopify partner integration.

    How to find the Meta Pixel ID?

    install-code-header
    Facebook-Pixel-Id-

    Locating the meta pixel ID might be difficult for beginners, but it’s quite simple. If you have created your meta pixel ID, then it won’t be difficult for you to find and access it.
    However, if you’re new to Facebook ads, then it might seem intimidating at first. Don’t worry because I’ve got your back.
    To find the Meta Pixel in the Facebook Ads Manager, you can follow these steps:
    i. Log in to your Facebook account and go to the Ads Manager.
    ii. Click on the hamburger menu icon (three horizontal lines) in the top left corner of the screen.
    iii. Select the “Events Manager” option from the list of available options.
    iv. In the Events Manager section, click on the “Data sources” tab in the left-hand menu.
    v. Once you click on the data source button, you will be taken to your pixel page. Here, you can see the pixel ID, view the pixel code, and make any necessary changes to the pixel settings.
    vi. If you want to use the pixel to track specific events on your website or app, you can click on the “Settings” button next to the top menu and access the specific option. This is the area that will give you access to the cookies set, event setup, and conversion API.
    That’s pretty much it!
    Now you have successfully found your Meta Pixel in the Facebook Ads Manager and can now use it to track user behavior on your website or app and create targeted ads.

    How to setup Events using the Event setup tool?


    Setting up Events is an essential step in optimizing and improving the ad campaign as it directly influences the customer base targeting. Since retargeting is all about reaching out to the audience that has shown some interest in your website, setting up the right event helps identify the intent of the website visitors.
    To start using Events, you first need to set them up. Facebook has a dedicated section for Events setup, and it’s called Event Setup Tool.
    Let’s head over to the Ads Manager once again for showcasing how to set up events using the Events Setup Tool. Here’s the step-by-step guide on how to do it:

    Step 1: Go to the Ads Manager
    The first step in setting up events using the Event Setup Tool is to log in to the Ads Manager. If you don’t have an account, you can create one for free by going to the Facebook Ads Manager.

    events-manager

    Step 2: Open the Events Manager
    Once you have logged in to the Ads Manager, you will need to navigate to the Events Manager. You can do this by clicking on the hamburger icon in the top left corner of the screen and selecting “Events Manager” from the menu that appears.

    connect-data-sources

    Step 3: Access the Data Sources

    Once you have opened the Events Manager, you will see a menu on the left side of the screen. From here, click on “Data Sources,” which will take you to a page where you can manage your data sources, such as your website, app, or offline events.

    settings-data-sources

    Step 4: Go to the Settings Section
    After accessing the Data Sources page, you will see a list of your data sources. Select the data source you want to set up events for and click on its name. This will take you to the Settings section for that particular data source.

    event-setup
    setup-events-popup-window

    Step 5: Open the Events Setup Tool

    Within the Settings section, scroll down until you see the “Events” section. Here, you will find the option to open the Events Setup Tool.

    Once you click on this button, you will be taken to a page where you can create and manage the events that you want to track on your website.

    How to confirm that the Meta Pixel is working using the Meta Pixel Helper?

    Facebook-Pixel-Helper-Extension
    Pixel-Helper-

    The Meta Pixel Helper is a convenient Chrome browser extension that can be used to check for the presence of Meta Pixel code on websites without any hassle.
    This browser extension operates in the background and doesn’t bother the script or performance of the website. Plus, it is quite easy to install even for newbies.
    After installation, an icon resembling </> – the Pixel Helper icon – will appear in the upper right corner of the browser alongside the address bar.
    When a website has a Meta Pixel installed, the Pixel Helper icon will change color from grey to blue, and a badge will appear showing the number of Pixels found on the page.

    If the icon does not turn blue, it means that there are no Meta Pixels installed on that particular webpage. To access the Pixel Helper, click on the Pixel Helper icon and a small popup will appear containing information that can be used to verify, troubleshoot, and improve the Pixel.
    Therefore, the Pixel Helper is a helpful tool for confirming the installation or existence of the Meta Pixel on the website. To download this Chrome extension, visit this page.

    How to use Meta Pixel with Replug?

    Replug is a powerful URL shortener that offers several features such as URL shortening, branded short URLs, retargeting, deep links, and bio links.

    You already know by now that Meta Pixel is used for retargeting people through Facebook ads. Since Replug also provides a retargeting feature, it’s time to figure out how the combo of Meta Pixel and Replug plays out.
    You can use the short links created with Replug to reach out and retarget the users that click on your short URLs through Facebook ads.
    Here are the steps involved in using Meta Pixel with Replug:

    i. Grab the Pixel ID from Facebook

    Facebook-Pixel-Id-

    You’d surely know by now where to get the pixel ID from your Facebook account. Here’s a quick guide if it all seems intimidating or too much to digest:

    • Go to the Ads Manager section and click on the Events Manager button from the options.
    • Then, go to the Data Sources from the left menu and you’ll see the Facebook pixel.
    • Open the settings area of your pixel and copy the pixel ID from there.

    ii. Login to your Replug Account

    add-retargeting-pixel

    Now go to the Replug website and log in to your Replug account.

    In case, you haven’t signed up for a Replug account, I highly recommend doing it now. Replug has a 14-day free trial. Try Now!

    iii. Add a Retargeting Pixel in Replug

    add-retargeting-pixel
    Click-Add-Pixel
    add-retargeting-pixel

    Once you’re in, access the profile settings from the top-right corner. Just click on your profile icon to do so.
    A drop-down menu would appear; click on the Retargeting Pixels.
    You’ll land on the Retargeting Pixels page. Now click on the “Add Pixel” button.
    Once you click the Add Pixel button, a popup window would appear. Choose Facebook, provide your pixel name, and paste your Facebook pixel ID.
    Once it’s done, click on the “Add” button to proceed.

    iv. Create a retargeting campaign

    Create-Retargeting-Pixel-Campaign
    select-brand-for-retargeting-campaign

    The next up is creating a new campaign for retargeting the Replug audience, meaning the visitors who click through your short links, so you could start retargeting them through Facebook ads.
    To do this, go to your Replug dashboard and access the Campaign section.
    Click on the “New Campaign” button to create a new campaign for this purpose.

    Select the appropriate brand or create a new one for this campaign.

    Add-retargeting-codes-for-campaign-

    Name this campaign and select the campaign type. You must check the “retargeting” option at this stage to let Replug know that it’s a retargeting campaign.

    Choose the retargeting script afterwards.

    In this case, it’ll be the one associated with Facebook. Choose the Facebook pixel you created earlier in your Replug account.

    Now save the campaign and you’re done with creating a new campaign using Replug.


    You may also like: 14 Crazy-Effective Ways to Boost E-commerce Sales Through Retargeting

    How to change the Meta Pixel’s name?

    Changing the meta pixel’s name might not be on your mind, but you should know whether or not you can do it, just in case.
    It’s possible to change the meta pixel’s name. All you have to do is to follow a few simple steps to do this:
    i. Go to your Ads Manager account after logging in to your Facebook account.
    ii. Access the Events Manager section from the Ads Manager.
    iii. Open the Data Sources to access your already created meta pixel. (Remember that you could create only one meta pixel per account).
    iv. Now click on the edit button next to your meta pixel’s name. This is where you could change the meta pixel’s name.
    That’s it.
    Easy-peasy!

    FAQs about Meta Pixel

    Is meta pixel a cookie?

    The Meta Pixel is a pixel code that helps advertisers target the audience who have visited their websites through Facebook ads. A cookie also does the user-tracking on the websites, but may not be directly influencing the retargeting like the meta pixel.

    How do I create the Meta Pixel?

    Log in to your Facebook account, go to the Ads Manager, access the Events Manager, and click on the Data Sources. You’ll see the option to create your meta pixel.

    Is the Meta pixel different from than Facebook pixel?

    No. The Meta Pixel and the Facebook Pixel are the same. The Meta Pixel was formerly known as the Facebook Pixel.

    What is Meta pixel in Facebook ads?

    It’s a pixel code that helps advertisers track the website visitors and empowers them to advertise to those visitors using Facebook ads by retargeting them.

    What is a Facebook Pixel notice?

    This is by no means legal advice, but a lot of countries require websites to display the cookie consent notification which tells the website visitors that this website is using cookies to track visitors.
    When a website is using Meta Pixel or any other user tracking tool to track website visitors’ activity, performance, and behavior, they must notify the website visitors about this.
    Have you ever seen a cookie consent notification on websites, especially when you visit it for the first time?
    The website is trying to tell you that they’re using some tracking tools or softwares to track the visitors’ activities and behaviors – it’s a very common website management practice.
    I’m no expert on GDPR or CCPA, so you should consult your lawyer for more clarity. However, I simply use a cookie consent WordPress plugin on my website that displays a cookie consent notification on the website.
    Some several tools and plugins automatically add cookies consent notices to the websites, but here are some of the popular website plugins for this purpose:
    ⦁ Cookie Notice & Compliance for GDPR / CCPA
    ⦁ Cookies and Content Security Policy
    ⦁ Cookie Script
    You May Also Like:
    Campaign Tracking: Data-Driven Tools for Marketers
    15 Proven Facebook SEO Techniques To Increase Brand Visibility

  • URL Hijacking Uncovered: A Complete Guide to Protecting Your Online Presence

    URL Hijacking Uncovered: A Complete Guide to Protecting Your Online Presence

    What is URL Hijacking?

    URL hijacking is when hackers redirect users to fake websites to trick them into sharing sensitive information. Once you land on the bogus site, you might be asked to provide your login credentials, financial information, or other sensitive data. This could lead to identity theft, financial losses, and other severe consequences.

    It’s no surprise that digital marketers, bloggers, and website owners face a wide array of challenges, especially when their sites or brands start to take off on social media or search engines.

    Most of us already know about hacking attempts on websites. However, most people don’t know about URL hijacking and how to prevent your website from it.

    Since URLs are an essential part of online marketing, social media management, email marketing, and paid advertising, it’s vital to stay vigilant about the vulnerabilities attached to URLs.

    We’ll try to go deep down into this topic and educate you on URL hijacking, its impact on brand positioning, and how to avoid it.

    URL hijacking is a malicious technique utilized by cybercriminals to redirect users to fraudulent websites, where they might be prompted to disclose sensitive information. It is a cybersecurity threat where attackers manipulate website URLs to redirect users to a fake website that looks almost identical to the original one— making NIST cybersecurity compliance essential. The fake website aims to deceive users into providing sensitive information such as login credentials, personal details, or financial information. Therefore, it is imperative to exercise vigilance and implement protective measures such as verifying URLs, Employing anti-phishing software, implementing robust firewall solutions, and maintaining updated security protocols on all devices..

    Types of URL Hijacking

    1. Paid search hijacking

    Paid search hijacking is a type of hijacking that involves putting an identical copy of a company’s ad in the paid search results, targeting the same target audience and reaching out to them by outbidding the ad of the actual brand with a few cents.

    Mostly affiliate marketers who don’t abide by the rules and terms of the affiliate programs/networks are involved in playing such tricks on companies.

    2. Browser hijacking

    URL-Blacklist-Warning

    Browser hijacking is an activity of installing unwanted softwares to the web browser without the user’s consent for various reasons, such as spying on users, stealing their sensitive information, or bombarding them with adverts.

    We all have had experiences, especially in the past, when clicking a link on a website opens a dozen more websites. Though most website builders use such strategies to gain more clicks and impressions on their display ads, it’s still a frowned-up tactic in the website-building community.

    3. Typo-squatting

    URL hijacking has a wide spectrum in the search engine marketing world, meaning it has different shapes and forms. Typo-squatting is a form of URL hijacking in which a person or company uses a misspelled version of the domain name to steal website visitors from the original website.

    For instance, if a person tries to steal the traffic/users of netflix.com by registering a domain like neftlix.com, then it’s called typo-squatting – it’s just an example.

    Anyway, some hackers or stinky website builders play such tricks on their competitors or top-notch companies by registering similar domain names and building websites to impersonate real brands or websites.
    Related: How to Block a URL in Chrome?

    What are hijacked domains used for?

    It’s crystal clear that URL or domain hijacking has different levels, shapes and forms. I’ll shed some light on different patterns to look out for when identifying URL hijacking.

    However, it’s important to learn why hackers hijack domains or URLs. When you know the evil purpose behind domain hijacking, you’ll be well-equipped to stop them and protect your online properties better.

    Here are several reasons why domains are hijacked:

    1. Stealing traffic

    Website security is a serious concern for bloggers, website owners, and digital marketers. Hijacked domains can be used to steal traffic from legitimate websites. Attackers can create a website with a similar name to a legitimate website and use the hijacked domain to redirect traffic to their fake site.

    This can result in legitimate traffic being redirected to the attacker’s site, potentially leading to financial loss for the legitimate site owner.
    Related: Boost Your Website Traffic Through Social Media

    2. SEO spam

    SEO spam is a process in which an SEO desperately or intentionally tries to create backlinks to a website through blog commenting, link insertion, cold reach out, or other ways. The purpose of SEO spam is to generate backlinks so that they could benefit their website. However, it’s a negative SEO practice that is illegal and unethical.

    In some cases, hijacked domains are used for SEO spam, which involves creating websites that are designed to manipulate search engine rankings. Some experts try to manipulate the SERP using their websites or hijacked domains.

    The way it works is that they create multiple low-quality websites that link back to their main site, in an attempt to improve their website’s search engine ranking.
    Related: How to Create an SEO Friendly URL: Ultimate Tips

    3. Phishing attacks

    phishing

    Phishing is a type of cyberattack in which an attacker sends fraudulent communications (usually via email or social media DM) that appear to come from a legitimate source in order to trick the recipient into disclosing sensitive information or taking a certain action.

    Hijacked domains can be used in phishing attacks as attackers can create URLs/links of legitimate websites to trick users into submitting their sensitive information or login credentials.

    4. Email spam campaigns

    message-online-chat-social-text-concept


    Email marketing is an excellent digital marketing strategy. Brands and experts build email lists so that they don’t always rely on third-party platforms to interact with their followers. Hijacked domains can also be used in spam campaigns to distribute unsolicited emails.

    Domain hijackers can use a hijacked domain to send spam emails that appear to come from a legitimate source, increasing the likelihood that the recipient will open the email and click on any links contained within it.

    5. C2 Servers

    Since there are various uses of hijacked domains, it’s hard to pin them down to just a few uses. Sometimes, hijackers steal domains to use for command and control (C2) servers for botnets or other types of malware. By using a hijacked domain as a C2 server, attackers can maintain control over infected devices and issue commands to them without being detected.

    6. Malware distribution

    malware

    Attackers could have different reasons for spreading the virus and malicious files, for instance, stealing passwords or credit card info, or code insertion. The problem is that they could use hijacked domains to distribute malware to the users.

    Attackers can create websites that appear legitimate or spread the links via email or social media and the users who click on those links may end up compromising their online security.
    Related: Easy Guide For Fixing URL Blacklist

    7. Fake news websites

    One of the use cases of hijacked domains is spreading fake news on the web. It’s easier to distribute disinformation and propaganda content through hijacked domains because it’s hard to track the original source. Often the domain hijacking victims have no idea how and where their certain pages or URLs are being misused for spreading fake information or data.

    How to recognize URL hijacking?

    If someone is new to digital marketing, they may have a hard time figuring out signs of URL hijacking. To make it easier for everyone to recognize URL hijacking, here are some common ways to recognize URL hijacking:

    1. The URL looks strange:
    If the URL looks different from what you would expect, it may have been hijacked. Look for misspellings, added characters, or unexpected domains in the URL.

    2. The website looks different:
    If you visit the URL and the website looks different from what you would expect, it may have been hijacked. Look for changes in the website’s layout, content, or functionality.

    3. You are redirected to another website:
    If you click on the URL and are redirected to a different website, it may have been hijacked. Check the URL of the website you are redirected to and see if it matches the original URL.

    url-blacklist-safe-browsing-warning-chrome

    4. Your browser warns you:
    Some browsers will warn you if they detect that a website may be unsafe or has been hijacked. If your browser displays a warning message, take it seriously and avoid visiting the website.

    Why does URL hijacking occur?

    It’s hard to pinpoint the cause of the URL hijacking to something specific because the reason may vary from case to case.

    However, URL hijacking is a negative activity that doesn’t bring any good to the victim. Instead, it often damages the brand’s reputation, SEO growth, and website traffic.

    Therefore, protective measures are imperative for online businesses, especially if you got competition in SEO.

    No doubt that there is always an agenda behind URL hijacking, and the more you know about it, the easier it gets to figure out the problem, just in case.
    Here are six of the common reasons why URL hijacking occurs:

    1. To gain unauthorized access to a user’s device
    2. To steal sensitive information, such as login credentials or personal data
    3. To spread malware or ransomware
    4. To redirect users to a malicious website that looks legitimate
    5. To carry out further attacks or gain financial gain
    6. To exploit vulnerabilities in a website’s security

    How to prevent domain hijacking?

    Here are several ways to avoid domain hijacking:

    1. Trademark your domain:

    Trademarking your domain helps establish legal ownership of your domain or brand which protects against infringement or domain hijacking. So don’t sleep on this preventive measure for the safety of your brand.

    2. Monitor for impersonation sites:

    Regularly monitor websites that may be impersonating your domain or brand, and take immediate action if you come across any. No one should be stealing your website traffic, brand value, and ROI.

    3. Register other versions of your domain:

    Registering different country top-level domain names can prevent others from registering them and using them for malicious purposes. You don’t necessarily need a separate website for each domain. Instead, you could redirect the additional domains to your main URL.

    Related: How to rename a link?

    4. Utilize HTTPS:

    An SSL certificate is a must these days. In fact, all major web browsers prompt safety messages to visitors who visit unsecured websites. Getting an SSL certificate for your website is an essential step in securing your website, as it encrypts data transmitted between the user and the server.

    5. Educate your staff/customers:

    Educate your staff and customers to be aware of phishing scams and other forms of cyber attacks, and train them on how to prevent them. You might be able to avoid some malicious attacks.

    6. Report false websites immediately:

    If you come across a website that is impersonating your domain, report it to the relevant authorities immediately. Also, you could track down their web hosts and provide them with all the details. They might also take appropriate action on such websites.
    Related: Track Your Success: How to Create a Tracking Link?

    7. Disavow canonical links:

    Canonical-Tag

    Disavowing canonical links means informing Google to ignore certain backlinks to your domain. It works as a proactive measure to be safe from search engine penalties. When search engines observe a disavowed canonical link, the chances are, it won’t be counted for or against you when ranking the specific pages in the SERP. It immensely helps against negative SEO.

    8. Use URL hijacking removal tools:

    Utilize software tools that can detect and remove hijacked URLs, preventing hackers from redirecting users to malicious sites. Try SEMrush, LinkResearchTools, or SISTRIX for this purpose.

    6 SEO implications of URL hijacking

    1. Losing search engine ranking:

    Often when a website’s domain is hijacked, it may start to showcase some malicious activities that are a major red flag in the search engines’ eyes. It could result in a search engine ranking loss.

    2. The decline in direct and organic traffic:

    One of the setbacks for the hijacked domain is the traffic loss for the original site. The fake/manipulative URL may attract some of the original website’s traffic, leading to a decline in direct and organic traffic to the original website.

    3. Massively affects brand positioning:

    URL hijacking can massively impact a brand’s positioning by redirecting users to a completely different website that might not have the same brand values. Plus, some lookalike websites could steal customers and damage the brand’s reputation afterward.

    4. The drop occurs in backlinks:

    Backlinks are an essential SEO element. The problem with URL hijacking is that it could take away some of the backlinks to a website. Backlinks that were pointing to the original website will now be pointing to the hijacked website, leading to a drop in backlinks for the original website.

    5. Search engines could flag the hijacked site:

    Hackers could try to remove the original site from the SERP by filing DMCA complaints against the original site or hijacking the original site and portraying it as damaging for the end users. If search engines detect that a website’s URL has been hijacked, they may flag the hijacked site as spam or malicious, leading to further SEO implications.

    6. Social media users are less likely to mention the site:

    Social media plays a vital role in spreading the word about a brand or offer. When something goes wrong regarding domain hijacking, social media users may be less likely to mention or share the hijacked site, leading to a decline in social media traffic and brand awareness on social media platforms.

    What is the impact of URL hijacking on brands?

    URL hijacking can have severe impacts on a brand’s growth, clientele, and reputation. It’s vital to keep an eye out for such activities. However, it’s also important to understand the implications that URL hijacking may cause to help create preventive measures.

    Let’s take a look at some of the impacts of URL hijacking on brands:

    1. Loss of revenue:

    URL hijacking can lead to a loss of revenue, as cybercriminals redirect potential customers to fake websites, resulting in lost sales. In some cases, credit card info gets stolen as a result of a security breach. Eventually, it becomes difficult for customers to trust the same website, leading to a decrease in repeat business and referrals.

    2. Reduced customer loyalty:

    No doubt that URL hijacking gets more damaging when customers get upset over the problem it causes. The issue is that it can affect customers’ loyalty when customers may feel deceived no matter what negative experience they have had as a result of URL hijacking. This can result in a loss of trust, decreased customer satisfaction, and a decline in customer retention.

    3. Shrinking brand value:

    URL hijacking can diminish a brand’s value, as it can damage the brand’s reputation and result in negative publicity. It’s a nightmare for any brand because it gets difficult for the brand to attract new customers and retain existing ones, leading to a decline in market share.

    4. Identity theft:

    Identify theft refers to stealing personal information and impersonating someone else in person or online. URL hijacking could lead to several problems and identity theft is one of them. Since hackers can use fake websites to steal personal information such as names, addresses, and credit card details, it could lead to financial troubles for the victim. As a result, it could lead to long-term financial repercussions.

    5. Data breach:

    URL hijacking is also used to breach data on websites, apps, and emails. Cybercriminals can use victims’ website URLs or lookalike URLs to gain access to sensitive data such as customer information, trade secrets, and financial data. This can result in significant financial losses, legal liabilities, and reputational damage.

    Last thoughts on URL hijacking

    No wonder brands, digital marketers, and affiliate bloggers spend hundreds of thousands of dollars and countless hours of work into building authoritativeness, trustworthiness, and online reputation. And when people go through such a bad experience or identify a red flag regarding their website or brand’s growth, it makes them want to tear their eyes out.

    The purpose of this article is to educate everyone operating websites, online brands, or blogs that URL hijacking is real and what needs to be done just in case.

    The gist of this piece is that you can hire all the cybersecurity experts and website analysts you want to tighten up your website security – something could still go wrong under your nose.

    The only way to protect your brand is to educate yourself on cybersecurity and take every preventive measure possible.

    FAQs about URL hijacking

    Where are 301 and 302 redirects used?

    A 301 redirect is a permanent redirect that informs search engines and browsers that a page or URL has moved permanently to a new location. It is used when you want to redirect an old URL to a new URL permanently without affecting the SEO rankings.

    A 302 redirect is a temporary redirect that informs search engines and browsers that a page or URL has moved temporarily to a new location. This redirect is used when a website is undergoing maintenance or when a page is temporarily unavailable for some reason. Unlike a 301 redirect, a 302 redirect does not transfer the SEO rankings to the new URL.

    What is reverse domain hijacking?

    Reverse domain hijacking refers to the attempt of a trademark owner to obtain a domain name (or a different TLD of the brand name) by making false or misleading claims of infringement, even though the domain name was registered before the trademark was established.

    How to prevent potential HTTPS URL hijacking?

    There are various types of domain security certificates that one can buy to protect the domain and website from potential hacking and malicious attempts.

    To prevent potential HTTPS URL hijacking, you can use a Certificate Authority that issues SSL/TLS certificates for your domain name and configure your web server to use HTTPS for all connections. Additionally, you should monitor your domain name’s DNS settings and make sure that no unauthorized changes are made.

    What is the difference between URL hijacking and URL phishing, spoofing, or typo-squatting?

    URL hijacking is the act of taking control of a domain name to redirect traffic to another website, while URL phishing, spoofing, or typo-squatting are different types of attacks that use deceptive tactics to trick users into visiting a fraudulent website.

    Are redirects harmful? What is the risk of URL redirection?

    Unwanted redirects could be damaging to the website’s SEO growth. Hackers could redirect website visitors to a malicious website or to a website that is not relevant to their search query.

    The risk of URL redirection also includes the loss of link equity and potential impact on website ranking, especially if the redirection is not done correctly or the redirect target is not trustworthy.

    Unwanted redirects are one of the tools of the negative SEO arsenal, so watch out for that.
    You May Also Like:
    What Are Tracking Pixels & How Do They Work?
    Campaign Tracking: Data-Driven Tools for Marketers
    Retargeting Ad Examples That Convert & Drive Growth
    Benefits Of A Link Rotator: Why & When To Use Rotating Links?

  • Easy guide For fixing URL blacklist

    Easy guide For fixing URL blacklist

    What is URL Blacklist?

    A URL blacklist is a list of website addresses (URLs) that are identified as potentially harmful or malicious by security organizations, internet service providers, or other entities. When a website is blacklisted, it is often blocked or flagged by web filters and security software to prevent users from accessing it.

    The URLs listed on these blacklists are often identified through automated scans or reports from users who have encountered suspicious websites. URL blacklisting is done to protect the end-user’s privacy, sensitive information, and important data against hacking attempts or malware attacks.

    Website owners, bloggers, and digital marketers rely on several channels and attention sources, such as social media, email lists, blogs, online communities, and advertising.

    However, most of these channels drive the audience to the website for conversion, no matter how long it takes to build a relationship between a brand and the prospective customer.

    No wonder entrepreneurs, bloggers, and affiliate marketers pay close attention to setting up their websites along with sales/landing pages, blog sections, and email newsletter opt-in forms.

    It’s no surprise that a well-designed and optimized website is crucial to your digital marketing campaign’s success.

    Speaking of website optimization, URLs play a key role in optimizing the website pages. Therefore, it’s essential to discuss URL blacklisting, and more importantly, how to fix the URL blacklisting issue.

    If you have no idea about URL or website blacklisting and you’re confused right now, don’t worry about it, because we’ve got this covered.

    Pay attention to every section of this very article.

    1.0 Is URL blacklist dangerous?

    Are you curious whether or not URL blacklisting is bad for your business? Always remember that businesses grow on relationships and reputation. A brand needs to establish strong brand positioning in the audience’s mind.

    Since URL blacklisting destroys a brand’s reputation, online reach, and business development ability to the core, it’s surely not something any brand or business owner would want to be associated with.

    More importantly, if a brand or entrepreneur somehow ends up getting their URLs blacklisted on search engines or social media platforms, it affects their communication, reach, and marketing. I do not doubt that URL blacklisting is quite dangerous for any business or personal brand.
    The impact of URL blacklisting has been discussed in detail further in the article. But before that

    1.1 What do blacklist warning messages look like?

    url-blacklist-safe-browsing-warning-chrome

    When websites or some of the website URLs are blacklisted, a warning message may appear in web browsers regardless of the operating system. These warning messages typically alert the user that the website is potentially dangerous, and advise them to proceed with caution or avoid the site altogether.

    Here are some common URL blacklist warning messages:

    This site may be harmful to your computer:

    This message is often displayed by web browsers such as Google Chrome and Mozilla Firefox when a website is detected as containing malware or other potentially harmful content.

    Also Read: How to Block a URL in Chrome?

    The site ahead contains malware:

    This message is also displayed by some web browsers when a website is detected as affected by malware.

    This website has been reported as a phishing site:

    This message is displayed by some web browsers when a website is detected as being a phishing site.

    This connection is not private:

    This message is displayed by web browsers when a website’s security certificate is invalid or expired.

    Also Read: Long URL Problem Solved: Use Cases and Examples

    1.2 How does URL blacklist affect your website and business?

    URL-Blacklist-Warning

    Being on a URL blacklist can have serious consequences for a website and brand. Here are 9 ways in which URL blacklisting can impact your website and businness:

    1. Decreased visibility in the SERP

    When a website is blacklisted, it may be removed from search engine results in pages or pushed down in rankings. This can lead to a significant decrease in traffic to the website, as users are less likely to find it through search.

    2. Loss of trust by users

    When a website is flagged as potentially dangerous, users may lose trust in the website and its content. This can lead to a decrease in engagement, as users may be hesitant to interact with the website or share its content.

    This loss of trust could result in customers seeking out alternative providers and ultimately harm the website’s long-term sustainability. Losing customers’ trust is the last thing any brand or e-commerce website would want to happen.

    3. Brand reputation at stake

    If your website is associated with malware or other malicious activity, it can damage your brand’s reputation and credibility. This can have a long-term impact on your business, as consumers may be less likely to do business with you in the future. As users may view the website as untrustworthy, which could harm the website’s brand image and make it challenging to establish trust with potential customers.

    4. The security risk for visitors

    If your website is blacklisted due to malware or other security issues, it could pose a risk to your visitors. Malicious software can infect users’ devices or steal personal information, which can lead to legal issues and also damage your brand’s reputation.

    5. Revenue losses

    If your website relies on advertising or e-commerce, being blacklisted can result in a significant loss of revenue. Advertisers may be hesitant to place ads on a potentially dangerous website, and customers may be less likely to make purchases if they don’t trust the website.

    6. Difficult to get rid of

    Getting off a URL blacklist can be a long and difficult process. You may need to identify and remove all malicious content from your website, and then submit a request to the entity that added you to the list. This process can take time, and during that time your website may continue to experience negative consequences.

    7. Decrease website traffic

    One of the most painful things that happen to a website is when the traffic graph goes down for whatever reason. Once a website is blacklisted, it is likely to be excluded from search results and flagged as potentially harmful by web browsers, leading to a decrease in website traffic. Users may be warned about accessing the site or redirected to a warning page, which could deter them from visiting the site altogether.

    8. Reduced conversion rate

    If a website’s traffic and credibility are affected, its conversion rate, i.e., the number of visitors who take a desired action, such as making a purchase or filling out a form, is likely to decrease. This could harm the website’s revenue and profitability.

    9. Affect organic visitors

    Organic website traffic is an essential source of visitors for millions of websites around the web. Organic visitors are users who find a website through search engine results, and when a website is blacklisted, it is likely to be removed from search engine results pages. This could significantly affect the website’s visibility and reduce the number of organic visitors.

    Also Read: 7 Ways to Increase CTR for Better Conversion on the Website

    1.3 How blacklisted URL affects website SEO performance?

    SEO

    URL blacklisting comes with loads of problems for a brand or organization. It could be fatal for brand reputation and SEO performance if not fixed immediately.

    Search engine optimization has become extremely competitive. When a website gets expelled from the good books of search engines, it’s not easy to crawl back to the same position.

    Once something goes wrong, it takes sheer hard work and a lot of time to win the same position back in the SERP.

    Here’s how blacklisted URLs affect a website’s SEO performance:

    1. Triggers traffic loss

    One of the most devastating issues webmasters and companies face when their URLs get blacklisted is that their website traffic takes a hit. It results in a revenue decrease, no matter the size or scale of the organization. More website visitors mean more revenue, it’s that simple.

    2. Rankings start to drop

    Since website page rankings are a crucial part of the SEO process, URL blacklisting causes the ranking to drop in search engines. The reason behind this issue is that search engines want to provide their users with the best experience when they’re using them. Any turbulence during the search process that causes the end-user to get frustrated is a serious matter for search engines.

    3. Decrease in inbound links

    People want to link to authoritative and trustworthy websites. When a website’s URL gets blacklisted by Google, it eventually sends out a negative message to others in the industry. Nobody wants to link out to a spammy and blacklisted website, because every company or website wants their users to have a great experience when they browse their website or reading their content.

    4. Bad user experience for visitors

    When a website’s URL is blacklisted by Google or any other search engine, it directly affects the user experience. The web browsers may block those websites with blacklisted URLs and anti-virus softwares to start notifying the visitors with cautionary messages forcing users to exit the websites for safety purposes. Therefore, it results in a bad user experience for the end-user.

    5. Dip in the website conversions

    Nobody wants to spend money using their credit card or PayPal account if there is a hint of malware or malicious activities on the website. While URL blacklisting affects the SEO performance of the website, it also decreases the website conversion rate very quickly.

    Also Read: 15 Proven Facebook SEO Techniques To Increase Brand Visibility

    2.0 How does a website URL get blacklisted?

    spyware-computer-hacker-virus-malware-concept

    URL blacklisting is the process of adding a website’s URL to a blacklist filter, usually maintained by search engines, web browsers, or anti-virus softwares, due to various reasons such as spamming, malware distribution, or other malicious activities.

    It’s vital to understand a website ends up getting flagged by search engines, web browsers, or anti-virus softwares. So I came up with a list of reasons why a website’s URLs get blacklisted:

    1. Phishing Attacks

    Phishing attacks involve tricking users into providing sensitive information such as usernames, passwords, or credit card details through fraudulent websites or emails. If a website is found to be hosting a phishing attack, its URL may be blacklisted to protect users from falling victim to the scam.

    2. SEO Spamming

    SEO spamming involves manipulating search engine rankings through various unethical practices such as keyword stuffing, cloaking, and link spamming. If a website is found to be engaging in such practices, search engines may blacklist its URL to maintain the quality and relevance of search results.

    Also Read: How to Create a SEO Friendly URL: Ultimate Tips

    3. Unsafe Plugins/Libraries

    Website owners often use third-party plugins or libraries to add functionality to their websites. However, if these plugins or libraries are found to have security vulnerabilities, they can be exploited by hackers to gain access to the website’s server. In such cases, the website’s URL may be blacklisted until the vulnerabilities are fixed.

    4. Website Defacement

    Website defacement refers to the unauthorized modification of a website’s content or appearance. This could be done for political, ideological, or malicious reasons. If a website is defaced, its URL may be blacklisted until the website owner restores it to its original state.

    5. Trojan Horses

    A Trojan horse is a type of malware that disguises itself as a legitimate program or software. Once installed on a computer, it can perform various malicious activities, such as stealing sensitive information or damaging files. If a website is found to be hosting a Trojan horse, its URL may be blacklisted to prevent users from unknowingly downloading the malware.

    6. Malware Codes

    malware

    Malware code is a type of malicious software designed to infect computers and cause harm. If a website is found to be hosting malware code, its URL may be blacklisted to prevent users from being infected.
    Also Read: What Does HTTP 302 Code Means For URL Shorteners?

    7. Vulnerabilities in the server

    Server vulnerabilities can be exploited by hackers to gain unauthorized access to a website’s files and data. If a website’s server is found to have vulnerabilities, its URL may be blacklisted until the vulnerabilities are fixed.

    8. Suspicious download links

    malware risks

    If a website includes suspicious download links that lead to potentially harmful software or files, its URL may be blacklisted to protect users from downloading such content.

    9. Malicious content

    If a website is found to contain malicious content, such as viruses or spyware, its URL may be blacklisted to prevent users from being infected.

    10. Downloading unwanted programs

    If a website prompts users to download unwanted or potentially harmful programs, its URL may be blacklisted to protect users from downloading such programs.

    11. Information scraping

    Information scraping involves the unauthorized harvesting of data from websites. Using reliable web scraping software ensures compliance with legal and ethical guidelines, helping avoid copyright violations and potential blacklisting. If a website is found to be scraping information from other websites without permission, its URL may be blacklisted for violating copyright and intellectual property laws.

    2.1 How do you check if Google has blacklisted you?

    There are clear signs and indications to figure out whether or not Google has blacklisted or penalized your website. I’ll dig deeper into this and try to help you out by sharing what I know.

    Here are the indicators to look out for when checking if Google has blacklisted your site:

    1. Page removal from the search index:

    One of the clear indicators of Google blacklisting a URL or a set of URLs from the same website is the removal of the website’s pages from its search index. What it means is that your site is no longer appearing in Google search results.

    This could be a sign that Google has blacklisted your website, possibly due to a violation of Google’s Webmaster Guidelines.

    2. The huge dip in organic traffic:

    Website owners keep an eye on the traffic numbers of their websites. As soon as they notice a significant drop in your website’s organic traffic (without any notification), it could be due to Google blacklisting the website for some reason.

    This could happen if Google has removed your website’s pages from its search index or if your website’s ranking has been penalized.

    3. Manual penalty for the site:

    Manual penalty could lead to up to 90% drop in traffic or the website URL getting blacklisted. If you receive a manual penalty notification in the Google Search Console, it means Google has identified a violation of its Webmaster Guidelines on your website.
    This could be due to black hat SEO techniques, such as keyword stuffing, misleading content, or link-building schemes. A manual penalty can result in your website being removed from Google’s search results or a significant drop in organic traffic.

    4. Malware notification in the Google SERP:

    If a website has been infected with malware, Google may detect it and warn users in its search results with a notification that the website may be harmful. The notification may look like this: This site may harm your computer.” This can lead to a decrease in traffic and a damaged reputation.

    If Google has identified malware on your website, it could lead to URL blacklisting. If the malware notification appears with your URLs in the SERP, ask your website host to scan your website for malware and hire a website developer to do code inspection for code injection. It’s always best to change the web hosting if the problem persists.

    3.0 How to protect the site from being blacklisted?

    URL-Blacklist-Protection

    Building an optimized, well-designed website for marketing isn’t enough. Often, it’s vital to protect a website property from fatal attacks that could turn out to be a pain in the butt if not taken seriously. While at the same time, it’s easy to get caught up in other marketing strategies which leads to putting website security and SEO techniques often on the back burner.

    If you need a precise plan of action to avoid URL blacklisting, then the following 10 tips would come in handy for you:

    1. Use a secure web hosting service:

    Choose a web host that is reliable and provides a secure environment for your website. This can help prevent your website from being compromised or hacked, which can lead to blacklisting.

    2. Choose a high-quality theme & plugins:

    Make sure your website code and layout are clean and optimized for search engines. It can help prevent any issues that may cause search engines to blacklist your website. A premium, high-quality WordPress theme would do the job for you. Secondly, use only genuine and premium plugins/themes on your website to ensure that they are secure and optimized for search engines. Using pirated or un-trusted plugins/themes can lead to security risks and blacklisting.

    3. Improve your website security:

    Use a reputable website security tool to scan your website to ensure it is free from any malicious code or scripts. Moreover, monitor your website for any suspicious activity and take action immediately if you suspect any security issues. This can help prevent your website from being compromised or hacked.

    4. Assign user roles and permissions:

    Assign user roles and permissions to ensure that only authorized users have access to your website. This can help prevent unauthorized access, which can lead to security risks and blacklisting.

    5. Install an SSL certificate:

    Use HTTPS encryption on your website, meaning buy and install an SSL certificate on your domain. Install an SSL certificate on your website to ensure that all communication between your website and users is encrypted and secure. This will help prevent security risks and blacklisting. Contact your domain and hosting provider for the SSL certificate installation.

    6. Update your WordPress edition:

    It’s important to keep your website software and plugins up to date. Outdated software can be vulnerable to security threats, and updating it can help prevent your website from being compromised. Keep your WordPress edition up to date, and ensure that your website is secure and optimized for search engines. It may also help prevent site security issues that lead to URL blacklisting.

    7. Apply white hat SEO techniques:

    Use only ethical and legitimate SEO techniques to optimize your website for search engines. Using black hat techniques can lead to blacklisting. Avoid using black hat SEO techniques. These tactics can include cloaking, hidden text, bulk backlinks, and other manipulative tactics that violate search engine guidelines.

    8. Limit WP login attempts:

    Limit the number of login attempts on your website to prevent brute force attacks and hacking attempts. Plus, keep a strong login password for your WP admin account.

    9. Replace broken links:

    Regularly check for broken links on your website and replace them to ensure that your website is functioning properly. While broken links may not lead to URL blacklisting, it sure sends out an SEO signal.

    10. Implement a DMARC policy

    Implement a DMARC policy to help prevent email spoofing and phishing attacks. This will help protect your domain reputation and prevent your website from being blacklisted by email providers. 25.5% of email senders who use p=none policy expect to move to stronger DMARC policy in the course of the next year which further showcase the important of using stronger email authentication standards.

    3.1 How to access website with URL blacklist warning?

    Your website browser might prompt a warning notification to exit the website or move ahead with caution. It’s always best to keep your anti-virus software active and updated just in case.

    Furthermore, try to understand the essence of the blacklist warning. Often the expiration or the absence of the SSL certificate prompts a warning message on the website. Some website visitors who have no idea about an SSL certificate, chicken out immediately.

    Similarly, if your anti-virus software warns that there is a serious threat of malware or phishing attack on the website you’re browsing, you shouldn’t move forward. Instead, try to exit the website and find an alternative website to visit.

    3.2 When to block and allow URLs?

    Before figuring out when to block or allow URLs, it’s important to comprehend how URL blocking works.

    There are levels of URL blocking. On the user level, you may install a Chrome extension for blocking the website and blacklist the website URLs you want to block. This way, no one on your PC would be able to access those URLs.

    Furthermore, there is country-level URL blocking where a governing body orders the concerned department to block a specific website on a state or country level.

    So URL blocking could be due to any reason, for instance, national security, blasphemy, rules violation, etc. The decision to block or unblock a URL depends on the case and the reason varies from case to case.

    4.0 Conclusion on URL Blacklisting

    I do not doubt that URL blacklisting is an important tool that helps protect users from visiting websites that are deemed unsafe, malicious, or contain harmful content.

    Search engines and web browsers use site filtering systems to identify and block access to such blacklisted websites, thereby preventing users from being exposed to potential security risks or malicious content.

    While URL blacklisting is an effective tool, website owners must take measures to ensure that their websites comply with search engine guidelines and do not engage in any malicious activity that may lead to URL blacklisting.

    By taking proactive steps to maintain website security, website owners can help prevent their websites from being blacklisted and ensure that their websites remain safe for users to visit.

    A lot of digital marketers, bloggers, and entrepreneurs prefer using URL shorteners to share their content on social media.

    While there are so many benefits of using link management tools, one of the reasons is to hide the main URLs from suspicious users and hackers on social media.

    I hope you learned a lot about URL blacklisting and taking away a ton of value from this article.

    5.0 FAQs about URL blacklisting

    Is URL blacklist a virus?

    URL blacklisting isn’t a virus, but malicious viruses on the web server could lead to URL blacklisting in search engines. So always keep an eye on your website performance and security.

    Is a blacklist permanent?

    URL blacklisting may last until the appropriate actions aren’t taken to clean the website code or change the web hosting server to ensure a smooth and safe user experience for the website visitors.

    What does blacklist mean in security? 

    Blacklisting refers to the act of being flagged by an authority or a platform. The cybersecurity experts educate and help audience the audience on the security of websites, apps, email addresses, and social media accounts.

    What kind of websites will the search engine blacklist? 

    Any website that contains malicious viruses, phishing codes, and suspicious scripts may get blacklisted by search engines.

    How can I check if my site is blacklisted? 

    There are several ways to check the site’s blacklisting status, such as hiring a cybersecurity expert, using an online URL blacklist checker tool, and keeping an eye on the site status in your Google Search Central account.

    Are blacklisted URLs and blacklisted domains the same thing?

    Blacklisted URLs mean the specific page URLs have been blacklisted, whereas the blacklisted domains mean the complete websites have been blacklisted.


    You May Also Like:
    What Is Affiliate Link Cloaking & How To Do It?
    What is a Vanity URL and Why You Need One?

    Affiliate Link Tracking To Optimize Your Earnings