Downloading your TikTok videos without the watermark can be challenging, as there is no straightforward method. This can be an issue if you create videos within the TikTok app and later want to share them on another social media platform, as the TikTok watermark will appear on the downloaded version of the video.
TikTok does not offer native tools for downloading videos without watermarks, but third-party apps and websites do. These apps and websites are created by independent developers and are not affiliated with TikTok. They can be used to download videos from TikTok with the watermark removed.
Most of these third-party tools are relatively straightforward, making downloading videos from TikTok as quick and easy as using the platform’s native tools. So, let’s get started and explore a reliable TikTok video downloader to simplify the process!
Save TikTok videos without watermarks with these free tools:
The process is quite simple to save a TikTok video without a watermark. All you need to do is copy the link of the video that you wish to download. This link can typically be found by clicking the “Share” button beneath the video on the TikTok app or website. Once you have copied the link, you can proceed to one of the tools mentioned.
Once you are on the website or application, you will likely see an input field where you can paste the video link you have copied. After you paste the link, you will be prompted to hit a download button or process. The tool will process the link, and the video will be ready for download in a few seconds without the watermark.
It’s important to note that saving a video without a watermark may not comply with the terms and conditions of TikTok and the content creator. So users should be careful while using these kinds of tools and take necessary precautions.
TikSave.io allows you to download TikTok videos without watermarks or user IDs. This means that when you download a video from TikTok using TikSave.io, the video will not have any overlaid text or logos that indicate the original creator of the video. Additionally, the video will not include any information about the user who uploaded it, such as their user ID.
To use TikSave.io, you must copy the link to the TikTok video you want to download and paste it into the input box on the website. Once you have done this, you can download the video in the format and quality you prefer. Downloading videos from TikTok using TikSave.io is simple and does not require special software or technical knowledge.
Overall this allows the user to download any TikTok video of their choice and save it to their device without any watermarks or UserID linked to it, making it an easy process.
SnapTik allows users to download TikTok videos without watermarks, which are then overlaid text or logos that indicate the original creator of the video. By using SnapTik.App, you can download TikTok videos in their original form without any branding or identification of the creator.
One of the main advantages of SnapTik is that it does not require users to install any software on their computers or mobile phones to use it. All you need is the link to the TikTok video you want to download, and you can use the website to download the video with just one click. The processing of the video is done on the SnapTik.App’s side and the user must just paste the link and download it.
This makes downloading TikTok videos simple and easy for the user, with no need for additional downloads or technical know-how. So SnapTik can be considered a user-friendly and efficient TikTok downloader.
[branded_short_links]
TTDL (tiktokdownload) is a tool that can save as many videos as you want without limitations or restrictions. In addition, you can download videos without any watermarks, which means that the videos will not have any overlaid text or logos that indicate the original creator of the video. This allows you to have a clean and unbranded version of the videos.
SSSTik.io is one of the most popular TikTok story downloaders. It allows users to save videos without any watermarks, which are overlaid text or logos that indicate the original creator of the video.
One of the main advantages of SSSTik.io is that users don’t have to install any additional apps or software to use the service. All that is needed is a web browser and the link to the TikTok story you want to download. You simply paste the link into the input field on the website, and it processes the link and allows you to download the story without any watermarks.
Read Now: How to check analytics on TikTok?
TikMate is another excellent tool for downloading TikTok videos without a watermark. The process is the same as for the above-explained tools. First, open the TikTok app and find the video you want to download. Next, click the “Share” button on the video to “Copy the Link.” Then paste the video link into the TikMate website or application. After that, click the “Download” button and the “Download Without Watermark” button to download the video in Mp4 format without the watermark. Eventually, You’ll have your TikTok video downloaded without the watermark.
FAQs
Do I have to pay to download TikTok videos without watermarks?
No, you don’t need to pay a single penny to download a TikTok video without a watermark. All you need to do is to visit one of the downloaders we discussed above, and you’ll have your video in just a few minutes.
Do I need to install the extension to download TikTok videos without a watermark?
No, you don’t need any extension to remove watermarks from the videos. Just paste the link to the video into any of the downloaders mentioned above, and you’ll have the video downloaded.
Trending Now:
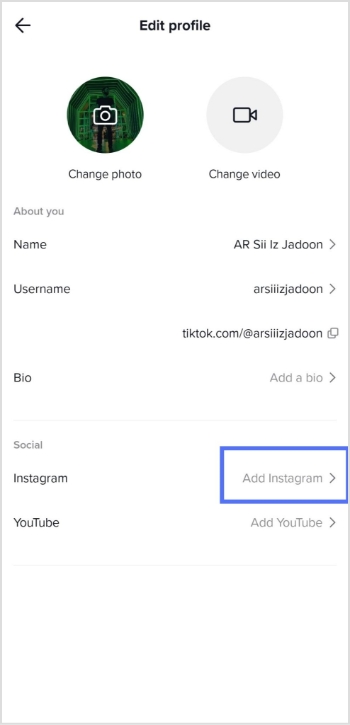
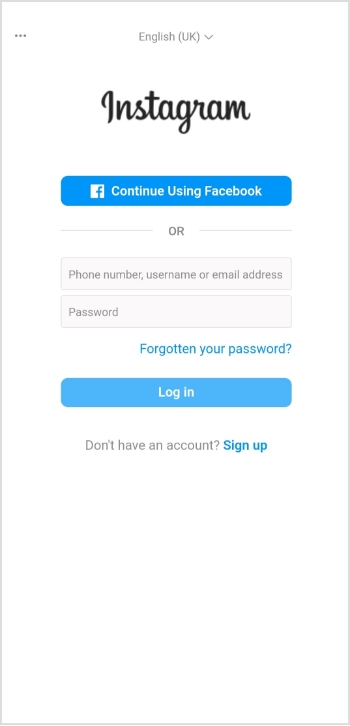
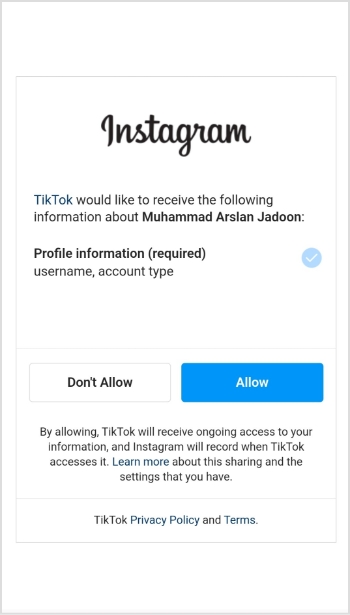
How to link Instagram to TikTok?
How To Put A Link In TikTok Bio?